To avoid these ads, REGISTER NOW!

Homemade end cabinet scrap build

superbovine

Well-known member
Joined
Apr 4, 2017
Messages
63
Location
Vero Beach
Hi everyone,
I've been reading the forums here for a good year or more whenever I am looking for a little inspiration and finally decided to register an account a few weeks back, so hello all.
I find myself with a lot of downtime in the shop during the spring/summer months and often starting fiddling with stuff just for the sake of fiddling with it, and this started early this year with a end cab build.
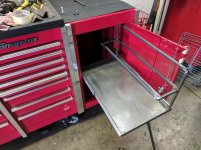
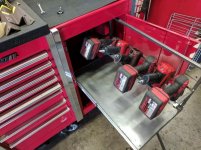
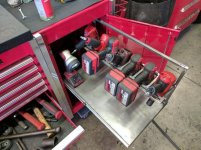
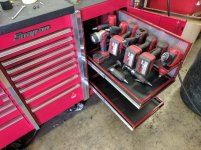
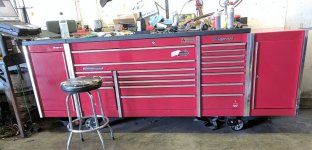
My work box is a Snap On master triple bank which is mostly full (and top drawer almost unusable from so many guns/etc laying on top). I have a side storage cab however it houses all of my scan tools so I needed another cab to house my impact guns (5), flashlight, grinders, hammer, etc. The existing side cab already has a mod to it with an articulating laptop arm, wired into the scan tool storage area as well.
attachment.php

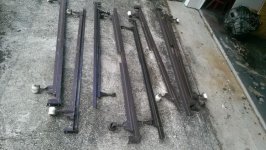
So I was in need of another side cab to house my air and electric tools, quite honestly don't feel like laying out another $2k+ for another cabinet, and I have an abundance of everyones favorite material, old bed frames! Stay with me here.
attachment.php

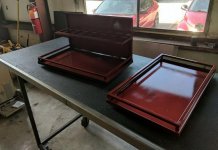
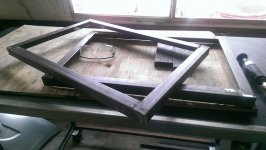
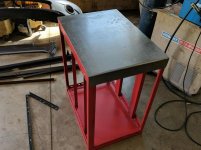
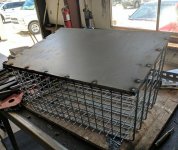
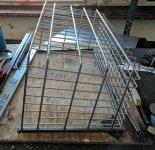
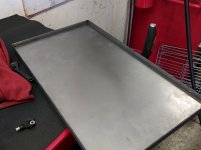
I cut the frames up, cope the corners and framed up a box.
attachment.php

attachment.php

attachment.php

As we know bed frames are pretty junky and warp really easily. So I mocked it up on the box to make sure things were still square.... about 1/4" off in two spots, I'll live with it.
attachment.php

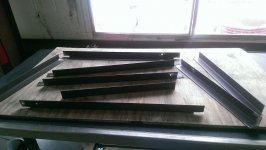
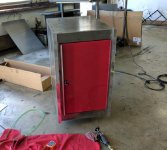
Inside the box I used some old industrial shelving leftovers to build the actual weight bearing portion of the box. This is welded to the inside of the outer cosmetic structure and is not only the portion that is bolted to the roll cab, but also the portion that the shelves will mount to inside (more trustworthy to weld and easier to drill than the bed frame of course). I tacked in a spacer in the front opening area to gain the correct width, then took the door off the existing side cab to mock it up on the new box to make sure the opening is still square (it is, door is just laying in place).
attachment.php

aaaaaaaannnnnd we're out of file attachments.
 

Attachments

  • box1.jpg
    box1.jpg
    87.4 KB · Views: 1,751
  • box6.jpg
    box6.jpg
    119.6 KB · Views: 1,739
  • box5.jpg
    box5.jpg
    133.5 KB · Views: 1,742
  • box4.jpg
    box4.jpg
    108.6 KB · Views: 1,741
  • box3.jpg
    box3.jpg
    89.2 KB · Views: 1,747
  • box2.jpg
    box2.jpg
    72.8 KB · Views: 1,749
  • box7.jpg
    box7.jpg
    126.3 KB · Views: 1,747
Last edited:
To avoid these ads, REGISTER NOW!
OP
S

superbovine

Well-known member
Joined
Apr 4, 2017
Messages
63
Location
Vero Beach
Re: Homemade end cabinet build

With the inner structure complete the remaining braces are in place and uprights for drawers added (more leftover industrial shelving pieces). At this point some protection was in order so it was quickly sprayed with some leftover red paint ('14 Mustang, if anyone cares :p)
attachment.php

Now was time for some sheeting. Originally I was going to use some old file cabinet sheeting, however most of that stuff is around 22-24ga and pretty flimsy. The Snap On material is supposedly 16ga, though honestly it is more like 18ga with some thick paint, it doesn't quite hit 16ga upon measurement. Additionally, of course I am not using this for structural purpose like Snap On does since I don't have a super expensive machine for doing 180 bends etc, so the sheeting is not terribly critical by comparison anyway. With the cabinet sheeting simply not cutting it, I called in a favor and had a buddy in Orlando pick up some 18ga sheets for me and traded them for a blown 6spd ******. Good deal, there are literally zero steel suppliers near me.
So with fresh sheet in hand I went about the only bend on the box, rounding over from the top to the face. The old fashioned way it was... clamped and twisted, and when that gave up the mallet stepped in. Worked well. Sheets when on with 3M PanelBond. That stuff is for real.
attachment.php

The remaining trim on the front was installed and side sheets were added, extending 3/4" past the front of the box for trim mounting.
attachment.php

attachment.php

Holes drilled for the door and rechecked fitment... OK. So corners are smoothed in and some primer is introduced while the box sits waiting for some paint and shows off some parts from Snap On.
attachment.php

attachment.php

attachment.php
 

Attachments

  • box14.jpg
    box14.jpg
    54.4 KB · Views: 1,694
  • box13.jpg
    box13.jpg
    47.9 KB · Views: 1,705
  • box12.jpg
    box12.jpg
    62.2 KB · Views: 1,705
  • box11.jpg
    box11.jpg
    66.2 KB · Views: 1,706
  • box10.jpg
    box10.jpg
    67.6 KB · Views: 1,707
  • box9.jpg
    box9.jpg
    62.1 KB · Views: 1,712
  • box8.jpg
    box8.jpg
    72.1 KB · Views: 1,706
OP
S

superbovine

Well-known member
Joined
Apr 4, 2017
Messages
63
Location
Vero Beach
Re: Homemade end cabinet build

Getting the magnet situation in order took some time and thought. The Snap On cabinet uses a 4x folded thin sheet of metal with magnets snapped in. I got the magnets, but the folded sheet you can't buy. ******.
So I ended up taking some 3/4" square tube and section a 90 degree quadrant out of it. Then in the open area I used that access to cut slots for the magnet. The tube was then cozied up around the inner corner of the door upright. Looks like it will work alright.
attachment.php

attachment.php


Still waiting for paint.... so boredom sets in again. We've been using a decades old inoperative welder as a welder cart... its so heavy it takes two people to move and even then barely rolls (no bearings in the rear wheels just plastic discs over a rod). So scrap to the rescue! Note I have since added braces for the welder so a bungee is not necessary :)
attachment.php

attachment.php

attachment.php
 

Attachments

  • box15.jpg
    box15.jpg
    135.7 KB · Views: 1,690
  • box17.jpg
    box17.jpg
    54.9 KB · Views: 1,686
  • 18076511_10155978606489018_8764789450646250744_o.jpg
    18076511_10155978606489018_8764789450646250744_o.jpg
    91.8 KB · Views: 1,680
  • 18010067_10155975689819018_2509961435168117814_n.jpg
    18010067_10155975689819018_2509961435168117814_n.jpg
    120.5 KB · Views: 1,690
  • box16.jpg
    box16.jpg
    92.2 KB · Views: 1,685
OP
S

superbovine

Well-known member
Joined
Apr 4, 2017
Messages
63
Location
Vero Beach
Re: Homemade end cabinet build

And still waiting for time to get painted!

So more time killing... some rag storage perhaps.
attachment.php

attachment.php

attachment.php


And finally I get to throw some paint!
attachment.php

Thingamajig added to the right.
attachment.php

And magnets installed... worked great!
attachment.php

Last round of pictures coming...
 

Attachments

  • box20.jpg
    box20.jpg
    131 KB · Views: 1,675
  • box19.jpg
    box19.jpg
    127.2 KB · Views: 1,674
  • box18.jpg
    box18.jpg
    113.3 KB · Views: 1,675
  • box27.jpg
    box27.jpg
    83 KB · Views: 1,675
  • box26.jpg
    box26.jpg
    111.4 KB · Views: 1,678
  • box25.jpg
    box25.jpg
    83.3 KB · Views: 1,677
OP
S

superbovine

Well-known member
Joined
Apr 4, 2017
Messages
63
Location
Vero Beach
Re: Homemade end cabinet build

Finally, time to see some return on investment! Mounted up to the old box... not too bad. I still was off about 1/4" from the bed frame warping initially but its totally passable. I had split the difference in the pictures but ended up compensating 100% for front facing being accurate so the trims are dead flush on the front. The top rear is down 1/4" almost in one corner, but since I can not use a Snap On work surface (due to difference in how they are constructed from mine), I plan to build upward with some shelves or something else amusing anyway. In case anyone is wondering/didn't notice, the factory mounting holes are used for hanging the box, and lower pinches are bolted through as well, just like a Snap On cab, just without the ultra-helpful 180 bend on the top to hold it while you bolt it up :(
I created provisions for the factory pull handle, however the rag storage won out on that battle. Also note previously mentioned thingamajig has been installed... My extra long prybar (PryZilla!) is a royal pain to put away in my tool box so I always leave it laying around... and it always falls over etc. So I just took some old galvanized pipe, cut it down and cleaned it and welded a tab on it to hook to the rag basket so I have somewhere to put it where it doesn't fall over. The tab just has felt inside it so I can move it around the basket if needed.
Please pardon the massive mess on the tool box, I've been busy not cleaning :)
attachment.php

attachment.php

attachment.php

attachment.php


I hope that was at least mildly interesting or amusing, it was quite a bit of fun to build. I know it is not super accurate, but the goal was to work with basically $0 budget... then the more I got into it I decided on spending the money on the proper door and trims, but beyond that is was all barter or salvage material, so not too bad given what it came from! I still have to construct the drawers, but have yet to come up with a gameplan on that yet... unfortunately I am out of reason to put it off, so it's time to get to it. I haven't been able to find any real useful custom drawer builds to take inspiration from, so I'll probably just end up winging it and hoping for the best!
 

Attachments

  • box21.jpg
    box21.jpg
    135.8 KB · Views: 1,674
  • box22.jpg
    box22.jpg
    60.2 KB · Views: 1,672
  • box23.jpg
    box23.jpg
    63.5 KB · Views: 1,675
  • box24.jpg
    box24.jpg
    54.1 KB · Views: 1,670
OP
S

superbovine

Well-known member
Joined
Apr 4, 2017
Messages
63
Location
Vero Beach
Thanks guys, it was a lot of fun. I normally just make junk stuff (yard art, jigs, things that don't really have to be terribly presentable), so it was nice doing something that was for show too for a change.
Regarding bed frames... It's been discussed ad nauseum, but be careful as the quality varies widely from one to another. The one I did the outer frame with on this one for example welded well just needed high heat to avoid cracking the welds off but otherwise was fine; the much newer one I used for the cart I welded fine on low heat with good penetration, but some of the pieces you could literally bend across your knee. You just never know what you get, but the older tan ones I've had the best luck with versus newer black and narrow ones (also the older rivets and wing nut clamp ones, versus newer slide-lock ones).
 

rsanter

Well-known member
Joined
Dec 22, 2007
Messages
18,487
Location
visalia ca
Looks good
If it was me I think I would use some MDF to make a top from. You can make it the same exact profile and coat it and it will look 95% like a snap on piece, just remember not to beat on it

Bob
 
OP
S

superbovine

Well-known member
Joined
Apr 4, 2017
Messages
63
Location
Vero Beach
Looks good
If it was me I think I would use some MDF to make a top from. You can make it the same exact profile and coat it and it will look 95% like a snap on piece, just remember not to beat on it

Thanks, I was thinking along those lines earlier, just using whatever wood I could come up with to layer it to have the same profile in the front, use some kittyhair to smooth the bevel then coat it in bedliner material. But then the warp happened so I've sort of put that idea away for right now. However it is probably the best option for continuity... perhaps I could use a furniture slider pin in the low corner to bring it up.
Got to get on the drawer situation, if I think about the top too much I'll end up putting them off even longer :)
 

rsanter

Well-known member
Joined
Dec 22, 2007
Messages
18,487
Location
visalia ca
Thanks, I was thinking along those lines earlier, just using whatever wood I could come up with to layer it to have the same profile in the front, use some kittyhair to smooth the bevel then coat it in bedliner material. But then the warp happened so I've sort of put that idea away for right now. However it is probably the best option for continuity... perhaps I could use a furniture slider pin in the low corner to bring it up.
Got to get on the drawer situation, if I think about the top too much I'll end up putting them off even longer :)

If you have a warp in the top, you have a couple,options.
One is just to shim the low area when you screw it on from the bottom.
This will,work for a stock one or one you make.

Second if you make one you can take a belt sander and thin the bottom in areas to fit the profile of the top of your box

Bob
 
To avoid these ads, REGISTER NOW!
OP
S

superbovine

Well-known member
Joined
Apr 4, 2017
Messages
63
Location
Vero Beach
I started on one drawer today. Since being square is pretty critical for the drawer, no bed frames this time :)
I used 3/4" angle to box in the frame, then two pieces of the angle in drop position across the center. It was super windy today, so I probably did more grinding than welding, it was ugly weld day for sure.
attachment.php

Test fitted to the drawer slides with some wood screws (bolts later), and everything fits nicely.
attachment.php

The bottom of the drawer is lined with one of my last pieces of 18ga. I have literally enough to do two drawer bottoms and that is about it excluding miscellaneous scrap. Luckily I do have a good amount of 20ga for sides etc.
Drawer bottom will be PanelBond'd in over night tonight.
attachment.php


The plan tomorrow/next week will be to reproduce the above for the second drawer bottom, and then on the top drawer begin building upward with it. The original plan was to have uprights on the right side of the drawer and have a shelf of "holes" going back that the impacts can all "holster" into. The bottom tray of the drawer could then hold air grinders, etc. However looking at it currently, I may have made the top drawer too high for that. While it isn't terribly difficult to lower the slides, it isn't terribly easy either (since I can't reach through the side anymore)... so whether I will deal with what I have or move the drawer down some remains to be seen. Odds are I will have the weekend to think it over, perhaps draw up some plans if I remember to write down measurements before leaving tomorrow.
 

Attachments

  • box30.jpg
    box30.jpg
    143.2 KB · Views: 1,283
  • box29.jpg
    box29.jpg
    66.9 KB · Views: 1,286
  • box28.jpg
    box28.jpg
    62.2 KB · Views: 1,280

Hammer1963

Well-known member
Joined
Jan 2, 2011
Messages
2,048
Location
Kentucky
Incredible usage of available materials. The box looks awesome! I am so inspired by so many of the builds that I see on the GJ and this shows what can be done with minimal cost involved with inexpensive components. Like you, I am a huge fan of panel bonding adhesive. If it's good enough for the Aerospace and Automotive industry then it's perfect for this application. Once again, well done!
 
OP
S

superbovine

Well-known member
Joined
Apr 4, 2017
Messages
63
Location
Vero Beach
Thanks guys!

Not much exciting today. I duplicated the drawer bottom for the other drawer... no pictures, so just imagine the same as the other one all over again :)
I slipped and managed to nick my fresh paint already. :sad: 
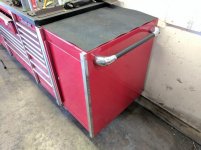
Right in plain view too (top/front rounded edge a few inches from the right). *****.

I did begin building upward with the top drawer. I used some 1/2" square tube to build a wall up and a platform to hang the guns from. It needs to be narrowed in the "rear" still and I will likely put a 3/16"x1.5" piece of scrap bar I have across the "front" section where they hang at a 45 degree angle. Then both contact surfaces will be felt covered. That is the plan anyway. I was going to put a diagonal brace on there too, but the thing is so strong its really not necessary, it would be just for show. The back of the upright will get either some 20ga sheeting or maybe some grill bars from the remnants of the shopping cart. The rest of the drawer design is still mostly undecided until I get the actual primary function portion finished.

Meanwhile I did learn that the drawer slides I got are ****. They flex so much, just leaning on them slightly when the drawer is extended you can see then flex downward a ridiculous amount. 100lbs per slide my ****. Its totally sufficient for what it is holding, but it irritates me so I will likely see if Snappy has some take-offs I can score. I like being able to stand on my drawers. Not because I need to, I just like knowing a I can.:lol:

attachment.php


attachment.php
 

Attachments

  • box31.jpg
    box31.jpg
    77 KB · Views: 651
  • box32.jpg
    box32.jpg
    79 KB · Views: 654
OP
S

superbovine

Well-known member
Joined
Apr 4, 2017
Messages
63
Location
Vero Beach
I've been busy at work and haven't had much time to work on this unfortunately, but I did get one drawer mostly done.

I added a spacer bar where the rear of the guns rest to balance them out, as well as spacers in between to keep them from flopping around etc. I had to do one a little wider than the rest for the Snap On 1/2" air impact since its a fatty... and wouldn't you figure that tiny little bit extra made the one on the end just a tad narrow for the 3/8 air impact. It fits still, but not the same way the others do.
Not pictured, but I also added a 2" high rail (more old 1/2" box) around the perimeter to give the impression of a typical drawer, and I tacked on a 20ga backing on the "wall" part. The ends of the box tubing I leaded solid and will probably do some spackling on it tomorrow or Monday and ready it for paint.

The bottom drawer is still basically flat... any ideas on what to do with it? It will have about 6-7" in clearance roughly.

attachment.php


Left to right: SO 18V Lithium flashlight, SO 3/8" air impact, SO air hammer, SO 18V-Li hammer drill (picked up yesterday!), Matco 1/2" air impact (IR 2135ti clone), SO 18V-Li 1/2" impact, SO 18V-Li 3/8" impact, SO MG750 1/2" air impact.
 

Attachments

  • box33.jpg
    box33.jpg
    78.4 KB · Views: 570
OP
S

superbovine

Well-known member
Joined
Apr 4, 2017
Messages
63
Location
Vero Beach
Got some quick and rather dirty paint on the drawers and started trimming them up. Used some aluminum hole punched scrap I have a few sheets of to trim the back wall of the gun rack. Up top the resting area for the triggers has 3mm felt across it now. Pics are kind of dark unfortunately.
Should have drawer liners arriving tomorrow as well as some stainless hardware for final drawer slide assembly!

attachment.php

attachment.php
 

Attachments

  • 2017-05-11 08.45.54.jpg
    2017-05-11 08.45.54.jpg
    53.2 KB · Views: 505
  • 2017-05-11 11.51.34.jpg
    2017-05-11 11.51.34.jpg
    144 KB · Views: 503
OP
S

superbovine

Well-known member
Joined
Apr 4, 2017
Messages
63
Location
Vero Beach
This should be the final update, unless I decide to try to mimic the top surface.

Drawers are fully assembled and in use; aluminum punch out is on top and bottom of the gun rack, felt padding on the resting surface, and rubber drawer liners cut to fit. Also figured out the air hammer fits fine in that last slim holster, so I swapped it with the 3/8 impact :beer:


aTavL3p.jpg
 

Attachments

  • box34.jpg
    box34.jpg
    85 KB · Views: 120
OP
S

superbovine

Well-known member
Joined
Apr 4, 2017
Messages
63
Location
Vero Beach
Thank you!
I did a cheap work surface build to match the rest of the box that came out OK, it is in another thread though.
 
To avoid these ads, REGISTER NOW!
Top Bottom