To avoid these ads, REGISTER NOW!

Snap-On KR-260 Roller Cab Refresh

thehorse13

Well-known member
Joined
Mar 15, 2015
Messages
3,478
Location
Jefferson County, WV
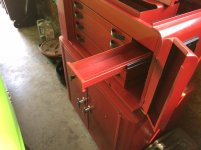
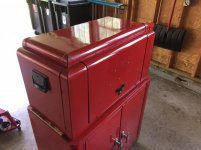
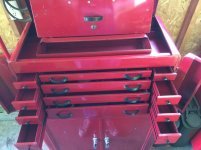
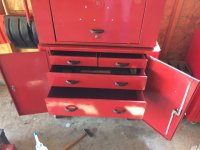
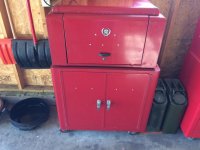
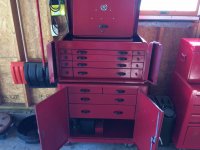
Many of you have already seen this tool box in the GJ tool box thread. It's next up on my summer projects list. I'm not going to repaint this, rather, give it a nice functional refresh because I plan on giving it light use when done. It will house vintage family tools when and other low use items.

The refresh list includes:
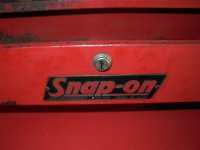
1) Remove the Caddy emblem.
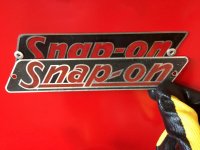
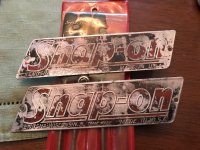
2) Locate 3 of the proper era Snap-On badges and put them back on.
3) Remove the mouse piss smell.
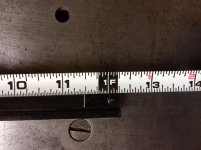
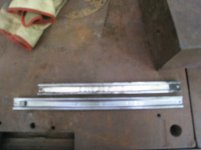
4) Go through every drawer slide and fix them. I know that I need at least one replacement set because tabs are missing from one of the small drawers.
5) Cut and buff the paint.
6) Enjoy using it.

So let's show you what we're starting with. Keep in mind I gave this thing a good scrub with Simple Green when I got it home plus I got rid of all the piss stained drawer pads.

Off we go...
 

Attachments

  • IMG_4707.jpg
    IMG_4707.jpg
    134.9 KB · Views: 266
  • IMG_4708.jpg
    IMG_4708.jpg
    132.1 KB · Views: 274
To avoid these ads, REGISTER NOW!

JimNC

Well-known member
Joined
Jul 9, 2017
Messages
580
Location
NC
That is a good looking setup. Good luck finding emblems, which year/style?
 

bill300d

Well-known member
Joined
Jul 25, 2010
Messages
237
Location
lehigh valley, pa
You might have better luck looking for hens teeth.
I have seen them on that auction site no one likes but not often.
In the off chance I find one I'll pass it along.
 
OP
T

thehorse13

Well-known member
Joined
Mar 15, 2015
Messages
3,478
Location
Jefferson County, WV
You might have better luck looking for hens teeth.
I have seen them on that auction site no one likes but not often.
In the off chance I find one I'll pass it along.

Yea, I comb that place and I also look for demolished KR-56 boxes that I can salvage parts off of. Those do come up on Craigslist from time to time but not since I developed a need for one. Of course.

Thanks for keeping an eye out. :)
 

JimNC

Well-known member
Joined
Jul 9, 2017
Messages
580
Location
NC
There are guys that manufacture reproduction plates for machinery. I'm not sure that I've seen any here at GJ, but there is a guy that does exceptional work that posts in the South Bend Lathe section of Practical Machinist.

Good luck!
 
OP
T

thehorse13

Well-known member
Joined
Mar 15, 2015
Messages
3,478
Location
Jefferson County, WV
It's been a horrible week for picking so I got to work on this project.

First, I made a drawer slide removal tool. I used an old Chinese made hack saw blade instead of buying one of the Snap-on tools. If you make your own, be sure to grind the lip like shown in the pictures. It will save you many curses and a lot of time. For the metal working folks, yes, I know that I overheated the metal edge when grinding. It doesn't matter for this application. It's not precision work.

After I removed the drawers, I was relieved to see that the fixed slide tracks are in great shape. If I can get some replacement slides, maybe I will get the small drawers opening and closing smoothly. Right now, most of the small drawers are tight.

Snapmom, I measured the slides as shown in the pictures. Thanks again for offering to help me out here.
 

Attachments

  • IMG_4727.jpg
    IMG_4727.jpg
    136.9 KB · Views: 98
  • IMG_4726.jpg
    IMG_4726.jpg
    140.5 KB · Views: 107
  • IMG_4724.jpg
    IMG_4724.jpg
    146 KB · Views: 114
  • IMG_4723.jpg
    IMG_4723.jpg
    145.7 KB · Views: 122
  • IMG_4722.jpg
    IMG_4722.jpg
    141.4 KB · Views: 114
  • IMG_4725.jpg
    IMG_4725.jpg
    136.7 KB · Views: 120
OP
T

thehorse13

Well-known member
Joined
Mar 15, 2015
Messages
3,478
Location
Jefferson County, WV
Thanks to SnapMom, I have 5 drawer slides for the K60 drawers. I cleaned up all 5 slides and at the moment I have two drawers that open and close butter smooth. I'm also left with one extra slide that I plan on using as a guide for fixing any slides of mine that can be saved.

That's the good news.

Seeing what a good slide should look like and comparing it to mine, well, I'm in some trouble. I guess I could try some sort of jig to straighten and reshape my slides but I've never attempted it before. Anyone have any ideas?

In the picture below, you can see a good slide on the left and one of my beat up slides on the right. A good slide should resemble an "I" beam.

Short of finding myself 6 more sets of K60 slides and two pair of K200 slides, I'm going to have to repair the parts that I have.
 

Attachments

  • IMG_4732.jpg
    IMG_4732.jpg
    135.7 KB · Views: 125
  • IMG_4735.jpg
    IMG_4735.jpg
    135.2 KB · Views: 142
  • IMG_4734.jpg
    IMG_4734.jpg
    136.4 KB · Views: 120
OP
T

thehorse13

Well-known member
Joined
Mar 15, 2015
Messages
3,478
Location
Jefferson County, WV
I wonder if the slides for the small drawers on a KR 537 would work on yours? I'd have to check the measurements.

I've wondered about which models use the same slides. I haven't found a resource that cross references this info though. For the moment, I'm just looking on the web for anything that meets the measurements. No luck so far.

If you get a chance to compare the measurements, please let me know what you find. Thanks!
 

jockeylot

Well-known member
Joined
Jul 9, 2013
Messages
116
Location
Florida
Great looking project that you're working on. Good luck to you.

I was going to ask where you get your drawer slides but it appears the ones you got were a one time deal.

I have a 3 drawer KRA429 that has one drawer that when I push it in it springs back and inch or so. I can't figure out what is causes this.
 

zkling

Well-known member
Joined
Jan 23, 2007
Messages
16,939
I have a 3 drawer KRA429 that has one drawer that when I push it in it springs back and inch or so. I can't figure out what is causes this.


It's supposed to be like that, is is part of the locking feature. You need to close the bottom two drawers before closing the top one. There are flaps with spring that cause the top drawer to sit proud of the other two.
 

FJ 432

Well-known member
Joined
Aug 2, 2010
Messages
3,733
Location
Littleton Colorado
A possible solution but requires a bit of a compromise.

I have a 1940's k55 that my plans were to cannibalize. This box has relatively good slides but there's a catch. They are short by 1.75".

Photos show the difference in length. The k55 where the slides came out and the difference in extensions using my k60. You can see that the original slides offer full extension whereas the k55's slide offers approximately 3/4's.
 

Attachments

  • IMG_3042.jpg
    IMG_3042.jpg
    136.2 KB · Views: 77
  • IMG_3043.jpg
    IMG_3043.jpg
    143.8 KB · Views: 105
  • IMG_3044.jpg
    IMG_3044.jpg
    135.6 KB · Views: 88
  • IMG_3040.jpg
    IMG_3040.jpg
    148.8 KB · Views: 66
OP
T

thehorse13

Well-known member
Joined
Mar 15, 2015
Messages
3,478
Location
Jefferson County, WV
A possible solution but requires a bit of a compromise.

I have a 1940's k55 that my plans were to cannibalize. This box has relatively good slides but there's a catch. They are short by 1.75".

Photos show the difference in length. The k55 where the slides came out and the difference in extensions using my k60. You can see that the original slides offer full extension whereas the k55's slide offers approximately 3/4's.

Beggers can't be choosers. I'll take anything that I can find in order to get the old girl into good serviceable condition.

I appreciate any offered help! :beer:
 
To avoid these ads, REGISTER NOW!

snapmom

Well-known member
Joined
Sep 4, 2008
Messages
3,520
Location
Florida
slides: can snap on, they still have slides, even if they are to long, cut them down.
 
OP
T

thehorse13

Well-known member
Joined
Mar 15, 2015
Messages
3,478
Location
Jefferson County, WV
slides: can snap on, they still have slides, even if they are to long, cut them down.

I also considered this but what slides would I ask for?

I contacted Snap-On a while back but all they would say is that the slides for my boxes are no longer available. Pretty much, go pound sand and go away. :confused:
 
OP
T

thehorse13

Well-known member
Joined
Mar 15, 2015
Messages
3,478
Location
Jefferson County, WV
Today I eagerly made my way to the shop to cut and buff the paint on the tool box. As I was going through the motions, all I could think about was how great this thing would look in less than an hour once I added the Snap-On badges.

FJ 432 was kind enough to send me not one, but three beautiful Snap-On badges along with slides and a removal tool. I laid everything out on the Alemite bench in anticipation of the big moment.

...and then it happened.

I discovered that the earlier badges have different sized mounting holes. As you can see in the pictures, the horizontal dashed Snap-On Kenoshaw WI badges have a shorter mounting hole distance than the diagonal dashed unmarked Snap-On badges.

Once I realized that I would have to either modify the box or these beautiful badges that FJ 432 sent to me, I raised the white flag and surrendered.

All of that said, if anyone has one or more of the Kenoshaw WI lettered badges like the one pictured below, I'm back in the market again. :sad:
 

Attachments

  • IMG_4747.jpg
    IMG_4747.jpg
    130.6 KB · Views: 85
  • IMG_4745.jpg
    IMG_4745.jpg
    142.1 KB · Views: 86
  • IMG_4746.jpg
    IMG_4746.jpg
    142.8 KB · Views: 75

454ragtop

Well-known member
Joined
Mar 24, 2008
Messages
5,011
Location
Carver, MA
Don't know if that is a pic of your badge, but it seems to me pop rivets aren't up to the quality and effort you're putting in this box. I'd get a small needle file and elongate the holes in the box if they're close or redrill and mount the badges with small button allen head stainless screws with nuts on the back side, I'm thinking 5-40 or the like.
 
OP
T

thehorse13

Well-known member
Joined
Mar 15, 2015
Messages
3,478
Location
Jefferson County, WV
Don't know if that is a pic of your badge, but it seems to me pop rivets aren't up to the quality and effort you're putting in this box. I'd get a small needle file and elongate the holes in the box if they're close or redrill and mount the badges with small button allen head stainless screws with nuts on the back side, I'm thinking 5-40 or the like.

Nope. That pop rivet job is on a KR-56 that I bought a year ago as is. I would never do such a thing with badging. I just haven't gotten around to fixing that problem just yet.
 
OP
T

thehorse13

Well-known member
Joined
Mar 15, 2015
Messages
3,478
Location
Jefferson County, WV
Thanks to assistance from FJ 432, I have enough slides to now show a fully working K60 top box. :) Getting the stack back in service remains my priority but let me shamelessly run my plug for 1950s Snap-On badges again. If you have any or know where I can find them, please let me know. A pic is attached of the specific badge that I need.

I got my hands on some brand new Snap-On slides. They are the 8-1257 type referenced by SnapMom in an earlier post. As anticipated, they are about 3 inches too long. You can see the comparison in the picture below.

That said, I've never modified a slide before. Does anyone have experience in how to do this successfully? I'm sure I can do some trial and error on the old ones but if I can save myself the suffering, I will.
 

Attachments

  • 005-5.jpg
    005-5.jpg
    35.8 KB · Views: 58
  • IMG_4759.jpg
    IMG_4759.jpg
    142.3 KB · Views: 63
  • IMG_4758.jpg
    IMG_4758.jpg
    134.8 KB · Views: 59
OP
T

thehorse13

Well-known member
Joined
Mar 15, 2015
Messages
3,478
Location
Jefferson County, WV
I decided to remove all of the drawers from the roller cab today. I figured that if I need to modify slides, seeing the drawers out of the box would motivate me to move ahead.

I'm happy to report that I ran into my first rub of good luck. Someone put the wrong sized slides in the roller cab. Once I removed the rest of the drawers it became apparent that the brand new Snap-On slides are the exact same size as the proper original roller cab slides. :D

I'm happy to report that all drawers are now 100% operational!!

Now to start a serious search for badges...
 

Attachments

  • IMG_4760.jpg
    IMG_4760.jpg
    137.8 KB · Views: 49
  • IMG_4763.jpg
    IMG_4763.jpg
    136.5 KB · Views: 52

Stuart in MN

Well-known member
Joined
Sep 8, 2005
Messages
23,111
Location
Minneapolis
Good deal on the slides. :) Even though those old boxes may not be as practical as newer ones, I'd still like to have one.
 
OP
T

thehorse13

Well-known member
Joined
Mar 15, 2015
Messages
3,478
Location
Jefferson County, WV
Practicality goes out the window when you have the tool box illness. lol. This isn't an everyday use box anyway. It's more of a family heirloom storage box and decoration in my garage. :)
 
OP
T

thehorse13

Well-known member
Joined
Mar 15, 2015
Messages
3,478
Location
Jefferson County, WV
After relentlessly searching, I finally turned up two proper Snap-On emblems for the roll cab. You'll notice that they are in bad shape but after they go through my restoration process, they will look just like the restored set.

Another GJ member posted his process and the pictures are from the result. Mine will look the same.

We're getting there slowly...
 

Attachments

  • 53520934572__D14AD96E-3750-465C-B153-E79C3AF7B323.jpg
    53520934572__D14AD96E-3750-465C-B153-E79C3AF7B323.jpg
    151 KB · Views: 78
  • 2014-05-19 20.35.43.jpg
    2014-05-19 20.35.43.jpg
    82.5 KB · Views: 76
OP
T

thehorse13

Well-known member
Joined
Mar 15, 2015
Messages
3,478
Location
Jefferson County, WV
I was going to restore these two badges to factory new condition until I looked at the cabinet itself and the one badge I already have on the top box. The long and short if it is that the badges would look out of place on the stack if they were done to perfection.

Instead, I decided to do a distressed look along with scuffing and simulated, "bleed through" of the black paint. When these were made, the factory first shot the entire badge in black, stencil shot the red and then sanded the raised part of the badge. I've done the same process only everything was done by hand. Over the years, the scuffing and daily use would expose parts of that base coat of black.

Anyhow, now the badges have the same amount of wear as the paint and the already existing Snap-On badge. They are even Twertsy approved. lol

On a parting note, believe it or not, it's harder to distress restore than perfectly restore these things. Too much pressure at any point of the process and you're going to have a mess on your hands.
 

Attachments

  • IMG_0103.jpg
    IMG_0103.jpg
    145.1 KB · Views: 78
OP
T

thehorse13

Well-known member
Joined
Mar 15, 2015
Messages
3,478
Location
Jefferson County, WV
Thanks!

I have about half dozen things left to do on this stack. The badges were one of the hardest because they are difficult to find these days.

Next up is finding original wheels. The ones on it are era correct but not the right ones for this box. A few minor paint touchups are needed and I have to find appropriate fasteners for the badges. If anyone has a good way to fasten them up, please share. Pop riveting is out of the question.

Once I get the above sorted, and I get some fresh drawer liners installed, I will call this a successful refresh.
 
To avoid these ads, REGISTER NOW!
Top Bottom