To avoid these ads, REGISTER NOW!

How to Make a Vintage Tow Rope

Private Lugnutz

Well-known member
Joined
Mar 30, 2012
Messages
30,486
Location
The Authentic Jersey Shore
INTRODUCTION

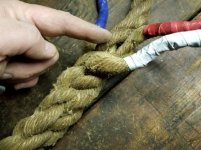
As I reported on the Garage Sale thread a week or so ago, I found this coil of 1-inch diameter manila rope.

View media item 77675
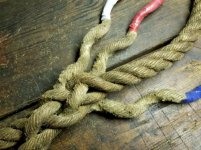
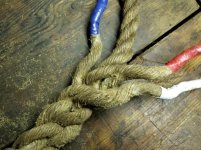
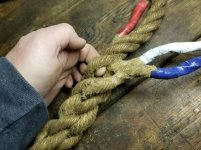
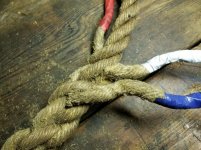
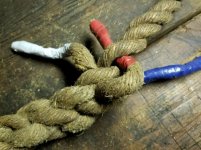
Whenever I find a coil of genuine 3-strand 1-inch diameter manila rope, I make as many WWII-spec tow ropes as I can out of it. If you’ve ever seen a WWII jeep at a car show or a parade, you’ve probably seen them wrapped around the front bumper. They were 20-22 feet in length, including the eyes spliced into each end. To make one, you need 25 feet of rope. All my tow ropes have splices with at least four tucks, sheared, seered, and whipped, usually with a strand of manila from the same rope, although I have also whipped them with 22 gauge wire.

Here’s one on my jeep.

View media item 76003
When I casually mentioned that I was going to make a few bumper tow ropes out of this coil, a couple guys on the Garage Sale thread asked me if I would do a DIY tutorial on splicing and whipping.

I was reluctant at first, but what the heck - this is it.

CAVEAT

I know there are many “How to…” YouTube videos and step-by-step process diagrams out there on the web for splicing and whipping. In fact, that’s the first thing I told the guys who asked me to do this. When I reviewed them, though, I discovered that most of them were working with much smaller rope, and usually nylon. Working with 1-inch hemp or manila rope, which is thick and not nearly as cooperative, is a whole ‘nother animal. I also found myself wanting to interject a helpful tip or two or three here and there about techniques I felt the other tutorials were missing.

I don’t profess to be an expert. I learned splicing and whipping – and all other types of basic marlinspike, from my dad, who was a deckhand in the Merchant Marines on the Great Lakes, the Mississippi, and open water before WWII, a quartermaster second class in the pilothouse on a destroyer ****** in the US Navy during WWII, and a pilot in the Coast Guard for a few years after WWII. He was 40 when I was born, and I was 40 when he died eighteen years ago and I still miss the heck out of him, especially at times like this.

View media item 78209
I know what he taught me and that’s what this tutorial will show. Nothing more, nothing less.

(Please hold off on replies until I'm done so as not to break up the flow.)
 
To avoid these ads, REGISTER NOW!
OP
P

Private Lugnutz

Well-known member
Joined
Mar 30, 2012
Messages
30,486
Location
The Authentic Jersey Shore
PART 1: SPLICING THE EYES

MATERIALS

A suitably large enough flat surface, the rope, three (3) rolls of electrical tape – red, white and blue (you’ll see why shortly!), a sharp knife, and a blow-torch and/or a suitable lighter.

View media item 78150
STEP 1: The Eye

Make a loop in the rope in the approximate size of the eye you want on the end. Some guys measure with a rule. Some guys use a coffee can. I’ve made so many of these I just eyeball it. Then, unravel the three (3) main strands of the rope down to the point where it intersects with the bottom of the eye. Everything above that will be spliced into the rope or sheared off as excess when you’re done.

View media item 78151
STEP 2: Lay Out

It is absolutely critical that you lay out your strands correctly from the outset. Knowing which strand is which and understanding the sequence of the tucks is the key to a successful splice. Losing track of the strands and the tuck sequence is what intimidates most novices. Strand #1 – always the first or highest on the rope, goes over the top of the rope. Strand #2, the next strand down, also goes over the top of the rope. Strand #3, the last strand, goes under the rope.

View media item 78152
View media item 78153
View media item 78154
STEP 3: The Fids

A three-strand rope is actually made of forty-five individual (45) strands, fifteen (15) in each of the three (3) main strands. A fid is a metal cap, like a pointy thimble, placed on the end of strands to aid in splicing, so that the strands don’t separate. Electrical tape will work just fine. Most people just tape the end. I like an extra long fid, especially with manila or hemp, which tends to unravel and get very messy. Most people use black electrical tape. I use red, white, and blue electrical tape to help me keep the sequence in order. Red goes to Strand #2, because that’s the first strand that gets tucked. White goes to Strand #1, because that’s the second strand that gets tucked. Blue goes to Strand #3, because that’s the last strand that gets tucked. All successive tucks are made in that order - red, white, and blue (easy to remember!), until the splice is finished.

View media item 78156
 
OP
P

Private Lugnutz

Well-known member
Joined
Mar 30, 2012
Messages
30,486
Location
The Authentic Jersey Shore
STEP 4. The First Tuck

Pick a link in the rope at the base of the eye. Using force (and trust me when I say this requires strong fingers and hands), separate it from the other strands to make an opening. Don’t be afraid to manhandle the rope. It’s required, and it can take it. If you want to use a tool (a spike), go ahead. Tuck strand #2 (red) through that opening.

View media item 78157
View media item 78158
And pull it up as tight as you can into the rope.

View media item 78159
Holding the rope at the eye (below the splice) firmly in your left hand, grab strand #2 (red) firmly by the fid, and pull it away from the eye, up the rope, aligned with the rope, as hard as you can. Get used to repeating this with every strand after every tuck. It is the key to a tight splice.

TURN THE ROPE OVER – by simply twisting the whole eye and splice, clockwise, to the right, essentially flopping the rope over to the other side. This will expose the next tuck. This is a key move that many novices forget.

View media item 78160
STEP 5: The Second Tuck

With the rope now turned over, find the link in the rope where strand #2 (red) is now poking through from underneath. Using your fingers, forcibly separate the strand directly behind it to make an opening. Tuck strand #1 (white) through that opening, to the left of (or behind) strand #2 (red). White always goes behind Red.

View media item 78161
View media item 78162
Again, holding the rope at the eye (below the splice) in your left hand, grab strand #1 (white) by the fid, and pull it away from the eye, up the rope, aligned with the rope, as hard as you can.

Turn the Rope Over Again!

View media item 78163
STEP 6: The Third Tuck

Now that the rope is turned over, find the link in the rope where strand #1 (white) is now poking through. Using your fingers, forcibly separate the strand directly behind it to make an opening. Tuck strand #3 (blue) through that opening, to the left of (or behind) strand #1 (white). Blue always goes behind white.

View media item 78164
View media item 78165
Again, holding the rope at the eye (below the splice) in your left hand, grasp strand #3 (blue) by the fid, and pull it away from the eye, up the rope, aligned with the rope, as hard as you can.

Turn the Rope Over Again!

View media item 78166
 
Last edited:
OP
P

Private Lugnutz

Well-known member
Joined
Mar 30, 2012
Messages
30,486
Location
The Authentic Jersey Shore
STEP 7: The Fourth through Twelfth Tucks

Repeat Steps 4 through 6, making three (3) more tucks with each of the strands, always in red, white and blue order. And remember to turn the rope over after every tuck.

VERY IMPORTANT NOTE: With that first tuck (red, strand #2), none of the other loose strands were in the rope. When you tuck strand #2 (red) through for the second time (the next or fourth tuck you make), it goes through the opening to the right (or in front) of strand #1 (white). Red always goes in front of white.
 

Attachments

  • Splice 17.jpg
    Splice 17.jpg
    76.5 KB · Views: 141
  • Splice 23.jpg
    Splice 23.jpg
    73.6 KB · Views: 111
  • Splice 22.jpg
    Splice 22.jpg
    71.4 KB · Views: 105
  • Splice 21.jpg
    Splice 21.jpg
    76.8 KB · Views: 100
  • Splice 20.jpg
    Splice 20.jpg
    76.5 KB · Views: 100
  • Splice 19.jpg
    Splice 19.jpg
    74 KB · Views: 104
  • Splice 18.jpg
    Splice 18.jpg
    72.7 KB · Views: 110
Last edited:
OP
P

Private Lugnutz

Well-known member
Joined
Mar 30, 2012
Messages
30,486
Location
The Authentic Jersey Shore
More tucks....
 

Attachments

  • Splice 30.jpg
    Splice 30.jpg
    76.5 KB · Views: 88
  • Splice 29.jpg
    Splice 29.jpg
    68.4 KB · Views: 82
  • Splice 28.jpg
    Splice 28.jpg
    69.1 KB · Views: 83
  • Splice 27.jpg
    Splice 27.jpg
    79.8 KB · Views: 85
  • Splice 26.jpg
    Splice 26.jpg
    76.4 KB · Views: 86
  • Splice 25.jpg
    Splice 25.jpg
    66.9 KB · Views: 86
  • Splice 24.jpg
    Splice 24.jpg
    71.6 KB · Views: 87
OP
P

Private Lugnutz

Well-known member
Joined
Mar 30, 2012
Messages
30,486
Location
The Authentic Jersey Shore
More tucks...
 

Attachments

  • Splice 37.jpg
    Splice 37.jpg
    71.5 KB · Views: 77
  • Splice 36.jpg
    Splice 36.jpg
    63.7 KB · Views: 71
  • Splice 35.jpg
    Splice 35.jpg
    72.3 KB · Views: 75
  • Splice 34.jpg
    Splice 34.jpg
    76.2 KB · Views: 75
  • Splice 33.jpg
    Splice 33.jpg
    75.4 KB · Views: 76
  • Splice 32.jpg
    Splice 32.jpg
    69.8 KB · Views: 75
  • Splice 31.jpg
    Splice 31.jpg
    65.7 KB · Views: 75
OP
P

Private Lugnutz

Well-known member
Joined
Mar 30, 2012
Messages
30,486
Location
The Authentic Jersey Shore
Final tucks before finishing...
 

Attachments

  • Splice 44.jpg
    Splice 44.jpg
    63.7 KB · Views: 79
  • Splice 43.jpg
    Splice 43.jpg
    67.9 KB · Views: 78
  • Splice 42.jpg
    Splice 42.jpg
    58.7 KB · Views: 75
  • Splice 41.jpg
    Splice 41.jpg
    63.3 KB · Views: 77
  • Splice 40.jpg
    Splice 40.jpg
    63 KB · Views: 77
  • Splice 39.jpg
    Splice 39.jpg
    67.4 KB · Views: 81
  • Splice 38.jpg
    Splice 38.jpg
    74.2 KB · Views: 90
OP
P

Private Lugnutz

Well-known member
Joined
Mar 30, 2012
Messages
30,486
Location
The Authentic Jersey Shore
View media item 78167
STEP 8:

Remove the electrical tape fids from the three (3) mains strands by unwinding the tape.

View media item 78168
STEP 9:

Unravel each of the three (3) main strands into their fifteen (15) strands. They’re much easier to cut when unraveled. Shear them off as close to the rope as possible with a knife, one at a time.

View media item 78169
View media item 78170
STEP 10:

Seer the sheared-off nubs of the main strands and the entire splice with a butane lighter or a torch, holding the flame against the splice, moving it back and forth, and turning the rope as you go. The hairs will quickly catch fire and ember and burn off.

View media item 78171
Voila!

View media item 78172
View media item 78187
 

AdrianBoomer

Well-known member
Joined
Jan 16, 2015
Messages
235
Location
Novato, California
Forgive me, I am a traditional sea captain. I love your splices. To take them to the next level a suggestion would be to taper them. Thin out the manilla with a knife after 3 passes of the standard splice, and continue for another 3 passes gradually thinning. It will have a really nice finish!
 

Tink

Well-known member
Joined
Aug 26, 2009
Messages
285
Location
Old Bridge,N.J.
Nice writeup. Thank you.
Whish I had a tutorial that good when I learned how to splice line. I do have to give thanks to a couple of barge men who helped me figure out what I didn't quite grasp from the instructions I had.
 

Farmer J.

Well-known member
Joined
Sep 18, 2016
Messages
1,995
Location
UK, Cornwall/Hertfordshire.
Nice tow rope Lugz.
I have been told not a good idea to always store a rope on the front of a vehicle as dirt and grit gets in to the fibres. From what I have heard from participants of D Day that would be the least of their worries, they just needed the ropes where they could get to them quickly! I don't expect they had time to do a neat taper on the rope splices either..

Here's what they look like tapered, I did this one for a hand rail along a steep winding stairway. Sea Captains do a neater job of this.
 

Attachments

  • IMG0073A.jpg
    IMG0073A.jpg
    142.1 KB · Views: 210
  • IMG0074A.jpg
    IMG0074A.jpg
    137.9 KB · Views: 194
OP
P

Private Lugnutz

Well-known member
Joined
Mar 30, 2012
Messages
30,486
Location
The Authentic Jersey Shore
Awesome!!!
Thanks, guys. Glad you liked it.

Nice writeup. Thank you.
Whish I had a tutorial that good when I learned how to splice line. I do have to give thanks to a couple of barge men who helped me figure out what I didn't quite grasp from the instructions I had.
Thanks. When looking for a good link to give to the guys who asked for this, I was surprised by how many instructional sites I found that didn’t say to turn the rope over!

Excellent and timely thread. I'm going to look at a CJ2A tomorrow. Its still 6v with no winch. This might be just what it needs.
Haha. Well, I trust my splices, but I have to admit, I’m not sure I’d trust all the old rope I make these out of, even on a little 1/4-ton truck. I’m not opposed to using modern tow straps with built-in clasps, etc. Good luck with the jeep!

nice! now try double braided rope !
Haha. I’ll meet you over on Boat Journal and we’ll have a race.

Forgive me, I am a traditional sea captain. I love your splices. To take them to the next level a suggestion would be to taper them. Thin out the manilla with a knife after 3 passes of the standard splice, and continue for another 3 passes gradually thinning. It will have a really nice finish!
If you’ll forgive me in return, Adrian, the only tradition I trust implicitly is what my dad taught me and my brothers, and that was to never taper a splice unless you had to, because it weakens the splice. There’s no need to taper an eye splice. Tapered splices – again, from what I was taught, whether on an end or a joining splice are for a line that is going to be run through a block or a pulley or a grommet, etc, so the bulge doesn’t foul the rigging. I’ve done plenty of them. Besides, I prefer to finish my splices with whipping.

Nice tow rope Lugz.
I have been told not a good idea to always store a rope on the front of a vehicle as dirt and grit gets in to the fibres. From what I have heard from participants of D Day that would be the least of their worries, they just needed the ropes where they could get to them quickly! I don't expect they had time to do a neat taper on the rope splices either..
More importantly, no need to. The eye splice is not passing through any rigging. Nice job on yours though. As for grit, I wash my ropes with soap and water, run them through a rag doused in used motor oil held in my hand, and dry them in the sun before wrapping around the bumper again. On that note, it’s very astute of you to mention expedience. If you look at most parade jeeps, the rope is wrapped real tight around the bumper, in many neat and uniform coils. That may have a more attractive appearance than one wound loosely in a figure 8, as mine is, but if you look at period photos (Getty, Life, etc), you hardly ever see a rope wrapped in neat tight coils – and when you do, it’s almost always a high-ranking officer’s jeep.

EDIT: Busy day ahead, but tonight, for those interested, I will post PART 2: Whipping the Splice
 
Last edited:

dr_clyde

Well-known member
Joined
Jan 7, 2009
Messages
6,431
Location
Holland, MI
This is cool. Thanks for posting. I love knots and ropework, I was heavily involved in Scouting as a lad and greatly enjoyed making structures with lashings, knots, and the seemingly miles of rope that we had in the troop trailer.
 
To avoid these ads, REGISTER NOW!

Farmer J.

Well-known member
Joined
Sep 18, 2016
Messages
1,995
Location
UK, Cornwall/Hertfordshire.
Great thread Lugz, thanks for posting it all, and appreciate your informed answers to the queries and comments. Learning a lot, and enjoying it, looking forward to the next episode splice whipping tutorial...
 
OP
P

Private Lugnutz

Well-known member
Joined
Mar 30, 2012
Messages
30,486
Location
The Authentic Jersey Shore
This is cool. Thanks for posting. I love knots and ropework, I was heavily involved in Scouting as a lad and greatly enjoyed making structures with lashings, knots, and the seemingly miles of rope that we had in the troop trailer.
Did you see the Sea Scout manual upthread? 1920's!

THAT is nice work. Thanks for showing that.
thanks for taking the time to document and post it.
Thanks, guys.

My wife's grandmother has a WW2 willies jeep we use around the ranch...
I can picture her or someone from that generation anyway behind the wheel! :)

aarrghh there matey!:thumbup:
Haha. Honestly, I spent so much time on the water when I was a kid, I think that's how I ended up in the Army, if that makes sense!
 
OP
P

Private Lugnutz

Well-known member
Joined
Mar 30, 2012
Messages
30,486
Location
The Authentic Jersey Shore
PART 2: WHIPPING

INTRODUCTION

Whipping is used on the ends of ropes to prevent them from fraying, in the middle to patch strands that are badly fraying, and on splices, which often get beat up, to protect them from popping or fraying. Any time my dad cut a line, he whipped the ends. He whipped most of his splices, too. There are many types of whipping. You can do a series of half hitches. You can do a back splice, weaving an excess strand into and around the end. The kind of whipping I like doesn’t involve a knot. You can whip a cracked wooden hammer or axe handle with wire with this kind of whipping. I’ve seen guys whip a perfectly good axe handle, and I have to admit I don’t get that. I guess it’s in case of an overstrike, to prevent the handle from cracking. If you know how to do that on a wooden tool handle, it’s the same process in marlinspike, using twine or a strand of manila instead.

MATERIALS

View media item 78188
My dad could whip a rope in his sleep in less than a minute without any aids. I am not nearly that good or dexterous. I use aids. Namely, duct tape. The knife is self-explanatory, as is the spool of twine. When feasible, you can use a strand from the same rope. Instead of shearing all the strands after finishing your splice, you leave one strand, and whip the splice with that. It has an elegant continuity to it. But I didn’t have that much excess to play with on these ropes. Another way is take a length of free excess rope, unravel it into the three strands, and unravel one of the main strands, pulling a single strand out of that. In this case, I didn’t have enough rope to do that either. The coil was about 78 feet long and I cut that into three (3) twenty-five (25) foot lengths, leaving me just two (2) feet. Twine works just fine. I like the darker stuff so it doesn’t clash with the color of the rope.

STEP 1

Tie off the end of the twine on the top of the eye.

View media item 78190
STEP 2

Pull the twine up to a point over the splice where you want the whipping to end. I like to end mine just before the very end of the splice, because I like to see the ends of the splice. Sometimes you will see them covering the ends. Sometimes you will see them much narrower and just before the end. Wherever your spot is, make a loop with the twine there and run the line back toward the eye.

View media item 78189
Tape the loop down well to the rope. With your index finger, press both lines at the point you want the whipping to begin.

View media item 78191
 
OP
P

Private Lugnutz

Well-known member
Joined
Mar 30, 2012
Messages
30,486
Location
The Authentic Jersey Shore
STEP 3

Put the spool of twine inside your roll of duct tape or on a spindle or something that will let it spin and feed twine out freely as you pull on it. Holding the rope in your left hand at the splice, and keeping your left index finger on top of both lines, take the loose line and make a few wraps around the rope. You're essentially wrapping over the line that's taped down and around the rope. These wraps should be as tight on the rope and to each other as possible as you keep tension on the line with your right hand. Press your left index finger on the line you are wrapping so it doesn’t unwrap when you let go or slide your right hand down to grab more line.

View media item 78192
View media item 78193
STEP 4

Turn the rope over and look at the back side. If the whipping has gaps, like this…

View media item 78194
…make adjustments with your thumb and index finger by simply nudging and cinching the wraps up against each other.

STEP 5

Repeat that process, wrapping, and using the index finger and thumb on your left hand to cinch the wraps up against each other, pulling more twine off the spool as you need it to make a wrap, and constantly keeping tension on the line with your right hand.

Check the back of the splice…

View media item 78195
..and the top as you go.

View media item 78196
View media item 78197
View media item 78198
View media item 78199
View media item 78200
STEP 6

When you get to the end, near the loop, take the tape off and cut the line.

View media item 78201
View media item 78202
 
Last edited:
OP
P

Private Lugnutz

Well-known member
Joined
Mar 30, 2012
Messages
30,486
Location
The Authentic Jersey Shore
STEP 7

Take the end of the line, tuck it through the loop, and pull it all the way through the loop.

View media item 78203
STEP 8

Cut the tail of the loop off at the eye.

View media item 78204
STEP 9

It's impossible to capture this next part with a photo and do it at the same time, sorry. A video would work better here. Grab the tail of the loop and pull – low (not upwards, parallel to the rope and table), deliberately and swiftly, but without jerking – toward the eye, away from the splice, in line with the rope. You are essentially grabbing the line you used to lay down the whipping with the loop and pulling it underneath the whipping. Again, there is no knot involved in whipping. The wrappings have the free end trapped underneath. Ideally, it should be pulled all the way through and snipped off. If it snaps off half way, that’s okay. It won’t come loose if it’s pulled through far enough.

View media item 78205
STEP 10

Snip the end of the line off as close the edge of the whipping as you can. Just like the splice, you can clean up the hairiness with a torch or lighter.

View media item 78206
View media item 78207
View media item 78208
 
Last edited:

Outlawmws

Well-known member
Joined
Aug 9, 2011
Messages
39,134
Location
The Badlands
Lugz, Thank you for posting this! This one gets added to my bookmarks for posterity!

Beautiful Job putting it together! I know it was a lot of work, so thanks again!
 

LesserSon

Well-known member
Joined
Feb 7, 2016
Messages
5,051
Location
PA USA
Great how-to, Lug. The whipping technique you used is also how line guides are attached to fishing rods.
 

twertsy

Well-known member
Joined
Jan 5, 2014
Messages
6,726
Location
Reedville, VA
Excellent tutorial Greg! You got that tow rope whipped right into shape. Have to start calling you the knotty professor..........ok, I'll stop now. :beer:
 

Ole Slewfoot

Well-known member
Joined
Feb 22, 2016
Messages
5,098
Location
Freedom, CA
USN 1944 'use and care of fiber rope'
I think this may have been a supplement to training on how to perform the actual splices.
looks like a cool tool board at about 10:00
 
OP
P

Private Lugnutz

Well-known member
Joined
Mar 30, 2012
Messages
30,486
Location
The Authentic Jersey Shore

tym

Well-known member
Joined
Mar 5, 2016
Messages
2,429
Location
MA
Thanks for the tutorial, Lugz. Inspires me to want to make a tow rope, but then I'd need to get the Jeep to go with it.

I've dabbled with an Indiana Jones whip-cracking group, and see some familiar techniques for plaiting whips and replacing the falls.
 
To avoid these ads, REGISTER NOW!
Top Bottom