To avoid these ads, REGISTER NOW!

Finally, My Porcelain is getting Installed!

Angelfire

Well-known member
Joined
Mar 22, 2012
Messages
1,367
Location
New Mexico and Ireland
Finally, My Porcelain is Installed!

Hiya Folks,
So I purchased porcelain tile (The King of Flooring according to bdamico!) nearly 5 years ago. Since then it's been patiently sitting waiting to be installed. Here is the thread from when I first purchased with the specs on the tile, costs, etc...:

https://www.garagejournal.com/forum/showthread.php?t=206193

I purchased knowing I was being sent overseas for work and that it would sit but I had no idea it would be sitting so long! My assignment was extended multiple times and then when I did finally return stateside, I had to the get the garage ready. It was just a framed shell with a few lights installed. Now it's got all the electrics done, well insulated, mini-split heater/AC, walls are up, etc....so it's time to get the floor down.

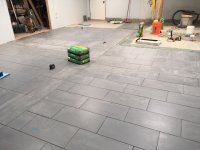
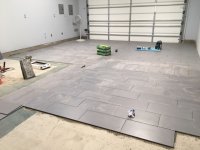
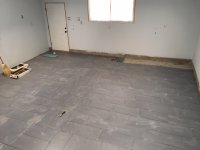
My space is 31x20 so about 620 sf of tiling to be done.

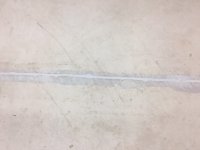
My first order of business was to get my control joints filled. I purchased 1/4" backer rod from Amazon (~$8/clf) and used that to take up most of the volume of the saw cuts. Followed that up with Armopoxy's CRAPCK (crack filling putty) for around $80 after their GJ discount/shipping. I went with this product vs. others as I could simply use a putty knife to fill the cracks without having to grind afterwards. The stuff is very sticky but with a 1:1 mix ratio, was pretty foolproof.

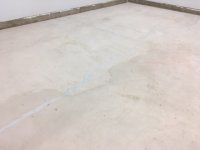
So got all the control joints filled with no issue. Had plenty of the crack putty left over so tackled a few small cracks with it as well. My contractor cut the control joints and didn't cut them where I asked him to. Guess where these cracks appeared....yep, right where I wanted my saw cuts. They haven't moved either apart or up/down since they first appeared so I'm hopeful they won't matter a bit.

Next up was to flatten the floor. Had a lot of birdbaths around. I used Versabond thinset to do this as the deviation was relatively minor (most were 1/4" or less in variation). Would have gone with self levelling material but I had a bad experience with that once before and I know my limitation with the stuff when working by myself so opted for the TS.

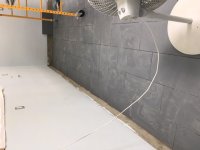
After flattening, it was time to add some isolation membrane to the equation to help prevent issues down the road. I used AquaDefense and covered all the control joints and any cracks 2 ft on either side of them. I've used Redguard before but the AD just seems better. I'm sure RG would have probably been fine, but I really liked the AD for its thicker viscosity. Anyway, 3.5 gallons later and I had covered all of the cracks/saw cuts.

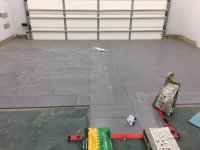
I opted to use a Reno U profile at the entrance to the garage. I have a profile cut into the slab kind of like a "pocket" for the garage door to set into. This profile has a trowelled bullnose on top so rather than trying to square up the bullnose, I set the Reno U at the edge of where the bullnose starts. See the pic as that will help to show what the heck I'm trying to describe.

Before I get too far into this, I need to give a very well earned Thank You to Dakota00! He has been absolutely fantastic at answering my stupid questions (and yes folks, there really are such things as stupid questions!). I'm no expert on tiling but he's the real deal and has been extremely helpful to me on this project. So thanks very much Dakota for giving back to the community and to me! Really appreciate the help. And there will definitely be a beer or 10 ready for you should I ever make it up there or you down here! :beer:
to be continued.........
 

Attachments

  • SawCuts1.JPG
    SawCuts1.JPG
    56.8 KB · Views: 305
  • Pocket Profile1.JPG
    Pocket Profile1.JPG
    123.3 KB · Views: 317
  • AquaDefense2.JPG
    AquaDefense2.JPG
    78.9 KB · Views: 315
  • AquaDefense1.JPG
    AquaDefense1.JPG
    85.2 KB · Views: 297
  • SawCuts3.JPG
    SawCuts3.JPG
    64 KB · Views: 290
  • SawCuts2.JPG
    SawCuts2.JPG
    73.7 KB · Views: 281
Last edited:
To avoid these ads, REGISTER NOW!
OP
A

Angelfire

Well-known member
Joined
Mar 22, 2012
Messages
1,367
Location
New Mexico and Ireland
Continued.....

So with regards to the Reno U, I cut it using my SCMS and it cut like a dream. Nice clean finish with my 90+ tooth blade. I wrapped the Reno U around the pocket profile in my floor just to finish things off.

Ok, finally ready for tile. My first go was an utter disaster. I haven't tiled in quite a while and the last I did, I did Saltillo. A very different beast from rectified porcelain and much more forgiving. Anyway, I mixed my first bit of thinset up and it came out way too wet. I tried to recover by mixing a second batch a bit drier......well let's just say live and learn. I ended up scraping it all up and tossing what I had mixed up, washed the backs of the tiles, and went to bed!

The next day, I got after it and paid much better attention to my mixing. Got a good mix and got the Reno U installed with 1 row of tile to keep it in place. Now, I have a lot of other commitments (family etc...) so can't work on this thing 7x24 so that's about as far as I got on that first day. The last two weekends have been fruitful however and I'm up to about 286 sf. down. Another couple of weekends and I think I'll be there.

Anyway, I'm using Flexbond as my thinset. This isn't meant for large format tiles but I'm still using it given it's better crack isolation properties. I try to mix a bit drier to accommodate this but sometimes I miss. Every tile is getting 100% back butter. I have noticed that these tiles are a little bit bowed in the center so I opted for a 1/3 offset running bond to try to hide the bow a bit. I'm also have mixed up the pattern a bit by running a double course side by side down the middle of the garage. This was just to break things up visually a bit but even more important to me, it breaks the garage up into smaller sections for me to tile. This way, if I get off a little bit somewhere, that mistake essentially ends at the divider line and on the other side, I start fresh again. I had nightmares that trying to run a full 20' across, that I'd have a small error somewhere that would magnify as I moved across to the other side. So for me, even though all the tile is the same color, it made sense to do a pattern.

So here I am at around 286sf done and 336sf to go. Not sure these old knees will make it! Kind of glad I don't have the time to work in the evenings during the week as it gives the body time to recuperate. Already starting to turn my attention to which grout, color of grout, and whether or not I'll do a baseboard border in tile. I'll update this as I progress...

Added a pic of a recent sunset here in NM.....just to mix it up a bit!
Cheers.
 

Attachments

  • Reno1.JPG
    Reno1.JPG
    103.1 KB · Views: 413
  • Reno2.JPG
    Reno2.JPG
    74.1 KB · Views: 434
  • Progress1.JPG
    Progress1.JPG
    88.7 KB · Views: 659
  • Sunset.JPG
    Sunset.JPG
    107.4 KB · Views: 362
Last edited:

Dakota00

Well-known member
Joined
Mar 9, 2008
Messages
1,078
Location
Woodbridge, Ontario
Looks fantastic man!!! Great write up and I'm happy to have helped you out along this journey. BTW, love the layout!

Looking forward to the updates! :)
 

Brian_WK

Well-known member
Joined
Jun 30, 2015
Messages
1,177
Location
NE South Dakota
I feel your pain literally and figuratively. Just finished up doing 700sqft in my house. Im only in my 30's but I still feel it days later.... Looks great and keep it up it is so worth it in the end.

Brian
 
OP
A

Angelfire

Well-known member
Joined
Mar 22, 2012
Messages
1,367
Location
New Mexico and Ireland
Thanks folks for the compliments and encouragement! Looking forward to another weekend getting closer to finishing, sort of! Between the physical demands on the knees and the cleanup after each bucket, I think I'd have a really hard time doing this for a living. Hats off to those that do!

One small lesson I've learned that I'll pass on with regards to the larger tiles. I did a bunch of Saltillo in the house a few years ago which was 12x12. It's a different animal altogether when compared to porcelain but that would be another thread I suppose. But what I found is when I got down towards the bottom of the bucket of thinset, I was almost always able to get one more tile down without running out and the bucket was pretty bare when I was done. Made clean up pretty simple. Now with the larger tiles, I have gotten to a point where I have a pretty good idea looking at the remaining thinset on whether I have enough for "one more tile" or not. Unfortunately, this has meant I end up washing out more thinset of the bucket vs the smaller tiles (yes, waste!). If I were laying more or professionally, I'd get it so I mixed only the exact amount I needed for a given number of tiles but for now I'll just get this job finished up as is.

Oh, and another learning. While back buttering, I started off by holding the tile in one hand and buttering with the trowel in the other while spinning the tile as needed to get 100% coverage. This works fine but gets a bit tiresome after a while. I found setting the tile face down on the top of a bucket and back buttering that way works pretty well. Can easily spin it and it takes the load off the arm that would have been holding it up. Hope that helps.

Hopefully more updates later this weekend!
Cheers.
 

Brian_WK

Well-known member
Joined
Jun 30, 2015
Messages
1,177
Location
NE South Dakota
Ok, finally ready for tile. My first go was an utter disaster. I haven't tiled in quite a while and the last I did, I did Saltillo. A very different beast from rectified porcelain and much more forgiving. Anyway, I mixed my first bit of thinset up and it came out way too wet. I tried to recover by mixing a second batch a bit drier......well let's just say live and learn. I ended up scraping it all up and tossing what I had mixed up, washed the backs of the tiles, and went to bed!

The next day, I got after it and paid much better attention to my mixing. Got a good mix and got the Reno U installed with 1 row of tile to keep it in place. Now, I have a lot of other commitments (family etc...) so can't work on this thing 7x24 so that's about as far as I got on that first day. The last two weekends have been fruitful however and I'm up to about 286 sf. down. Another couple of weekends and I think I'll be there.

A little tip to get your mix spot on is to get a container that is tall and narrow measure out what you need for water into it, mark it with a sharpie, then use a hole saw to drill a 1 inch hole with the bottom of the hole level with your mark. No matter how much water you pour/scoop into you measuring container it will always be the right amount once the water comes out the hole. No counting or measuring just poor it into your thinset bucket before you add the mix.

Brian
 
OP
A

Angelfire

Well-known member
Joined
Mar 22, 2012
Messages
1,367
Location
New Mexico and Ireland
A little tip to get your mix spot on is to get a container that is tall and narrow measure out what you need for water into it, mark it with a sharpie, then use a hole saw to drill a 1 inch hole with the bottom of the hole level with your mark. No matter how much water you pour/scoop into you measuring container it will always be the right amount once the water comes out the hole. No counting or measuring just poor it into your thinset bucket before you add the mix.

Brian

Thanks. I've marked my bucket with the amount of water so that's staying consistent. I haven't gotten to the point of measuring out the thinset. I'm not mixing full batches (probably more like 3/4 bag at a time) and that's where my variation comes in. Maybe I'll do that this weekend....might save me some time in the long run.
Cheers.
 

James-W

Well-known member
Joined
Feb 3, 2013
Messages
12,432
Location
Southeastern Wisconsin
When I was checking onto a suitable floor for my 24X36 garage I looked into the cost of doing ceramic or porcelain tile. Being as old as I am and not knowing much about laying tile, I figured I would get a professional place to do it for me. The local flooring place wanted $6,000 just to prep the concrete and lay the tile. When you add the cost of the tile, it would be roughly $9,000 to $10,000 to do the garage floor. I figured it wasn't worth it to me to spend that much on the garage floor.

I thought about epoxy, but there is a lot of prep to do if you want to get a really good epoxy floor. Again, being older I would want to hire it done, which of course is more money.

After getting some samples of Racedeck tiles, I was convinced this was the way to go. Floor prep was simple, sweep the floor and then use the shop vac to get anything I may have missed by sweeping. Laying the tiles was simple and the job was done in no time flat. The floor looks wonderful and my only regret is that I didn't do it sooner.
 

madbim

Member
Joined
May 4, 2014
Messages
17
This is the exact look I want, but dont even know where \ how to get started.
 

James-W

Well-known member
Joined
Feb 3, 2013
Messages
12,432
Location
Southeastern Wisconsin
:eek: WTF!!!!!

You didn't get any other quotes?
I didn't get any other quotes, the place I went to is the only one around here that does ceramic or porcelain tile. I have used them for other stuff in the past, like carpeting for the bedrooms and my oldest daughter has had them do carpeting for her. They have always done excellent work and the price they charge is very reasonable, not just the materials but the labor charges as well.

I could get some companies from Madison or from Milwaukee to give me a quote, but from past experience I have found that any business in these two cities are generally higher than a similar business around here. It certainly wouldn't have hurt to get additional quotes, but I figured it wouldn't do much good so I didn't. Thinking back, you are right, additional quotes would have been the thing to do.

But in any case, I am VERY happy with the Racedeck floor and I am glad I went that route. A porcelain or ceramic floor would have been nicer, but it is difficult for me to justify the huge cost. With the Racedeck tiles I have a really nice work space at a fraction of the cost.
 
OP
A

Angelfire

Well-known member
Joined
Mar 22, 2012
Messages
1,367
Location
New Mexico and Ireland
So I'm done for this weekend. Got another few tiles down so I'm up to about 407sf done. Only 213sf to go! I'm really hoping to finish it up next weekend but that would probably mean me getting some tiles down during the week....which is tough. I'm actually considering starting the grout this week as that would be easier for me to tackle during the week. All in all it's going ok although I'm changing my name to "Lippage Master" meaning I'm really good at getting it! I have a new found respect for those in the trade who can lay large format tiles with no lippage (and no levelling system!). But it's a garage so it's all good.

I could tell that today it was a bit warmer just by how fast the thinset started to set up vs. yesterday. I really want to get this done before the higher temps hit so hence my thinking I may actually start grouting.

Ahh sure, it's all good.
Cheers.
 

Attachments

  • Progress22Apr2.JPG
    Progress22Apr2.JPG
    98.3 KB · Views: 388
  • Progress22Apr1.JPG
    Progress22Apr1.JPG
    95 KB · Views: 329
OP
A

Angelfire

Well-known member
Joined
Mar 22, 2012
Messages
1,367
Location
New Mexico and Ireland
And now, what say the GJ experts with regards to grout color? I can essentially match the tile color, go lighter, or black. I'm kind of in the mind of going lighter as it would match my wall color (and I will be doing the baseboards in the same tile). I know I shouldn't be using a light grout due to the very nature of a garage but I'm still considering it given so many of the grouts nowadays are pretty stain proof.

So what say ye? Colors under consideration are Platinum, Delorean Gray, Pewter, and Black (Charcoal)-see photo. Other photo is up against my wall color. Some of my decision will be based on what's stocked locally.
Cheers.
 

Attachments

  • GroutColor1.JPG
    GroutColor1.JPG
    96.6 KB · Views: 144
  • GroutColor2.JPG
    GroutColor2.JPG
    106.9 KB · Views: 110

Tony_G

Well-known member
Joined
Jan 15, 2016
Messages
89
Location
CO
It is looking great, good job! Can't wait to see the finished product!
 

deezee

Well-known member
Joined
Feb 28, 2014
Messages
60
Location
Saskatchewan
.........

Oh, and another learning. While back buttering, I started off by holding the tile in one hand and buttering with the trowel in the other while spinning the tile as needed to get 100% coverage. This works fine but gets a bit tiresome after a while. I found setting the tile face down on the top of a bucket and back buttering that way works pretty well. Can easily spin it and it takes the load off the arm that would have been holding it up. Hope that helps.

Hopefully more updates later this weekend!
Cheers.

Floor looks great!

This is what I used. Back Butter Buddy. It worked great for me as a DYI.
back_butter_buddy.jpg
 
To avoid these ads, REGISTER NOW!
OP
A

Angelfire

Well-known member
Joined
Mar 22, 2012
Messages
1,367
Location
New Mexico and Ireland
If you're going for that "wow" factor, Platinum color will do it.

Yes it would and it matches the walls very well. Just not sure if it's going to make things look too busy. But after the time/effort of doing a pattern, might be nice to show it off...haha. The pewter color matches the tile nearly exactly which might help hide my, er, mistakes.

I'll probably see what colors they have in stock locally and just go from there. It's a garage after all!

I did have a question about expansion joints. I've left 1/4" at the edges of the flooring already. My floor is ~20'Wx31'L and am thinking I should use caulk in place of grout on at least one 1/8" groutline (if not two) in each direction to provide for expansion. Thoughts?

This space is conditioned when I'm in there but mostly will be left unconditioned when I'm not. The garage door faces the west so in the summer, if/when the door is open, there will be a lot of heat generated on the floor in the afternoons.
Cheers.
 

Brian_WK

Well-known member
Joined
Jun 30, 2015
Messages
1,177
Location
NE South Dakota
And now, what say the GJ experts with regards to grout color? I can essentially match the tile color, go lighter, or black. I'm kind of in the mind of going lighter as it would match my wall color (and I will be doing the baseboards in the same tile). I know I shouldn't be using a light grout due to the very nature of a garage but I'm still considering it given so many of the grouts nowadays are pretty stain proof.

So what say ye? Colors under consideration are Platinum, Delorean Gray, Pewter, and Black (Charcoal)-see photo. Other photo is up against my wall color. Some of my decision will be based on what's stocked locally.
Cheers.

I used TEC accucolor grout with grout boost. It still stained. I ended up using StoneTech BulletProof Sealer and it gives really good protection with 2 coats following the directions. I tested it with red wine and was still able to wipe away clean at 5 minutes.

I think the only really stainproof grout is epoxy. But I personally feel it is 10x more work to apply as you have to work fast. It would be good if you had help at least 2 more people.

Brian
 
OP
A

Angelfire

Well-known member
Joined
Mar 22, 2012
Messages
1,367
Location
New Mexico and Ireland
I used TEC accucolor grout with grout boost. It still stained. I ended up using StoneTech BulletProof Sealer and it gives really good protection with 2 coats following the directions. I tested it with red wine and was still able to wipe away clean at 5 minutes.

I think the only really stainproof grout is epoxy. But I personally feel it is 10x more work to apply as you have to work fast. It would be good if you had help at least 2 more people.

Brian

Thanks for the insight. I won't go epoxy. I know it's nearly bulletproof but I would probably ****** it up good especially with the rising temps that are starting here. I'm one man band here as well. Instead, I'm looking at the acrylic mixes that are not cement based. These seem to get good reviews on the stain front. But they do take more labor to install, similar to epoxy although not quite as bad I believe. I think I'll bite the bullet and buy a small amount to test on some scrap tile and see how it does with the likes of oil, grease, etc.....

Cheers.
 

mnwebb

Well-known member
Joined
Mar 6, 2017
Messages
98
Location
St.Paul, MN
AngelFire, looks great nice work! One question, how did you know where you wanted the saw cuts (before the contractor ignored you)? I ask because I have a poor coming up and need to know!
Thanks,
Wilson
 
OP
A

Angelfire

Well-known member
Joined
Mar 22, 2012
Messages
1,367
Location
New Mexico and Ireland
AngelFire, looks great nice work! One question, how did you know where you wanted the saw cuts (before the contractor ignored you)? I ask because I have a poor coming up and need to know!
Thanks,
Wilson

Typical spacing is every 10–12 ft if I remember correctly. On my 31’ length, I wanted 2 cuts evenly spaced but only got one. :(
 
Last edited:

Dakota00

Well-known member
Joined
Mar 9, 2008
Messages
1,078
Location
Woodbridge, Ontario
I did have a question about expansion joints. I've left 1/4" at the edges of the flooring already. My floor is ~20'Wx31'L and am thinking I should use caulk in place of grout on at least one 1/8" groutline (if not two) in each direction to provide for expansion. Thoughts?

Cheers.

If no movement has occurred or settling has already taken place in the past. There really shouldn't be any issue of grouting the joints where the expansion joints are. But seeing as you honored the expansion joints you could play it safe and caulk it, if you prefer.
 
OP
A

Angelfire

Well-known member
Joined
Mar 22, 2012
Messages
1,367
Location
New Mexico and Ireland
If no movement has occurred or settling has already taken place in the past. There really shouldn't be any issue of grouting the joints where the expansion joints are. But seeing as you honored the expansion joints you could play it safe and caulk it, if you prefer.

Thanks Dakota. I didn't have any expansion joints in the field except at the edges of the floor where the slab meets the stemwall. Those, I have honored. Otherwise, I have tiled right over the saw cuts that were made.

I was more concerned with the situation of where I have the garage door open in the summer and the sun is beating on the tile. Not sure if I should expect significant movement (of the tile) from that or not.

I do have a few places where I have a grout line that runs continuously E/W and N/S so was thinking I could caulk those and be done.

Cheers and thanks for the help!
 

Dakota00

Well-known member
Joined
Mar 9, 2008
Messages
1,078
Location
Woodbridge, Ontario
My mistake, I remember from previous discussions that you were not going to honor the expansion joints. I thought maybe you changed your mind with the layout. Don't stress about the joint at the stemwall. No need to grout or caulk as you're planning to add baseboard. Once the baseboard is installed, leave a joint at the bottom where it meets the floor tile. This joint should be filled with caulking.
From a quick look of the pictures, I see you have one honored joint in the middle of the garage floor running front to back, that can be caulked if you want too. Also having the sun beating on the tiles will not cause any movement, no need to worry. :)
 
OP
A

Angelfire

Well-known member
Joined
Mar 22, 2012
Messages
1,367
Location
New Mexico and Ireland
Thanks. I actually have 4 grout lines that could be caulked (dividing the space evenly) but it sounds like I don't need to worry about it, which is great news. Here's a rough diagram of my pattern. I didn't show the "field" with the 1/3 offset but it gives a picture of what I have available (bold lines are where I was considering using caulking). These lines are the same as all the other grout lines in the rest of the space (1/8").

As for the baseboard, yep, took your advice from your PM's and have that detail sorted and will be installing per your description.
Cheers.
 

Attachments

  • movement joints.JPG
    movement joints.JPG
    30.8 KB · Views: 82

Dakota00

Well-known member
Joined
Mar 9, 2008
Messages
1,078
Location
Woodbridge, Ontario
The bold lines should be grouted same as the field tiles, there's absolutely no need or benefit in caulking those joints. The only joint (if you prefer) to caulk would be the center joint running N to S. As it falls right on top of the expansion joint.
 

mnwebb

Well-known member
Joined
Mar 6, 2017
Messages
98
Location
St.Paul, MN
Two general questions about tiled garage floors..

-How does it feel when wet, more or less slippery than other floor coatings?

-Grout has to be sealed, and regrouted over time if abused, yes? Is this a case of a tile floor lasting much longer in Florida than in MN?

Thanks,
W
 
OP
A

Angelfire

Well-known member
Joined
Mar 22, 2012
Messages
1,367
Location
New Mexico and Ireland
Two general questions about tiled garage floors..

-How does it feel when wet, more or less slippery than other floor coatings?

-Grout has to be sealed, and regrouted over time if abused, yes? Is this a case of a tile floor lasting much longer in Florida than in MN?

Thanks,
W

I'll let some of the folks that have been using porcelain for a few years comment on their experience. But all my research points to a couple of things. The floor is as slippery, or not, as you want it. Choosing a tile with the proper CoF (Coefficient of Friction) is key depending on what you want. Typically it is recommended that for wet areas, a CoF of 0.60 or higher is recommended. These tiles will have some "texture" to them vs. polished tiles.

And on the grout situation, it is recommended to go with a dark color to mask stains that may occur in the garage. Although that being said, there are a number of newer grouts on the market (cementitious, Acrylic, Epoxy) that are getting pretty good reviews for their ability to resist stains without the use of sealers. As this is my first garage floor with tile, I can't comment on whether they actually work personally. At least not yet!

Cheers.
 
OP
A

Angelfire

Well-known member
Joined
Mar 22, 2012
Messages
1,367
Location
New Mexico and Ireland
Another weekend in the books! Got another 160+/- SF down so the light at the end of the tunnel is definitely shining. Of course that light is actually a train by the name of grout...haha.

Regardless, getting excited to get this thing all cleaned up and start on the grout. I think I'm going to use the same tiles as a baseboard...will make the space look smaller but I like the added protection it would add to the bottoms of the walls.

Cheers.
 

Attachments

  • Progress29Apr.JPG
    Progress29Apr.JPG
    73.5 KB · Views: 235
OP
A

Angelfire

Well-known member
Joined
Mar 22, 2012
Messages
1,367
Location
New Mexico and Ireland
Make a test board with scrape tile for grout selection, that's the best way to make grout color decision.

Yep. I’m actually leaning towards a grout color that matches the tile vs something contrasting just given some of the lippage (some which is my own doing and some that is just inherent with larger tiles). But yeah I plan to do a test board as you suggested. Thanks!
 
OP
A

Angelfire

Well-known member
Joined
Mar 22, 2012
Messages
1,367
Location
New Mexico and Ireland
Didn't get as far as I wanted this weekend but am onto the grout now!

Friday night I finished up the tile which was great. Made a sample board as well and settled on a color....Pewter. Saturday was spent doing yardwork...blech. But I did get to HD and picked up the grout. I'm using the Fusion Pro stuff.

Never used it before and it's a different animal compared to cementitious grout. Did a lot of reading on JohnBridge.com and watched a number of videos until I felt like I could do this. Cracked open the lid and found it had separated a bit. Everything I've read has said pull the top off and use so I was a bit worried that maybe this was old stock. Held off doing any grout until I got some answers. As it turns out, it's normal and it just takes a stir to get it all mixed up.

So far this stuff is a bit of a love/hate relationship. It's very handy (no mixing), getting good coverage, color is very consistent, etc.... But it does seem to shrink a fair amount so my joints are sitting a little low in places. Also getting a few pinholes in it as it sets up. Not the end of the world as this stuff will bond to itself with no prep so I'll just go back over those spots. The cleaning regimen is pretty serious though. It gets hard in no time on the face of the tile so you have to get after it. And of course, I have a few spots of haze but it's coming up with minimal effort. So I got about 70sf done over the course of a couple of hours. I'll try to hit it during the week but doubtful I'll get much done. Out of town on Friday/Saturday so it won't get much further for another couple of weeks.

But thrilled to finally be at the grouting stage!
Cheers.
 

Attachments

  • Tiledone3.JPG
    Tiledone3.JPG
    76.9 KB · Views: 168
  • Grout2.JPG
    Grout2.JPG
    72.4 KB · Views: 192
  • Grout1.JPG
    Grout1.JPG
    48 KB · Views: 178
  • Fusion Pro 1.JPG
    Fusion Pro 1.JPG
    79 KB · Views: 152
  • Tiledone1.JPG
    Tiledone1.JPG
    77.4 KB · Views: 170
To avoid these ads, REGISTER NOW!
Top Bottom