To avoid these ads, REGISTER NOW!

Above 1200 Sq/FT Craig's Colorado Car Condo

Wokspaces above 1200 squarefeet.

Craig Balzer

Well-known member
Joined
Sep 21, 2005
Messages
862
Location
Colorado Springs
I have been wanting, planning, anticipating this garage build since 2007 when my ex-wife said "No garage in my backyard'.

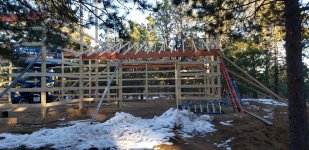
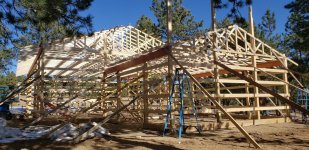
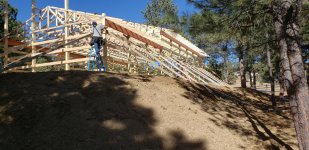
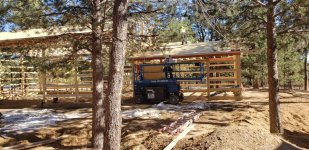
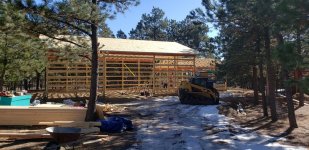
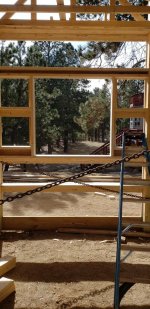
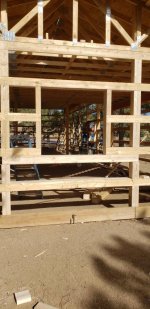
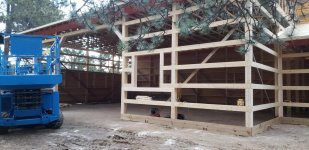
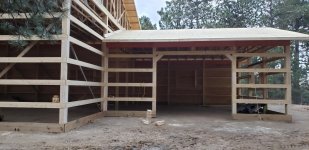
WARNING: This is gonna be a photo-intensive thread.

The Plan

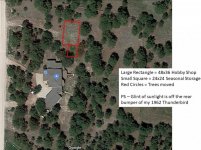
See attached PDF file of PowerPoint sketch. Lot's of info on it. If it's too small to read, I'll copy/paste the text into another posting. Also a Site plan of my lot from Google Maps with basic notes.

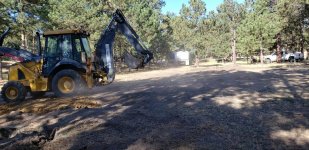
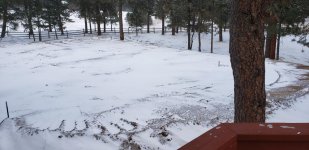
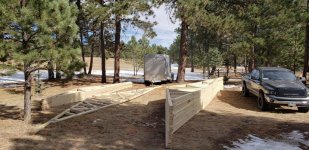
Then what follows is some photos of Site Prep:
- removal of 3-rail fence (before and after)
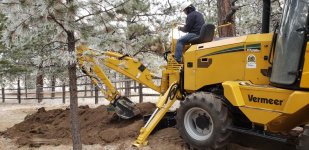
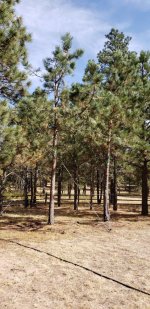
- moved 6 trees rather than cut them down
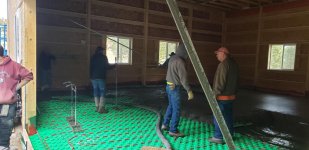
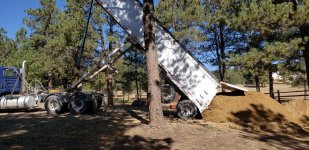
- Initial site prep -- bringing in 40 tons of fill dirt (of a total of 1,200 tons)
 

Attachments

  • Floor Plan - OCT19.jpg
    Floor Plan - OCT19.jpg
    124.3 KB · Views: 1,636
  • Site Plan.jpg
    Site Plan.jpg
    117.4 KB · Views: 1,136
  • 100_3913.jpg
    100_3913.jpg
    158 KB · Views: 891
  • 20191005_125617.jpg
    20191005_125617.jpg
    147 KB · Views: 819
  • 20191005_125906.jpg
    20191005_125906.jpg
    146.6 KB · Views: 760
  • 20191007_094149.jpg
    20191007_094149.jpg
    149.8 KB · Views: 843
  • 20191007_102845.jpg
    20191007_102845.jpg
    152.7 KB · Views: 842
Last edited:
To avoid these ads, REGISTER NOW!
OP
C

Craig Balzer

Well-known member
Joined
Sep 21, 2005
Messages
862
Location
Colorado Springs
The above photos showed the size of the trucks bringing the dirt. The below photos show the heavy equipment moving the dirt and making dust.

At the end of day one the ~350 tons of fill still is 2-3 feet short of filling the end of the site that requires the most fill.
The blue tape on the T-bars mark the required height of the pad.
 

Attachments

  • 20191007_093906.jpg
    20191007_093906.jpg
    150.8 KB · Views: 637
  • 20191007_093541.jpg
    20191007_093541.jpg
    141.4 KB · Views: 628
  • 20191007_163435.jpg
    20191007_163435.jpg
    148.5 KB · Views: 601
  • 20191007_163503.jpg
    20191007_163503.jpg
    149.2 KB · Views: 630
  • 20191007_172229.jpg
    20191007_172229.jpg
    113.5 KB · Views: 614
OP
C

Craig Balzer

Well-known member
Joined
Sep 21, 2005
Messages
862
Location
Colorado Springs
The above photos showed the size of the trucks bringing the dirt. These photos show the heavy equipment moving the dirt and making dust,. The days efforts brought in ~350 tons of fill.

The blue tape on the T-Bars mark the required height of the fill level. Still 2-3 feet to go . . .

sorry -- some how got a double-post here
 

Attachments

  • 20191007_093948.jpg
    20191007_093948.jpg
    151.1 KB · Views: 424
  • 20191007_093607.jpg
    20191007_093607.jpg
    109.4 KB · Views: 383
  • 20191007_163435.jpg
    20191007_163435.jpg
    148.5 KB · Views: 382
  • 20191007_163503.jpg
    20191007_163503.jpg
    149.2 KB · Views: 402
  • 20191007_172229.jpg
    20191007_172229.jpg
    113.5 KB · Views: 360
Last edited:
OP
C

Craig Balzer

Well-known member
Joined
Sep 21, 2005
Messages
862
Location
Colorado Springs
Well, the GC saw the weather forecast for Thursday 10OCT19 and decided to push hard on Wednesday. Good Call.

The temp in NE Colorado Springs at noon Thursday was 12° with an accumulation of 3-5" inches of snow. On Wednesday, the high was 81° -- that's a 69° swing in 24 hours.

GC figures he is within an inch of the target grade and will made that up with the dirt that he pulls out of the holes for the poles -- some of the holes will be 36" in diameter. Ought to be about right.

GC moved, compacted, and graded 1,147 tons of dirt in 3 days. He said he's done more dirt but not in that period of time.
 

Attachments

  • 20191010_174716.jpg
    20191010_174716.jpg
    149.8 KB · Views: 402
Last edited:
OP
C

Craig Balzer

Well-known member
Joined
Sep 21, 2005
Messages
862
Location
Colorado Springs
Two weeks of clear weather and I have significant progress

-- Windows Delivered
-- Pedestrian Doors Delivered
-- 90% of Girts Attached
-- All LVLs Attached

Photos below

Trusses to be erected in week of 28OCT19 to 01NOV19 weather permitting.
 

Attachments

  • 20191023_145145.jpg
    20191023_145145.jpg
    131.1 KB · Views: 630
  • 20191025_160635.jpg
    20191025_160635.jpg
    123.8 KB · Views: 596
  • 20191025_161858.jpg
    20191025_161858.jpg
    49.8 KB · Views: 585
  • 20191027_142546.jpg
    20191027_142546.jpg
    148 KB · Views: 637
  • Trusses Arrive 26OCT19.jpg
    Trusses Arrive 26OCT19.jpg
    147.6 KB · Views: 586

QwikKotaTx

Well-known member
Joined
Aug 10, 2013
Messages
967
Location
Seabrook, TX
Crazy temp swing. I'm going to Keystone around Christmas. I'm sure I'll be freezing.

Sent from my VS987 using Tapatalk
 
OP
C

Craig Balzer

Well-known member
Joined
Sep 21, 2005
Messages
862
Location
Colorado Springs
Well - the plan to erect trusses during the last week of Oct (28OCT-01NOV19) was pushed to the right when Colorado Springs got snow on Mon, Tues and Wed of that week. And the temps those days were in the 20s.

The crew showed up Thurs when the weather broke a little bit and shoveled all the snow out of the footprint of the Hobby Shop and for 10 feet around the perimeter. This gave them a nice firm and dry surface to work on rather than a muddy field. It paid dividends.

On Mon 04NOV19, the crew erected the 13 trusses on the 24x24 storage building
 

Attachments

  • 20191104_160331.jpg
    20191104_160331.jpg
    155.4 KB · Views: 496
  • 20191104_160358.jpg
    20191104_160358.jpg
    157.6 KB · Views: 455
OP
C

Craig Balzer

Well-known member
Joined
Sep 21, 2005
Messages
862
Location
Colorado Springs
They said the 25 trusses on the shop area (48' wide and 36' deep) would be finished the next day (Tues 05NOV19).

I was doubtful -- not because of the quality work they were doing but -- I watched them erect the first truss. Lots of hard work. That wall is 14 feet tall and the truss has 2 feet of soffit on each end so they are 40 feet wide.

I made a 30 sec video as they installed the first truss. It's way too big to post, though. These four guys are brothers; dad owns the construction company. They are Amish and it shows in all they do
 

Attachments

  • 20191105_094550.jpg
    20191105_094550.jpg
    150.5 KB · Views: 487
  • 20191105_094323.jpg
    20191105_094323.jpg
    147.1 KB · Views: 475
  • 20191105_094250.jpg
    20191105_094250.jpg
    118.1 KB · Views: 510
Last edited:
OP
C

Craig Balzer

Well-known member
Joined
Sep 21, 2005
Messages
862
Location
Colorado Springs
They were true to their word. At 3PM I came home from part-time job to see this.

The second pic was taken with my back against the wall of the shop looking back toward my house. It also shows the turnbuckles used to square up the walls. They had run a sting along the top of the 14' walls and snugged up the chains until the three center poles were within 1/4" of that string.

The last two are about the same. They show the 24'x24' storage area with 10 foot walls and a 8x9 garage door. Behind that is the 48'x36' hobby shop with 14' walls (tall enough for my 2-post asymmetric lift

The work continues as will the updates . . .
 

Attachments

  • 20191105_165951.jpg
    20191105_165951.jpg
    152.9 KB · Views: 588
  • 20191106_110524.jpg
    20191106_110524.jpg
    129.1 KB · Views: 589
  • 20191106_110647.jpg
    20191106_110647.jpg
    160 KB · Views: 606
  • 20191106_110958.jpg
    20191106_110958.jpg
    160 KB · Views: 605
Last edited:

QwikKotaTx

Well-known member
Joined
Aug 10, 2013
Messages
967
Location
Seabrook, TX
Wow, that is a massive shop. It doesn't look all that big on the aerial view. Great progress.

Sent from my VS987 using Tapatalk
 
OP
C

Craig Balzer

Well-known member
Joined
Sep 21, 2005
Messages
862
Location
Colorado Springs
I did want to post a shot of the back of my structure. This perspective also shows just how much fill needed to be trucked in to level the construction site: 1,154 tons of dirt. The near corner in this pic has 7 to 7.5 feet of fill.
 

Attachments

  • 20191106_110920.jpg
    20191106_110920.jpg
    152.5 KB · Views: 628
Last edited:
OP
C

Craig Balzer

Well-known member
Joined
Sep 21, 2005
Messages
862
Location
Colorado Springs
The last week (04-08NOV19) has witnessed continued visible progress.
Monday the 4th of Nov through Thursday, the crew placed half the roof on the large shop, covered the entire roof over the 24'x24' and placed two courses on the back-side of the large roof.

The weather in Colorado so far is really playing havoc with the schedule for the floor to be poured. After the roof is completed (on Mon 11NOV19) and the exterior sheeting added to the walls (the rest of next week), the plan is to:
  1. Lay 10-mil vapor barrier
  2. Install 2" close foam insulation
  3. Run the lines for the in-floor radiant heat, along with manifold
  4. Pour concrete

The "interior" photo is angled upward showing half the roof being covered
 

Attachments

  • 20191108_102153.jpg
    20191108_102153.jpg
    103.2 KB · Views: 446
  • 20191108_113651.jpg
    20191108_113651.jpg
    153.6 KB · Views: 410
  • 20191108_101951.jpg
    20191108_101951.jpg
    153.5 KB · Views: 440
OP
C

Craig Balzer

Well-known member
Joined
Sep 21, 2005
Messages
862
Location
Colorado Springs
Nothing much visible has happened on my build lately. The technical stuff is that stiff backs were added to every girt to strengthen the structure -- necessary to provide rigidity and to support the stucco.

Extra vertical boards were also added onto each post between each girts.

Not very exciting but necessary.

Lot's of movement in the last several days -- 13 thru 16 November 2019.

First window framed - a view from inside and out.

The long view shows windows framed along the long rear wall:
 

Attachments

  • 20191113_105222.jpg
    20191113_105222.jpg
    120.4 KB · Views: 340
  • 20191113_105245.jpg
    20191113_105245.jpg
    92.2 KB · Views: 336
  • 20191114_102439.jpg
    20191114_102439.jpg
    155.8 KB · Views: 414
OP
C

Craig Balzer

Well-known member
Joined
Sep 21, 2005
Messages
862
Location
Colorado Springs
On Saturday (16NOV19) the crew attached all the OSB they had on hand to sheet the walls. That covered the entire rear wall and most of the north wall. More OSB to be delivered on Monday morning.

It's taking shape; looking more like a garage than a skeletal frame.

The crew wants to have the structure enclosed in the next week. That will allow them to work inside out of the elements.
Sorry the last two shots are so dark. They were taken moments prior to sunset after site clean up.

Next steps: finish sheeting the walls, enclose the soffits and install fascias, and pour the 4" stab for the floor (after 10 mil vapor barrier, 2" insulation sheets, and in-floor heating lines).
 

Attachments

  • 20191116_115744.jpg
    20191116_115744.jpg
    150.8 KB · Views: 452
  • 20191116_161851.jpg
    20191116_161851.jpg
    153.9 KB · Views: 424
  • 20191116_161858.jpg
    20191116_161858.jpg
    151.9 KB · Views: 459
OP
C

Craig Balzer

Well-known member
Joined
Sep 21, 2005
Messages
862
Location
Colorado Springs
Did they compact the fill?

Yes. Good question

They brought in 1,154 tons of fill in 46 loads (~25 tons per load). As each load was delivered and spread, it was compacted using the tracked Cat and wheeled John Deere back hoe.

The pad is very firm. Prior to the pad (et al) being poured, they are doing a final grade and fill to get everything level and smooth.

I wasn't expecting the fill to be as deep / as tall as it turned out (see photo posted on 06NOV19). Next spring I am having pavers laid in layers to provide support to the steep slope of the fill.
 
Last edited:
To avoid these ads, REGISTER NOW!
OP
C

Craig Balzer

Well-known member
Joined
Sep 21, 2005
Messages
862
Location
Colorado Springs
Nice record of your build. Great progress considering the time of year and location!

Rix -- I am surprised how quickly it is going up and how far along they are. It has been ~6 weeks since construction began and considering how many snow days I've had in October (5) and November (2), they are doing a great job.
 
Last edited:
OP
C

Craig Balzer

Well-known member
Joined
Sep 21, 2005
Messages
862
Location
Colorado Springs
A major milestone.​

The structure is enclosed. The GC wanted to get to this stage before the first (major) storm of the winter. There were about half-a-dozen snow's so far in Colorado Springs, but none I would call major.

They are gonna nail/staple a tarp over the two garage door openings and be able to work inside out of the elements for the rest of the build.
 

Attachments

  • 20191119_103452.jpg
    20191119_103452.jpg
    150.5 KB · Views: 474
  • 20191119_164113.jpg
    20191119_164113.jpg
    152.1 KB · Views: 504
  • 20191119_103318.jpg
    20191119_103318.jpg
    150.4 KB · Views: 521
OP
C

Craig Balzer

Well-known member
Joined
Sep 21, 2005
Messages
862
Location
Colorado Springs
Looking great. I like the large overhanging eves.

Isonic

I like that feature as well. I went for a two-foot eave for two reasons:


  1. To provide cover during rains. The last piece of the construction schedule is to add a three-foot wide walkway around the perimeter of the garage.
  2. The wider eaves and sidewalk will eliminate splatter from rain (beyond the capacity of the gutters) hitting at bottom of the walls and splashing mud on the stucco

Oh -- and, I just decided to delete lights over the garage doors and pedestrian doors and instead go with a set of equi-spaced LED can lights inset in the eaves about every 8 feet. This change was possible with the wider eaves/soffits.
 
Last edited:
OP
C

Craig Balzer

Well-known member
Joined
Sep 21, 2005
Messages
862
Location
Colorado Springs
It has been more than a month and a lot of little items were taken care of on my garage. Nothing that was worth a photo update so this covers a bunch of little items over 5 weeks time.

Back on 25 NOV19, the local power company installed a transformer and pedestal in the back center of my lot and trenched a cable between it and an existing transformer. Power will soon be in my shop.

I just gotta figure exactly where to place the breaker box and trench in the connecting cable
 

Attachments

  • 20191121_111925.jpg
    20191121_111925.jpg
    144.6 KB · Views: 388
  • 20191121_111949.jpg
    20191121_111949.jpg
    155.3 KB · Views: 371
Last edited:
OP
C

Craig Balzer

Well-known member
Joined
Sep 21, 2005
Messages
862
Location
Colorado Springs
I enlisted the help of a neighbor and installed a 10 mil vapor barrier (https://www.wrmeadows.com/en-ca/perminator-underslab-vapour-barrier-canada/) across the entire floor. That was Saturday 30NOV19 and my knees are still aching on Monday. The real pain-in-the-a$$ was taping around all the poles and the tape itself. I didn't realize I needed to tape the vapor barrier to the walls so I was really really short on tape.

Of course I made this discovery at 4PM on Saturday. Bought two more rolls of tape (at $38 each) on Monday (02DeC19) morning and finished the job.

Another contractor is scheduled for Thursday (05DEC19) to install foam insulation and lay the lines for the in-floor heating system. Concrete scheduled to be poured on Saturday 07DEC19

The first photo clearly shows the depression for the extra concrete to be poured for the 2-post lift. Since I haven't yet decided on the lift I had an extra large area dug out to maximum placement options of the two-post lift posts.

The second photo looks in the opposite direction and is a stage for my latest change -- made after a friend with 40 years of wrenching in his own shops and others gave me some new ideas. The key to the latest change is the three spaces between those poles you see in photo 2.
 

Attachments

  • 20191202_123352.jpg
    20191202_123352.jpg
    147.6 KB · Views: 588
  • 20191202_123450.jpg
    20191202_123450.jpg
    149.3 KB · Views: 559
Last edited:
OP
C

Craig Balzer

Well-known member
Joined
Sep 21, 2005
Messages
862
Location
Colorado Springs
The gaps between those poles will be:

1. Between the exterior wall on the left and the first pole will be a utility room and future bath room

2. Between the center two poles will be an open archway connecting the 24'x24' storage area and the 36'x48' shop. There will be some stairs in that "breezeway" -- see attached power point slide

3. Between the exterior wall on the right and the third pole will be part of a Dirty Room (media blaster, drill press, parts washer, welding station, buffer, grinder . . . ). With the Dirty room in this corner, I moved all my benches to the diagonal corner,

The first PDF shows the above word picture in a PPT slide.
The second PDF is a bit difficult to visualize cuz I tried a 3D view with transparent walls and the floor of the loft.

The trusses above the Dirty Room will extend a bit to support a landing that gives access to a loft to store large parts
 

Attachments

  • Floor Plan.pdf
    132.4 KB · Views: 141
  • 3D View of Loft.pdf
    76.5 KB · Views: 101
Last edited:
OP
C

Craig Balzer

Well-known member
Joined
Sep 21, 2005
Messages
862
Location
Colorado Springs
Monday 02DEC19 saw the gutters/down spouts being installed and the soffits being installed and readied for paint.

The soffits have all the vents installed and the holes drilled for the LED can lights (9 lights on the front and rear of the building).

Assuming the weather holds (forecast says high 40's to low 50's° F) the plan is to paint the entire exterior of the structure on Tuesday 03DEC19 -- fingers crossed.
 

Attachments

  • 20191202_153550.jpg
    20191202_153550.jpg
    82.2 KB · Views: 435
  • 20191202_153237.jpg
    20191202_153237.jpg
    97 KB · Views: 442
  • 20191202_124208.jpg
    20191202_124208.jpg
    147.7 KB · Views: 422
  • 20191202_123812.jpg
    20191202_123812.jpg
    152.3 KB · Views: 444
Last edited:

shortykorte

Well-known member
Joined
Sep 1, 2014
Messages
8,039
Location
Tallahassee, Fl
You’re off to a nice start. I’m amazed at the amount of fill since the before picture looked somewhat level. What is the loft going to be used for? Just wondering because the stairs can take up a lot of space.
 
OP
C

Craig Balzer

Well-known member
Joined
Sep 21, 2005
Messages
862
Location
Colorado Springs
Shorty

I see the loft fulfilling two functions.

Primarily it will keep larger car parts out from under-foot during rebuilds/restorations - hoods, doors, bench seats, etc. The first car in this garage will be my 72 Jaguar XK-E for a full restoration. Seats, convertible top mechanism, trans, etc can all be placed in the loft to keep the floor space open and clear while I rebuild engine and IRS..

Also, in keeping with the theme of maximizing floor space and minimizing trip hazards, I plan to put the Air Compressor and Water Heater in the loft.

I am planning to keep the stairs in place so I don't take up space in the Dirty Room (I am at a loss for where else to place the staircase). The stairs are currently going to be the standard 3' wide and they'll be in a "corridor" that is 8' wide. Should work.

Craig
 

shortykorte

Well-known member
Joined
Sep 1, 2014
Messages
8,039
Location
Tallahassee, Fl
That’s the same idea I had/have for my loft. Still need to get compressor up there. So the loft is going to run front to back over the bathroom? Where is the dirty room? Where I have area circled in red?0c503d4d5f6df74e5c6f84a93633cbf7.jpg


Shorty Korte
Always remember quality in QST

Sent from my iPhone using Garage Journal
 

Attachments

  • 0c503d4d5f6df74e5c6f84a93633cbf7.jpg
    0c503d4d5f6df74e5c6f84a93633cbf7.jpg
    45.7 KB · Views: 84
OP
C

Craig Balzer

Well-known member
Joined
Sep 21, 2005
Messages
862
Location
Colorado Springs
Shorty -

Short answer -- Yes and Yes.

Long answers:
I plan the loft to run the entire span from the front of the shop to the rear -- 36 feet. It will be 8 feet wide and likely end up being about 6 feet tall. I have 14 feet from floor to ceiling: 7 feet in the dirty room + ~1 foot for the joist/flooring in the loft and that leaves ~6 feet in the loft. I am 5' 10" -- so that works for me. I'll lose a little space at the front & rear of the loft due to the slope of the roof (4/12).

Yes - the area you circled is the dirty room. It'll be a little tight in there as it is 8 feet wide and 20 feet long. If it gets too crowded in there, I can relocate the items that make the least amount of dirty: parts cleaner, and drill press are my first candidates.
 
Last edited:
OP
C

Craig Balzer

Well-known member
Joined
Sep 21, 2005
Messages
862
Location
Colorado Springs
Glad to see the progress going on. Keep up the good work!

Warrens -- thanks for the encouragement. Big strides planned for this week:

1) installing the Crete-Heat insulating pads and plex lines for the in floor heat is set for Thursday followed by

2) pouring the 4" pad on the 2304 square feet of the floor plan on Saturday.
 
Last edited:
OP
C

Craig Balzer

Well-known member
Joined
Sep 21, 2005
Messages
862
Location
Colorado Springs
Right on schedule - Thursday 05DEC19 the contractor arrives to install Crete-Heat insulation and heating tubes.

Pictures tell the story.
 

Attachments

  • Crete-Heat is 2'x4' and 2 Inchesthick.jpg
    Crete-Heat is 2'x4' and 2 Inchesthick.jpg
    147.5 KB · Views: 429
  • Close Up of Crete-Heat.jpg
    Close Up of Crete-Heat.jpg
    57.5 KB · Views: 421
  • Future Manifold.jpg
    Future Manifold.jpg
    83 KB · Views: 395
  • Installing Plex Tubing 2.jpg
    Installing Plex Tubing 2.jpg
    81.2 KB · Views: 421
  • Installing Plex Tubing 5.jpg
    Installing Plex Tubing 5.jpg
    154.6 KB · Views: 447
  • Interlocking Foam Slabs (2x4).jpg
    Interlocking Foam Slabs (2x4).jpg
    44.2 KB · Views: 413
  • 20191207_154731.jpg
    20191207_154731.jpg
    103.5 KB · Views: 424
Last edited:
OP
C

Craig Balzer

Well-known member
Joined
Sep 21, 2005
Messages
862
Location
Colorado Springs
Saturday 07DEC19 and the concrete crew is on schedule.
They show up at 7AM -- Yawnnn. Started pouring at 8.
Photo story below. The pour only took 2 hours; then the real work started. All finished by 4 PM.

Oh yeah -- somewhere along the way, 8 windows were installed,
 

Attachments

  • Final Screed.jpg
    Final Screed.jpg
    146.9 KB · Views: 538
  • Rough Screed.jpg
    Rough Screed.jpg
    98.9 KB · Views: 522
  • Pouring Concrete 3.jpg
    Pouring Concrete 3.jpg
    39 KB · Views: 521
  • Pouring Concrete 2.jpg
    Pouring Concrete 2.jpg
    146.9 KB · Views: 526
  • Concrete Pump.jpg
    Concrete Pump.jpg
    152.2 KB · Views: 513
  • Power Trowelling Done.jpg
    Power Trowelling Done.jpg
    104.1 KB · Views: 641
Last edited:

shortykorte

Well-known member
Joined
Sep 1, 2014
Messages
8,039
Location
Tallahassee, Fl
Having the floor done sure makes it a lot nicer. What is going in hole by the pex stick outs.


Shorty Korte
Always remember quality in QST

Sent from my iPhone using Garage Journal
 
To avoid these ads, REGISTER NOW!
Top Bottom