To avoid these ads, REGISTER NOW!

Snap On KR-1000A Restoration/Transformation

Darby9

Well-known member
Joined
Jan 18, 2020
Messages
110
Location
San Francisco
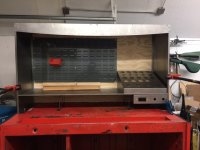
I'm re-organizing my shop and got hooked on the idea of consolidating my various toolboxes into one big boy. I don't go to the track any more, but I still keep my tools in various small-ish boxes (top chests, an army surplus hip roof, a few Rubbermaid totes) and my new mill came with a cheap-o rolling cart that's taking up valuable floor space in my tiny shop.

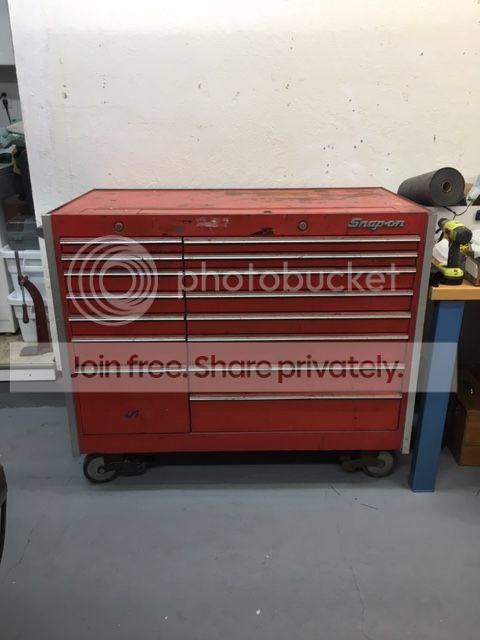
I started looking for a Matco or Mac box on CL, but then my cheapskate self found a cruelly used Snap On and I talked myself into believing a $600 beatup Snappy was better than a well-cared-for $1500 Matco, so here we go...

IMG_0959.JPG


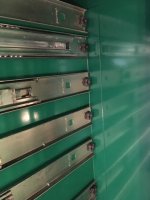
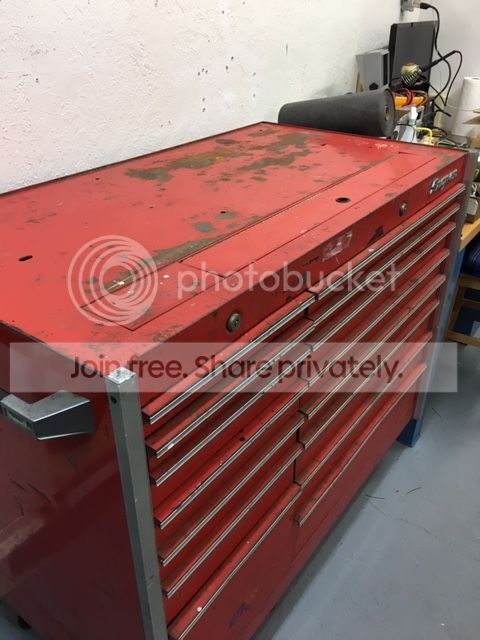
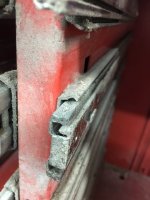
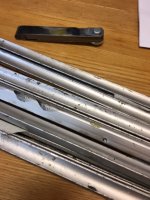
Supposedly it was owned by a diesel mechanic who then left it in a body shop to collect overspray in all its drawer slides. And I'm assuming he also had a goat that liked to gnaw on aluminum drawer trim.

IMG_0960.JPG


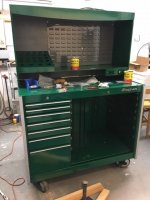
My goal is to get this looking "good-enough" by toolbox standards, and also make it into a workstation for my mill.
 
To avoid these ads, REGISTER NOW!
OP
D

Darby9

Well-known member
Joined
Jan 18, 2020
Messages
110
Location
San Francisco
Here it is torn down, and mostly ready for blast and powdercoat. I did some hammer and dolly work on a couple of the drawers to square them back up, but I'm not going for concours quality here. It's a toolbox.

I read a few posts on here about using the special Snap On tool to disengage the drawer slides from the box, but I was able to drill out the rivets, and then knock them free with a wooden block and a hammer. Maybe the older boxes like this have a simpler dent/bayonet system?

Anyway, took about a day's work and 64 oz of Sierra Nevada Torpedo Ale to get the trim off, slides out, drawer liners out, casters off, and the big dents turned into smaller dents.
 

Attachments

  • IMG_0987.JPG
    IMG_0987.JPG
    103.1 KB · Views: 352
  • AB21EFC2-6F36-4A47-AF48-D98596795C09.jpg
    AB21EFC2-6F36-4A47-AF48-D98596795C09.jpg
    112.8 KB · Views: 329
  • D871D128-9EC2-4E86-85CC-10FAE69E14D3.jpg
    D871D128-9EC2-4E86-85CC-10FAE69E14D3.jpg
    75.7 KB · Views: 334
  • IMG_1016.JPG
    IMG_1016.JPG
    135.1 KB · Views: 321

Wamsutta

Well-known member
Joined
Jan 8, 2014
Messages
10,867
Location
Amarillo, Texas
Here it is torn down, and mostly ready for blast and powdercoat. I did some hammer and dolly work on a couple of the drawers to square them back up, but I'm not going for concours quality here. It's a toolbox.

I read a few posts on here about using the special Snap On tool to disengage the drawer slides from the box, but I was able to drill out the rivets, and then knock them free with a wooden block and a hammer. Maybe the older boxes like this have a simpler dent/bayonet system?

Anyway, took about a day's work and 64 oz of Sierra Nevada Torpedo Ale to get the trim off, slides out, drawer liners out, casters off, and the big dents turned into smaller dents.


Yes the older boxes didn't have that claw thing on the slides that requires the special pry bar.

Here's the paint code and the powder coat code if you decide to go for the authentic look.

Snap-on Red: -- PPG Ditzler 73504 -- AR320 Resin
 
OP
D

Darby9

Well-known member
Joined
Jan 18, 2020
Messages
110
Location
San Francisco
Here's the paint code and the powder coat code if you decide to go for the authentic look.

Thanks Wamsutta. I considered a stock red, but I don't have any other Snap On boxes I have to match it with, so I'm going green. It may look like a road sign--we'll see.
 
OP
D

Darby9

Well-known member
Joined
Jan 18, 2020
Messages
110
Location
San Francisco
OK, the custom bits: I hunted for a middle box or a hutch for a little while, but I need hardware space more than drawer space, and I'd have to modify any hutch I bought. So, I drew up this hutch-ish thing. There's a toolholder for the mill, hanging bins for hardware, a shelf I'll clutter immediately, a power outlet with USB charger, and lights. I do a fair amount of sheet metal design work in Solidworks, and tried to keep it simple.

I considered making this myself on a friend's plasma table & brake, but work got crazy in December, and I sent it out. When I came back from vacation, there was a pallet of 16 ga steel waiting for me to mock up.

I put most of the holes and slots into the CAD, but left out a few on purpose so I could square it all up and match drill stuff like the mounting holes into the box top. I also designed this before the drawers were out, so I didn't know what structure I'd have to avoid inside the box...
 

Attachments

  • IMG_1010.JPG
    IMG_1010.JPG
    97.5 KB · Views: 333
  • IMG_1008.JPG
    IMG_1008.JPG
    94.2 KB · Views: 367
  • IMG_0986.JPG
    IMG_0986.JPG
    67.9 KB · Views: 369
Last edited:

Speed-Racer

Well-known member
Joined
Aug 25, 2008
Messages
731
Looking forward to seeing your restored tool box and custom hutch. Thanks for posting.
 

Ohmthis

Well-known member
Joined
Jan 20, 2013
Messages
3,009
Location
Outside of Louisville KY
This looks great! I have a KR 660 that I want to restore/clean up. I can’t get myself to completely take it down. Im looking at wrapping the box and drawers with vinyl.
 
OP
D

Darby9

Well-known member
Joined
Jan 18, 2020
Messages
110
Location
San Francisco
This looks great! I have a KR 660 that I want to restore/clean up. I can’t get myself to completely take it down. Im looking at wrapping the box and drawers with vinyl.

It's not that bad--it took me a couple afternoons to get it apart and cleaning the slides has been the most time consuming part since then. If I'd stripped the paint myself, that would have been a PITA, but I was happy to leave that to the sand blaster.
 
OP
D

Darby9

Well-known member
Joined
Jan 18, 2020
Messages
110
Location
San Francisco
While the cabinet and drawers were off at the spa, I freshened up the casters and the drawer trim. Most of these pics are of the Before state. I guess I was more impressed with how ugly they were when I started. I started sanding and polishing one piece of drawer trim, and realized they were too far gone to really polish, so I got the gunk and overspray off with acetone, filed down the gouges, and hit it all with some Scotchbrite--it's a reasonable compromise.

The drawer slides sucked. I sat at my garage door with a wire brush, some rags, and a gallon of diesel. For hours. But, I saved 26 out of 30. The ones from the bottom drawers are bent to hell and missing balls out of their bearings.

Thanks for reading. It'll get prettier, I promise.
 

Attachments

  • D871D128-9EC2-4E86-85CC-10FAE69E14D3.jpg
    D871D128-9EC2-4E86-85CC-10FAE69E14D3.jpg
    75.7 KB · Views: 341
  • IMG_0973.JPG
    IMG_0973.JPG
    111.8 KB · Views: 336
  • IMG_1139.JPG
    IMG_1139.JPG
    127.7 KB · Views: 333
  • IMG_1082.JPG
    IMG_1082.JPG
    118.6 KB · Views: 336
  • IMG_1080.jpg
    IMG_1080.jpg
    55.8 KB · Views: 338
  • IMG_1078(1).jpg
    IMG_1078(1).jpg
    54 KB · Views: 344
OP
D

Darby9

Well-known member
Joined
Jan 18, 2020
Messages
110
Location
San Francisco
That is impressive. I can't wait to see the end result.

Thanks! So far it's been mostly elbow grease and patience. I have more of one than the other.

UPS man had presents today from Snap On--detent/stopper thingees and a new set of drawer slides. Big Boy Christmas!
 

Attachments

  • IMG_1142.JPG
    IMG_1142.JPG
    115.5 KB · Views: 353
OP
D

Darby9

Well-known member
Joined
Jan 18, 2020
Messages
110
Location
San Francisco
My GJ posting is running slightly behind reality, but here's the return of the Green Monster and start of its re-assembly. The color was a solid decision.

Paint quality: I'm really happy with what I got. I did minimal prep, and took this to a shop that does industrial powder coating. They media blasted and powdercoated everything with a Cardinal-brand color they stock. If it was a Ferrari and I spent $20K, I'd be annoyed. But it's not and I did not, so I'm juiced by how well it turned out.

I mounted a single 3' LED tube from Home Depot in the top of the "hutch", and the rotary switches operate the light and the outlet independently, so I can either leave the bench live to charge something, or shut it all down without unplugging a bunch of stuff.
 

Attachments

  • IMG_1106(1).JPG
    IMG_1106(1).JPG
    101.6 KB · Views: 470
  • IMG_1086.JPG
    IMG_1086.JPG
    120.9 KB · Views: 467
  • B7015234-BC2E-4610-81A9-BE05C696D125.jpg
    B7015234-BC2E-4610-81A9-BE05C696D125.jpg
    117.7 KB · Views: 417
Last edited:

fatfillup

Well-known member
Joined
Jan 17, 2009
Messages
10,276
Location
Finksburg, Md
That is coming along beautifully. The KR1000 is one of the best boxes Snap on ever made IMO and lots of other folks too.

You will end up with a sweet looking, high quality, UNIQUE tool box that will look good in your shop.

And that box will last the rest of your life,,,,,,,,,,,,,,,,,,or until you fill it up and need more space GJ style:lol_hitti
 
OP
D

Darby9

Well-known member
Joined
Jan 18, 2020
Messages
110
Location
San Francisco
Thanks for all the kind words. :beer:

That is coming along beautifully. The KR1000 is one of the best boxes Snap on ever made IMO and lots of other folks too.

You will end up with a sweet looking, high quality, UNIQUE tool box that will look good in your shop.

And that box will last the rest of your life,,,,,,,,,,,,,,,,,,or until you fill it up and need more space GJ style:lol_hitti

It's a tank, all right. I'm thinking this one will last me a long while. I'm not a pro, and I've survived with smaller boxes for a long time.

Great job! I’m excited it with all the drawers in. Not to be nosy, do you mind disclosing what you have into box restoration?

I'm guessing it'll come in a little under $2k. And if I think it's going over, I'll stop doing the math. :)

Box: $600
Outsourced work (sheet metal, plus blast & powdercoat 28 pieces): $1000
Electrical (light, switches, outlet, 20' cord): $100ish
Drawer liners and top mat: $125
Machine screws, rivets, gray paint for the back etc: $50ish.
 
To avoid these ads, REGISTER NOW!

designer485

Well-known member
Joined
Jan 12, 2010
Messages
547
Location
Orange County, CA
Great job on the restoration! The KR1000 is just such a classic. There is nothing like loading up a freshly redone box.

Be sure to post finished pictures with all the drawers back in.
 
OP
D

Darby9

Well-known member
Joined
Jan 18, 2020
Messages
110
Location
San Francisco
Re-assembly progress... The back is 3/8" plywood, painted to match a bin rack I already had. Put new stopper/detent thingees on the slides, and got the lock mechanisms back together before starting on drawers.

I numbered everything as it came apart and the painters preserved my numbers, so it's gone back together pretty well. Current Me is grateful to Previous Me for that. But I wish Previous Me had taken better pictures of the locking linkage...

attachment.php
 

Attachments

  • IMG_1150.JPG
    IMG_1150.JPG
    101.2 KB · Views: 269
  • IMG_1144.JPG
    IMG_1144.JPG
    82.8 KB · Views: 267
  • IMG_1147.JPG
    IMG_1147.JPG
    105.6 KB · Views: 1,297
Last edited:

njride

Well-known member
Joined
Sep 1, 2011
Messages
646
Great job, i bought a kr1000 for 600 too a while ago, luckily it wasnt in a body shop but its pretty well used. I still felt like i got the deal of a lifetime at that price. You chose a great color too. I dont really need any slides but out of curiousity i was looking them up a while ago and i couldnt find where to get them. Did your snap on guy just happen to have some?
 

Ohmthis

Well-known member
Joined
Jan 20, 2013
Messages
3,009
Location
Outside of Louisville KY
Great job, i bought a kr1000 for 600 too a while ago, luckily it wasnt in a body shop but its pretty well used. I still felt like i got the deal of a lifetime at that price. You chose a great color too. I dont really need any slides but out of curiousity i was looking them up a while ago and i couldnt find where to get them. Did your snap on guy just happen to have some?

I emailed Snap On directly and got slides for my older box. I was honest in that I was not the original owner and needed some slides and could you hey help me with the correct ones. I gave them any info they needed from the box. They asked me how many I needed and sent them for free. That is great customer service.
 

Ohmthis

Well-known member
Joined
Jan 20, 2013
Messages
3,009
Location
Outside of Louisville KY
Thanks for all the kind words. :beer:


It's a tank, all right. I'm thinking this one will last me a long while. I'm not a pro, and I've survived with smaller boxes for a long time.


I'm guessing it'll come in a little under $2k. And if I think it's going over, I'll stop doing the math. :)

Box: $600
Outsourced work (sheet metal, plus blast & powdercoat 28 pieces): $1000
Electrical (light, switches, outlet, 20' cord): $100ish
Drawer liners and top mat: $125
Machine screws, rivets, gray paint for the back etc: $50ish.


Wowser!!! That’s quite a bit! The box is well worth what you have done to it.
 

Evilunclegrimace

Well-known member
Joined
Sep 24, 2015
Messages
868
Location
Erie Pa
The KRA 1000 is my favorite box. I purchased mine new in the late '80's for about $4,700.00. You have done a very nice job restoring yours and I really like the color. I might have to borrow your hutch idea if and when I get spare time and money to under take the project.
 
OP
D

Darby9

Well-known member
Joined
Jan 18, 2020
Messages
110
Location
San Francisco
Did your snap on guy just happen to have some?


Same as @Ohmthis--I contacted them direct.

Wowser!!! That’s quite a bit! The box is well worth what you have done to it.

It added up, for sure. The alternative was $1200 for a decent Mac or Matco, then rig up a Unistrut hutch with plywood shelves and a powerstrip and buy a CNC toolholder and... I'd end up with something just as functional but would look pieced together, and cost maybe $200 less. That's my usual MO, and I'm trying to do better. The collet holder drove the price up a little--chopping out all the little numbers takes laser time, and there are 48 PEM studs pressed into it to hold the plastic bushings I'll eventually machine.

I also want my shop to look a little more professional than it has. I don't have clients in it very often, but when I do, I want it to look like I'm worth the money they're paying me. No more repainted kitchen cabinets and MDF workbenches.
 

derek_m

Well-known member
Joined
Oct 5, 2014
Messages
142
That looks really good. I've been wanting to do this with my '88 KR-1000A. Tracking down parts has been difficult but interesting to hear that SO has been helpful.
 
OP
D

Darby9

Well-known member
Joined
Jan 18, 2020
Messages
110
Location
San Francisco
Just so we're on the same page; I'm talking about the KRL slides where you have a rear bayonet, a front bayonet, and then a 3rd claw thing a little ways rearward of the front bayonet.

This one doesn't have the 3rd claw, but it does have a rivet near the front edge. Drill that, and then whack the slide with a block of wood.

That looks really good. I've been wanting to do this with my '88 KR-1000A. Tracking down parts has been difficult but interesting to hear that SO has been helpful.

So far, they've been great. Last drawer slide is on back order, but supposedly on its way soon.
 
To avoid these ads, REGISTER NOW!
Top Bottom