To avoid these ads, REGISTER NOW!

I get paid to do this

nathanras

Member
Joined
Mar 22, 2017
Messages
17
Location
Anchorage, AK
I Have been wanting to start this thread for a while now and finely decided to do it. I am new at this so bear with me as i am learning the little tricks of this forum.

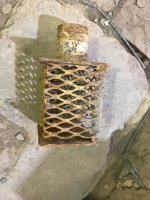
This thread is about all the cool tools and fun projects that I get to do at my job.

I work at a metal fabrication shop in Alaska. We do general fabrication but we specialize in tank fabrication. We are also a steel supplier so we have a large stock of steel and aluminum with some stainless. here is a list of the major machines that we have here.

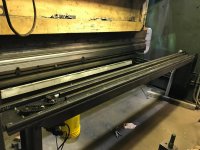
400 ton press brake 16ft long
1/2" x 12ft sheet shear
18" x 22" vertical band saw with 60 degrees of tilt in both directions
1/4" x 6' plate rolls
1" x 10' plate rolls
3/8" circle shear capable of doing a 14' circle
3/8" circle flanger
2 iron workers
Tank weld-off machine
to many welders to count mostly millers but some Lincolns
5 plasma cutters
4 oxy/propane torches
1 10 ton bridge crane (2-5 ton hoists on one bridge)
2 5 ton bridge cranes
1 3 ton bridge crane
30' x 60' Blast booth/Paint tent
3 forklifts largest capable of lifting 36,000 lbs
and a lot more but those are the big ones

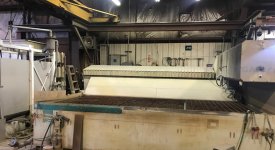
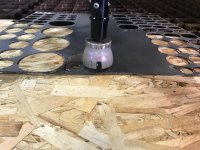
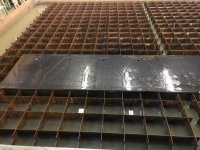
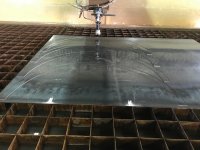
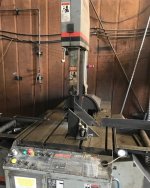
But my favorite and my main job is a Flow waterjet with a 6' x 12' table capable of cutting 10" of pretty much anything. It uses 60,000 psi water and a fine garnet sand to cut with erosion thru most all materials. it is an amazing machine.

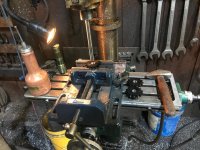
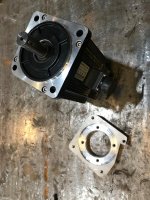
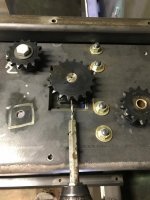
A little about me. I have been working here for about 13-1/2 years now and running the waterjet for about 13 years. My main job is to run the waterjet and do the drawing/programming for it. But my job title doesn't end there, I am also the shops lead electrician, maintenance, mechanic, IT, the guy every one comes to when something isn't working. I service, fix and maintain almost every piece of equipment in the shop. I average 8-10 hour days but when there is a big projects I work long hours. My record was about 55 hours over 3 days. I knew how to operate almost every machine in the shop. The cool thing about my job is after hours I have full access to the shop and all of the machines I just have to pay for materials (which I get a employee discount on).

Any questions feel free to ask.

Nathan
 

Attachments

  • Waterjet.jpg
    Waterjet.jpg
    148.3 KB · Views: 786
To avoid these ads, REGISTER NOW!

royce

Well-known member
Joined
Jun 22, 2014
Messages
3,110
Location
fairbanks ak
Welcome Nathanras,
That is a very nicely equipped shop.
Is the shop Greer tank, by chance?
What a treat for you to have all that equipment to use.
I'm up in Fairbanks and enjoy tinkering with steel myself, but are limited in the tooling I have.
Hope you post some of your projects.
Royce
 
OP
N

nathanras

Member
Joined
Mar 22, 2017
Messages
17
Location
Anchorage, AK
How did you get started in doing all of that?

I got staterd when i was 17. started pushing broom then as a fabricator/welder then waterjet. For 2 years in high school I went to a carer center for high school for welding half days regular class the other half.

Welcome Nathanras,
That is a very nicely equipped shop.
Is the shop Greer tank, by chance?
What a treat for you to have all that equipment to use.
I'm up in Fairbanks and enjoy tinkering with steel myself, but are limited in the tooling I have.
Hope you post some of your projects.
Royce

I would definitely like a couple of more tools mainly a lathe and a real mill (we have a drill press/mill that barely cuts it as a mill but i make it work).

It might be I would rather not say

Should have some pics up later to day. I am currently working on a new back gauge for our press brake. Been doing some milling work and taped over 70 holes this morning.
 
Last edited:
OP
N

nathanras

Member
Joined
Mar 22, 2017
Messages
17
Location
Anchorage, AK
got some pics of some of what I have done today.

did a little waterjet cutting this afternoon. customer wanted some 4-1/8" circles cut from 1/4" A36 steel.
https://www.garagejournal.com/forum/attachment.php?attachmentid=1035106&stc=1&d=1595630306

been doing some work on the mill for the back gauge project today.

chucking reamers are way faster than setting up the boring bar to get a fairly persice hole in some sprockets.
https://www.garagejournal.com/forum/attachment.php?attachmentid=1035107&stc=1&d=1595630306

when you don't have a lathe but have lathe tooling you make it work
https://www.garagejournal.com/forum/attachment.php?attachmentid=1035108&stc=1&d=1595630770
 

Attachments

  • IMG_7238.jpg
    IMG_7238.jpg
    148.1 KB · Views: 485
  • IMG_7237.jpg
    IMG_7237.jpg
    157.5 KB · Views: 455
  • IMG_7239.jpg
    IMG_7239.jpg
    117.2 KB · Views: 445

ddawg16

Well-known member
Joined
Jul 11, 2008
Messages
21,005
Location
S. California
You do have a cool job.....

But those water jet cutters are a ***** to clean out. How long between cleaning?

Some companies have 2 beds, so one can be in operation while the other one is being cleaned.
 

Bears Fan

Well-known member
Joined
Jan 26, 2012
Messages
3,439
Location
Indiana
Awesome shop! Would love to have access to a waterjet, subscribing to see more of your projects :beer:
 

Bopbop

Well-known member
Joined
May 25, 2016
Messages
180
Location
Savannah,Ga
Nice set up there Nathanras. Anchorage is a beautiful place to fly into. Was there a couple years ago to see my Father-in-law before he past in Kenai. Just to paint a picture I grew up in south Georgia and was going to Alaska in the middle of Feburary
 

nadogail

Well-known member
Joined
Jan 23, 2009
Messages
31,982
Location
Coronado, CA
Welcome to the forum.

You make me want to return for a visit, I graduated form Anchorage High School,there was only one high school at the time, in 1958.

Several years ago, before Buck Knives moved from California to Idaho, I was taken on a tour of their El Cajon, CA factory where they cut the blades of their knives from plate steel with a waterjet.
 
OP
N

nathanras

Member
Joined
Mar 22, 2017
Messages
17
Location
Anchorage, AK
It used to be a pain to clean out but now I have a sand/mud removal system that I built I never have to dig it out. It used to take 2 guys about 1-1/2 days to dig it out. the problem is that all of the little cutouts that fall thru the grates lock together with the sand and make it impossible to dig with a shovel. The sand/mud/cutouts have to be broken up with a rotary hammer in hammer mode with a chisel just to be able to shovel it. Its like trying to shovel hardened concrete.

The system starts with 4 intake screens on a 1-1/2" pipe in the catch tank. there are 2 of these pipes in the tank.
attachment.php


The sand/mud then goes threw a screen filter to keep out the big chunks that made it past the intake screens out of the pump.
attachment.php


It then gets pumped by the 1-1/2" air powered diaphragm pump
attachment.php


From the pump it goes into a home built cyclone filter. The input is on the side. Heavy solids/sand goes out the bottom. Instead of having a pressurized bottom catch container thee is a metering disk to keep the flow working properly. The light mud water goes out the top.
attachment.php


Both outs from the cyclone filter dump into supper-sacks that are hanging from custom lifting frames that sit on a support frame. When they are new the bags filter the water and take several hours to over fill. Spilling over the top of the bags is fine as the bags are meant to be a settling chamber not a filter that is just a bonus.
attachment.php


The water from the bags falls into a catch pan underneath the bags. There is a sump pump in there that pumps that water up into a custom set of "sluice boxes" that to get almost all of the mud out of the water. There is a small catch tank on the last sluice box that has another sump pump that pumps the water back into the waterjet catch tank. compared to what came out of the waterjet catch tank the going back in is pretty clean.
attachment.php


In the future I do want to put a set of bag filters inline after the sluice boxes to get the last bit of mud but that is a low priority. Bag filter housings are expensive so i will be building them. The system only works when the waterjet is running to mix up the sand in the bottom of the tank. Otherwise it is just cycling water and not taking out any of the sand.

I took these pictures first thing in the morning so the system hasn't been running since last week.

Also just so everyone knows I update this thread from my work computer (of coarse never during work) so I won't be responding on the weekends or at night.
 

Attachments

  • 7-27-20 sluice box.jpg
    7-27-20 sluice box.jpg
    104.6 KB · Views: 1,898
  • 7-27-20 sand remover bags.jpg
    7-27-20 sand remover bags.jpg
    103.8 KB · Views: 1,903
  • 7-27-20 sand remover cyclone filter.jpg
    7-27-20 sand remover cyclone filter.jpg
    73.2 KB · Views: 1,906
  • 7-27-20 sand remover.jpg
    7-27-20 sand remover.jpg
    134.9 KB · Views: 1,918
  • 7-27-20 sand remover screen filter.jpg
    7-27-20 sand remover screen filter.jpg
    151.4 KB · Views: 1,926
  • 7-27-20 sand remover intake screen.jpg
    7-27-20 sand remover intake screen.jpg
    112.9 KB · Views: 1,931
To avoid these ads, REGISTER NOW!

Copymutt

Well-known member
Joined
Sep 3, 2016
Messages
3,392
Location
Colorado
My neighbor is the most tenured employee at Stoneage Tech. They make your waterjet pump. One heck of a company. Started in mine applications and developed the tech for municipal sewer, oilfield gathering and jet cutting. They are still riding a wave of several million dollars a month in sales.
 

PelicanPines

ALLIANCE MEMBER
Joined
Apr 30, 2014
Messages
38,116
Location
New Jersey, USA, Earth, My own reality
In line with what you do for a living. Years ago... I wrote a sheet good inventory on an IBM AS400... that gave a digital representation of what was left on the sheet of metal after a job. Their inventory started with stock a foot thick and went down... as you can imagine managing that inventory could save or break the profit on a project. FYI... this all predated PC Windows.

The project manager could scroll thru the inventory on his computer before "pulling" a freakishly large slab of metal.

Oh... it wasn't a waterjet.
 
OP
N

nathanras

Member
Joined
Mar 22, 2017
Messages
17
Location
Anchorage, AK
Did some more waterjet cutting today.

cut some 1/16" nylon for some washers for the sprockets for the press brake project that I have been working on.
attachment.php


also cut some 1/2" UHMW (ultra high molecular weight) plastic for the same project but didn't get a picture of that.

This afternoon I cut some 1/2" Aluminum stair stringers for a customer. They said there should be 3-4 more sheets of them if these work out correctly.
attachment.php


If anyone wants to see something specific in the shop just let me know and I will try to do a wright up and pictures on it.
 

Attachments

  • 7-27-20 nylon.jpg
    7-27-20 nylon.jpg
    153.8 KB · Views: 1,720
  • 7-27-20 1-2 Aluminum.jpg
    7-27-20 1-2 Aluminum.jpg
    141.6 KB · Views: 1,718

4 FN 27

ALLIANCE MEMBER
Joined
Oct 19, 2015
Messages
4,635
Location
Minnesnowta
How did I miss this???

Pretty kool stuff. Looking forward to seeing more of it.

Nice to see a guy with skills and passion doing something you love. Good for you!!!:rocker:

What is the thickest to date you have cut?

My thickest so far is 2.563 D Full Hard Tool Steel and 3 inch thick UHMW.

Now I may or may not get paid to run the Water Jet (not to mention the Design Dept, CNC Mill, Manual Mill/lathe, Weld Shop and Press Brake)...but there is no time clock and I/we can have a beer on the job if required.:bounce:

One day my Nephew stopped by and since I was running the WJ I did not hear him come in.

He went in the Office and mixed 2 Jack Cokes came out and handed me one. And then said as he passed the Glass..."You look like you could use some cutting fluid."
 
OP
N

nathanras

Member
Joined
Mar 22, 2017
Messages
17
Location
Anchorage, AK
So far the thickest that i have cut has been some 4" A36 steel. but my program will take up to 10".

The hardest that I have ever cut successful has been some custom planer blades. I did try to cut some carbide blades one time but it took to long and didn't relay cut all the way thru.

Didn't have time to post anything yesterday but did lots of stuff.

Started off cleaning out and replacing the cutting fluid on out vertical band saw. Here it is done.
attachment.php


Then I cut some 3/16", 10ga and 3/8" A36 steel for a fab job. I will get some pictures when one of the fabricators finishes it.
attachment.php


attachment.php


attachment.php


While all of that was cutting I completed fab work on the cross frame for the back gauge project and got it installed. Then placed the spacer/support bars and got the UHMW that I cut last week ready to install.
attachment.php


attachment.php
 

Attachments

  • 7-28-20 backgauge crossbar b.jpg
    7-28-20 backgauge crossbar b.jpg
    141.1 KB · Views: 1,117
  • 7-28-20 backgauge crossbar.jpg
    7-28-20 backgauge crossbar.jpg
    138.4 KB · Views: 1,114
  • 7-28-20 waterjet parts c.jpg
    7-28-20 waterjet parts c.jpg
    153.9 KB · Views: 1,119
  • 7-28-20 waterjet parts b.jpg
    7-28-20 waterjet parts b.jpg
    147.7 KB · Views: 1,121
  • 7-28-20 waterjet parts a.jpg
    7-28-20 waterjet parts a.jpg
    150.5 KB · Views: 1,125
  • 7-28-20 band saw.jpg
    7-28-20 band saw.jpg
    117.3 KB · Views: 1,128
OP
N

nathanras

Member
Joined
Mar 22, 2017
Messages
17
Location
Anchorage, AK
So here is what I have done so far today.

A little bit about the back gauge project that I have been working on. About 5 years ago our old manual back gauge on our press brake wore out. I designed and started to build a new back gauge from scratch. the design uses linear bearings and ball-screws for the travel. It is powered by 2 AC Servo motors, 1 for front to back movement and 1 for up and down movement. the 2 sides are connected with roller chain. To save money I bought most of the parts from china, every thing is high quality but at a cheaper price. The AC Servo motors are controlled with a basic touch screen controller, you put in the distance you want the back gauge and it will go to that position. About a month ago I finely have been able to get back on the project.

When I first made my Solidworks model i didn't have all of the parts yet so i was going off of the motor specs online for the motor mount pattern. I made a mistake and didn't verify the actual motor mount pattern before i cut the cross frame. The pattern that I cut was to small so i cut a piece of 1" Aluminum with the bolt patterns. Then machined out part of one side for the step on the motor flange and taped the holes. Because I based my design on the smaller motor mount I had to put a notch to clear the chain tensioner brackets.

I started today mounting the UHMW chain guilds to the cross frame and then mounting the adaptor plate to the motor.
attachment.php


attachment.php


The ends of the ball screws come machined to a metric dimension. because of this I decided to mount the sprockets by first using a chucking reamer to get the hole in the sprocket to the right size. Then I drilled 3 holes in the sprocket, and taped 1 of them for a setscrew. To make sure that the setscrews don't slip on the shaft I drilled into the shaft a little bit. To make sure that I got the holes lined up I used the 1 taped hole on the sprocket to hold the sprocket in place while I used the 2 other holes a guides to drill the shaft. Then remove the sprocket and tap the other 2 holes. Then reinstall it back on the shaft and drill the the last hole. Here is where I encountered a problem I don't have a drill bit long enough to clear the cross frame so I made a extension. I drilled a hole in the end of some 7/16 hex shaft that i have laying around. Then drilled and taped it for a setscrew. It came out perfect no wobble at all.
attachment.php


attachment.php


I hope all of that makes sense.
 

Attachments

  • 7-29-20 ac servo and adaptor.jpg
    7-29-20 ac servo and adaptor.jpg
    121.2 KB · Views: 1,082
  • 7-29-20 ac srevo with adaptor.jpg
    7-29-20 ac srevo with adaptor.jpg
    91.6 KB · Views: 1,079
  • 7-29-20 extended drillbit.jpg
    7-29-20 extended drillbit.jpg
    112.8 KB · Views: 1,082
  • 7-29-20 extended reach drillbit.jpg
    7-29-20 extended reach drillbit.jpg
    84 KB · Views: 1,080
OP
N

nathanras

Member
Joined
Mar 22, 2017
Messages
17
Location
Anchorage, AK
While i was working on the back gauge this morning the waterjet was cutting some custom brackets from 1/8" steel. This cut took a little over 3 hours to cut 50 brackets.
attachment.php


This afternoon I got the rest of the sprockets mounted and the chain cut and in place.
attachment.php


attachment.php


attachment.php


Should have it moving up and down tomorrow.
 

Attachments

  • 7-29-20 backgauge chain b.jpg
    7-29-20 backgauge chain b.jpg
    149.7 KB · Views: 1,075
  • 7-29-20 backgauge chain.jpg
    7-29-20 backgauge chain.jpg
    149.5 KB · Views: 1,073
  • 7-29-20 backgauge sprockets.jpg
    7-29-20 backgauge sprockets.jpg
    147 KB · Views: 1,068
  • 7-29-20 waterjet brackets.jpg
    7-29-20 waterjet brackets.jpg
    107 KB · Views: 1,099
OP
N

nathanras

Member
Joined
Mar 22, 2017
Messages
17
Location
Anchorage, AK
What does the initial hole look like when piercing 4" steel plate?

Round

I only get weird looking piercing holes when i am piercing some soft or brittle materials. On steel it stays true and round.

The problem with the thick material is the pierce time. If I let it just sit there and pierce then it takes forever, about 10 minutes for 4" steel. But if I tell it to pierce on the fly, it starts moving as soon as the jet is established. Then it only takes about 3 minutes to get through 4" steel. In the past I have pre-drilled the pierce hole with a drill bit because I can drill faster then it can pierce on the thick stuff.


Didn't get any pictures today. But got some things cut for customers on the waterjet. I got the back gauge leveled with the machine. The machine is off by about 1/64" in 12ft but that is close enough. Also got the up/down part moving by the motor.
 
OP
N

nathanras

Member
Joined
Mar 22, 2017
Messages
17
Location
Anchorage, AK
Wow it has been a while since I updated this. I stopped posting because of how long it was taking me to wright every thing up. so from now on I will be just posting photos with a short description and if any one wants more info let me know and I will elaborate.


IMG_7321.JPEG
had the brake caliper on my truck seize up. just a little bit of ware.

IMG_7334.JPEG
IMG_8999.JPEG
IMG_8998.JPEGIMG_8997.JPEGIMG_8996.JPEG
got the backgauge operational. still have to make flip stop fingers and covers but it is working. in/out has a little backlash .010". but both have a target accuracy of less than .005". now i just have to get the guys to trust hop accurate it is.


IMG_7336.JPEG
love this vacuum lifter has a capacity of 2,000 lbs. and it can rotate material vertical. that is a sheet of 1/2" steel

IMG_7338.JPEGIMG_7345.JPEGIMG_8993.JPEG
had a crack in the high pressure cylinder on the pump (60,000 psi). the manufacture considers it a consumable part so only warrantees it for about 50-100 hours this one lasted about 3,000 hours
 
OP
N

nathanras

Member
Joined
Mar 22, 2017
Messages
17
Location
Anchorage, AK
page 2

IMG_7357.JPEG
what some of the parts that I cut last year.

IMG_7543.JPEG
came across this and thought it was funny because I am the driver for the loader that we have for plowing snow and it has a slow leak that sometimes ends up on the rim.

IMG_8495.JPGIMG_8496.JPEG
had to go repair one of our plastic tanks in the field. the bottom of that concrete casing is only about 3-4' wide I am 6'2" not a lot of space.

IMG_8539.JPEG
some railing panels that I designed and cut.

IMG_8609.JPEG
blown capacitor on one of the servo drives on the backgauge got it replaced working fine now

IMG_8778.JPEG
love cutting titanium on the waterjet
 
OP
N

nathanras

Member
Joined
Mar 22, 2017
Messages
17
Location
Anchorage, AK
page 3

IMG_8991.JPEGIMG_8992.JPEGIMG_9001.JPEGIMG_9002.JPEGIMG_9003.JPEGIMG_9004.JPEG
this is something that some of you will understand, some will be jealous, and some will be sad. i have cut over 800 of these 1/4" Aluminum adaptor rings for our plastic tanks in the last 2 1/2 years. all of the circles and the rest of the sheet goes to the recycler we don't keep any of the leftovers we don't have the room. we will be taking all of it soon lots of scrap.
 
To avoid these ads, REGISTER NOW!
Top Bottom