To avoid these ads, REGISTER NOW!

Shop Project: A DoAll Work Holding Jaw

A_Pmech

Well-known member
Joined
May 8, 2007
Messages
8,002
Location
IL
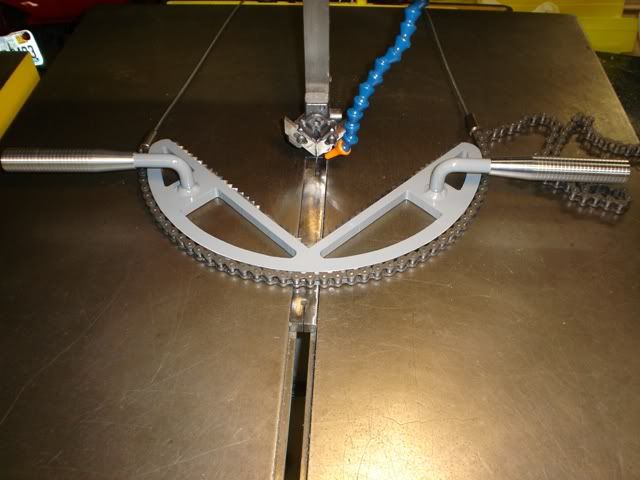
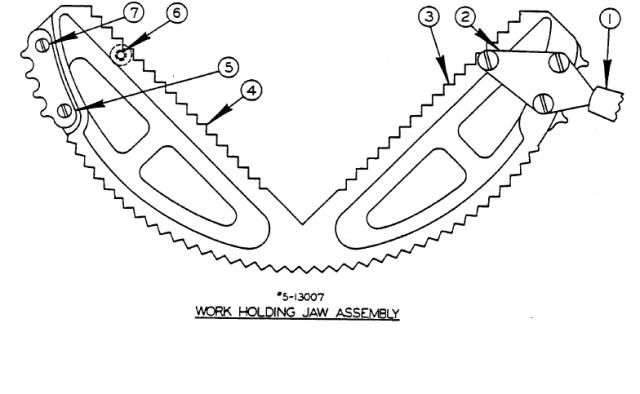
Now that the saw is nearing completion, I've been surfing Ebay looking for accessories. One particular accessory I have been looking for is a DoAll Work Holding Jaw. DoAll offers these new for $140, part number 5-13007 as evidenced by the DoAll V-36 parts manual:

workjaw1.jpg


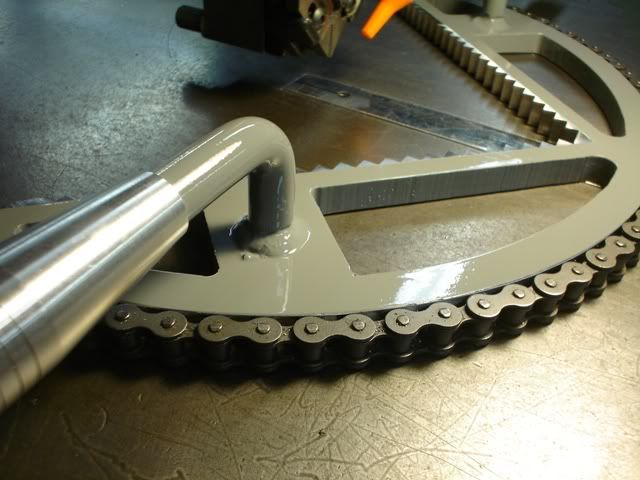
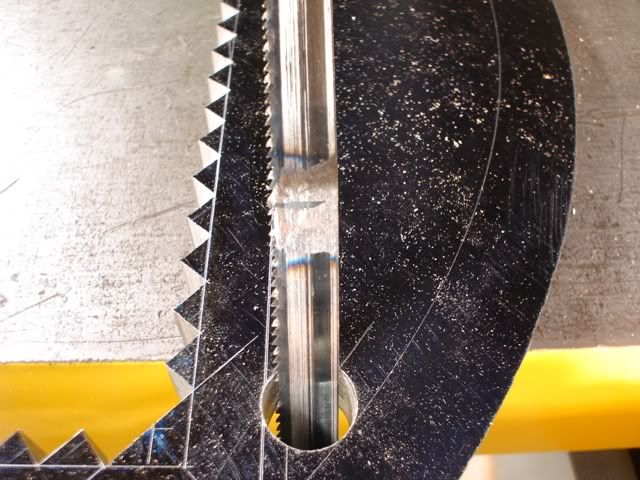
Unfortunately, here's an example of what shows up on Ebay occasionally in the neighborhood of $100:

workjaw2.jpg


It doesn't have any teeth left and that's the best of the bunch! So much for the "Ebay Discount"... Obviously, buying a used one is out of the question. So, I can either buy a new one or make one.

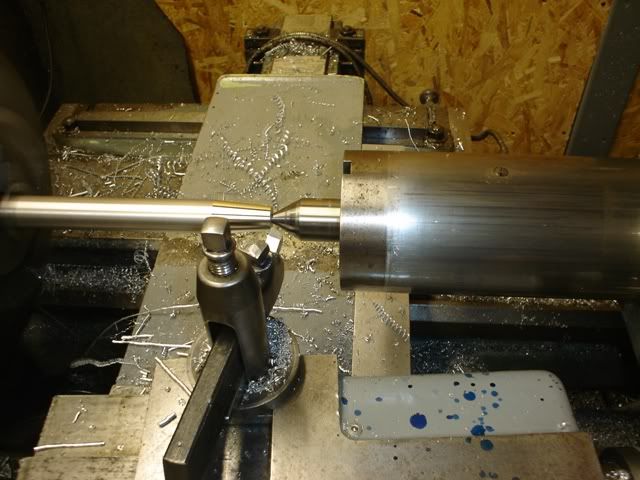
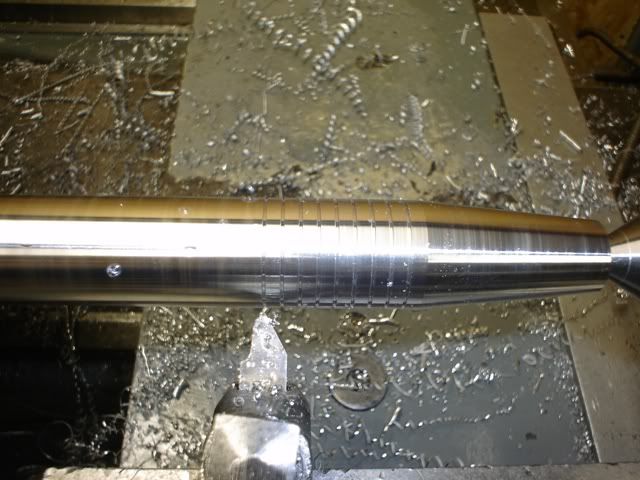
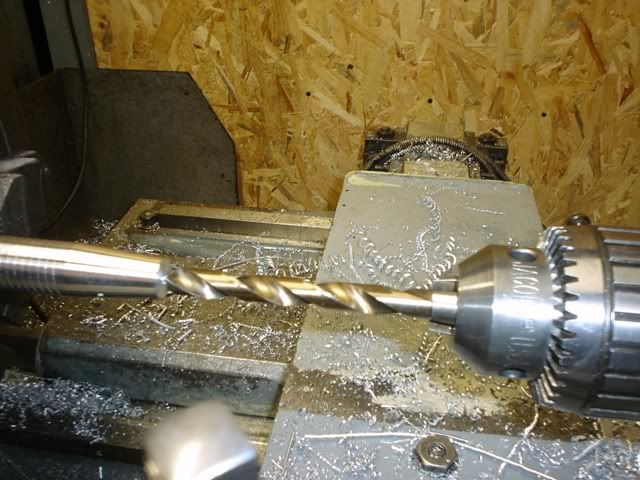
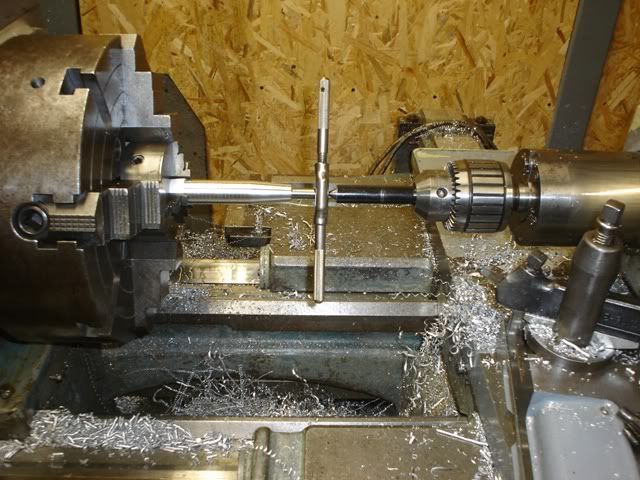
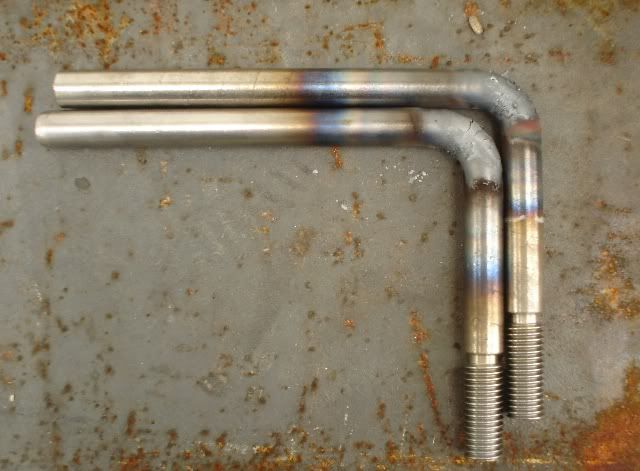
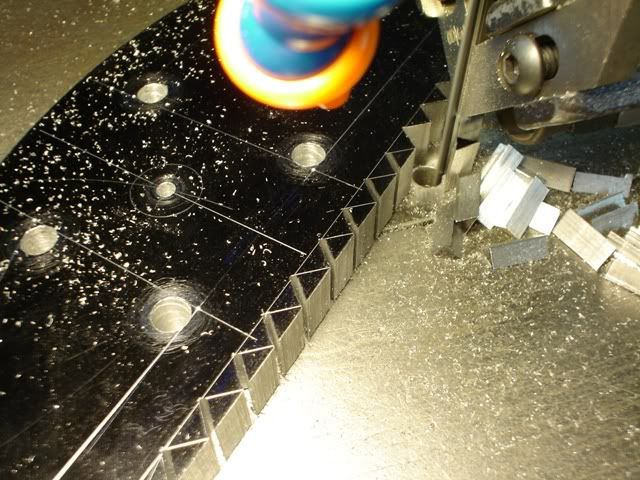
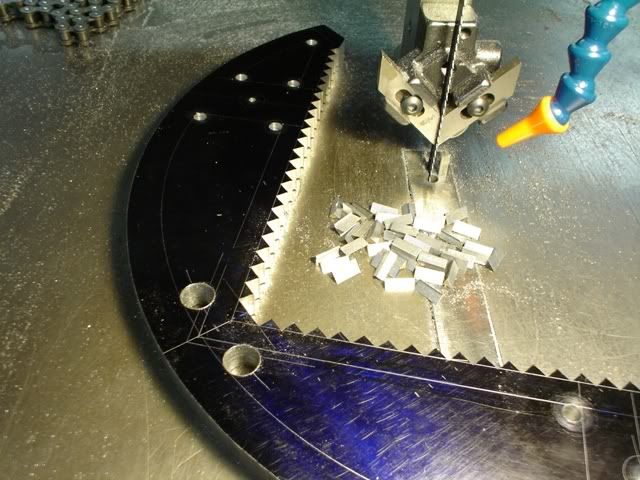
I've never been very impressed with the design of DoAll's work jaw, especially the angle of the handles. Since I just got the saw mechanically finished, I'm interested to see how it performs. Making a work holding jaw would be a good test of the saw. In addition, I could use some contouring practice and let's not forget, what's the fun in buying one?

So you guessed it, I'm going to make one!

:bounce:

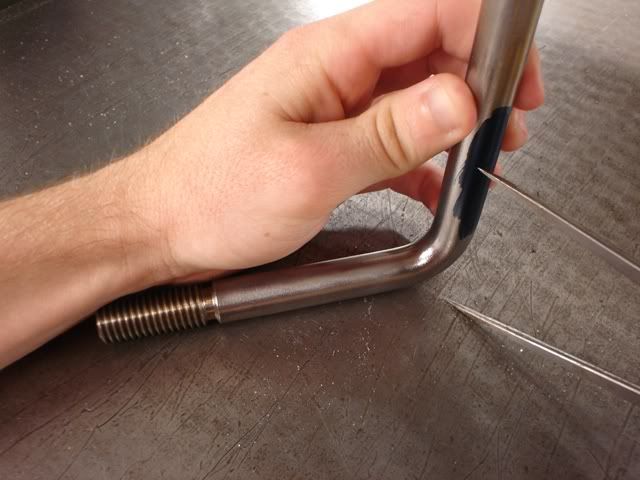
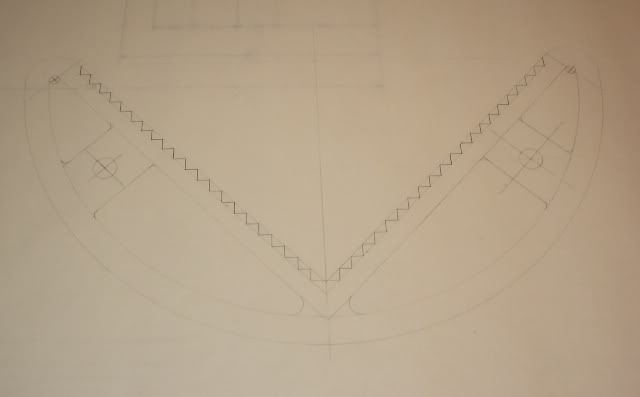
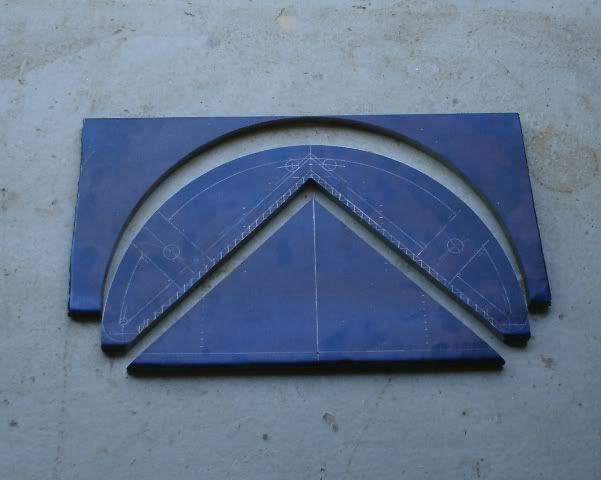
After studying DoAll's design, I decided on a few modifications to suit me and made a quick drawing of the rough geometry:

workjaw3.jpg


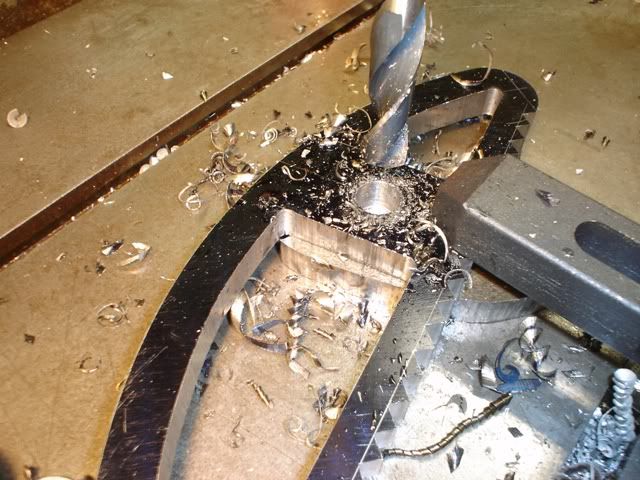
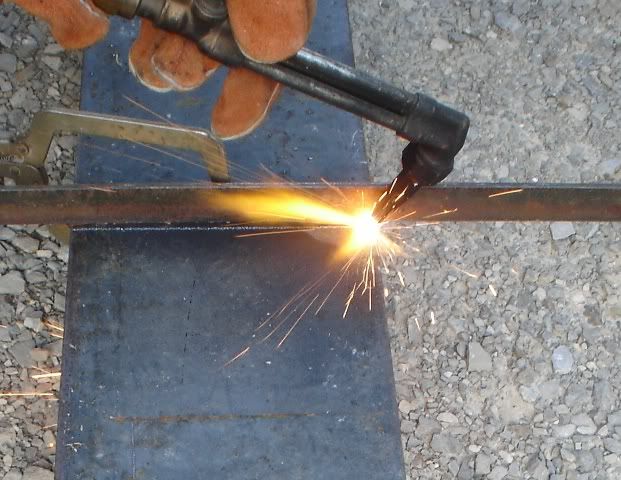
I found some 1/2" x 8" steel flat in the rack and torched off a section:

workjaw4.jpg


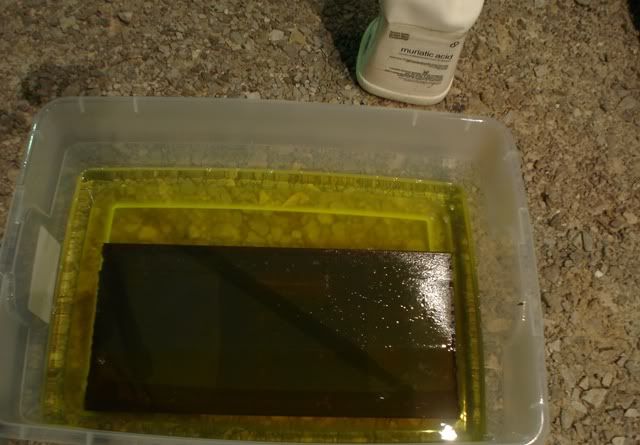
Then I pickled the steel in Muriatic Acid to remove the mill scale:

workjaw5.jpg


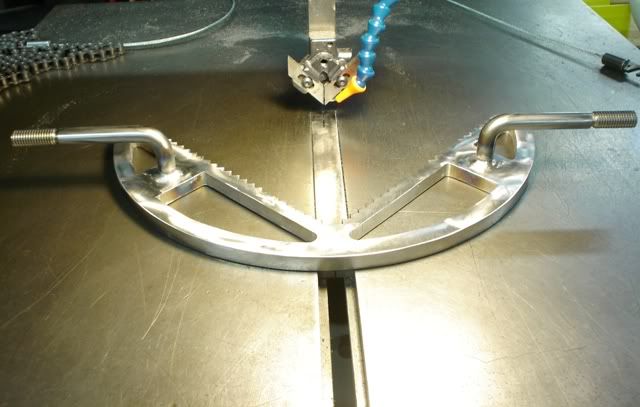
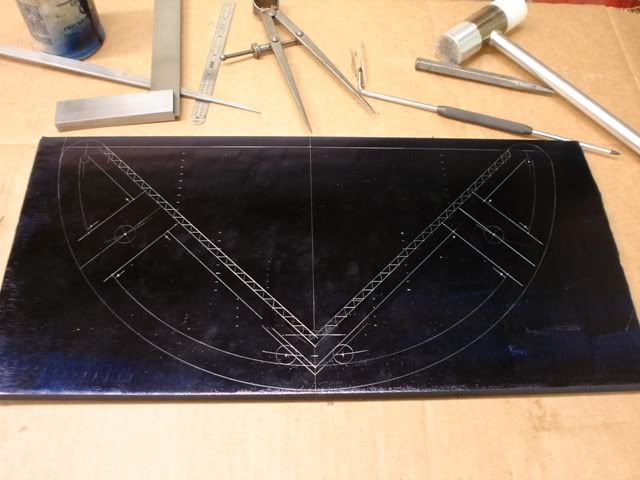
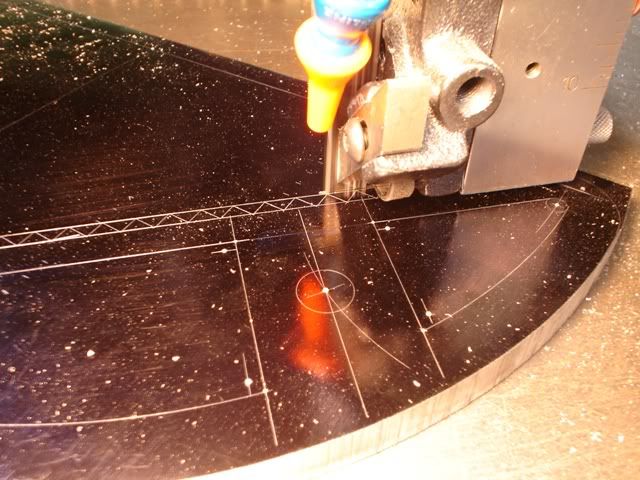
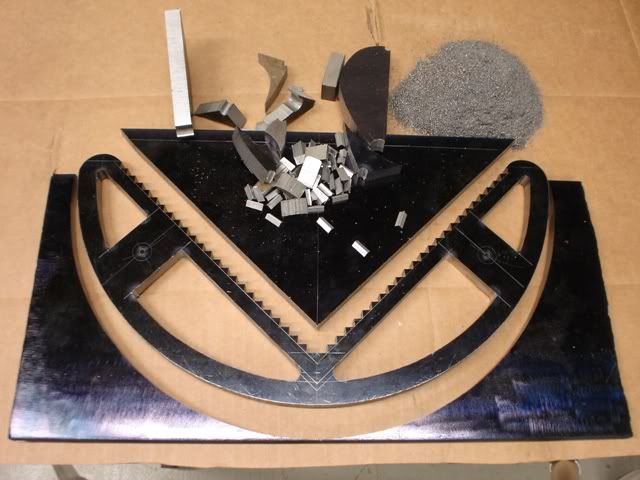
With the mill scale removed, I applied an even coating of layout fluid to the steel and got down to the business of laying out the work jaw. Here it is, nearly complete:

workjaw6.jpg


That's all for now...
 
To avoid these ads, REGISTER NOW!
OP
A

A_Pmech

Well-known member
Joined
May 8, 2007
Messages
8,002
Location
IL
After the layout, I began by removing the main pieces of excess metal:

workjaw7.jpg


workjaw8.jpg


Then I drilled all the holes except for the handle holes:

workjaw9.jpg


Back at the saw, I began sawing out the "teeth":

workjaw10.jpg


workjaw11.jpg


Switching to a 3/8" 18TPI band, I threaded it though one of the internal holes and welded it to begin the inside contouring:

workjaw12.jpg


A close-up of the weld. It isn't perfect, but it doesn't have to be. It will only be running a few minutes before being cut apart to start the next internal contour:

workjaw13.jpg


Finally, the contour sawing is done!

workjaw14.jpg
 

cronic

Well-known member
Joined
Jun 19, 2008
Messages
245
Looks great, very nice work. How many hours do you have in layout and cutting?
 
Last edited:
OP
A

A_Pmech

Well-known member
Joined
May 8, 2007
Messages
8,002
Location
IL
Looks great, very nice work. How many hours do you have in layout and cutting?

Hi Cronic,

Thanks! :)

About 3 hours drafting, 2 hours layout and 5 hours sawing.

DHcrocks said:
WOW! very impressive work.

Thank you. It's good evening entertainment. :D
 

DHCrocks

Well-known member
Joined
May 2, 2008
Messages
1,349
Location
Hawaii
did you use a jig for the teeth or is that just free hand, the cuts look very even and consistant. also, are you going to harden them? I'd hate to see all that hard work end up looking like them ebay specials.
 

Bolster

Well-known member
Joined
Jul 8, 2008
Messages
4,056
Location
Mexifornia
Love it.

I've used one of those (looking like your eBay samples) at the school several times; it certainly is handy, and even MORESO with teeth.

No, don't harden! Be nice to your bandsaw blades!!

Funny when I saw the layout it did not occur to me this could be a saw-only project. I expected to see you milling those steps with a honkin long endmill...live and learn, didn't know you could be that precise with the saw alone!

HEY, you can make a smaller one from your waste piece!

PS how did you saw out the nadir of the V?
 
Last edited:

Steve from Socal

Well-known member
Joined
Jan 27, 2009
Messages
3,491
Location
Hutchinson Ks.
John,

You have a lot more patience than I do! What are you going to do for sprocket teeth?

Do you have a miter gauge? I have been thinking about making one, they go for crazy money on flea bay.

Steve
 

red92s

Well-known member
Joined
Dec 16, 2009
Messages
334
This seems like one of those Chicken/Egg conundrums to me. It always blows me away that you can use a machine tool, to make parts that improve the funcionality of that same tool. It's sort of like trying to think about how it requires access to precision milling machines to make a precision milling machine . . . at some point, long long ago, someone had to make one without the benefit of having such equipment, right?
 

Bruce Lancaster

Well-known member
Joined
Apr 3, 2006
Messages
1,642
Chicken and egg...I once read about the development of the modern lead screw lathe for cutting threads. Don't have time to research and find my way back to the details, but basically the inventor made the best lead screw he could by hand, used it to make a slightly better one on a lathe, and continued on thus through multiple generations til he had a really good lead screw, capable of replicating itself for future lathes as well as its designed task of making precise and interchangeable threads. I wonder if the "DNA" of that lead screw is still directly in the ancestry of modern lathes...
This jaw cutting article is really amazing, starting with the engineering task of inventing a process possible with the available machine! Obviously the creator here could be led to a lathe, mill, drill press, whatever, and probably a chainsaw or hammer, chisel, and file, and he would immediately get to work on an alternate route to the jaw he wants!
 

Bolster

Well-known member
Joined
Jul 8, 2008
Messages
4,056
Location
Mexifornia
Chicken and egg...I once read about the development of the modern lead screw lathe for cutting threads. Don't have time to research and find my way back to the details, but basically the inventor made the best lead screw he could by hand, used it to make a slightly better one on a lathe, and continued on thus through multiple generations til he had a really good lead screw, capable of replicating itself for future lathes as well as its designed task of making precise and interchangeable threads. I wonder if the "DNA" of that lead screw is still directly in the ancestry of modern lathes...

You just blew my mind with this post. :eek2:
 

Bolster

Well-known member
Joined
Jul 8, 2008
Messages
4,056
Location
Mexifornia
Wow that looks great. For the uninformed...How does the work holder work?

Short pieces, that cutting friction would get too hot to hold by hand, can be held between teeth and pushed through the blade. Keeps the user's hands faar faar away from the blade.

Think of it as a fancy "push stick," as you'd use on a table saw.
 
OP
A

A_Pmech

Well-known member
Joined
May 8, 2007
Messages
8,002
Location
IL
did you use a jig for the teeth or is that just free hand, the cuts look very even and consistant. also, are you going to harden them? I'd hate to see all that hard work end up looking like them ebay specials.

Hi DH,

All the cuts are made freehand.

Being Mild Steel, it can't really be hardened. I can case harden it via several methods, but as Bolster pointed out, a jaw of this type is best left soft. That way, should I have a crash, the blade will keep it's teeth. The Ebay example was the victim of heavy abuse, probably by the same people that drill "arcs of shame" into drill press tables. :lol_hitti

Moose-LandTran said:
I think i speak on behalf of everyone when i say "Holy ****! That's freakin' amazing!"

Awesome work!

Tks Moose! I told you I was re-inventing the wheel. :bounce:

Bolster said:
Love it.

I've used one of those (looking like your eBay samples) at the school several times; it certainly is handy, and even MORESO with teeth.

No, don't harden! Be nice to your bandsaw blades!!

Funny when I saw the layout it did not occur to me this could be a saw-only project. I expected to see you milling those steps with a honkin long endmill...live and learn, didn't know you could be that precise with the saw alone!

PS how did you saw out the nadir of the V?

Thanks, Bolster!

Yeah, they definitely work better with teeth!

It can certainly be a saw-only project! It can even be done without a welder, if you make a jig to silver solder the blade.

The accuracy of the saw is only limited mainly by your ability to follow the line. Properly set up, the blade guides have about .002" slop.

After sawing down to the bottom on both sides, I started the blade at one side and made a minimum radius curve to the bottom of the other side, taking out a major chunk of the waste. Then, starting from the other side, I made a minimum radius curve into the other corner. There was still about 1/32" of material in the middle which I nibbled out.

designer485 said:
This is awesome, you do some great work!

Thank you! :)

DavidB said:
Wow that looks great. For the uninformed...How does the work holder work?

Hi David,

You can momentarily see a work jaw being used 39 seconds into DoAll's contour saw video here:


It's purpose is to help you control the workpiece. Metal sawing requires quite a bit more force than wood sawing. On small workpieces this will tire out your thumbs pretty quickly! The power feed chain can also be wrapped around the back of the work jaw to aid in applying the required force.

SteveinSoCal said:
John,

You have a lot more patience than I do! What are you going to do for sprocket teeth?

Do you have a miter gauge? I have been thinking about making one, they go for crazy money on flea bay.

Steve

I'm going to make the sprocket inserts from some 1/8" or 3/16" plate by laying out the profile, drilling the roots and sawing the rest of it. Then touch-up with a file. I'll slot the front sides of the jaw with a slitting saw, slide in the sprockets, match drill and install roll pins.

I don't. Yet... :)

Didn't see that one. I did see a circle cutting attachment for a 16" saw went on Ebay recently for $270! Nuts! I did save all the detailed photos though. :bounce:
 

speed bump

Well-known member
Joined
May 28, 2008
Messages
6,317
Location
Butte Montana
Looks good, i'm glad there are people out the that can do that kind work with a saw because I certainly am not one of them.


Hi Cronic,

Thanks! :)

About 3 hours drafting, 2 hours layout and 5 hours sawing.


Thank you. It's good evening entertainment. :D

I'm glad someone has time to invest in projects like, where i'm at in life even if I cut the make time to 5 hours I would rather buy it.
 
OP
A

A_Pmech

Well-known member
Joined
May 8, 2007
Messages
8,002
Location
IL
This seems like one of those Chicken/Egg conundrums to me. It always blows me away that you can use a machine tool, to make parts that improve the funcionality of that same tool. It's sort of like trying to think about how it requires access to precision milling machines to make a precision milling machine . . . at some point, long long ago, someone had to make one without the benefit of having such equipment, right?

At a certain critical mass, a machine shop can build and rebuild it's own machines. It's that critical mass I'm working towards. :)

Many, many machine tools were made in the 1800's by teenagers in backyard sheds with nothing but hand tools. Some of the guys who made them went on to become giants in the business. Very little is needed to build a basic lathe or a basic milling machine. The only real hurdle is cutting an accurate leadscrew.

Bruce Lancaster said:
Chicken and egg...I once read about the development of the modern lead screw lathe for cutting threads. Don't have time to research and find my way back to the details, but basically the inventor made the best lead screw he could by hand, used it to make a slightly better one on a lathe, and continued on thus through multiple generations til he had a really good lead screw, capable of replicating itself for future lathes as well as its designed task of making precise and interchangeable threads. I wonder if the "DNA" of that lead screw is still directly in the ancestry of modern lathes...
This jaw cutting article is really amazing, starting with the engineering task of inventing a process possible with the available machine! Obviously the creator here could be led to a lathe, mill, drill press, whatever, and probably a chainsaw or hammer, chisel, and file, and he would immediately get to work on an alternate route to the jaw he wants!

Bruce, I believe you're talking about Henry Maudslay.

As far as "DNA", there's probably some truth to that. Although many companies did indeed invent their own machines for making accurate screw threads and may have also made their own screws in-house. As an example, all the leadscrews for American lathes in the 1940's were made on one machine. (No mention of where their original screw came from though):

leadscrew.jpg


A lot of machining is figuring out how to "make do" with what you have. Metals and machining in general is very unforgiving of poor approach, it forces you to have a good plan before you make the first cut. A lot of getting things done in machining is knowing what works and what doesn't and applying that to the plan before you "cut yourself into a corner", so to speak. :headscrat:shocking:

Bolster said:
Think of it as a fancy "push stick," as you'd use on a table saw.

"Fancy push stick"... Yeah, that's it! :beer:

warmpancakes said:
wow I gave 2 of them with the saw I just sold, no where near as nice as yours

Glad to hear you got it sold. Thanks! :thumbup:
 
To avoid these ads, REGISTER NOW!

red92s

Well-known member
Joined
Dec 16, 2009
Messages
334
Annnnnndddddd once again I am humbled not only by your attention to detail, but also your historical knowledge of the trade and tools.
 

Bruce Lancaster

Well-known member
Joined
Apr 3, 2006
Messages
1,642
Pretty sure Maudsley is the right guy...he was pretty much the last major inventor in the road to modern screw cutting on lathes. There were older lathes using the general idea of a lead screw, but M I think got to the modern layout and achieved a serious level of precision in the screw that allowed the development of interchangeable bolts. Have not found the right details about the actual work that I remember...they came from an obscure book, cannot go chasing now. I just wonder if lathes working right now have leadscrews whose great-great-X-many Granddads was made by a Maudsley screw. If so...not only can a lathe replicate itself, it has real ancestry and lineage and real evolution! An inorganic organism!
It must have been liking starting with a rusted bolt found in a field, going on to make a the equivalent of Home Depot all-thread from that, and repeating till capable of manucaturing Aero space parts.
Here's about the middle of a neat online copy of a history:

http://chestofbooks.com/home-improv...the-Introduction-Of-Screw-Threads-Part-2.html

The ancient stuff is really cool, lathes you could probably build on a desert island with a pocketknife...
 
OP
A

A_Pmech

Well-known member
Joined
May 8, 2007
Messages
8,002
Location
IL
Annnnnndddddd once again I am humbled not only by your attention to detail, but also your historical knowledge of the trade and tools.

History is fascinating, especially the history of manufacturing which isn't well documented. :)

Arkangel said:
Nice fab skills there!

Thanks Ark!

:beer:

Bruce Lancaster said:
There were older lathes using the general idea of a lead screw, but M I think got to the modern layout and achieved a serious level of precision in the screw that allowed the development of interchangeable bolts. Have not found the right details about the actual work that I remember...they came from an obscure book, cannot go chasing now. I just wonder if lathes working right now have leadscrews whose great-great-X-many Granddads was made by a Maudsley screw. If so...not only can a lathe replicate itself, it has real ancestry and lineage and real evolution! An inorganic organism!
It must have been liking starting with a rusted bolt found in a field, going on to make a the equivalent of Home Depot all-thread from that, and repeating till capable of manucaturing Aero space parts.
Here's about the middle of a neat online copy of a history:

http://chestofbooks.com/home-improve...ds-Part-2.html

The ancient stuff is really cool, lathes you could probably build on a desert island with a pocketknife...

Maudslay developed a method for averaging the error of leadscrews, IIRC his initial interest in accurate leadscrews was for a ruling machine. That, I believe, caused a natural interest in screw cutting lathes which came later. I don't recall much about his lathe contributions besides leadscrews, I'll have to read that book you link to!

As the American brochure tends to indicate, many leadscrews and thus all the products generated by them can trace their roots to a fairly small number of masters. Even a big lathe company like American had only one leadscrew lathe!

Likely, their master leadscrew started life as an ordinary screw thread cut on an ordinary engine lathe, assuming they had access to one. If not, all bets are off. Regardless, the screw would have been "mapped" and corrected along the lines of Moore's method until the desired accuracy had been achieved. Making a screw from a screw will not result in an increase in accuracy, only a tendency to average the errors of the master.

So the idea that a lathe manufacturer's master leadscrew has a lineage is, to a degree, very true. But many of the errors of it's common engine lathe master would later be massaged out after mapping to create the royal master. From common screw to master leadscrew... It's a rags to riches story. :D

Thanks for the book link! I love reading the old books. :)
 
Last edited:

Bolster

Well-known member
Joined
Jul 8, 2008
Messages
4,056
Location
Mexifornia
A lot of machining is figuring out how to "make do" with what you have. Metals and machining in general is very unforgiving of poor approach, it forces you to have a good plan before you make the first cut. A lot of getting things done in machining is knowing what works and what doesn't and applying that to the plan before you "cut yourself into a corner", so to speak.

Ain't that the truth, cuss the luck. Seems this is the lesson I keep re-learning over and over. Plan carefully, THEN cut...or you'll end up trying to clamp the unclampable, as I'm always doing.

When I get 90% through a project and realize I have to do the final bit of metalwork with a hatchet, a file, epoxy, and a pipecleaner, THEN it dawns on me how I should have planned the job in the first place.
 
OP
A

A_Pmech

Well-known member
Joined
May 8, 2007
Messages
8,002
Location
IL
Making the Handles

I had a couple scrap pieces of 6061 aluminum which I decided to use for making the handles. I began by turning the OD and the handle taper:

workjaw15.jpg


Using a 60 degree threading toolbit, I cut a few grooves into the handle spaced .150" apart. I set the threading stop and used the compound to set the groove depth, ensuring that each groove would be the same:

workjaw16.jpg


After removing the work and sawing off the excess I faced each end and drilled the tapered end:

workjaw17.jpg


After running a second drill, sized to give the 9/16" handle shaft some clearance, I set up for hand tapping a thread to a depth of 3" in the handle bore:

workjaw18-1.jpg


Finally, the handle bores were cleaned of chips and deburred:

workjaw20.jpg


Here's the finished result. Can you spot the cosmetic defect in one of the handles? Hint: .150 + .150 does not equal .350! I'll leave it be as it's good for a story and a laugh.

workjaw21.jpg
 

Arne73

Well-known member
Joined
Mar 20, 2010
Messages
1,477
This is why I love GJ. The rest of the internet is now ****....
 
OP
A

A_Pmech

Well-known member
Joined
May 8, 2007
Messages
8,002
Location
IL
Double cut about ten lines down on the vertical part above?

Steve


That's it, Steve. :)

OccupantRJ said:
Just curious, why did you not power tap the hole in the handle?

RJ

Hi RJ,

I didn't power tap mainly because the small chuck I was using doesn't have a lot of gripping force. I was gripping the finished surface of the part with a piece of paper between the jaws and the part surface and I didn't want to chance the chuck slipping and marring the OD.

chevy3755 said:
very nice job.........kudos

Thank you. :)

Arne73 said:
This is why I love GJ. The rest of the internet is now ****....

:bounce:
 
OP
A

A_Pmech

Well-known member
Joined
May 8, 2007
Messages
8,002
Location
IL
Today I started by turning and threading a couple sections of 9/16" cold rolled rod:

workjaw22.jpg


workjaw23.jpg


Then I hot bent them to a 90 degree angle:

workjaw24.jpg


After wire brushing the rods I marked them for cutting to length:

workjaw25.jpg


Then I drilled the holes though which the handles will soon fit:

workjaw26.jpg


Handles cut and holes drilled, I welded up the handles to the jaw body. Here's one of the rosette welds securing the handle from the bottom. It was later ground flush:

workjaw27.jpg


Here's the jaw assembly after welding the handles on the top side and deburring all over:

workjaw28.jpg


Finished!

workjaw29.jpg


workjaw30.jpg
 
OP
A

A_Pmech

Well-known member
Joined
May 8, 2007
Messages
8,002
Location
IL
Hi guys, the chain is part of the DoAll weight-assisted power feed. Basically there's a big cast-iron weight inside the saw in the left of this photo:

436.jpg


That weight pulls the pulley in this photo down, tensioning the cable.

433.jpg


Using a the foot pedal on the front side along with adjusting the location of the weight on the weight arm with the handwheel, the tension force can be adjusted.

437.jpg


The cable runs up though these pulleys to the top of the table:

413.jpg


By wrapping the chain around the work jaw, significant force can be applied without tiring your hands pushing the work into the blade. Steering is accomplished by turning the work jaw handles left or right while the weight assisted power feed does all the work of pulling the material into the saw.

:thumbup:

(I managed to do that entirely from "stock" photos!) :shocking:
 
Last edited:
To avoid these ads, REGISTER NOW!
Top Bottom