To avoid these ads, REGISTER NOW!

Restoring a Prentiss No 56 Vise (Help!)

midnightcruise

Well-known member
Joined
Jul 5, 2010
Messages
246
Location
Hilliard, OH 43026
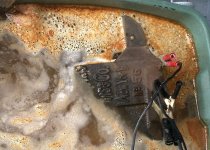
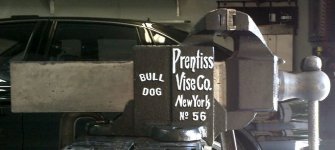
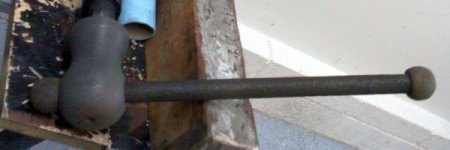
I picked up a Prentiss No 56 vise last weekend. It has had a hard life... not as a vise, but as an anvil. It looks like it was used very little as a vise. The screw, and jaws are in great shape, but the beam was cracked half the length. It was so bad that the gap of the crack was just over 3/4" at the end.

I did not take any original pics (wish I would have). But here are the original pics from the add:

PrentissVise-1.jpg


PrentissVise-2.jpg


So far I have:
- Pulled it apart, cleaned it with oven cleaner and break parts cleaner.
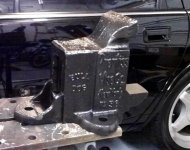
- Preheated, welded, and slowly cooled the beam best as I could.
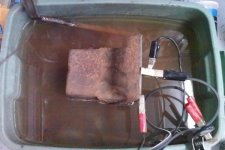
- Started electrolysis on the handle.

100_0142.JPG


100_0141.JPG


100_0143.JPG


100_0144.JPG


The handle is rusted up and I'm not sure if painting it would hold up to use. Should I try an polish it back to silver and protect it with some Flitz metal polish/protector? or is painting it the correct thing to do?

The beam is repaired and slides nicely with tight tolerance, but there is still some sag from all the years of beating on it. I was thinking about using the highest grit flap wheel and just cleaning it up... unless someone has a way to fill in the sag?

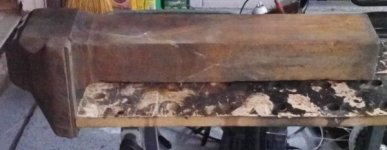
The top of the body has also been used as an anvil. I am thinking just flap wheel it to reduce the look of the abuse. Any other suggestions?

I am planning on painting it black with yellow lettering. There are many suggestions about paint already on the forum, but opinions are welcome.

Thank you for any input.

- mike
 
To avoid these ads, REGISTER NOW!

s_ontario

Well-known member
Joined
Jan 5, 2006
Messages
552
Location
canada
If that vise could talk it would likely tell you about alot of repairs it helped make and projects it helped build plus rusted parts it help break loose
when your 80+ years old you should look so good after working as hard as it has

enjoy it hope you can work it hard enough to keep it happy
 
OP
M

midnightcruise

Well-known member
Joined
Jul 5, 2010
Messages
246
Location
Hilliard, OH 43026
If that vise could talk it would likely tell you about alot of repairs it helped make and projects it helped build plus rusted parts it help break loose

That is why I am putting it back in use... I love to put old tools back in action. It will be mounted in the center of my garage (between the 2 bays) and see a lot of use by me and my 2 sons.
 

mjozefow

Well-known member
Joined
Apr 9, 2009
Messages
2,111
Location
Lafayette, IN
That is why I am putting it back in use... I love to put old tools back in action. It will be mounted in the center of my garage (between the 2 bays) and see a lot of use by me and my 2 sons.

That poor thing was beaten half to death., I hate when people abuse good tools. I'm all for working them hard, but abuse is frustrating.

Good on you for fixing it up! :thumbup:
 

DavidB

Well-known member
Joined
Feb 6, 2010
Messages
734
Location
Navarre, FL
Glad to see it's getting put back into a useable condition instead of being sent to the scrap heap. I look forward to the finished pics!
 
OP
M

midnightcruise

Well-known member
Joined
Jul 5, 2010
Messages
246
Location
Hilliard, OH 43026
After 20 hours in the tank, the handle is 99% rust free and I think I am going to try and polish it back to silver then seal it with Flitz.

The main body is in the tank now... it will probably need several turns and a few days to complete.

I'm new to this... should I keep posting pics of the progress?

Also... did any one have suggestions for my original questions?
 

Attachments

  • 100_0146.JPG
    100_0146.JPG
    26 KB · Views: 128
  • 100_0148.JPG
    100_0148.JPG
    46.2 KB · Views: 129

DavidB

Well-known member
Joined
Feb 6, 2010
Messages
734
Location
Navarre, FL
Yes, continue to post pics. I'm not to sure what you could do to clean up the sag. If you really wanted to you could probably fill the voids with lead or bondo but I'm not sure how that would hold up. Cleaning it up with the flap wheel may be the best solution. Just them it's battle wounds! :)
 

Even 11

Well-known member
Joined
Dec 7, 2009
Messages
1,322
Location
Colorado
That thing looks massive! I love the script written on the side! I'd probably fill in the beam with weld and grind it flat. The back of the static jaw is kind of a toss up. If its not going to be used real hard bondo or lead would be neat to fill it in and paint over. If it is (most likely) I'd either flap wheel it or just leave it as is before paint.

Yes on the pics by the way, we all like to see your progress. Looks like one hell of a cool project too!

-Dane
 

JASTECH

Well-known member
Joined
Oct 21, 2009
Messages
2,671
Location
Gering, NE
Nice project. I have a pipe vise that mounts to a truck bumper I think. It is rusted real bad and in need of? What does the electricity do and how is this done please?

Thanks, JASTECH
 

DavidB

Well-known member
Joined
Feb 6, 2010
Messages
734
Location
Navarre, FL
What does the electricity do and how is this done please?

It's part of a process called electrolysis. You use electricity to remove the rust off of your piece and put it on a sacrificial piece of steel. It's very simple to do and works very well on rusty parts.

Here are a couple sites about the process:
http://www.rowand.net/shop/Tools/Electrolysis.htm
http://www.stovebolt.com/techtips/rust/electrolytic_derusting.htm
http://www.rickswoodshopcreations.com/Miscellaneous/Rust_Removal.htm
http://myweb.tiscali.co.uk/andyspatch/rust.htm
 
OP
M

midnightcruise

Well-known member
Joined
Jul 5, 2010
Messages
246
Location
Hilliard, OH 43026
So far the static jaw (just learned that term) is looking great. It should be done this afternoon and I will start painting it tonight, while the other jaw is in the tank.

At this pace it will be done and installed by next weekend!
 

Attachments

  • 100_0149.JPG
    100_0149.JPG
    112 KB · Views: 127

bubinga2

Active member
Joined
Jul 30, 2010
Messages
42
Location
Houston
Hey Mike,
Very nice Prentiss. The cast letters on the body look like its from the roaring 20's. Any idea about the ago? I would mix some JB Weld or similar product, smooth it on a little thick. Then take an orbital sander or belt sander at slow speed and sand it flat. Looks like it only effect its use when fully open and is mostly cosmetic. Good job on the electrolysis. I've done car parts in a larger tank with the same method. ......Carl

http://picasaweb.google.com/vise27/Vises#5500163408413648834
 
OP
M

midnightcruise

Well-known member
Joined
Jul 5, 2010
Messages
246
Location
Hilliard, OH 43026
Here is the static jaw all primered and painted... still need to do the lettering.

The sliding jaw/beam should be done tomorrow and then I'll be working on the garage mount.

I decided to leave the scars on the vise... it does give it character and shows it has a long story.

I did not find a date stamped on it anywhere... but I still need to check the sliding jaw closely after it's out of the electrolysis tank.
 

Attachments

  • 100_0150.jpg
    100_0150.jpg
    73.5 KB · Views: 179

old salvage

Well-known member
Joined
Dec 16, 2007
Messages
1,464
Location
Rhode Island
I decided to leave the scars on the vise... it does give it character and shows it has a long story.
Good decision .
I did or actually didn't do the same thing with a Parker that had the same wear on it. I don't regret it it. I didn't even repaint it and wont as long as the rust doesn't decide to get worse.
 

Boiler

Well-known member
Joined
Nov 20, 2009
Messages
1,967
Location
Indiana
Welding in big areas on the top of the slide would have been a good way to warp the **** out of the slide, potentially. Glad you didn't do it.
 
To avoid these ads, REGISTER NOW!
OP
M

midnightcruise

Well-known member
Joined
Jul 5, 2010
Messages
246
Location
Hilliard, OH 43026
Welding in big areas on the top of the slide would have been a good way to warp the **** out of the slide, potentially. Glad you didn't do it.

I already had to weld the heck out of the slide... It was beat so much it had a 12" crack in it that was 3/4" wide at the end of the slide. I spent 4 hours pulling it back straight again, pre-heating, welding, and slow cooling the beam. I just did not know if I could fill in some more of the sag (caused from the history of abuse... beating on the slide as an anvil). Currently the sag is less than 1/8" and only in the area outlined in red. I am happy enough with this since it does not affect operation one bit, and the beam is lined up perfectly.
 

Attachments

  • visecrack.jpg
    visecrack.jpg
    36.4 KB · Views: 142
  • visesag.jpg
    visesag.jpg
    36.3 KB · Views: 125

Boiler

Well-known member
Joined
Nov 20, 2009
Messages
1,967
Location
Indiana
Not sure what I was thinking...you already welded the **** out of it...

Have at it!
 
OP
M

midnightcruise

Well-known member
Joined
Jul 5, 2010
Messages
246
Location
Hilliard, OH 43026
Another late night with my vise...

White lettering is done.

The handle is starting to turn silver with a lot of work... but I like the results so far.

The sliding jaw is out of the tank and waiting for some touch-up welding / flap wheel, then paint and polish...

Good night all. gotta be up at 7 for work!
 

Attachments

  • 100_0154.JPG
    100_0154.JPG
    36.2 KB · Views: 143
  • 100_0153.JPG
    100_0153.JPG
    31.5 KB · Views: 132
  • 100_0151.JPG
    100_0151.JPG
    57.3 KB · Views: 145
Last edited:
OP
M

midnightcruise

Well-known member
Joined
Jul 5, 2010
Messages
246
Location
Hilliard, OH 43026
Finished with the vise!

The 3rd pic is my celebratory beer.... I don't drink much, but this was a special occasion.

Last night even my wife said it looked good. Up till now she thought I was crazy to put so much effort into a "hunk of rust".

Now I am looking for an I beam to mount the vise to...
 

Attachments

  • 100_0155.JPG
    100_0155.JPG
    54.7 KB · Views: 178
  • 100_0156.JPG
    100_0156.JPG
    110.4 KB · Views: 180
  • 100_0157.JPG
    100_0157.JPG
    70.6 KB · Views: 181

Bolster

Well-known member
Joined
Jul 8, 2008
Messages
4,056
Location
Mexifornia
Beautiful Job, well done!

Please stick around, we need guys like you on GJ who are restoration experts!
 
OP
M

midnightcruise

Well-known member
Joined
Jul 5, 2010
Messages
246
Location
Hilliard, OH 43026
Beautiful Job, well done!

Please stick around, we need guys like you on GJ who are restoration experts!

I'm no where near an expert... This is my first vise restore. I was looking at purchasing a vise and all I could find was Chinese junk in the local Sears/Lowes/Home Depot. I wanted something better.... so I found this one and used my car resto skills on it. I have to say this forum is a GREAT source of information! You guys rock!

Since starting this vise, I purchased 3 others to work on... I'll post pics once I get over the high of this one ;)

mixxmstrmike, thanks for noticing the work on the slider. Half the resto time was spent there. I spent a total of 38 hrs on this vise. It was worth it.

Anyone have any ideas on how to get some scrap I-beam (about 6')?

Oh yea... one more thing I found 05 stamped by hand into the bottom of the slider... might be mfg date of 1905?
 
Last edited:

DavidB

Well-known member
Joined
Feb 6, 2010
Messages
734
Location
Navarre, FL
It turned out great! Yeah, vises like to multiply. They're funny like that I suppose. Start posts on the other ones when you start restoring them.
 

tbfrank

New member
Joined
Feb 27, 2011
Messages
3
Location
Green, Ohio
You now have me motivated to finish what I started so long ago, Monarch 223 that was cracked also. Got the cracked fixed and blasted all the rust off but then it just sat by the wood burner neglected and all apart. I guess I need to do some primer and paint and reassembly. You have a real nice vise there, great job on the restoration!
 

gatewaysysop

Well-known member
Joined
Nov 11, 2008
Messages
3,293
Location
Arizona
Sweet restore! I have a Prentiss #54 that is almost identical, if slightly smaller in jaw size. Digging the white lettering on black paint, may have to go that route on this one when I finally get around to restoring it one of these days.

Again, awesome job and a beautiful Prentiss. Wish I could find one that big around here!
 
To avoid these ads, REGISTER NOW!
Top Bottom