To avoid these ads, REGISTER NOW!

103.0803 Restoration

Cruzan80

Well-known member
Joined
Jul 22, 2015
Messages
4,302
Location
Denver, CO
So I started taking apart the 6x48" belt sander and cleaning up the various parts. Very easy to disassemble, can be done with a socket wrench and flat-bladed screwdriver (for grub screws). Started putting things under the wire wheel to clean up the years of dust/grease/grime, and it is turning out to be suprisingly easy.

One thing I know is needing to be replaced is the bearings. This takes "new type bronze bearings" (per the manual) which need to be constantly supplied with oil. However, when questioning my dad, he never added oil and didn't know it needed it! :shocking: The shaft looks to be in good shape, but figured I would swap the bearings while it was apart. Is it as easy as taking a dowel that is the right diameter and gently tapping them out? Ideas on how to get the gunk cleaned out of the oil reservoir, as at least one set was missing the oil plugs? I also see there is a large silver part sticking out from the end which pivots. Did this use two different types of bearings, or is it jsut an extended one for that?

Pictures will be following shortly. Going to try and match colors with the mohawk drill press (this way the shop will be color themed by era). Still looking for someone with a image of the red/gold King Seeley decal (not the riveted version). Mine is missing the R (can photoshop the A, if need be).
 
To avoid these ads, REGISTER NOW!

BlueBomber

Well-known member
Joined
Sep 14, 2013
Messages
3,201
Location
Outside Boston, MA
Hi, Cruzan. I can't help you with your specific quarks, but would love to see some pictures of your belt sander, both "before" and disassembled (if you have both). Pictures might also help others answer your questions.

Good luck!
 
OP
C

Cruzan80

Well-known member
Joined
Jul 22, 2015
Messages
4,302
Location
Denver, CO
I don't think I have a before picture. I always start tearing into it, and then about 10 min later I remember I didn't stop and take pictures. Right now it is laid out across parts of the floor, but I will try to lay it out in an exploded way to take pictures. The top of the base has already been sprayed, but I left a section of the bottom original to show paint differences.

I will definitely get pictures up of the areas in question, as trying to describe it doesn't work so well.

Same item and rough match for condition/color (not mine):
14722-A.jpg
 

RonnieC

Well-known member
Joined
Aug 7, 2013
Messages
813
Location
Orlando, FL
Looks like you did a bang-up job on that! Did you resolve your bronze bearing issues? I'm guessing these were the "oilite" bronze bushings that were popular at the time?
 
OP
C

Cruzan80

Well-known member
Joined
Jul 22, 2015
Messages
4,302
Location
Denver, CO
Adrian, did you replace the bearings in yours?

Can I t a shot of how the motor is attached? Guessing gravity keeps it tensioned?
 

AdrianBoomer

Well-known member
Joined
Jan 16, 2015
Messages
235
Location
Novato, California
The bearings were fine. Round and smooth and no play on the drums so I just did maintenance on them. I have not explored adding rubber to the roller drums but I know that this is something I should do. I believe these sanders came with a rubber sleeve to prevent slipping and help with tracking. However currently, belt tracks well and not much slipping so I am not to worried. Nines has a thread about this going on as he also has this machine.

I have a 1/3 PH motor that is not a craftsman but an old PowerKraft that it came with. I have recently rebuilt a 1HP Craftsman of the correct vintage that I will one day switch but for now I am happy. The motor is mounted to bracket that is on an shaft that mounts to the stand. I can adjust the position of the motor mount laterally and vertically with set screws. The other end is on a long spring that supports it so that not all the load is bearing on the belt.

I will take a pic when I get out to the shop.
 
To avoid these ads, REGISTER NOW!
OP
C

Cruzan80

Well-known member
Joined
Jul 22, 2015
Messages
4,302
Location
Denver, CO
Looks like a well-done homemade fabrication job that is way beyond my skills at the moment. Reminds me of the motor housing for the 18" bandsaw I have.
 
OP
C

Cruzan80

Well-known member
Joined
Jul 22, 2015
Messages
4,302
Location
Denver, CO
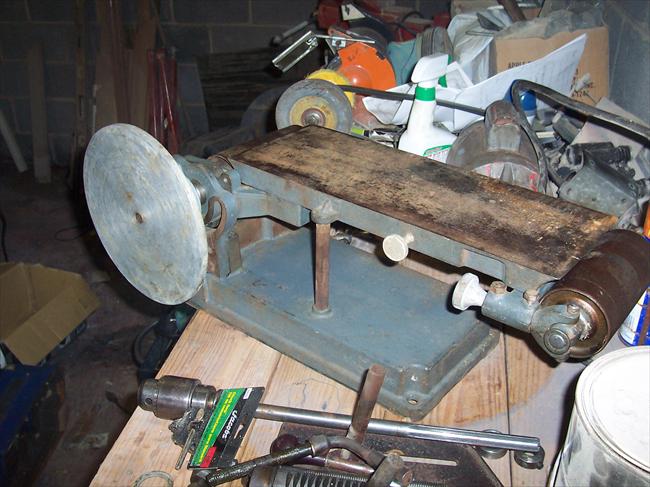
So pictures of the entire thing in an exploded view. You can see the new color in the base, nex tto the color of the originals.

I also attached two different views of the drive roller attachment piece. I was asking earlier about the silver part you see in the photos. Not sure if it serves as a bearing of some kind, or just reinforcement to pivot the table around.
 

Attachments

  • 2016-05-03-18_20_07[1].jpg
    2016-05-03-18_20_07[1].jpg
    133.7 KB · Views: 50
  • 2016-05-03-19_25_24[1].jpg
    2016-05-03-19_25_24[1].jpg
    144.9 KB · Views: 41
  • 2016-05-03-19_24_57[1].jpg
    2016-05-03-19_24_57[1].jpg
    140.7 KB · Views: 42
OP
C

Cruzan80

Well-known member
Joined
Jul 22, 2015
Messages
4,302
Location
Denver, CO
Yeah, the entire thing can be (dis)assembled using a socket wrench and a flat bladed screwdriver to get it to the point shown in the pictures. And there are only about 2 main sizes of sockets used. Weighs quite a bit for it's size, though.
 

nine4gmc

Well-known member
Joined
Mar 24, 2012
Messages
14,357
Location
Dallas
I recently did a restore on one of these and kept my original bearings, they seem decent condition for not being ball bearings. If you don't have any slack in them, I would probably leave them. IDK what silver part you are referring to, could you be a little more specific?
 

ambenz

Well-known member
Joined
Dec 12, 2010
Messages
4,237
Location
NW Chicago Suburbs
I didn't restore mine, just mounted it on a small base so I can store it on a shelve.
And pull it out on a table when I want to use it.
attachment.php


my thread on my sander... http://www.garagejournal.com/forum/showthread.php?p=5091755#post5091755
I'll be watching your progress! Have fun. Where do you plan to get missing parts?
I am sure Sears isn't selling them anymore!
Good luck in your quest, we'll be watching!
 
Last edited:
OP
C

Cruzan80

Well-known member
Joined
Jul 22, 2015
Messages
4,302
Location
Denver, CO
The only thing missing (if I haven't buried it somewhere) is the sanding stop for the table. Otherwise the sintered bronze bearings are not machine specific. I did pick up a couple of adjusting arms from the classifieds here so I had spares depending on how bad my set was. Right now I am leaning towards swapping out the bearings, simply to have access inside the oil reservoirs to clean them of any sawdust or other debris. They seem to be under $5 a set, and if I have to go back and replace them later, I will be angry with myself for not doing them now.

The silver part is in the third photo above. It is part of what holds the drive roller (the silver piece sticks out one end). It then fits into the circular looking thing just to the right of the base in the first pic. The same piece is at the bottom of the first pic, laying down with the silver end on the right. Not sure if it serves any bearing function.
 

nine4gmc

Well-known member
Joined
Mar 24, 2012
Messages
14,357
Location
Dallas
That silver thing is just the pivot for the belt assembly, it allows you to loosen the bolts and rotate the belt assembly straight up, straight back or anything in between. The bearing just happens to be in there by design.

Sent from my SM-T230NU using Tapatalk
 
To avoid these ads, REGISTER NOW!
Top Bottom