To avoid these ads, REGISTER NOW!

16' Utility Trailer Rebuild

D KRAGER

Well-known member
Joined
Oct 16, 2007
Messages
581
Location
Central IL
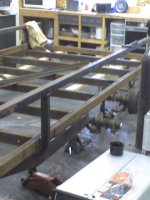
Thought I'd share the current project that's going on in the shop right now.

It's my neighbor's 16' trailer. He hauls his tractor on it, along with lumber, whatever, and I borrow it every once in a while, so I told him I'd help rebuilt it.

He knew that there was some rust starting. :( Well it was a lot worse than he thought after he took off the wood decking.

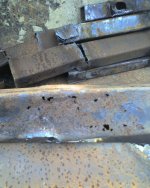
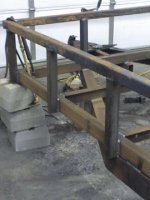
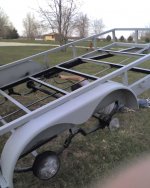
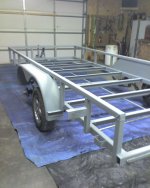
So we are almost totally rebuilding it, cutting out the rusted bottom frame rails and replacing with new thicker tubing.

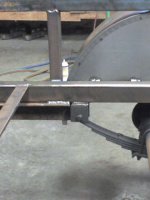
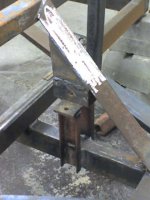
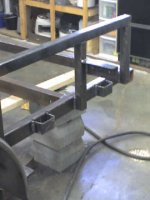
Here are some pics of one of the frame rails and spring mounts. (The new rail is just sitting on top of the old cracked one for clamping reasons, the old will be cut out and replaced with the new beam)
 

Attachments

  • frame rail rusted and cracked.jpg
    frame rail rusted and cracked.jpg
    8.7 KB · Views: 250
  • spring mount.jpg
    spring mount.jpg
    22.4 KB · Views: 242
  • post before.jpg
    post before.jpg
    23.7 KB · Views: 220
To avoid these ads, REGISTER NOW!
OP
D

D KRAGER

Well-known member
Joined
Oct 16, 2007
Messages
581
Location
Central IL
Some pics of the metal that was removed...... Kind of scary that it was still in one piece. These trailers get all their strength from the side rail system. Without it, this trailer would be broken in half. :shocking:
 

Attachments

  • old.jpg
    old.jpg
    118.4 KB · Views: 157
  • old2.jpg
    old2.jpg
    119.5 KB · Views: 130
OP
D

D KRAGER

Well-known member
Joined
Oct 16, 2007
Messages
581
Location
Central IL
Made good progress yesterday, got one of the side, and front rails cut out and the new ones installed. A little time consuming but not as hard as I was anticipating....... :thumbup:
 

Attachments

  • trailer overview after rail replacement- right.jpg
    trailer overview after rail replacement- right.jpg
    32.6 KB · Views: 178
  • after- rear.jpg
    after- rear.jpg
    23.6 KB · Views: 159
  • after front.jpg
    after front.jpg
    29.9 KB · Views: 169

930dreamer

Super Moderator
Staff member
Joined
Oct 7, 2009
Messages
22,942
Location
Amarillo,TX and Stinnett,TX
Hello, are you replacing with heavier gauge metal? I have a single axle frame a friend started. I want to build it to haul a smoker, won't see highway use. Not sure of channel gauge used. Any recommendations, Thanks.
 
OP
D

D KRAGER

Well-known member
Joined
Oct 16, 2007
Messages
581
Location
Central IL
Hello, are you replacing with heavier gauge metal? I have a single axle frame a friend started. I want to build it to haul a smoker, won't see highway use. Not sure of channel gauge used. Any recommendations, Thanks.

The new frame rails are 3/16" thick. (Twice as heavy as the old tubing was) It might be overkill, but he hauls a tractor that is almost too heavy for the trailer, so he went a heavier gauge.

On a smaller trailer only seeing weights of 2000# or so, I would think that 1/8" thick tubing would be plenty strong....
 
OP
D

D KRAGER

Well-known member
Joined
Oct 16, 2007
Messages
581
Location
Central IL
Some more pics....

Got all the frame rails done, working on fenders right now.
 

Attachments

  • 03-13-10_0957.jpg
    03-13-10_0957.jpg
    106.6 KB · Views: 244
  • 03-13-10_0958.jpg
    03-13-10_0958.jpg
    115.4 KB · Views: 234
  • 03-13-10_1019.jpg
    03-13-10_1019.jpg
    26.3 KB · Views: 217

babzog

Well-known member
Joined
Apr 20, 2009
Messages
2,117
Location
Eastern Ontario, Canada
Some more pics....

Got all the frame rails done, working on fenders right now.

Looking good! Looks like you're building a whole trailer... is there anything original left? LOL

I've got a couple of questions, if you don't mind: In the second pic, what is the function of the brace from the front of the trailer box to the tongue? Seems it would have been a good place for a toolbox or spare tire. Also (just a general welding type question I've pondered from time to time), in the third pic, just behind the susp. mount, the two pieces of steel appear to be welded in just a few places along the length as opposed to along the entire length. What is the purpose of of these "staggered" or "intermittent" welds (ie: why not weld along the whole length)?
 
OP
D

D KRAGER

Well-known member
Joined
Oct 16, 2007
Messages
581
Location
Central IL
Looking good! Looks like you're building a whole trailer... is there anything original left? LOL

I've got a couple of questions, if you don't mind: In the second pic, what is the function of the brace from the front of the trailer box to the tongue? Seems it would have been a good place for a toolbox or spare tire. Also (just a general welding type question I've pondered from time to time), in the third pic, just behind the susp. mount, the two pieces of steel appear to be welded in just a few places along the length as opposed to along the entire length. What is the purpose of of these "staggered" or "intermittent" welds (ie: why not weld along the whole length)?

The brace on the front from the top rail down to the front - Keeps that top rail from being bent forward. He hauls a tractor with loader on it, just keeps it from bending forward if someone were to hit it. Also adds strength to the tongue ( I have seen many trailers like this one have a brace like I added).

The staggered or intermittent welds I think you are talking about - That is that back side of the fender. The fender material is really thin, if you were to weld the entire length you can get heat distortion.

what are you going to use for deck?

The deck- we are going to re-use the old 2 x 12's and turn them over. The bottom side was in really good shape. Going to use some deck waterproofing on them.
 
OP
D

D KRAGER

Well-known member
Joined
Oct 16, 2007
Messages
581
Location
Central IL
Looks good. Gonna add some d-rings on the sides? Sure does make it quicker to strap that tractor down.

Yea we're gonna add some kind of side pockets/tie down points. Welding shop is working that up on the metal break for us, then we can cut lengths off that we need and weld them on.

I think there will be a winch on the front also before we are done....
 

gabeancounter

Well-known member
Joined
Jan 8, 2010
Messages
914
Location
east bumble
Sounds good. I really like the rings over the stake pockets, but I guess that is just personal preference. I normally see the winches setup inside a tool box where you have the front brace, with battery pack etc. Do you have ramps or a gate on the back, slide in ramps? The welding work looks great I am hoping to get a welder soon and try my hand at it.
 
OP
D

D KRAGER

Well-known member
Joined
Oct 16, 2007
Messages
581
Location
Central IL
I think the winch we are just making a mount for it. I don't think he plans on keeping it on the trailer all the time.

Ramps attach to a small angle iron on the rear. There is no place to store them under the trailer currently.
 
To avoid these ads, REGISTER NOW!

babzog

Well-known member
Joined
Apr 20, 2009
Messages
2,117
Location
Eastern Ontario, Canada
The brace on the front from the top rail down to the front - Keeps that top rail from being bent forward. He hauls a tractor with loader on it, just keeps it from bending forward if someone were to hit it. Also adds strength to the tongue ( I have seen many trailers like this one have a brace like I added).

Gotcha. :thumbup:

The staggered or intermittent welds I think you are talking about - That is that back side of the fender. The fender material is really thin, if you were to weld the entire length you can get heat distortion.

I figured that was the reason for the intermittent welds on the fender. What I was referring to though, was the weld right behind the susp. mount, highlighted it in the attached inage.

weld.jpg
 
OP
D

D KRAGER

Well-known member
Joined
Oct 16, 2007
Messages
581
Location
Central IL
I figured that was the reason for the intermittent welds on the fender. What I was referring to though, was the weld right behind the susp. mount, highlighted it in the attached inage.

weld.jpg

Both those pieces are heavy metal, and yes I could have welded the entire length, but not really necessary. That would be major overkill. Also I was following suit with the way the trailer was welded originally. There are two more spots that it's welded that is out of the picture, also welded on the outside.
 
OP
D

D KRAGER

Well-known member
Joined
Oct 16, 2007
Messages
581
Location
Central IL
Some pics of the pocket stake tie downs, and the 2" receiver winch mount.
 

Attachments

  • 03-20-10_1522.jpg
    03-20-10_1522.jpg
    33.6 KB · Views: 121
  • 03-20-10_1521.jpg
    03-20-10_1521.jpg
    27.4 KB · Views: 98
  • 03-20-10_1520.jpg
    03-20-10_1520.jpg
    86.6 KB · Views: 99
OP
D

D KRAGER

Well-known member
Joined
Oct 16, 2007
Messages
581
Location
Central IL
We are running all the wires for the lighting through conduit. The box you see is where it splits in the back and goes to each tail light.
 

Attachments

  • trailer conduit.jpg
    trailer conduit.jpg
    11.4 KB · Views: 103

brokenknee

Well-known member
Joined
Dec 7, 2009
Messages
142
Location
Northern, MN
Do you plan on using this trailer for commerce? Example = if you use it to haul cars that you repair and then resell or charge for the repair. Then the trailer would have to meet DOT guidelines , that would mean brakes on both axles, retro reflective sheeting down each side of the trailer that covers half the side evenly spaced from front to back. Retro reflective tape across the back of the trailer. Three ID lights in the center of the rear if it is over 80" wide, etc.

There are many more regulations that you would have to abide by IF you use it for monetary gain.

The only reason I mention it is because it would be easier to do now why you have it in the shop. If you plan on using it only for personal use, then you just have to abide by the laws of your state.
 
OP
D

D KRAGER

Well-known member
Joined
Oct 16, 2007
Messages
581
Location
Central IL
Do you plan on using this trailer for commerce? Example = if you use it to haul cars that you repair and then resell or charge for the repair. Then the trailer would have to meet DOT guidelines , that would mean brakes on both axles, retro reflective sheeting down each side of the trailer that covers half the side evenly spaced from front to back. Retro reflective tape across the back of the trailer. Three ID lights in the center of the rear if it is over 80" wide, etc.

There are many more regulations that you would have to abide by IF you use it for monetary gain.

The only reason I mention it is because it would be easier to do now why you have it in the shop. If you plan on using it only for personal use, then you just have to abide by the laws of your state.

Just personal (neighbor) use.... It's my neighbor's trailer if you didn't catch.

I think in IL you must have front amber marker lights and lights on front and back of fenders, also the 3 bar light on the back if it's over a certain width. I mentioned it to him, but he doesn't like taking care of all those lights. He said he's never had a problem before... so he's not messing with it.

Laws are starting to get stiffer on stuff like this.
 
OP
D

D KRAGER

Well-known member
Joined
Oct 16, 2007
Messages
581
Location
Central IL
Some pics of the 2" receiver that we welded into the rear channel. Yes we know you can't legally haul another trailer behind it. But he sometimes pulls a farm wagon behind it (no tongue weight). It also gives another tie down point, you can stick a receiver in there with a clevis to act as a tie down.

Ready for paint!!!!
 

Attachments

  • 03-28-10_1217.jpg
    03-28-10_1217.jpg
    32.9 KB · Views: 67
  • 03-28-10_1218.jpg
    03-28-10_1218.jpg
    103.4 KB · Views: 72
  • 03-28-10_1219.jpg
    03-28-10_1219.jpg
    100.9 KB · Views: 81

nolatoolguy

Banned
Joined
Jan 11, 2010
Messages
1,065
Location
Louisiana
You should of just redone the whole trailer at that point. LOL. Looks good though any more pics coming

What you gonna use as a deck
 
OP
D

D KRAGER

Well-known member
Joined
Oct 16, 2007
Messages
581
Location
Central IL
The deck- we are going to re-use the old 2 x 12's and turn them over. The bottom side was in really good shape. Going to use some deck waterproofing on them.
 
OP
D

D KRAGER

Well-known member
Joined
Oct 16, 2007
Messages
581
Location
Central IL
Paint!!!! Primed with soy zinc with brush and roller.

Broke the paint pot and the HVLP gun for the black. We ran out of daylight so had to break out the lights.
 

Attachments

  • 04-01-10_2021.jpg
    04-01-10_2021.jpg
    36.8 KB · Views: 74
  • 04-01-10_1948.jpg
    04-01-10_1948.jpg
    102.3 KB · Views: 73
  • 04-01-10_1857.jpg
    04-01-10_1857.jpg
    39.7 KB · Views: 69
  • 04-01-10_1856.jpg
    04-01-10_1856.jpg
    114.6 KB · Views: 81
  • 04-01-10_1855.jpg
    04-01-10_1855.jpg
    110.9 KB · Views: 71
  • 03-29-10_1930.jpg
    03-29-10_1930.jpg
    91 KB · Views: 78
OP
D

D KRAGER

Well-known member
Joined
Oct 16, 2007
Messages
581
Location
Central IL
A pic after paint. We have a few touch ups to do seeing how we finished under the lights.
 

Attachments

  • 04-02-10_2042.jpg
    04-02-10_2042.jpg
    96.2 KB · Views: 77

NUTTSGT

Super Moderator
Staff member
Joined
Sep 14, 2009
Messages
50,867
Location
Northern Central Ohio
Sorry i missed this, I wish I would have seen it sooner.

I added some bracing on my car trailer where the wheels sit, incasse there's ever a problem with the wood rotting/breaking while hauling.
DSCN0117.jpg
 
To avoid these ads, REGISTER NOW!
Top Bottom