To avoid these ads, REGISTER NOW!

18x28 Compromise

Bowman85merc

Well-known member
Joined
Aug 12, 2011
Messages
49
Location
Central Iowa
Hey all,

I have been a long time lurker and have enjoyed looking at all the build threads on the forum. I have been stockpiling tools from always browsing the *Hot Deals* thread for awhile, but my small basement "shop storage" area is starting to get a little full, lol.

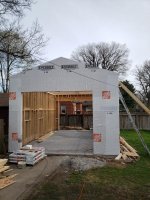
When I moved into the house, it had a small 12x20 "garage" that came with it. My wife enjoyed it, because it was just large enough for all of her gardening stuff, lawn mower, snow blower, and a few bags of mulch. But even that left little walking room. Basically it was just a large shed with an overhead door. Useless to me.

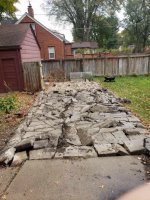
The slab of the old garage was extremely heaved up (several inches wide and up) 20' straight down the center. I believe it was from years of rain going under the slab and freeze/thawing on either side since the garage never had gutters on it.


-----

So that brings me to the dreams of bigger and better things. I compromised with the wife on building a new garage. She wanted yard space, I wanted garage space, so we (she) decided that 18x28 was right about where we both would be happy, at least for the next 8 years or so, which is how long we are planning on living here as of right now.

My only real demand was, besides having enough room to comfortably walk around a car, was to have 12' walls for a 2-post lift. She was all for it, as long as I would be happy living here for the next 8-10 years or so (she loves the neighborhood, I like the neighborhood but the houses are very close together which I don't like.) She was a little...surprised at how tall 12' actually was when the walls started going up though, but no turning back now!. :lol:

------

Onto pictures! (Not sure if the pictures will go in order like I hope, but I don't feel like going though photobucket right now)

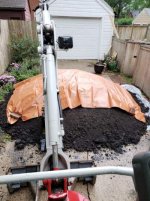
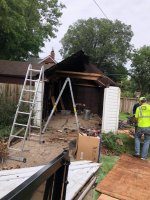
First pic is the old garage (large shed) before it was torn down. The pile of dirt is for just to the right off the camera. I had to dig along the basement wall and relieve some pressure and straighten the wall out with some I-beams on the interior side. The ground used to slope towards the house in that area, which after years caused that section of block wall to start bowing in quite a bit. Also replaced the old busted up brick window-well with a new metal one. Thankfully that whole project is all taken care of now.

y4moQ_ed3NVaZYxNgKsN50LSJV7-8uTw58gb7mf6ZeHTZRVNMTc-DQexNe2px36MYe_L0ZFaD_punrJj5IdvUYiTNmFlaVIDz0UikDxdiqGreixEXAgb5LLWUIdYESJ8HjtRBnTEGcRRORn5dEeBFJchSKXkRIh7t--SGxiIbaOT7opUeuknWVuTsboiCMhh7ucKxJD9fcdjyHrK1O7-ae9tw


y4mebzpmpDDp0I6v7TJFWYZKL5x4FhO8YisjUTEk4iRvWkHpPMEILSdXJ52KqIcrceS0wQ013XmzyS8dkcTlubZGLsuuuCZVMHxXsDUgPp71XI5i_W1a9wBLOP4b20mBWhAbF4bPCY9_5HnnloS8OuEO10yTyWFaArGvDeZ-vZYNMHTZ9z_tEMWWBQVF7Y3v8ELNcm3O5p-zx9PAmW1KpkDqA


------

Then the garage was torn down, I saved some of the lumber for building forms and such, even found an old solid wood door for the house hidden in the rafters, also turns out the garage was on fire at some point in history, but the interior was sheathed with plywood to cover it several decades ago to hide it.

y4mKxzrXyqhL-UbA8JkKDpCGkIWKmN86_Dcx8BxJZ1rsLC8E9n8CONIN0nlcj9Q2YcAr-ZHZbKhYHrSt08ke-W65257MIIHIOKzq5kj7tt3B4F85B8V18HfKXHIUX_HArC29EqI1QYHehbtKYyUEO-3HGuTnS1KEjVPXrNIj6d5TLDcBHwUC8zVyfHWrxjUs0BaP7REEJzt1VjorRO81ZwNfA


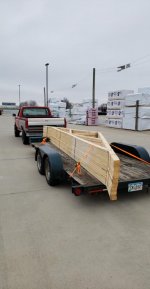
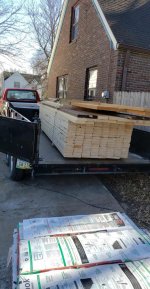
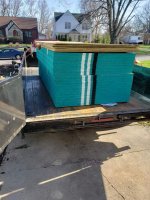
But once the structure was torn down I rented a concrete breaker/jackhammer from Home Depot to bust up the slab. I Also purchased the new dump trailer for this project that you can see in the pictures. I couldn't justify spending money on renting dumpsters or even renting a dump trailer, after running the numbers I was be better off buying the dump trailer outright and using it on my own schedule without worrying about being on a time crunch. After I'm finished with this project, hopefully this summer I am also going to tear up and pour a new driveway, and then I'll probably resell the trailer for a little less than what I bought it for (they hold their value extremely well around here) and pretty much be money ahead.

y4msVy50yqnWNLLc2yDSjTJmYLfVIkw3Nggb1U_F53h2aS2FlLCRDvdQnedWHkYdGqVJYVep3R18N4RtoMmY2vLte94OWrnnmUVDGM7qeNBKwQ65aY_kZTjGnwf-i4W1ozrKsXT4kpF_Ha6CMSS1sRhp0rgtP8-5fyGrYvRUmFLDPWuOFSiZ_bs-t3mBQsEuIC41FAu3lFx4L099CmRhAY-GQ


y4mw4KzDI4bY_6bdLdMJ_iPO4r63fUon1ZmI4e74Q-WojQcmumtmWTChWX3V08ZiM-51uJM6SGA5nrePKun4O8WYwVDdvoKeDw5UnzjOzFz1x8U4M4CRvjiCkGqEZLel1uDXN62vRwekK7wZ-z75FltxvDgJD5J5UkhjSwBNtIfQOmazkPXuVMgMFgTdGHMeQEX3fQxuQuBvjhaznLq92SqqA


------

The new dump trailer paid for itself the first trip to the dump, I hate touching material twice, especially if its garbage going to the dump. This thing is also a life saver for the building material, just have it loaded with a forklift, bring it home and dump it out. It might be difficult to get rid of this thing! :bounce:

y4mzd4QZPU6X31CLNmvSuem7749aKqpqUCqPSta_aEutU_9qSfyV4Az0LYl40c3ws6bkoHthBQJC8nyOg64nBGZbyBwDuTcVbX15daThSyguJ9Yl7xwAVuZvkeGjVqnQrW-8qQroIBgbPN8hWaVb3oxfpZtMqKHbDWV2Yvh47jMmkf8XQoIAEU7seBCMTV_-5-Bl00LOQEfnXHPMpOQapK6DA


y4mNzfkykCZZ3SNZ-CpuuwrzCAIEt4L3yMExBLmet6m74gopHCFcZMUleJzkeWkwzyMLXgVu063-pDQrB-Yx_h7JVlEqStHX2YhHGfqm97h_R4QHMfJv0JKOTRtE8Nv5cplSmuFt7Pmt5i-7oBJP2ZzZeWK8o3xMtnnSKe94bd_Ivg3dMckZGu3VTiergnxzIKIc1TfKre0djYOfOKQn8wstg


y4m6Z8CMceThNz3jXJUgmA1TX4jIqJXWQWftKG2O1CpcnggLhkAL5o1xrHCsjKbaimgTVRI8U3xT4_HSDoDi4IQbCgvhgGZVRtCorkoUdg8HqM4uzRaAdVQl9wCXs3SlsNVCWHCENPnIBtycKmgPMwIwMlellfnP3SJPMr0fBB6ok4qq9WSevdQIkpfBJuz8ysZvNBQc9mI-ozSIkmIr1HWmA


---


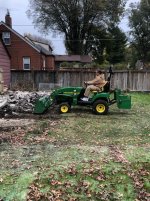
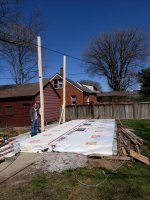
Also, if you guys are wondering, I'm the one with the hi-vis shirt in the teardown pic. (That's the in-law on the tractor) More pictures and info to come here in a few minutes. :beer:
 

Attachments

  • old garage.jpeg
    old garage.jpeg
    38.9 KB · Views: 58
  • teardown.jpg
    teardown.jpg
    148.4 KB · Views: 62
  • Breaking concrete.jpg
    Breaking concrete.jpg
    150.4 KB · Views: 59
  • scooping concrete.jpg
    scooping concrete.jpg
    153.6 KB · Views: 64
  • Forms.jpg
    Forms.jpg
    111.1 KB · Views: 65
  • Lumber.jpg
    Lumber.jpg
    106.9 KB · Views: 60
  • Sheathing.jpg
    Sheathing.jpg
    139 KB · Views: 55
Last edited:
To avoid these ads, REGISTER NOW!
OP
B

Bowman85merc

Well-known member
Joined
Aug 12, 2011
Messages
49
Location
Central Iowa
Second part.

As you can see in the previous post, after everything was removed, my Dad and I excavated the area for the new slab and built the forms and put in and graded the rock. I was running behind and the season was catching up with me (early-mid December) so I hired someone to pour it for me. Money well spent, as it was only a few hundred more then I probably would have spent on beer and pizza for my friends helping me pour it! :lol:

The concrete guys did an excellent job, its got a super nice finish to it, nice, flat, and smooth and all I had to do after was remove the forms. I saved a ton of money doing all the ground work, form work, and putting in the rock myself. But I see hiring out the concrete as money well spent in my eyes, they were very quick, professional, ands it's reassuring knowing it was done by pro's when I'm putting a lift on top of it.

------


Then the pad sat for a couple months, waiting for me to get around to building it. I just actually started building a few weeks ago. Pretty much all the progress you're going to see was done in about 6 days by just my Dad and me.

I was stumped on how to lift the walls, since they're 12' tall, 2x6, 16" o.c. with 1/2" sheathing (also with 5/8" drywall on one wall under the sheathing to meet firecode) you can definitely say they weren't light by any means.

But besides trying to round up 13 people that somehow happened to have the same day off to help, I though wall jacks would be my best bet!

...BUT!... The makers of wall jacks are extremely proud of their products apparently, because to me, they are way expensive for what they are. So, I decided they looked simple enough, and redneck engineered my own. I spent a total of $53 on both my wall jacks, and they worked a lot better than expected, it just took the two of us to lift the entire 12' tall 28' long section of wall in about 6 minutes.

All I used was two cable winches and T-hinges from good ole Harbor Freight (using 20% coupons of course,), a couple old garage door pulleys, a few lag screws, and just used some of the 2x6 studs I had laying around to make the pole and... VOILA!

y4mnxzRHr6uaGbu_DWms39DZBIASFcn8sXAPS5GWQf_s9aEDfAs4cnGsDpsUkuTymkIYivBflN4KdFCrz__bupZjQ0Q1i9JbvKYD12yCPx5KeHE7kkJxF5Kl5eyYLtQzL2KBueNQIiEVlUOhUQQPHSJh1YDovBsIv_5UuCQEJFhZ_Hr5wDexZF5tJyAEAlrz8DtxW7wbvRfBCVBR0tcOByBPg


y4m3UF0tPQSyB26sGw380gr4ZZASt9JvUHBNy-V-LHOIVsmpz7wwYXcTlIykBVPujVg3FDr3FsVAO2NKsSGZVlKucLNL-2rSwCdqtla7O50AqIrvmKmjmFE4V9hljG3XKfm8iThnEiORx-8KTiEpgmj5pOnHZNQW6d0f3UwS2EPB-t5vNuF2FQOnDVUXpx6zFra7pPcdyOs3VndFxQTLvWFBw


y4mQHrbJmudXVbZ87xT8_0bsUDGApTEQ5nFbSt64KDyM7091Tlj3gfrZ4HD1ZqTGWjoe_IMDLC1s92Ma45QKugCkflsTGTzwWeaDK5e7oKUr6Wal-nCyQ_SDZ6UsaTXeUqx89EYMCRsNnMig1srntZgslYaFSoshYx1-ppBZMLc40y5-EKiq8h-m7hA3bVmykHV6Sh_Towhn7MakpsUynj7PA


------

The garage is the maximum I can go to the lot line. Which requires the one side to be a firewall, and that means you have to have 5/8" drywall on BOTH sides of the wall (which to me just seems like asking for trouble with water issues) but no amount of arguing can change the cities mind of course, another reason I want to move to the country with more land, but I digress.

So to try and stop, or at least deter future water intrusion, I painted the bottom 2' on either side of the bottom course of drywall with exterior grade self priming paint. I also sheathed over that with 1/2" pressure treated plywood for the bottom course, and standard 1/2' OSB for the rest. The reason for the pressure treated is that the original garage wall on that side was pretty much completely rotted away, so I did not want a repeat of that, and also I want to avoid having to go over to replace/repair anything on the neighbors side of my garage for as long as I live here. Since my garage wall is basically their "fence" on that side, they may put plants up close to the wall and I just didn't want any moisture wicking up into the bottom of a sheet of OSB.

y4miZ2TheOxRg_Sgo12ZgG8hC-FwjJhi26Kfk22KXK_MaEziURGokqmD1AoTdG9jVJX6Ybp7-mV7vk5ckbXugIS-U_ZBpBDfiOg5OZTiihwYJDd36Q6VK9CJXFzMXscy8XoN9bQpR6ZgQcW0b4SAgxQjtIu4aL8e4fwqIMm2-EhL5KP4Cnp0JJVwGZP1hZ_Vz6sQXYtrqsyV-yHs8DvRTuzuA


------

Pictures are of the firewall, and my dad standing next to the homemade wall jack for height reference (19' tall) and also a pic of mid-lift.
 

Attachments

  • jack height.jpg
    jack height.jpg
    134.7 KB · Views: 54
  • lifting wall.jpg
    lifting wall.jpg
    140.7 KB · Views: 54
  • firewall.jpeg
    firewall.jpeg
    40.1 KB · Views: 55
Last edited:
OP
B

Bowman85merc

Well-known member
Joined
Aug 12, 2011
Messages
49
Location
Central Iowa
Now some pics of the progress we did in a few short days. Each of these pictures were taken at the same time in the morning each day, for the 6 days we worked on it.

y4maDD-N7bstlVAjVCJ_eCcPdxh5wiIyRLkTgp_Lqb2DDZ9bXI-9MCOJSDI4kguLoubjBscqDQHzJxF28Yv_eCFiP2Ids7REdC7qi81DiKAdrIH_hRaJSBfDyG9kxNRMHqUpdmPMJuXR7I8AivUw78gt-ZIaKsiQlvgVJH8EubHiih4uRe645_FgSWYkY_SO-GPKLeKX84jAAFEFVoYTRb4LQ


y4m1CG7AF3p7ZoOUBqhuZm_2smZBDo_K7Wicq7V0uFN8kTCMP_Dm6aBunMrVtp9aCfXr3i_xyrRN2R58QgxZ17nahl6LItMx39HyR2cHej4iJXpuy9aKFE3ZzldHAMuuKVtYnLIAOt9iM24pDxmx12Rs6w2si-gynWQA2EF3U6K5EgMeDo7RSx_cl1IWt4Wn-5IB77lRhUXOX2iGElSp33hmg


y4mlE3ntRGh1RUBKTyPolJgKfBQOQcOpnYxzT5m3_gnt_bK0k5QaAm1yjKmCBQ85lZ1PKiJb-Hd23ibMH4Qm4qGupr756Eb9U7kTHmaPUFu87EA_2A8-4Lv8D79xffMAZuRAQWCdJvdN5OBl7GP8Q8bATYtu29lYUiThbspf6ZOZg0C2EDxr6l3qqARGUDGLhpYuQYd8QT95S4TiJLvBvlOKA


y4m36ZRAn2_FZwQrC2IDH-Zx_oiQchilSx2FL42iX02q33FrSahpABEebpJzjUgtw89YpgrkW0VZoavdlEte8owlylXr1Xd22PJjDO-fMX5lzNeJbnfhTmMVuHhc3TVQY8VL57KLQe-c3ev9Uzu403XDPSJMK_vMYiVaL7HI4My7ONqlaLm8vUe9s6QgmJA2SvltG1LULTqG7kIxpQVYu1BYQ


y4mRLYu4OdolQVUE5Lp-Vb_keGq4chPvvMk5gVs3XBoNpgwX1sjcCfk3wVbzYh24nNo-vQZJaZ1eboGPuB7yO2FlRWzAawH9jisZFwsuLq5-YCNIUKlrkO0kqD16cUCVSL87aw8sgc_xa89W6vZfqzxpI5990RMM-nA4pL8PZbloRrOBX_3aj0i7yoon2hoGP7biepx9wxm8_AvWEnOz8z3bg


y4m3PPqQbWMzIQvVKkzxUGm9Vjil3aBkX4Q_xnfm0gM_gRIHqgYrvLKn-HGksqVO9LPNQcq2Ak-RQ10diSRGnlDn_FvV-CBB6HOCwEwxTqd0KQLmHi14SUrR5pl-IVxh_LtNo4Tn0Z0cJD34tIznFqi1YNZUSCTTVIu_4_6Ety4LBQdA9ZlUplon7dHfHEesogjxS-Sog3cPePNOF9oyiyc2A


------

Also, The homemade wall jacks didn't just go to the scrap heap. I was NOT about to try and push sheathing and carry shingles up a ladder on a 16' tall roof. I'm young, but I'm psychologically WAY too old for that. (even though my old man of a Dad called me weak and a sissy for not wanting to do it all off of a ladder like they did in the "old days" :rolleyes:)

So I re-cobbled the wall jacks and made something new and improved!

Its what I call the 'roofing-material-trolley-backsaver-thingy-2000!'

*Patent Pending*


I just flipped the wall jack, winch side down, built a bracket to keep it from the wall and high enough for the sheathing and shingles to go over the fascia, and built a little sliding trolley for the material (looks basically like an easel.) Then, all you do is load it with the material and hook the ole corded Milwaukee drill up to it and BAM! you have a whole square of shingles on the roof in about 15 seconds! No back breaking work!


I have videos of the wall jacks and roof-material-trolley-backsaver-thingy-2000 in action, but haven't looked into how to upload them to this site. Might try to do that tomorrow hopefully.

y4mI7ETOxSo8KX9GXB8Wx26ji9-FyaXy1Y3LrnKk2OyuEFEPrDEOKAmRIuRgJ6Z58xd8-EaKoBjBvhE9KFt-PROhuIqYk2tP1JDlQNUDTsg-hJyqclS9_9G3FmKUQg1xnuPFYSfMCh88p0AHWejgiDwDOIJv6EhasRuZCSagPKxozCGkj9hSh-YNSLNA97KHq2q4X6ujThGPrwHqVL0v5gznw


----


That's it for updates, beside that I got all the shingling done a few days ago. Things are going slow now since I've been called up for National Guard stuff and the world seems to be ending as we know it currently. But hopefully I can continue to chip away at it. :beer:
 

Attachments

  • frame 1.jpg
    frame 1.jpg
    125 KB · Views: 52
  • frame 2.jpg
    frame 2.jpg
    147.2 KB · Views: 50
  • frame 3.jpeg
    frame 3.jpeg
    66.9 KB · Views: 48
  • frame 4.jpg
    frame 4.jpg
    147.3 KB · Views: 49
  • frame 5.jpg
    frame 5.jpg
    123.4 KB · Views: 44
  • frame 6.jpg
    frame 6.jpg
    122.9 KB · Views: 56
  • roof lift.jpg
    roof lift.jpg
    145.9 KB · Views: 48
Last edited:

el monte slim

Well-known member
Joined
Apr 4, 2018
Messages
243
Location
Midwest USA
All the work looks very good thus far, and I'm looking forward to your continued progress. Kudos for your DIY jack system!
 
Last edited:
OP
B

Bowman85merc

Well-known member
Joined
Aug 12, 2011
Messages
49
Location
Central Iowa
Thanks guys.

Also, as you can see, the garage door opening is built for a 12x10 overhead door. Looking at getting a nice insulated one with a couple windows in it, just waiting for all my Menards cash to come back and also hoping they have a sale on garage doors soon.

But ontop if that, I roughed in for an additional 12x10 door opening in the back of the garage. That's because the original plan I had was to reuse the old garage door back there to have more natural light, and the ability to have a through-breeze in the garage with both doors open. Also giving us direct access to what was our garden behind the garage. But the old garage door is only a 9x7. So I'll have to build a smaller wall/opening within the current opening to accommodate it.

... but also, the reason I built the opening so large (besides me being a fan of all things symmetrical) was because I'm already trying to talk the wife into letting me build a 18x12 addition on the backside, where our garden is. Which would be the perfect size for my ideal little machine shop area I'm imagining. But that probably won't be until next year, if it happens. I want to see if it gets enough sunlight back there to even have a garden now that the garage is 6' taller and 6' wider than the old one. And I do like the idea of growing some of our own food, so I'm torn.

-----

Also here's a picture I forgot of all the trusses loaded up on my old car trailer. They were a lot lighter than I expected, which I was thankful for, since it was just my old dad and myself putting them up on the top plates. Just over 50lbs each. Not bad at all. I considered building rafters for even more head room, but time was just not available, and these trusses were pretty cheap and quick.

y4m2HKVEOE9O2LNJpIzlZCmGr5QsTarQJsKB7dBeVZbmtP4hUnetZBySUy1T2smRK0zBivNuym7NvTUNqAANuZEx8YEO78UUxFTLG0XWAhiG6SneTV8mA15wG9Q6QCmF8TVlCzoOfSkLBCWJiKEAw9xpBEdoBb7g_OCY9sY1v-79msI2jy0AcwgU3hg56tWKB6TpO7YO6zAYTEaR-9jgPXbNg
 

Attachments

  • Snapchat-1156756755.jpg
    Snapchat-1156756755.jpg
    52.2 KB · Views: 32
Last edited:
To avoid these ads, REGISTER NOW!

davo727

Well-known member
Joined
Jun 17, 2012
Messages
1,660
And I see to the right of the garage a lot of grass than can be replaced with a lean to addition.
 

captain14

Well-known member
Joined
Dec 19, 2012
Messages
7,048
Location
Near College Park Maryland 20740
Nice garage going up. Is everything buttoned up since you have been called up?

Can you show a picture of the patent pending shingle lifter? I have seen some roofers mount a shelf with arms that carry a bundle up the length of the ladder. It’s either been pulled with a rope or motor driven.
 
OP
B

Bowman85merc

Well-known member
Joined
Aug 12, 2011
Messages
49
Location
Central Iowa
And I see to the right of the garage a lot of grass than can be replaced with a lean to addition.

Ha! I wish. Funny enough, the 'addition' I am wanting to build in the back is more like a "lean-to" style...and my wife is horrified at even the thought, she says it'll look like we have a barn! (which isn't a bad thing in my eyes. lol)

Nice garage going up. Is everything buttoned up since you have been called up?

Can you show a picture of the patent pending shingle lifter? I have seen some roofers mount a shelf with arms that carry a bundle up the length of the ladder. It’s either been pulled with a rope or motor driven.

Nope, Not much has happened since the last picture of the framing. I got the shingles done, and worked on the ridge cap a little today. But they got me going all over the state for foodbank and testing sites, so I've had little time to tinker unfortunately.

Here are a couple pictures of the "Backsaver 2000" This in the shingle format, the Plywood format had a longer 2x6 going up the pole on the "slide" to better support the sheet goods going up. Pretty much made out of all scrap material, like those angle pieces on the rack were actually stakes from the concrete forms, just now turned upside down, and that top horizontal piece is just a cut-off from the rafter tails. lol.

y4maSXhWRhg9mfhDDhI-aydNxuUOiPyRcI6mJ4Bh18Ji27cgP8IHaEfa3AFzZV_85w-4LN0jZLJX9n9iZj6bugE0oxtYvMcI__1YpK6X9WpsRcn0Oyoe2WinsncXHV7SWwDy0x1LFIKKKCbI0Cvd_pD42RAB4-DevcgisMH7LFEaUI_bjzQKxTeONuGEQXyKMeQL8scpZf4KfuMxCvRfkdAXg


y4mPW6dgP2pKtizdVVg-60rOHkif9wmCGfa8qwNWe9UnbjY5NL4oWfI2CvpTBgX71peaexaucHWyjE1gMa7i7eYp0gtudi22td0AfiQ9Xi3brDVEn56FV-yrdrnSBnWh75YFv4D6CIcgVxs0tGUFf0BG-9-EqVHVSiHNSc68g5DMCXdlZbUA1AV0GJiDLCv1xYoiv3sRLAC-Zc91bbt4Mw_nw


y4mHq8LNICRt9fbgjeAXFv5L6jb5CZmwizAxIVMv2NYknKwtwcmCt_9sDYEhWn3e_dReC_BcTMnqs-DKmCG93Yjf2u201n8jcNpyY2sVMcShN0p1xEESMfzpbZ3EcdHJivNbvrxrWyNtOIzuQZ60ZFP9f_70kl4rFxgZ2wXTvxvn3kSRXvtVoQDcI_V8Zksq3dxz3_NS3WnNA12HughgE9paA
 
Last edited:
OP
B

Bowman85merc

Well-known member
Joined
Aug 12, 2011
Messages
49
Location
Central Iowa
Here is a little bit I got done today. Just got the Ridge vent put on and nailed down. Didn't even think about it when I bought everything, but now I have to go get some longer nails to nail down the ridge caps, the ones I have are nowhere near long enough for that. :tard:

y4mIp-pK82l4yuCRj9G3_p1SSeBdivil792qMPxldR-VWx52tRVqaV7mR2y84Ckpa1EhFoEfwlL5pAjiKBVECZkP44O4zPAKndJBKKMqt5o47SIQuM0wTnVCXnq_iwX4hNKD-e7QyWDp4pveNbOcDF3n-zuv3m9qsdq5cmSEp9A7tO_TO4f-_r9sEwWnd2t6gNLsu5ABOIt3UH3RD4t9jficg
 
OP
B

Bowman85merc

Well-known member
Joined
Aug 12, 2011
Messages
49
Location
Central Iowa
Just a couple small boring updates. Still can't do a whole lot, military orders got extended another month, so small bites is all I can do. :willy_nil

Got the Ridgecap installed after I ran to the store and grabbed longer nails.

y4mN8WinkSwYmMEi2chL_GIIalNpdC3Qv5RKC2i4UU4yjG1n24VJXpLJl-gBfKAh6QwG_QsiQpoInp3raPXOsd2RTfU7N6R3oXKXSXsJIFHqkN9l8QLeAIQGfQGVVQFlt-5_PsOVPqYU5oYyYBtt3tsOy2nNvmhrQ67xYf9dnk0dmy55BQEkA03EUS5X7lvsI-_QDYoPEgps3j6O97ktGVpwA


Also got the Fascia installed.

y4mgnuqRIVRoa5IqMjCuLhMDykN3AXRiRXi59iLotXSbvmWX5JdGNiMF8zj9tnRWZBN25i1hsaBv5A2Mn6xq7ud6WTXbDaFaptTACEEJV9sCxWn0WSv2LXGwkXitPQW6Mdskyxt5LKtk2_i9wQfqIde9HaKJaKiFRW3zkF5PczpAKduV2MR8utDgMISna6khV0vLiAr5_oLJ00AxyC7t5g4ew


And not related to garage stuff, but finally got the call to pick up my 1/2 cow I had processed. All 320 pounds of it. I'm really glad we had it done when we did, they're backed up several months now because of this whole 'end of the world' thing. Now I just need to get some propane (and time) :beer:

y4mCONBDX2PHEOb9GQIGsZQxqBprllMIo-rp2RUDFIICu8NyszDaGjh3KYIH4SO2NOXkuqH_tpIfGO7_zsq8LteUejIFz94SiGDw1f6xPYSIufoWk1fx9yuj79U6iFJMyFah02xGn6CIVZgRnBkh1fuosfJ34_4LK4gtVe978peT4H--gfFxHnTR1Gro0VxVvUTC3G_iGwESdGPzyxN5CUq_A
 
Last edited:
To avoid these ads, REGISTER NOW!
Top Bottom