To avoid these ads, REGISTER NOW!

1919 Garage Renovation

michaelg

Member
Joined
Feb 7, 2012
Messages
18
Location
Maryland
After lurking here for several months I've decided to make my first post! I am in the middle of renovating the detached garage of my circa 1919 Maryland house and I thought it appropriate to share my progress because the Garage Journal forum and its members have been indispensible to my efforts thus far.

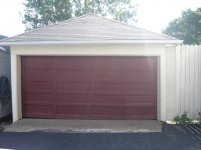
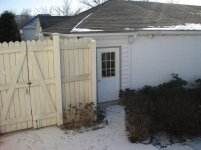
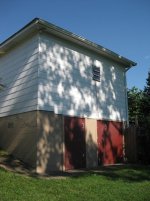
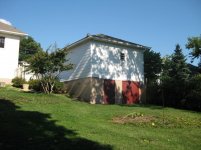
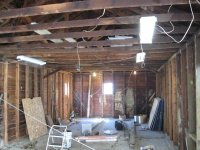
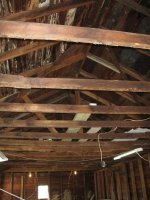
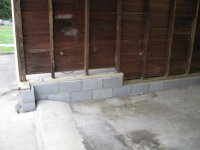
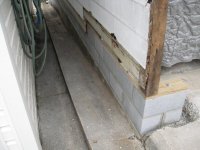
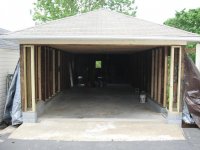
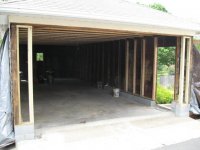
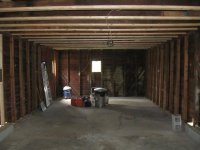
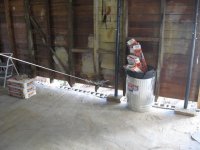
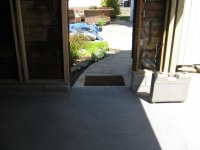
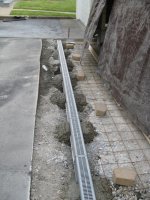
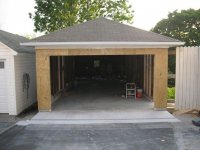
The garage is approximate 15' x 40' and built in two sections. The front part is the original one car garage that is probably contemporary to the house, while the back section was added in the 40s or 50s. When I bought the house in February 2010 it had been mostly renovated by the previous owners, the garage however, had been largely neglected. The garage itself had a pronounced lean at the entrance due to rotten sillplates and studs, the wooden door was falling apart, the cement floor was a 60 year old disaster, and there were several layers of drywall, plywood and pine siding nailed to the interior walls. The exterior was also clad in cement-asbestos siding. On the positive side it had a relatively new roof that didn't leak!

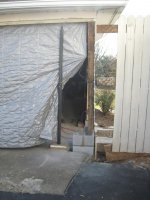
Here is the house and a few pictures of the garage before I started working on it. Unfortunately I don't have any before pictures of the inside.
 

Attachments

  • house1.jpg
    house1.jpg
    82.7 KB · Views: 124
  • garage_front.jpg
    garage_front.jpg
    86.5 KB · Views: 128
  • garage_side_door.jpg
    garage_side_door.jpg
    96.7 KB · Views: 123
  • garage_rear1.jpg
    garage_rear1.jpg
    89.9 KB · Views: 147
  • garage_rear2.jpg
    garage_rear2.jpg
    108.4 KB · Views: 136
To avoid these ads, REGISTER NOW!
OP
M

michaelg

Member
Joined
Feb 7, 2012
Messages
18
Location
Maryland
Here are some pictures of the interior after demo. I removed five pickup truck loads of drywall, plywood and tongue and groove siding from the interior walls and ceiling. Over the years people just scabbed over the rotten framing with new layers of material to make it look decent.
 

Attachments

  • demo_done.jpg
    demo_done.jpg
    105.7 KB · Views: 162
  • rafters.jpg
    rafters.jpg
    93.2 KB · Views: 153
  • debris1.jpg
    debris1.jpg
    99.6 KB · Views: 167
OP
M

michaelg

Member
Joined
Feb 7, 2012
Messages
18
Location
Maryland
So my driveway slopes down towards the garage and when it rains water collects around the garage door and the front corners (which are below the driveway grade). Over the years this rotted out about 8-10 feet of the sill plates and the bottoms of several studs in the front of the garage. After reading about similar situations on the forum I decided to cut out a foot of the walls and add another row of block to get them above grade.

I jacked up one wall at a time with metal posts, removed the rotten material, repaired the original blocks underneath, added another row of block and then filled the cores.
 

Attachments

  • cores_filled.jpg
    cores_filled.jpg
    83.1 KB · Views: 166
  • front1.jpg
    front1.jpg
    73 KB · Views: 154
  • new_block2.jpg
    new_block2.jpg
    85.5 KB · Views: 154
  • new_block1.jpg
    new_block1.jpg
    88.7 KB · Views: 164
  • jack1.jpg
    jack1.jpg
    88.9 KB · Views: 178

fergus

Well-known member
Joined
Oct 4, 2009
Messages
1,620
Location
Yolo County CA
NICE! This is the way to do it man! I'm familiar with the "pronounced lean". Hahaha. And sloping driveways. And rotten sill plates. And crummy slabs. I'll be looking forward to this one.
 
OP
M

michaelg

Member
Joined
Feb 7, 2012
Messages
18
Location
Maryland
Once I had the new block in place I installed new pressure treated sill plates and bolted them in. On the left side of the garage you can see where the rain water is channeled around the side of the garage by a cement trough. This is the original drain channel from 1919. In the last picture you can really see the few inches of lean on the garage.
 

Attachments

  • lean1.jpg
    lean1.jpg
    86.4 KB · Views: 166
  • right1.jpg
    right1.jpg
    85.5 KB · Views: 139
  • left3.jpg
    left3.jpg
    71.8 KB · Views: 134
  • left2.jpg
    left2.jpg
    82.8 KB · Views: 132
  • left1.jpg
    left1.jpg
    94.4 KB · Views: 124
OP
M

michaelg

Member
Joined
Feb 7, 2012
Messages
18
Location
Maryland
Thanks Fergus! Your thread here was a huge help when I got to straightening out my garage's lean.
 

fergus

Well-known member
Joined
Oct 4, 2009
Messages
1,620
Location
Yolo County CA
Glad to hear it. I'm so glad that I actually documented everything here. We've seen at least five or six others since then with "the lean" and I just hope it helps others get along with their builds.
 
OP
M

michaelg

Member
Joined
Feb 7, 2012
Messages
18
Location
Maryland
During the entire process of building up the foundation and removing the rotten wood I used a 2 ton come-a-long to keep the garage from leaning even more. After I got the new sill plates installed I used it to slowly winch the garage back into square. I left the come-a-long in place until all the framing was complete and the garage stood straight on its own.

As far as the framing, I started by sistering most of the studs at the front of the garage. All of the old rough-sawn wood in this garage is of different sizes and pairing it with new wood is challenging. It is hard to drive a nail into most of it, while some of it has spots of dry rot.

Next I grafted 16' 2x4's to the bottom of the ceiling joists to provide some more lateral bracing between the top plates as well as improving the aesthetics of the interior. I also built out the small side walls that flank the garage door.

When I was done the garage pretty much stood straight!
 

Attachments

  • front_straight.jpg
    front_straight.jpg
    89.4 KB · Views: 133
  • framing1.jpg
    framing1.jpg
    75.4 KB · Views: 125
  • joists2.jpg
    joists2.jpg
    77.2 KB · Views: 131
  • joists1.jpg
    joists1.jpg
    74.9 KB · Views: 136
  • wall2.jpg
    wall2.jpg
    93.7 KB · Views: 133
  • wall1.jpg
    wall1.jpg
    83.4 KB · Views: 132
  • winch1.jpg
    winch1.jpg
    78 KB · Views: 130
OP
M

michaelg

Member
Joined
Feb 7, 2012
Messages
18
Location
Maryland
I also built a storage area in the ceiling over the garage door. I added some cross bracing I made from old 2x4's left over from the demo and put a few sheets of osb on top.
 

Attachments

  • storage1.jpg
    storage1.jpg
    90.2 KB · Views: 79
  • storage2.jpg
    storage2.jpg
    98.1 KB · Views: 75
OP
M

michaelg

Member
Joined
Feb 7, 2012
Messages
18
Location
Maryland
At this point in the renovation it is was time for a new concrete floor so I got a bunch of bids, picked one and forged ahead. The contractor removed most of the old concrete floor, put down a vapor barrier, wire mesh and 6" of 4500 psi fiber mesh concrete. He quoted me for 4" of concrete but ended up ordering and using alot more in order to get the floor to slope properly to the garage door. Forunately this did not cost me extra. I also had him form up a new garage apron with a channel drain to take care of the water that flows down the driveway.
 

Attachments

  • floor_done3.jpg
    floor_done3.jpg
    66.3 KB · Views: 138
  • floor_done2.jpg
    floor_done2.jpg
    74.7 KB · Views: 136
  • floor_done.jpg
    floor_done.jpg
    80.1 KB · Views: 152
  • apron_finished.jpg
    apron_finished.jpg
    65.8 KB · Views: 142
  • apron.jpg
    apron.jpg
    114.2 KB · Views: 169
  • floor_prep.jpg
    floor_prep.jpg
    82.4 KB · Views: 148

ODIS

Well-known member
Joined
Apr 30, 2012
Messages
2,110
Location
Pacific Northwest
Looks like a great project and a nice remodel to add to your lovely home. Will be good to see what your next steps are too. I'm thinking of a nice big window in the back of the garage to let in more light and for you to enjoy what looks like a pleasant view. Maybe add "carriage" doors at the entry? I'm sure you will make it just perfect and will have the best garage space on the block. Thanks for letting us see what you have done thus far. Nice!

Ody.
 
To avoid these ads, REGISTER NOW!

n2ocamaro

Well-known member
Joined
Aug 3, 2011
Messages
183
Location
Clarksville, IN
Nice work on giving it some new bones. I am jealous of the new concrete. I would love to do that but its not in the budget right now. Looking forward to see what else you have planned.
 

64dragnwagon

Well-known member
Joined
Sep 3, 2006
Messages
461
Location
Northeastern Tennessee
Very nice work, you are doing it right and it will serve the next generation. I love your old house, I am a big fan of old 2 story homes. I know this is a garage sight but do you have any interior pics of the house like maybe old woodwork and doors?
 

Dan in Pasadena

Well-known member
Joined
Feb 18, 2009
Messages
13,149
Location
Pasadena, CA
"....The contractor removed most of the old concrete floor..."

"...So did you pour the new floor on top of the old floor? Maybe I missed that..."
 

WQ59B

Well-known member
Joined
Feb 18, 2010
Messages
762
Location
NJ
Nice work! What's the story with the 'downstairs' at the back of the garage? How deep is that space & how's the 'car floor' done over that?
 

WQ59B

Well-known member
Joined
Feb 18, 2010
Messages
762
Location
NJ
^ I've seen similar vintage garages but with a wooden floor over a 'downstairs'....
 
OP
M

michaelg

Member
Joined
Feb 7, 2012
Messages
18
Location
Maryland
Thanks everyone for the positive comments...I am glad to hear that I am on the right track with this renovation! I will try to post some more pictures of the garage and house soon.

To answer your questions let me try to explain a bit more about the floor and the back of the garage. I wish I had taken more pictures of it beforehand but I didn't really think about at the time.

The "newer" back half of the garage has two storage rooms underneath which are about 10'-12' deep and accessible by the red doors at the back of the garage. The two rooms are divided by a concrete block wall which supports a heavy duty wooden floor structure. So the back of the garage's concrete floor is over top of these rooms and supported by the wood floor. I know this doesn't sound like a good idea but the back half of the garage is going to be a workshop so no cars will be parking on it. The contractor and myself figured that if the old slab that had been sitting ontop of this wood floor held up fine for 60 years with no cracks then the new slab would probably be just fine.

Now the old concrete floor was a real mess. Although it showed few signs of cracking or movement, it was poured in sections, on top of one another over the years. The apron running into the garage was poured later and was about 6 inches higher than the oldest part of the floor which was level with the top of the block foundation. In the back, over the wooden floor, another pour was done at some point which was also about 6 inches above the oldest part of the floor. I had the contractor remove the higher front and back sections to make the entire floor level and then pour the new slab on top. I understand that forum members recommend a complete demo of the old floor with a newly compacted gravel base...but that was not in my budget. I also figured that given the unusual construction of the garage (i.e. the concrete over wooden floor) I couldn't expect the same level of perfection as a in new construction.

All in all the floor turned out great and I am happy with it. Now that the drainage issues at the front of the garage are solved, I expect the new floor to last and look good for decades to come. Later I plan on staining and sealing it as well. I hope that clarifies things for you guys...if not let me know and I will do my best to answer your questions!

Thanks again!
 
OP
M

michaelg

Member
Joined
Feb 7, 2012
Messages
18
Location
Maryland
64dragnwagon,

Here are several photos of the inside of our house. My wife and I love old houses too and one of the great features of ours is the woodwork. The house has oak floors, baseboards and trim throughout and it is all original, although some has been refinished.

The house is a form of the four-square design with arts and crafts/mission details. These pictures are from when we purchases the house, since then we have done a lot of painting and updating as well. Thanks for your interest!
 

Attachments

  • house_7.jpg
    house_7.jpg
    87.1 KB · Views: 47
  • house_6.jpg
    house_6.jpg
    113.1 KB · Views: 49
  • house_5.jpg
    house_5.jpg
    80.9 KB · Views: 51
  • house_4.jpg
    house_4.jpg
    64.6 KB · Views: 57
  • house_3.jpg
    house_3.jpg
    83.7 KB · Views: 57
  • house_2.jpg
    house_2.jpg
    75.2 KB · Views: 56
  • house_1.jpg
    house_1.jpg
    82.3 KB · Views: 54

GOLF for LIFE

Well-known member
Joined
Apr 8, 2012
Messages
173
Location
NORTHERN ILLINOIS
Sure reminds me of my 1920 garage 18x18 on the outside. I've added a 6x16 shed on the rear for tools. Will be doing insulation, wall covering with peg board and plywood. Also doing a ceiling. FUN FUN FUN.
 

KULIWOBBY

Well-known member
Joined
Feb 28, 2011
Messages
227
Location
NE Iowa
Very nice oak finishes. The staircase is beautiful. The storage out back under the garage will be nice to have.
 

fergus

Well-known member
Joined
Oct 4, 2009
Messages
1,620
Location
Yolo County CA
Wow. You really did a great job on the garage. Some of the things you did (like adding ceiling joist wood perpendicular to the orginal joist) made me go "Duh...why didn't I do that?".

I believe that part of the problem with mine, just like yours, was a patio outside the garage which was higher than the slab.
 

bobemmerich

Well-known member
Joined
Aug 23, 2009
Messages
1,611
Location
Middletown, Ct.
Just found this thread. Nice job on the garage. And the house, man, it's awesome. I love old houses. Too bad my 90yr old was in such bad shape I couldn't save the original woodwork. :(
 
To avoid these ads, REGISTER NOW!
Top Bottom