Hi all,
Just thought I would share with you my latest restoration project. It is in fact a complete monster of a pump. I have randomly stumbled upon it on Ebay, did some reading into it and thought it sounded like a great project.
Below is a small company extract I have borrowed from vintagepumps.co.uk
"William Turner and Bro. Ltd, of Eyre Lane Sheffield started business in the late 1890’s and made a range of pumps under the KISMET brand name. Turners were probably the most prolific of the quality pump makers and pneumatic engineers in the first half of the 20th century. They made an incredibly wide range of high quality pumps to suit all tastes, pockets and storage spaces.
Several types of KISMET pump were issued in the tool kits of quality cars such as Rolls Royce and Bentley. They also supplied heavy-duty military issue examples for use by the Army and Air Force in WW2. In the RAF they were used, among other things, for pressurizing the pneumatic systems of Spitfires and Hurricanes during ground maintenance and repair."
The one I sourced was their flagship Trolley Compressor model with dual action high pressure cylinder capable of pumping up to 500psi!!! At the time it was used by garages before the time of compressor to quickly inflate large bus/tractor/truck tires.
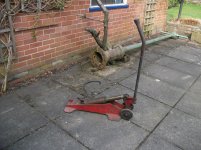
Enough talking, here are some photos of when I collected this little pump:


It is in fact so large it dwarfs my trolley jacks!!

Quick clean up of the solid brass name plaque quickly identifies the model as Trolley Compressor:

I did some more browsing of the internet and came over another helpful website called heritagefootpumps.co.uk where the owner gave me some good advice in terms of restoration tips as well as a scan of an old instruction leaflet. The leaflet and diagram were very old so with the help of Photoshop I managed to touch it up into something legible again:

Next I dismantled the entire compressor and started cleaning up the metal chassis. In doing so I noticed just how well this whole thing is put together. Metal ball bearings on pivot points, grease ******* with covers for all hinge points, solid brass piston ram and housing. Amazing.
As the name plaque was attached using the original rivet pins, I didn't want to drill them out therefore I taped up the plaque instead:

Using some Gunk degreaser I cleaned up 80+ years worth of grime and grease, and then wire wheeled the whole chassis. Next I applied 3 coats of primer:

Followed by 4 coats of red top paint. I am chuffed with the result:

Next I started cleaning up all the smaller fasteners:

While the top coat is hardening I have stated to work on the pneumatic cylinder.
First I had to unscrew the cylinder head, however this is easier said then done when some cowboy in the past has soldered it shut to stop it leaking air

So first thing I had to do was get the blowtorch out and melt away a ton of solder, just so I could get to the thread. With a help of a wire brush I soon exposed the threaded section:

Finally I was able to undo the cylinder top and expose what lied beneath. Due to this being a high pressure dual action pump, the internals were relatively complex compared to a normal pump, with about 4 leather cup seals and 3 leather washers:

Each rubber seal also had a male and female brass cup plate that held it in place. Ended up separating all the items as not to mix them up at a later date:

As someone had obviously got a little heavy handed with this cylinder, is shows up many battle scars from various vice clamps, drifts, hammers

Therefore I decided to try and put the whole cylinder up on a lather and turn the top knurled section away as to reveal just clean brass underneath.
Below is a photo with upper section almost cleaned up and lower section still untouched (need to get hold of a lather steady)

So this is as far as I have got in the last week. I hope to continue this project tomorrow and will update you accordingly.
Thanks for reading so far and please feel free to ask any questions you may have.
Thanks
Mig
Just thought I would share with you my latest restoration project. It is in fact a complete monster of a pump. I have randomly stumbled upon it on Ebay, did some reading into it and thought it sounded like a great project.
Below is a small company extract I have borrowed from vintagepumps.co.uk
"William Turner and Bro. Ltd, of Eyre Lane Sheffield started business in the late 1890’s and made a range of pumps under the KISMET brand name. Turners were probably the most prolific of the quality pump makers and pneumatic engineers in the first half of the 20th century. They made an incredibly wide range of high quality pumps to suit all tastes, pockets and storage spaces.
Several types of KISMET pump were issued in the tool kits of quality cars such as Rolls Royce and Bentley. They also supplied heavy-duty military issue examples for use by the Army and Air Force in WW2. In the RAF they were used, among other things, for pressurizing the pneumatic systems of Spitfires and Hurricanes during ground maintenance and repair."
The one I sourced was their flagship Trolley Compressor model with dual action high pressure cylinder capable of pumping up to 500psi!!! At the time it was used by garages before the time of compressor to quickly inflate large bus/tractor/truck tires.
Enough talking, here are some photos of when I collected this little pump:
It is in fact so large it dwarfs my trolley jacks!!
Quick clean up of the solid brass name plaque quickly identifies the model as Trolley Compressor:
I did some more browsing of the internet and came over another helpful website called heritagefootpumps.co.uk where the owner gave me some good advice in terms of restoration tips as well as a scan of an old instruction leaflet. The leaflet and diagram were very old so with the help of Photoshop I managed to touch it up into something legible again:
Next I dismantled the entire compressor and started cleaning up the metal chassis. In doing so I noticed just how well this whole thing is put together. Metal ball bearings on pivot points, grease ******* with covers for all hinge points, solid brass piston ram and housing. Amazing.
As the name plaque was attached using the original rivet pins, I didn't want to drill them out therefore I taped up the plaque instead:
Using some Gunk degreaser I cleaned up 80+ years worth of grime and grease, and then wire wheeled the whole chassis. Next I applied 3 coats of primer:
Followed by 4 coats of red top paint. I am chuffed with the result:
Next I started cleaning up all the smaller fasteners:
While the top coat is hardening I have stated to work on the pneumatic cylinder.
First I had to unscrew the cylinder head, however this is easier said then done when some cowboy in the past has soldered it shut to stop it leaking air
So first thing I had to do was get the blowtorch out and melt away a ton of solder, just so I could get to the thread. With a help of a wire brush I soon exposed the threaded section:
Finally I was able to undo the cylinder top and expose what lied beneath. Due to this being a high pressure dual action pump, the internals were relatively complex compared to a normal pump, with about 4 leather cup seals and 3 leather washers:
Each rubber seal also had a male and female brass cup plate that held it in place. Ended up separating all the items as not to mix them up at a later date:
As someone had obviously got a little heavy handed with this cylinder, is shows up many battle scars from various vice clamps, drifts, hammers
Therefore I decided to try and put the whole cylinder up on a lather and turn the top knurled section away as to reveal just clean brass underneath.
Below is a photo with upper section almost cleaned up and lower section still untouched (need to get hold of a lather steady)
So this is as far as I have got in the last week. I hope to continue this project tomorrow and will update you accordingly.
Thanks for reading so far and please feel free to ask any questions you may have.
Thanks
Mig

") ) lathe steady boss, which I inserted one end to keep it solid as a rock on the lathe, and then I skimmed about 0.25mm off the wall of the cylinder and about 0.5mm off the cylinder head and lip. Below are the results:
) lathe steady boss, which I inserted one end to keep it solid as a rock on the lathe, and then I skimmed about 0.25mm off the wall of the cylinder and about 0.5mm off the cylinder head and lip. Below are the results: