To avoid these ads, REGISTER NOW!

1934 Ford pickup frame repair

planecrazy29

Well-known member
Joined
Oct 10, 2011
Messages
72
I inherited this truck and the story is here:

http://www.garagejournal.com/forum/showthread.php?p=1820711#post1820711

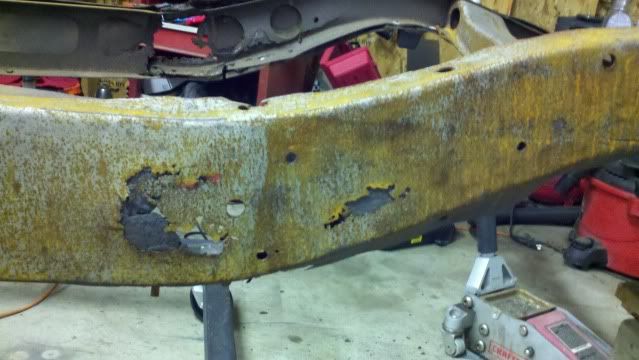
The frame is pretty rough but I decided to try to repair it. I'm not the world's greatest welder, but I have some experience in fab and machining.

So we'll start with the bad news:
2011-09-24_20-02-54_645.jpg


The frame rail and x-member have rotted through on both sides. Look close and you'll see this is the good side.

I marked the area to be repaired and made a cardboard template. I got some 11 gauge steel from the steel store and got to work.

2011-09-24_22-07-06_343.jpg


The first repair parts were cut out with a sawsall. It sucked bad so I sold some excess **** I had and bought a Harbor Freight 40 amp plasma cutter. This is the first piece:

2011-09-24_20-03-15_451.jpg


2011-09-24_21-00-24_802.jpg
 
To avoid these ads, REGISTER NOW!
OP
P

planecrazy29

Well-known member
Joined
Oct 10, 2011
Messages
72
After I cut everything out, I started tacking it up

2011-09-24_22-06-17_553.jpg


2011-09-24_22-06-47_851.jpg


I cut the outer frame away from the x member between the lines I had made

2011-09-25_15-41-20_413.jpg


At this point, a member of the HAMB mentioned that I should probably brace it so it wouldn't move too much. I took their advice:

2011-09-30_19-27-22_126.jpg


2011-09-30_19-27-30_296.jpg


And a picture of the old and new:

2011-09-25_15-41-35_386.jpg
 
OP
P

planecrazy29

Well-known member
Joined
Oct 10, 2011
Messages
72
A little note about the last picture: The first parts I cut out and tacked together ended up being for the opposite side. I tacked the rails on the wrong side of the plate. Oops. So I had to write myself a note so I wouldn't make 2 rights....

On with the repair:

2011-09-25_15-42-01_254.jpg


And tacked into place:

2011-09-30_20-56-07_70.jpg


I went through the same procedure with the x member. They were offset so the vertical welds do not line up and create a weak spot.

2011-10-02_13-26-34_461.jpg


2011-10-02_13-26-53_539.jpg


I spent a lot, no really, a LOT of time grinding everything down and making it look nice on the outside. The finished repair looks pretty darn good if I do say so myself:

2011-10-13_15-50-13_210.jpg


2011-10-13_15-50-26_172.jpg


2011-10-19_19-17-39_793.jpg


I did get a copy of the frame dimensions and checked everything for square and trapezoid and made sure everything was as close as I could get it. It's within 1/16" so I'm happy with it. I still may box it for extra strength. I've got about $200 in materials into the repair. A new frame runs $2500. And since everyone loves tools here, the welder used was a Lincoln Pro-mig (Lowe's special) that I got from CL for $430. I did add a bottle to get better welds. It was welded with .035".

All 3 crossmembers also need repair and I'm tackling the center crossmember first. It was packed full of 77 years worth of oil, grease and gravel.
 
To avoid these ads, REGISTER NOW!
OP
P

planecrazy29

Well-known member
Joined
Oct 10, 2011
Messages
72
The HF plasma works fine. It's not like the Esab I used years ago in the shop I worked in, but for home use I think it's fine. I haven't really had it long enough to see how it's going to hold up. That's my biggest concern. I got it on sale for $599 and nothing else was even in the same ball park. Not even CL. It's got a Trafimet torch that I should be able to get parts for if need be. Consumables are pricey at HF. I'll check to see if I can get them at the welding shop for less. The only ***** so far is it does seem to flame out easily. I'm not sure if that's me or the unit. It's mostly when starting the cut and a second pull of the trigger usually lites it up.
 
To avoid these ads, REGISTER NOW!
Top Bottom