
You are using an out of date browser. It may not display this or other websites correctly.
You should upgrade or use an alternative browser.
You should upgrade or use an alternative browser.
1935 Blackhawk No. 27CB Hot Box - Help Me Decide
- Thread starter thehorse13
- Start date
OP
thehorse13
Well-known member
Horse!, that came out great! A thorough job indeed. I often use satin black or a satin finish too. One way that I have been taught by show car painters is to use regular finish chassis black as a base color (which is gloss) and then a second coat of clear satin finish. It ends up being satin but has a depth and deep luster to it. And the satin still helps hide my inabilities as a body man!
Funny you mention that technique. The base coat on this box is gloss black. My final coat is satin. This is the rattle can equivalent to what you've described.

OP
thehorse13
Well-known member
Thehorse13, this looks fantastic. The best 2.25 spent on a toolbox!
Fantastic work saving it!!!
Thanks. Even Mrs. Horsey said that it's the best money I've ever spent on a, "crappy old metal thing".

Looks pretty good!Thanks. Even Mrs. Horsey said that it's the best money I've ever spent on a, "crappy old metal thing".
y'sguy
Well-known member
Funny you mention that technique. The base coat on this box is gloss black. My final coat is satin. This is the rattle can equivalent to what you've described.
Yes!, exactly what I meant to type WITH rattle cans. Love it.

OP
thehorse13
Well-known member
Looks pretty good!
Thanks!
Yes!, exactly what I meant to type WITH rattle cans. Love it.
Thanks. I've become a rattle can artist over the years. Believe it or not, with enough practice, you can lay down rattle can paint extremely close to the consistency and look of a professional spray gun.
pelletman
Well-known member
Gonna have to agree with you here.
and I am of the same opinion. Preserve
OP
thehorse13
Well-known member
and I am of the same opinion. Preserve
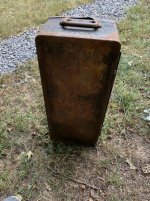
Normally I preserve but this time I was on the fence. The box itself had the final vote, though. Over 90% of the original label disintegrated on the very first tap of a body hammer.
At this point, the box has a fresh new satin black finish and I'm waiting on a label maker to create a reproduction Blackhawk water label.
OP
thehorse13
Well-known member
With the help of OldTuleGuy, I've moved the little tool box another step closer to being complete.
About a month ago, OTG hooked me up with a decal guy who is making one of these decals. While I wait for that to pan out, I decided to try to make my own label.
I have not received my water transfer printer paper yet so I am experimenting with regular printer paper and a professional ink jet printing system. Note that the printer I'm using is in bad need of maintenance but it works good enough for a proof of concept test.
What you're looking at is a photo that OTG took and sent along to me. The printer is so sensitive, that it picked up the color detail from his camera flash. Up near the end of the word, "chief" and the start of the word, "Socket" you can see the color wash out from the flash.
I've printed this decal to perfect scale thanks to all the info and hi-res image that OTG provided. I hit this label with two coats of clear coat on both sides. If I was going to use this for a final product, I'd simply spray the back side with adhesive spray and then press it on the tool box lid.
Now you may think that doing this little test would be uneventful but you'd be wrong. As I was letting the decal dry inside of a cardboard box, a flicker decided that it would make a nice addition to the bird nest it was making in the tree. Just as I turned the corner from the garage, the bird dropped the label and flew off. lol
About a month ago, OTG hooked me up with a decal guy who is making one of these decals. While I wait for that to pan out, I decided to try to make my own label.
I have not received my water transfer printer paper yet so I am experimenting with regular printer paper and a professional ink jet printing system. Note that the printer I'm using is in bad need of maintenance but it works good enough for a proof of concept test.
What you're looking at is a photo that OTG took and sent along to me. The printer is so sensitive, that it picked up the color detail from his camera flash. Up near the end of the word, "chief" and the start of the word, "Socket" you can see the color wash out from the flash.
I've printed this decal to perfect scale thanks to all the info and hi-res image that OTG provided. I hit this label with two coats of clear coat on both sides. If I was going to use this for a final product, I'd simply spray the back side with adhesive spray and then press it on the tool box lid.
Now you may think that doing this little test would be uneventful but you'd be wrong. As I was letting the decal dry inside of a cardboard box, a flicker decided that it would make a nice addition to the bird nest it was making in the tree. Just as I turned the corner from the garage, the bird dropped the label and flew off. lol
Attachments
Username already in use
Well-known member
The flash is never your friend for this kind of thing. Still a good looking decal and significantly better than the one on my box. I can't wait to see what the finished product looks like!
Oldtuleguy
Well-known member
- Joined
- Nov 4, 2017
- Messages
- 10,461
I sent him some hopefully better pics. That decal is not bad though. Did not use a flash I think that decal is just particularly reflective and I have never been accused of being a great photographer!
OP
thehorse13
Well-known member
I sent him some hopefully better pics. That decal is not bad though. Did not use a flash I think that decal is just particularly reflective and I have never been accused of being a great photographer!
There is a gem in the recent set of pictures that you sent over today. I will be using that one on the water transfer paper once it arrives.

OP
thehorse13
Well-known member
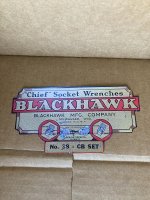
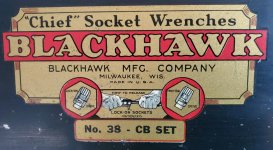
I've decided to try to clean up the image that I'm going to use to make my own water slide label. Attached you'll find the original photo and my touched up version.
I'm not even close to a graphics artist and I used a free image editing tool online to do this. I have about 15 minutes total invested in the retouch and I think that I'm pretty happy with the result.
All of the water label materials are on order and should arrive on Monday. Another step closer...
I'm not even close to a graphics artist and I used a free image editing tool online to do this. I have about 15 minutes total invested in the retouch and I think that I'm pretty happy with the result.
All of the water label materials are on order and should arrive on Monday. Another step closer...
Attachments

Oldtuleguy
Well-known member
- Joined
- Nov 4, 2017
- Messages
- 10,461
Looks pretty good. Which software was it?
OP
thehorse13
Well-known member
Looks pretty good. Which software was it?
It's a free online tool. If you're not a photoshop wizard, this handy little site is for you.
PIXLR
Oldtuleguy
Well-known member
- Joined
- Nov 4, 2017
- Messages
- 10,461
Thanks I will check it out.
OP
thehorse13
Well-known member
UPDATE: Water transfer decal test. SUCCESS!!
Before I begin, pay no attention to the missing ink in certain places of the label. This is one of my, "aged" early prototype images that I used for testing the process of creating and applying a homemade water decal.
I'm happy to report that I'm extremely pleased with the outcome. So much so, that I'm preparing my final decal right now.
OTG, I'd be more than happy to mail you one or more of these if you like. You'll see the finished product on the tool box shortly.
That said, here is what I did:
1) Got my hands on a good image of the original along with the measurements.
2) Bought myself a pack of 8.5x11 water transfer paper off Amazon along with the sealer spray. Total investment, around 20 bucks.
3) Printed the image on the paper, applied the sealer and waited 24 hours.
4) Soaked the label in tap water for 60 seconds, peeled and transferred.
5) Worked the air out with a dish rag, then blotted up all the excess water.
Once I get 5 minutes to myself I will be applying the final decal to the tool box. Results to follow.
Before I begin, pay no attention to the missing ink in certain places of the label. This is one of my, "aged" early prototype images that I used for testing the process of creating and applying a homemade water decal.
I'm happy to report that I'm extremely pleased with the outcome. So much so, that I'm preparing my final decal right now.
OTG, I'd be more than happy to mail you one or more of these if you like. You'll see the finished product on the tool box shortly.
That said, here is what I did:
1) Got my hands on a good image of the original along with the measurements.
2) Bought myself a pack of 8.5x11 water transfer paper off Amazon along with the sealer spray. Total investment, around 20 bucks.
3) Printed the image on the paper, applied the sealer and waited 24 hours.
4) Soaked the label in tap water for 60 seconds, peeled and transferred.
5) Worked the air out with a dish rag, then blotted up all the excess water.
Once I get 5 minutes to myself I will be applying the final decal to the tool box. Results to follow.
Attachments

Oldtuleguy
Well-known member
- Joined
- Nov 4, 2017
- Messages
- 10,461
Looks good! I may take a shot at printing one. Recently got a fancy new printer (old one died).
OP
thehorse13
Well-known member
Looks good! I may take a shot at printing one. Recently got a fancy new printer (old one died).
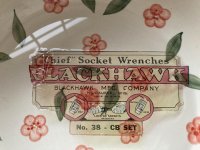
Here is one error that I made that cost me a sheet of water transfer paper. Make sure that the image is 100% opaque otherwise you're going to print a transparent/ghost decal. With only 5 sheets of water transfer paper to a pack, there is not much room for failure.
Attached failure for reference. Also, a picture of the final product that will be used. Overall I am very pleased with the experiment.
Attachments

Last edited:
JoCoSawdust
Well-known member
That's the exact problem I've encountered while making my own waterslides horse. The transparent paper allows the background to print through the inked decal. I've had good luck using white decal paper instead of transparent. It fixes the opaque issue but requires a perfect job of cutting around the border of the logo. That can be done of course but I've placed my "homemade" SKF decals on several DPs and now, about 6-9 months out, they're starting to fade color. This, after sealing them with clear paint after putting them on the machines. I've got a friend of a friend currently working on some pre-war CM decals using professional equipment. He's backlogged with his paying job so it's taking a while. If the end results from him are good I may be able to get him to produce a few other logos but I'll be at his mercy on a timeline.
OP
thehorse13
Well-known member
That's the exact problem I've encountered while making my own waterslides horse. The transparent paper allows the background to print through the inked decal. I've had good luck using white decal paper instead of transparent. It fixes the opaque issue but requires a perfect job of cutting around the border of the logo. That can be done of course but I've placed my "homemade" SKF decals on several DPs and now, about 6-9 months out, they're starting to fade color. This, after sealing them with clear paint after putting them on the machines. I've got a friend of a friend currently working on some pre-war CM decals using professional equipment. He's backlogged with his paying job so it's taking a while. If the end results from him are good I may be able to get him to produce a few other logos but I'll be at his mercy on a timeline.
I'm still going to hedge my bets because of everything you've mentioned. I will be purchasing a decal that is currently being professionally made by a decal guy who OldTuleGuy referred me to.
OP
thehorse13
Well-known member
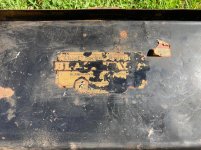
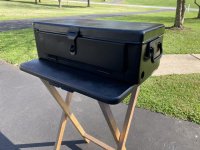
Well folks, this is the end of another beat up tool box journey. If you recall, this little box was purchased on Ebay for $2.25. After materials and time invested, I'm into it for just under 40 bucks. It would have been a little more but the professional decal guy vanished on me so I went ahead with a water decal made from the pictures generously provided to me by OldTuleGuy. Thank you again for that. I'd be stuck right now without your contribution.
So here it is, metal bent back into place, a fresh coat of satin black and a nice, "new" water decal. I can move all of my early Blackhawk overflow tools to their new home this weekend.
So here it is, metal bent back into place, a fresh coat of satin black and a nice, "new" water decal. I can move all of my early Blackhawk overflow tools to their new home this weekend.
Attachments



Oldtuleguy
Well-known member
- Joined
- Nov 4, 2017
- Messages
- 10,461
Looks good! I have emailed Jim a couple times and no response. Hopefully he is ok.
Private Lugnutz
Well-known member
Well done, Sonny.
OP
thehorse13
Well-known member
Looks good! I have emailed Jim a couple times and no response. Hopefully he is ok.
Yea, it's strange. He kept telling me tomorrow for about 2 months then sent me a quick note that he was still working on it, then went dark. It's been about 2 months now so I figure it's a dead end. Maybe he will surprise me though.
Well done, Sonny.
Thanks Lugz. I'm happy that this little guy will live on now.
JoCoSawdust
Well-known member
Looks great horse! The decal turned out great.
OP
thehorse13
Well-known member
Looks great horse! The decal turned out great.
Thank you.
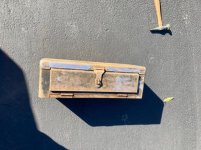
And as a final nod to another job done, here is the reason why I sourced this small Blackhawk box to begin with. All of my odds and ends Blackhawk stuff will live here now.
EDIT: I've added a few pictures to summarize the journey from near death to full service.
Attachments


Last edited:
Oldtuleguy
Well-known member
- Joined
- Nov 4, 2017
- Messages
- 10,461
I like it. Is that a torque wrench with the dial?
OP
thehorse13
Well-known member
I like it. Is that a torque wrench with the dial?
Nope. That's a VT1103 valve tappet adjusting tool. I've only seen this tool in the 1953 Catalog.
And as a final nod to another job done, here is the reason why I sourced this small Blackhawk box to begin with. All of my odds and ends Blackhawk stuff will live here now.[/QUOTE]
This looks great, Thehorse13! It’s threads like this showing the beauty of old American tools, boxes and restorations which made me join GJ and become addicted to saving, restoring , collecting and using vintage tools after I started looking for a small toolbox to organize my random tools (and instead of new Husky chest from Home Depot bought a well used Snap On KRA 56, 1955)
Great job!!!!! Bravo!
This looks great, Thehorse13! It’s threads like this showing the beauty of old American tools, boxes and restorations which made me join GJ and become addicted to saving, restoring , collecting and using vintage tools after I started looking for a small toolbox to organize my random tools (and instead of new Husky chest from Home Depot bought a well used Snap On KRA 56, 1955)
Great job!!!!! Bravo!
jabberwoki
Well-known member
****** marvelous, that box is all puffed up and beaming with pride.
OP
thehorse13
Well-known member
This looks great, Thehorse13! It’s threads like this showing the beauty of old American tools, boxes and restorations which made me join GJ and become addicted to saving, restoring , collecting and using vintage tools after I started looking for a small toolbox to organize my random tools (and instead of new Husky chest from Home Depot bought a well used Snap On KRA 56, 1955)
Great job!!!!! Bravo!
Thank you. This is just a nice honest refresh which will be used. Saving this stuff is much more fun than buying imported garbage from China.
****** marvelous, that box is all puffed up and beaming with pride.
Thanks. Saving this sad little box from the edge of death was a lot of fun. It will now live on for many years after I'm gone and I'm not planning on going anywhere for a long time.
Oldtuleguy
Well-known member
- Joined
- Nov 4, 2017
- Messages
- 10,461
OP
thehorse13
Well-known member
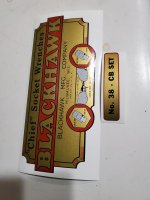
Just a heads up Jim did finally come through with the decal. Looks awesome!
Yep! I did order one in the event that my homemade decal gives up the ghost. I planned on posting a picture here when it arrived but the USPS is gridlocked so I figure that I might see the decal sometime around Easter. I suspect that Jim was also a victim of the USPS gridlock but didn't realize how bad it really is right now.
Thanks for posting the decal pic. You've saved me the effort.
Oldtuleguy
Well-known member
- Joined
- Nov 4, 2017
- Messages
- 10,461
I have noticed the gridlock. Been waiting for an ignition wrench set from Buffalo for a couple weeks!