To avoid these ads, REGISTER NOW!

1940's Kennedy Toolbox refresh

Panicman

Member
Joined
May 23, 2026
Messages
15
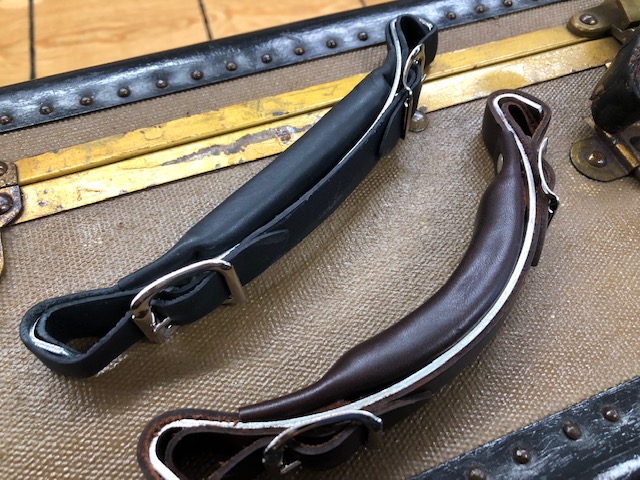
I was looking for a tool chest with compartments for my growing interest in watchmaking. My search led me to Kennedy machinist boxes, which looked ideal, but the nice ones are pretty $$. I ran across this one on eBay for $40, and ordered it. It's rough: handle nearly destroyed, missing front plate, a ****** padlock hasp screwed on, fetid green felt that is filthy and failing, and the beginnings of a rust problem. But, it has a cool Norden Laboratory badge, and it has the old "Kennedy" script under the top lid.IMG_2226.jpegIMG_2228.jpegIMG_2227.jpegIMG_2229.jpegIMG_2214.jpegIMG_2226.jpegIMG_2228.jpegIMG_2227.jpegIMG_2229.jpegIMG_2214.jpeg
 
Last edited:
To avoid these ads, REGISTER NOW!
OP
P

Panicman

Member
Joined
May 23, 2026
Messages
15
I spent some time scraping out all of the felt, then used a dremel to grind the rivet backs off.IMG_2222.jpegIMG_2219.jpeg
 
OP
P

Panicman

Member
Joined
May 23, 2026
Messages
15
I had one broken plastic drawer pull. These pulls are mounted using rivet/expansion backs, and I wanted to avoid removing it. I instead used a Plastex repair kit, and just repaired it in place. IMG_2238.jpegIMG_2237.jpegIMG_2245.jpeg
 
OP
P

Panicman

Member
Joined
May 23, 2026
Messages
15
I decided that with all the holes drilled in it, the big cut out notch in the top compartment, and the advancing rust, I couldn't just preserve it, and it wasn't worth the energy of a full blown restoration. I'd leave the interior alone, and use all of the original hardware, but take a few liberties:

#1- not buying the Kennedy paint. With shipping it's probably $60 a can and says right on the description not to use on large areas. People who have used it says it doesn't crinkle the way they wanted it to.

#2- not doing black oxide finish on the hardware. I'm set up for zinc plating so I'll do that, and polish it so it's bright.

#3- my original plan was to use fresh leather to re wrap the top handle. I went ahead and ordered a compatible leather handle "in case."
 
OP
P

Panicman

Member
Joined
May 23, 2026
Messages
15
I did an 80 grit sand on the whole box, followed by a flap wheel to remove any rust, then 400 grit all over. I scrubbed the outside of the box with Dawn suds, rinsed, and then masked so that my paint would only get to the outsides of the box.

I'd decided to spray the box with Rustoleum Hammered bronze to keep/give some texture, followed by Rustoleum Camo brown flat, because that is a close match for the Kennedy brown, and finally several coats of flat Rustoleum clear.

I built a simple jig to mount the box so I could paint all sides of it.

I then spent hours doing light coats, and it came out looking pretty good. The match is quite close.IMG_2248.jpegIMG_2252.jpegIMG_2254.jpegIMG_2257.jpegIMG_2258.jpeg
 
OP
P

Panicman

Member
Joined
May 23, 2026
Messages
15
there was no reaction between the old paint and the new. I decided to just scrub the drawer fronts, mask the plastic pulls, and then hit them with the brown and clear. The internal parts of the drawers all are rust free and still have a nice original finish, so I cut slots in a cardboard tote, and exposed just the drawer fronts for new paint and clear. This helped retain the cool Kennedy texture.
IMG_2263.jpeg
 
OP
P

Panicman

Member
Joined
May 23, 2026
Messages
15
Time for that hardware. I am going with polished zinc, which should hold up fine indoors for a long time, and I'll try to keep it waxed.

First, a dunk in acid to remove all the rust and old coating, then a scrub with a brass brush. IMG_2268.jpegIMG_2269.jpegIMG_2270.jpeg
 
OP
P

Panicman

Member
Joined
May 23, 2026
Messages
15
During the acid stripping, the internal spring tensioner broke in one of the side latches. I measured the broken parts and found that residential window screen tension springs match the width and thickness of these latch springs. I ordered a box, and cut one to the correct length. IMG_2279.jpegIMG_2283.jpeg
 
OP
P

Panicman

Member
Joined
May 23, 2026
Messages
15
Zinc plating is pretty basic. Having an adjustable power supply really helps. I struck these pieces 4 times, brushing them between each strike. IMG_2273.jpegIMG_2275.jpegIMG_2276.jpegIMG_2277.jpeg
 
To avoid these ads, REGISTER NOW!
OP
P

Panicman

Member
Joined
May 23, 2026
Messages
15
I decided to finish this dude, and save the handle restoration for a lazy day in the future.

I used solid aluminum rivets, and refitted all of the hardware to the box. I then loaded it with all the little watch tools.

For now, it seems like an ideal kit. I did splurge and order a new front plate from Kennedy, and I'll repaint it to match if needed. I'll post images after I get it. IMG_2290.jpegIMG_2290.jpegIMG_2289.jpeg
 

Lassen Forge

Well-known member
Joined
Apr 26, 2014
Messages
15,023
Location
The romantic hills of central Umbria, Italy,
#3- my original plan was to use fresh leather to re wrap the top handle. I went ahead and ordered a compatible leather handle "in case."

Where was your source for this? My 40's cantilever (handed down from dad, also my daily use household box) has a handle that looked exactly like yours... I ended up wrapping it with paracord and it's held up well, the old one was literally falling apart.
 

RTM

Well-known member
Joined
May 13, 2019
Messages
13,079
Location
SF Bay Area
Where was your source for this? My 40's cantilever (handed down from dad, also my daily use household box) has a handle that looked exactly like yours... I ended up wrapping it with paracord and it's held up well, the old one was literally falling apart.
I bought some here.

 
OP
P

Panicman

Member
Joined
May 23, 2026
Messages
15
Where was your source for this? My 40's cantilever (handed down from dad, also my daily use household box) has a handle that looked exactly like yours... I ended up wrapping it with paracord and it's held up well, the old one was literally falling apart.
Amazon. I found a reinforced handle designed for a large amplifier. It does feel stout. I removed its loops and used the originals to mount it.

If I have to replace it, I'm going with the handles RTM posted.
 

Machinehead

Well-known member
Joined
Jan 10, 2025
Messages
59
Great job!
Can I ask a few questions?
Can you show how or what you used for the rivets?
Also anymore on the painting, that looks like a great job.
Could you have filled the hasp holes with JB weld and ground it off, then paint it?
 
OP
P

Panicman

Member
Joined
May 23, 2026
Messages
15
Sure-

I used M4 solid aluminum rivets very much like pictured below. I did trim most of the rivets down by 1/8" or so with some side cutters, and filed flat.

I used a rivet set tool that is designed for old VW hubcap clips, and just a ball peen hammer on the back sides.

I positioned the box such that when possible I could position the setting tool on a solid surface, and then pound away on the rivet end.

For painting, I thought the jig was clever, as it meant I didn't need to reposition the box at all, and could apply the coats easily on all sides. I just used Rustoleum: Hammered bronze 3 coats, Flat camo brown 3 coats, and flat clear 3 coats.

I wanted to remove as much rust as I could, and save as much of the crinkle texture as possible.

For the hasp holes, I figured they were part of this old box's past, and for my needs, they don't hurt anything.

If I had committed to a more serious resto, I'd have welded the holes shut, I think. You could probably use JB as well. IMG_2300.jpegIMG_2301.jpeg
 

Beerhippie

Well-known member
Joined
Oct 13, 2023
Messages
9,654
Location
Far NE Oregon
Amazon. I found a reinforced handle designed for a large amplifier. It does feel stout. I removed its loops and used the originals to mount it.

If I have to replace it, I'm going with the handles RTM posted.
I found a beat-to-death old suitcase at a second-hand store for $3. The handle was a near-identical match for mine, and the only thing on the suit case worth saving.
 
To avoid these ads, REGISTER NOW!
Top Bottom