To avoid these ads, REGISTER NOW!

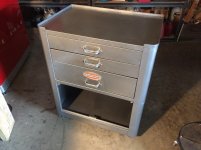
1950s Craftsman Tool Box - How Would You Fix This?

thehorse13

Well-known member
Joined
Mar 15, 2015
Messages
3,481
Location
Jefferson County, WV
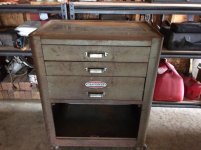
Today I found a few minutes to begin tearing down my new to me $25 Craftsman roller. When I removed all of the drawers, I discovered that this poor thing had a rough past.

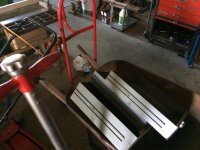
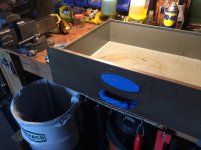
The bottom door is missing and someone took a grinder to the ears on all of the drawers. The ears are what cause the drawers to lock when the bottom door is closed. I will have to bend a lot of metal back into place inside the box but the locks will never work again even if I can find a replacement door.

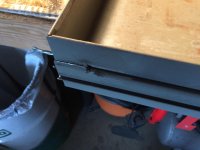
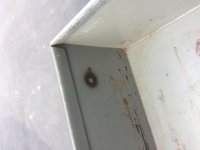
I then inspected the drawers and discovered a split at the back of one of the drawer rail guides. It's about 2 inches long and I'm on the fence about how to repair it.

The metal is very thin and I'm a bit worried about burning through it if I take a mig welder to it. Then of course I will have to use a dremel to grind and shape the repair so that it works properly with the frame rail.

Has anyone repaired something like this with any success? Thanks!
 

Attachments

  • IMG_4360.jpg
    IMG_4360.jpg
    145.3 KB · Views: 175
  • IMG_4362.jpg
    IMG_4362.jpg
    141.3 KB · Views: 167
  • IMG_4352.jpg
    IMG_4352.jpg
    142.6 KB · Views: 175
To avoid these ads, REGISTER NOW!

Craptain

Well-known member
Joined
Apr 18, 2013
Messages
4,031
Location
Tampa Bay FL
I don't recall the name of the thread but someone did a full restoration of a newer but worse box than yours. It's doable and worth it.

Sent from my SM-G900T using Tapatalk
 
OP
T

thehorse13

Well-known member
Joined
Mar 15, 2015
Messages
3,481
Location
Jefferson County, WV
I'm sure I will do fine once I figure out the best way to go after this little hiccup. :)

I may just take the welder to it and call it a day. lol
 

CNGsaves

Well-known member
Joined
Sep 26, 2012
Messages
13,233
Location
KS and OK
+1 for this to become the Zeeman (#2) restoration thread !! ;)

Looking forward to that great old Craftsman toolbox getting new life.

x2 to practice your technique on mig spot welding patches on sacrificial metal. Only when ready, work on the C-Man box. Also recommend viewing all the YouTubes by WeldingTipsAndTricks as he's great.
 
OP
T

thehorse13

Well-known member
Joined
Mar 15, 2015
Messages
3,481
Location
Jefferson County, WV
Oh I know how to weld I'm just lazy this week and looking for any reason to fix it another way. lol. Unfortunately, I'm going to have to strip down the area carefully and then get down to tack welding and grinding fun.

Im getting the new rivets ready, body hammers out and a few cans of Rustoleum Hammered Grey paint ready to go.

Body work will begin once I get the castors off.
 

smokeyburb

Well-known member
Joined
Aug 20, 2014
Messages
163
Location
Southeast AZ
Spot welder should work. If you don't have one then drill a small hole (about 1/8" or 3/16") through the drawer from the inside. Only drill through the drawer, not the slide. Clean the metal shavings from between the layers, get them all out so you can clamp everything together tight. Then make a tack weld through the hole. You might need to make two holes and two tack welds, but a little heat and mig wire goes a long way. Put the weld inside the drawer so you don't leave a lump in the slide area that will have to be ground smooth for the drawer to work correctly.

I've welded panels together this way on my Suburban and a Blazer I had before the Burb.

Sent from my SCH-I545 using Tapatalk
 

Zeeman

Well-known member
Joined
Mar 21, 2016
Messages
1,185
Location
Bartow County Georgia
I like Smokeyburb's idea. That metal is plenty thick for welding a few spots. It does not look rusty. I'm looking forward to the finished product.
 
OP
T

thehorse13

Well-known member
Joined
Mar 15, 2015
Messages
3,481
Location
Jefferson County, WV
The split is in the very top of the slide, dead center. I would have used the, "drill and fill" technique if it was a matter of the slide being detached from the drawer.
 

rsanter

Well-known member
Joined
Dec 22, 2007
Messages
18,523
Location
visalia ca
There are a couple ways to properly repair that slide rail.
If you weld it you have to be sure not to burn through which could make the inner slide piece not fit. Even if you grind it back out it will have a rough spot.

Method 1, get some copper that will fit into that slide very snug and then weld the crack. Prefer with a TIG but a MIG can work. The copper will resist the weld and help prevent blow through as well as pull heat to reduce warping.

Method 2, remove that slide and make a new one. This is the best way and with a brake it won't be that hard to make. Ideally you spot weld the new one back on.

Method 3, remove those sides and swap then side for side. This way the main stress will be on a different part and the old slide will act like new (almost)

Bob
 

smokeyburb

Well-known member
Joined
Aug 20, 2014
Messages
163
Location
Southeast AZ
The split is in the very top of the slide, dead center. I would have used the, "drill and fill" technique if it was a matter of the slide being detached from the drawer.

Using my phone it was difficult to tell the crack was at the top. That information does change the game.

rsanter has good ideas; making a new slide might be easiest.
 
To avoid these ads, REGISTER NOW!
OP
T

thehorse13

Well-known member
Joined
Mar 15, 2015
Messages
3,481
Location
Jefferson County, WV
I like to preserve as much of the original parts as possible so I'm going to try and repair the old slide first. If that fails, I will just cut one off a spare parts drawer that I have and then, "drill and fill" the replacement on there.

Stay tuned.
 

Al Borland

Well-known member
Joined
Jan 20, 2016
Messages
1,599
Make sure it's clean, really clean and gasweld with a jeweler's torch. Clamp it tight and strictly fusion weld with no filler.
 

6PTsocket

Well-known member
Joined
Mar 12, 2014
Messages
4,593
Maybe I am not seeing it right or you may be looking for a pretty restoration but what about a patch inside the drawer extending above and below the slide, pop riveted in place from the outside. Push the slide and the torn side agsinst the patch and pop rivet through the slide. It is functional if not stock looking.

Sent from my SM-G900V using Tapatalk
 
OP
T

thehorse13

Well-known member
Joined
Mar 15, 2015
Messages
3,481
Location
Jefferson County, WV
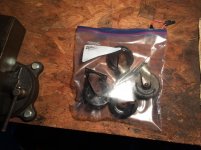
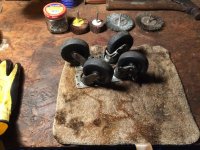
Today I did some work on the Craftsman roller. You'll notice the nice rusty wheels that will now get an Evapo-Rust bath for 24 hours.

Just to recap...

When fully taken apart, I noticed that someone gutted the internal drawer locks and also cut the ears off the drawers. Because of this, I will just clean this box up and make it look really nice, but not perfect.

Below are the results of today's progress. Enjoy!
 

Attachments

  • IMG_4378.jpg
    IMG_4378.jpg
    135.4 KB · Views: 50
  • IMG_4377.jpg
    IMG_4377.jpg
    145.2 KB · Views: 45
  • IMG_4373.jpg
    IMG_4373.jpg
    140.8 KB · Views: 43
  • IMG_4372.jpg
    IMG_4372.jpg
    152.4 KB · Views: 48
OP
T

thehorse13

Well-known member
Joined
Mar 15, 2015
Messages
3,481
Location
Jefferson County, WV
Here are what the wheels look like after a nice Evapo-Rust bath. Clean enough for me.

Next up will be cleaning a giant stain out of one of the drawers and welding up the broken rail on the other drawer.
 

Attachments

  • IMG_4380.jpg
    IMG_4380.jpg
    150.7 KB · Views: 44
OP
T

thehorse13

Well-known member
Joined
Mar 15, 2015
Messages
3,481
Location
Jefferson County, WV
Today I went after the drawer with the split rail. Upon closer inspection, the area where the rail split was paper thin. No amount of welding would solve that. For now, I trimmed the paper thin metal away and just booger tack welded the area that had some meat. It will hold fine and won't be seen so I consider this bush fix checked off the list. I will clean up the bead of weld with a grinder before painting.
 

Attachments

  • IMG_4381.jpg
    IMG_4381.jpg
    129.3 KB · Views: 38
OP
T

thehorse13

Well-known member
Joined
Mar 15, 2015
Messages
3,481
Location
Jefferson County, WV
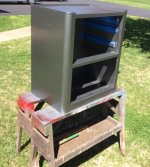
Here are a few pics along the way. In the end, the bottom roller is now paired up with the top box I had laying around for a long time.

On to the next adventure...
 

Attachments

  • IMG_4384.jpg
    IMG_4384.jpg
    134.1 KB · Views: 42
  • IMG_4385.jpg
    IMG_4385.jpg
    138.8 KB · Views: 45
  • IMG_4386.jpg
    IMG_4386.jpg
    140.1 KB · Views: 43

CNGsaves

Well-known member
Joined
Sep 26, 2012
Messages
13,233
Location
KS and OK
Very nice work OP . . . . turned out great !! :thumbup:

This being GJ, in those 3 pics. . . I spied 2 great vises, Coke machine and cool Texaco barrel.
What is that monster vise in the 3rd pic ??
 
Last edited:
To avoid these ads, REGISTER NOW!
Top Bottom