To avoid these ads, REGISTER NOW!

1951 Merc Panel Repair

Builderrhys

Well-known member
Joined
Nov 27, 2010
Messages
69
Location
Sarnia, Ontario, Canada
Hello All,
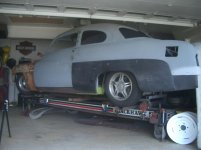
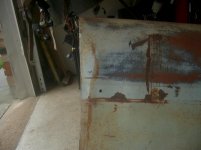
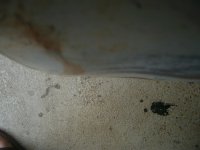
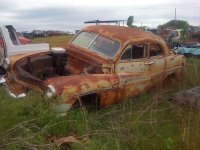
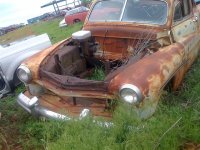
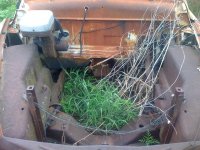
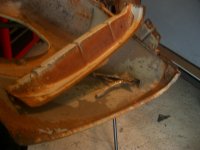
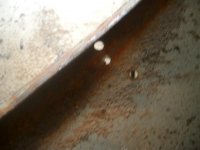
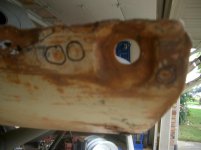
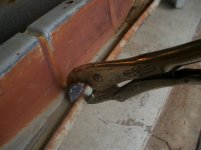
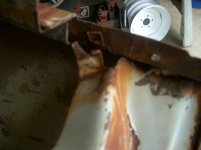
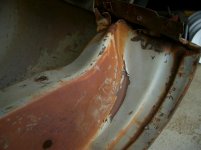
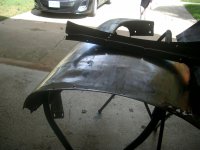
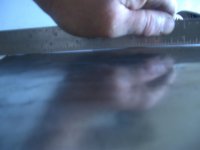
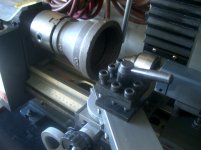
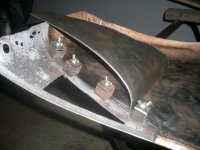
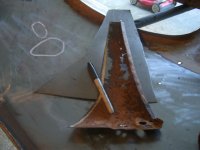
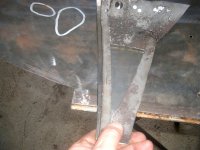
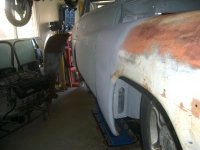
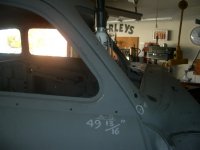
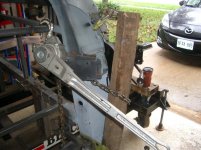
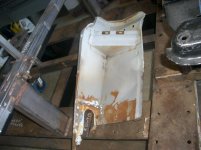
I am by no means a body repair technician but I have some basic skills and the confidence to take this on. I would like to try and repair the below right front fender but where do I begin? Hoping some GJ experts can chime in and get me going. I will be removing the back side support brace for a lower patch panel that I have to fab and weld in. I think that the crease should be repaired while the fender brace is off. I have included a picture with the door fitment to fender. A quick picture of the car (this is a 51 Merc on a Lincoln Mark VIII chassis lengthened to 118" wheelbase and Merc shell widened 5-1/2", ignore the roller wheels and tires). Your thoughts guys and girls? Thanks, Rhys.
 

Attachments

  • 003.jpg
    003.jpg
    72.7 KB · Views: 157
  • IMGP3921.jpg
    IMGP3921.jpg
    135.5 KB · Views: 171
  • IMGP3922.jpg
    IMGP3922.jpg
    138.9 KB · Views: 155
  • IMGP3923.jpg
    IMGP3923.jpg
    135.5 KB · Views: 152
  • IMGP3924.jpg
    IMGP3924.jpg
    130.5 KB · Views: 158
  • IMGP3928.jpg
    IMGP3928.jpg
    141.2 KB · Views: 136
  • IMGP3929.jpg
    IMGP3929.jpg
    133.2 KB · Views: 146
To avoid these ads, REGISTER NOW!

Zeke

Well-known member
Joined
Aug 13, 2009
Messages
17,176
Location
Long Beach CA, the sewer by the sea.
Well, you're going to have a time getting the bracing out from under that pinch seam. There are tools to do that. However, many would choose to cut out the rust and **** weld a patch in.. Where it's bent in, just lay your larger dolly on the high edge and tap the seam back to straight.

Learn to shrink metal with heat. You'll need that skill on the concave part. Heat/shrink will pull it right out in no time.
 
OP
B

Builderrhys

Well-known member
Joined
Nov 27, 2010
Messages
69
Location
Sarnia, Ontario, Canada
Well, you're going to have a time getting the bracing out from under that pinch seam. There are tools to do that. However, many would choose to cut out the rust and **** weld a patch in.. Where it's bent in, just lay your larger dolly on the high edge and tap the seam back to straight.

Learn to shrink metal with heat. You'll need that skill on the concave part. Heat/shrink will pull it right out in no time.

Thanks Milt,
Couple of questions: I am usually stretching, planishing or hammering out my welds, so I have no experience with shrinking (other than fabbing up patch panels with my shrinker/stretcher). I assume running some heat in the concave section and quenching would shrink, correct? Would a shrinking disc on my 5" grinder work better. Next question would be the dolly high side, do you have a picture? Thanks, Rhys.
 
OP
B

Builderrhys

Well-known member
Joined
Nov 27, 2010
Messages
69
Location
Sarnia, Ontario, Canada
I do not have much of a set up in regards to hand tools for body work. Here they are, which dollie do you recomend or suggest I purchase. Thanks, Rhys.
 

Attachments

  • IMGP3930.jpg
    IMGP3930.jpg
    148.3 KB · Views: 54

MP&C

Well-known member
Joined
Oct 21, 2009
Messages
4,403
Location
Leonardtown, MD
Rhys, Looking at where the damage is, I'd agree that you would have better luck effecting the repair by removing the rear inner fender brace. As you don't want to inflict any more damage with this removal process (got enough to worry about now, right?) here is an "unflanging tool" that may help to get the fender skin's folded flange unfolded just enough to make the brace removal a bit less painful.. The pic is linked to the tool's fabrication thread.....


Next, once the brace is removed to provide access to both sides, I would again lean toward methods that will minimize any further damge, or specifically in this case, more stretching. Have a look at this dent repair thread, I think a combination of the donut dolly technique, perhaps favoring a flat dead blow hammer over the body hammers you show, may have enough of non-metal on metal that would introduce more stretch. Tinman added a blurb toward the end of the thread, expanding on the principle by using a dead blow as a dolly. So depending on what you have to work with for "tooling", you may need to adapt as needed to overcome.. Using this process your dolly would be behind the panel spanning the low and you would hammer/bump from the outside.


http://www.jalopyjournal.com/forum/showthread.php?t=610135


Back to tools again, it may also help to use a *******/spoon over a body hammer to spread out the blunt force for less chance of adding dings from the hammer's more localized area of force applied. So here's another thread on making a spoon if you feel it may help.


http://www.garagejournal.com/forum/showthread.php?t=73834


By all means take plenty of pics, and let us know how it progresses! :beer:
 
Last edited:

e-tek

Well-known member
Joined
Dec 19, 2007
Messages
10,690
Location
Saskatoon, SK
Never "quench" your metal!! It's an old-school mistake. The metal shrinks without quenching it.... All quenching does is make the metal brittle.
 
OP
B

Builderrhys

Well-known member
Joined
Nov 27, 2010
Messages
69
Location
Sarnia, Ontario, Canada
As you don't want to inflict any more damage with this removal process (got enough to worry about now, right?) here is an "unflanging tool" that may help to get the fender skin's folded flange unfolded just enough to make the brace removal a bit less painful.. :beer:

Will do Robert. The upper section of the back brace has become unflanged already. First step then is to follow the thread and fab up an unflanging tool. I will post pictures.

Never "quench" your metal!! It's an old-school mistake. The metal shrinks without quenching it.... All quenching does is make the metal brittle.

Thanks for the above advice Mr. Etek. I have followed many of the threads posted by all that are replying to mine and I really appreciate the direction. I will post pictures step by step and see where it takes me. Thanks, Rhys.
 

Zeke

Well-known member
Joined
Aug 13, 2009
Messages
17,176
Location
Long Beach CA, the sewer by the sea.
Never "quench" your metal!! It's an old-school mistake. The metal shrinks without quenching it.... All quenching does is make the metal brittle.

You can use compressed air. Quenching does make the metal brittle as does planishing. I don't worry so much because I don't expect to ever work that panel again. If somebody else has to, that's his problem.
 
OP
B

Builderrhys

Well-known member
Joined
Nov 27, 2010
Messages
69
Location
Sarnia, Ontario, Canada
Found some pictures of the car that the fenders were removed from. Not sure of the mechanics of how the crease came about or if it really matters at all. From the look of the rest of the car it does not appear to have been in an accident. More than likely as a result from being pushed aroound the yard. Regards, Rhys.
 

Attachments

  • IMG_0199.jpg
    IMG_0199.jpg
    147.2 KB · Views: 40
  • IMG_0201 (Small).JPG
    IMG_0201 (Small).JPG
    80.1 KB · Views: 39
  • IMG_0202 (Small).JPG
    IMG_0202 (Small).JPG
    81.2 KB · Views: 38
  • IMG_0205 (Small).JPG
    IMG_0205 (Small).JPG
    71 KB · Views: 38
OP
B

Builderrhys

Well-known member
Joined
Nov 27, 2010
Messages
69
Location
Sarnia, Ontario, Canada
Found the back support damaged a bit (notice the split and peeling paint) and attachement welds to the top of the fender sheared. Made the unflanging tool and it worked great. located all the spot welds, even the one under the flange. Back support is out and now just the undercoating to remove with the heat gun. I will then clean to bare metal and grid it off and try some off dolly hammering. I think the slapping spoon would work best. Regards, Rhys.
 

Attachments

  • IMGP3941.jpg
    IMGP3941.jpg
    138.4 KB · Views: 57
  • IMGP3942.jpg
    IMGP3942.jpg
    134.2 KB · Views: 53
  • IMGP3938.jpg
    IMGP3938.jpg
    141 KB · Views: 59
  • IMGP3936.jpg
    IMGP3936.jpg
    137.4 KB · Views: 70
  • IMGP3935.jpg
    IMGP3935.jpg
    138.3 KB · Views: 63
  • IMGP3932.jpg
    IMGP3932.jpg
    140.8 KB · Views: 60
  • IMGP3931.jpg
    IMGP3931.jpg
    132.2 KB · Views: 58
To avoid these ads, REGISTER NOW!
OP
B

Builderrhys

Well-known member
Joined
Nov 27, 2010
Messages
69
Location
Sarnia, Ontario, Canada
Nice time to fix that rust area while the brace is out.. :thumbup:

Yes, we will see how well my repairs go on the crease. If I can straighten this out I will move to the patch panel. I have the same lower repairs to make on the left side. I will remove the brace to do that side as well. Rhys.
 
OP
B

Builderrhys

Well-known member
Joined
Nov 27, 2010
Messages
69
Location
Sarnia, Ontario, Canada
Just had a bit of time tonight in the garage so I cracked out the heat gun and cleared some of the undercoating. Hopefully I get the opportunity this weekend to crack into it, Rhys.
 

Attachments

  • IMGP3943.jpg
    IMGP3943.jpg
    139.6 KB · Views: 38
OP
B

Builderrhys

Well-known member
Joined
Nov 27, 2010
Messages
69
Location
Sarnia, Ontario, Canada
Only had a couple of hours of garage time today but I did mamage to clear all of the undercoating on the back side and I stripped the damaged area to bare metal on the front and back side. I also sand blasted the back side support ready for a bit of repair. I think I should bend the edge flange to 90 degree to straighten out the edge damage. Thoughts? I will read Roberts thread on "off dolly" work and see what happens. Thanks, Rhys.
 

Attachments

  • IMGP3945.jpg
    IMGP3945.jpg
    138.3 KB · Views: 33
  • IMGP3946.jpg
    IMGP3946.jpg
    134.6 KB · Views: 37
OP
B

Builderrhys

Well-known member
Joined
Nov 27, 2010
Messages
69
Location
Sarnia, Ontario, Canada
I managed to make good progress on the crease. I had to bend the flange back and really bang out the top, back edge as it was really low. I also had to curve more contour into the panel at the top edge. I did this with my knee and work boots. I used a cast iron pipe reducer to "off dolly" bump out many of the low spots. I am about 90 percent of the way there at this point, I think. This is really time consuming. constantly flipping the panel over, fitting to the car, etc.... I was barely bumping or tapping with my crowned body hammers. It really did not take much force to get the metal moving. I have a real urge to crack out my hand held English Wheel or panel wheel to smooth everything out nicely but I will hold back until I do a bit more bumping and patching. Any advice or information appreciated. I hate body work, Rhys.
 

Attachments

  • IMGP3955.jpg
    IMGP3955.jpg
    138.8 KB · Views: 52
  • IMGP3947.jpg
    IMGP3947.jpg
    139.1 KB · Views: 51
  • IMGP3952.jpg
    IMGP3952.jpg
    167.7 KB · Views: 58
  • IMGP3950.jpg
    IMGP3950.jpg
    136.8 KB · Views: 57
  • IMGP3954.jpg
    IMGP3954.jpg
    139.5 KB · Views: 55
  • IMGP3949.jpg
    IMGP3949.jpg
    134.9 KB · Views: 58

Zeke

Well-known member
Joined
Aug 13, 2009
Messages
17,176
Location
Long Beach CA, the sewer by the sea.
Too bad you're not enjoying your efforts. A nicely finished panel is very satisfying and you should be proud you can do it.

You mentioned "off dolly" and that tells me you know more than you're letting on. :D

Don't over beat it. Take your time with gentle hits. Looks good.

Get a Vixen file to see where the lows and highs are.
 
OP
B

Builderrhys

Well-known member
Joined
Nov 27, 2010
Messages
69
Location
Sarnia, Ontario, Canada
The vixen file sounds good. The small high and low spots are bugging me. I will pick one up with a slapping spoon. I think the spoon would work better for me on the wider or open areas. The "off dolly" term came from Robert's thread. I really don't know my way around body work (I really wish that I did and had spent more time with this when I was younger, I can see that it will be very rewarding when completed). I have always concentrated on chassis and drive line fabrication and it is my comfort zone. I have done well at patch panel fabrication and install with my limited tools and skills, still lots of skill and knowledge to pick up with this as well. I look forward to doing as much of the body work on this old Merc as I can and I appreciate all of the input and advice, thanks, Rhys.
 
OP
B

Builderrhys

Well-known member
Joined
Nov 27, 2010
Messages
69
Location
Sarnia, Ontario, Canada
Managed a bit of garage time tonight. I really do not have much as far as tooling and what I do have is Princess Auto (Canadian version of Harbour Freight). I am working on the patch panel, I tried to think it through as far as order of steps to take and it seems to be going okay. I am going to make a die to press in the pictured contour. I think this is best to do after I fully form the patch panel and before I weld it in? Regards, Rhys.
 

Attachments

  • IMGP3967.jpg
    IMGP3967.jpg
    137.9 KB · Views: 49
  • IMGP3964.jpg
    IMGP3964.jpg
    140.6 KB · Views: 56
  • IMGP3962.jpg
    IMGP3962.jpg
    139.5 KB · Views: 53
  • IMGP3961.jpg
    IMGP3961.jpg
    142.9 KB · Views: 49
  • IMGP3960.jpg
    IMGP3960.jpg
    136.3 KB · Views: 48
  • IMGP3959.jpg
    IMGP3959.jpg
    137.3 KB · Views: 52
  • IMGP3956.jpg
    IMGP3956.jpg
    138.2 KB · Views: 50
OP
B

Builderrhys

Well-known member
Joined
Nov 27, 2010
Messages
69
Location
Sarnia, Ontario, Canada
Finished the die and pressed away. Not exactly as factory but a one shot deal so it will have to do. I had to trim the flanged edge to get the correct contour to the door. I will have to tig weld the edge back together. I don't see any other way of doing this edge without some crazy tooling. I have it clamped up ready to tig in. Looks good so far. Ordered a slapping spoon after work today, should be in Friday (in time to slap away all weekend). Regards, Rhys.
 

Attachments

  • IMGP3975.jpg
    IMGP3975.jpg
    142 KB · Views: 35
  • IMGP3973.jpg
    IMGP3973.jpg
    142.8 KB · Views: 26
  • IMGP3972.jpg
    IMGP3972.jpg
    142.1 KB · Views: 27
  • IMGP3971.jpg
    IMGP3971.jpg
    137.9 KB · Views: 30
  • IMGP3970.jpg
    IMGP3970.jpg
    142.8 KB · Views: 28
  • IMGP3969.jpg
    IMGP3969.jpg
    138.9 KB · Views: 32
  • IMGP3968.jpg
    IMGP3968.jpg
    144.9 KB · Views: 28
OP
B

Builderrhys

Well-known member
Joined
Nov 27, 2010
Messages
69
Location
Sarnia, Ontario, Canada
Well, I tried the dinging spoon out and I can see it's advantage over flatter areas but on all the curves of this fender I just feel like I am chasing my tail. I decided to put the brace back in and fit the fender. It has much better fitment but I still need to put a contour or bend in near the top to match the door. I think that to do this I may have to strap it down on my welding table and use my hydraulic jack to get it where it needs to be? I can see where I shrank the outer skin where I put the brace spot welds back in but I have no way of hammering this out or stretching it. I think that I also have to pull the fender mounting flange back a bit to get the required fender to door gap again with hydraulic jacks or come-along. I need to get these gaps just right befoe I finish welding out the Lincoln chassis to the Merc; thus the reason for all of this fender repair. Any suggestions would be appreciated at this point. Thanks, Rhys.
 

Attachments

  • 005.jpg
    005.jpg
    102.4 KB · Views: 23
  • 001.jpg
    001.jpg
    80.1 KB · Views: 25
  • IMGP3986.jpg
    IMGP3986.jpg
    136.9 KB · Views: 26
  • IMGP3984.jpg
    IMGP3984.jpg
    135.9 KB · Views: 36
  • IMGP3985.jpg
    IMGP3985.jpg
    142.2 KB · Views: 26
  • IMGP3980.jpg
    IMGP3980.jpg
    139.4 KB · Views: 28
  • IMGP3976.jpg
    IMGP3976.jpg
    138 KB · Views: 27
OP
B

Builderrhys

Well-known member
Joined
Nov 27, 2010
Messages
69
Location
Sarnia, Ontario, Canada
Pictures of the fender mouting flange repair. Although I used a jig from my frame machine to keep door hinge position and locate the "A" pillar extension and fender mounting flange the car was pretty rusty so it may just need that little tweak to get the door to fender gaps.
 

Attachments

  • IMGP3803.jpg
    IMGP3803.jpg
    103.1 KB · Views: 26
  • IMGP3801.jpg
    IMGP3801.jpg
    112.4 KB · Views: 25
  • 008.jpg
    008.jpg
    91.2 KB · Views: 23
  • 006.jpg
    006.jpg
    107 KB · Views: 24
OP
B

Builderrhys

Well-known member
Joined
Nov 27, 2010
Messages
69
Location
Sarnia, Ontario, Canada
Well, I beat this fender around for days and I could not seem to get any better with gaps and it always seemed to deform back to the original crease (I wish I had some basic skills here).

IMGP3993.jpg

I decided to weld in a patch from a second rusted out fender

IMGP3997.jpg

I had to modify the mounting flange

IMGP3996.jpg

All tacked in. Gaps are better. Welding in the patch panel is like bolting in a new panel in my opinion. I wish I had the skills to finish out the dents and dings. I will keep on trying as I come across more panel repair but I needed to get moving with door gaps and this was holding me up :dunno:

IMGP3999.jpg

IMGP4000.jpg

IMGP4001.jpg

IMGP4002.jpg
 
To avoid these ads, REGISTER NOW!
Top Bottom