To avoid these ads, REGISTER NOW!

1955 Craftsman Vise Rehab

TBone69

Well-known member
Joined
Sep 9, 2009
Messages
56
Location
NJ
Just about a year ago I aquired a bunch of tools that had been submerged by the tidal surge of Hurricane Sandy.

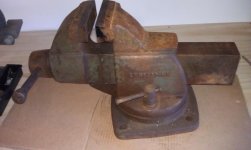
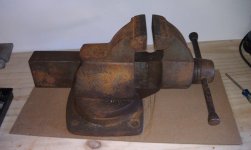
This Craftsman vise was in good shape but was a little rusty and crusty, nothing a little elbow grease and some paint couldnt take care of.

The moveable jaw is stamped 6 55 I assume this means June 1955. An it looks the part according to old Craftsman tool catalogs.

I believe this is the BIG Dog of that year, Jaws measure 4 1/2 inches and opens 8 plus inches. I havent weighed it but damn it's heavy.

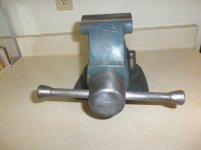
So hear is the before as I received it. She still worked but was a little stiff and looked a little worse for wear.
 

Attachments

  • IMAG1603.jpg
    IMAG1603.jpg
    151.4 KB · Views: 164
  • IMAG1604.jpg
    IMAG1604.jpg
    140.3 KB · Views: 186
To avoid these ads, REGISTER NOW!
OP
T

TBone69

Well-known member
Joined
Sep 9, 2009
Messages
56
Location
NJ
So after sitting on this since last year I decided I needed to get this baby back in tip top shape and put her to use.

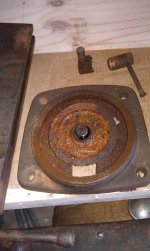
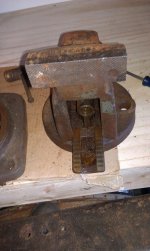
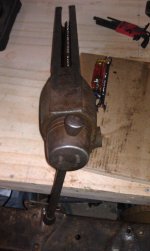
First step disassembly. Note the center bolt is still in the swivel base. It was stuck good and it wasnt till reassembly that I realized it was supposed to come out.
 

Attachments

  • IMAG1605.jpg
    IMAG1605.jpg
    145.4 KB · Views: 144
  • IMAG1606.jpg
    IMAG1606.jpg
    146.8 KB · Views: 134
  • IMAG1610.jpg
    IMAG1610.jpg
    147.9 KB · Views: 130
  • IMAG1607.jpg
    IMAG1607.jpg
    140.7 KB · Views: 133

gilbo

Well-known member
Joined
Feb 1, 2010
Messages
717
Run it through electrolysis for a few hours and it will clean right up,and be good as new, if you want some before and after pics, look at the vises in my sig of the one i cleaned up.
 
Last edited:
OP
T

TBone69

Well-known member
Joined
Sep 9, 2009
Messages
56
Location
NJ
Once I had the moveable jaw out it took a little figuring to get the main screw out. There was a collar with set screw. Once the set screw was out I stuck a punch in the set screw hole and just spun the main screw.

Unfortunately I didn't get a good shot of the disassembly at this point. Started cleaning up the small bits on the wire wheel and spraying down everything with degreaser and or brake fluid.

Started cleaning up the machined areas with scrapers to remove the heavy crud and rust and finished them up with WD40 and scotch brite.
 

Attachments

  • IMAG1616.jpg
    IMAG1616.jpg
    151 KB · Views: 127
  • IMAG1615.jpg
    IMAG1615.jpg
    138.1 KB · Views: 121
OP
T

TBone69

Well-known member
Joined
Sep 9, 2009
Messages
56
Location
NJ
At this point it was time to tackle the BIG pieces got out the grinder loaded up with wire wheel cups. Wear long pants, sleaves, eye protection to protect from becoming a wire porcupine and a mask to protect from rust, dust, crust and probably lead paint.
 

Attachments

  • IMAG1609.jpg
    IMAG1609.jpg
    150.7 KB · Views: 95
OP
T

TBone69

Well-known member
Joined
Sep 9, 2009
Messages
56
Location
NJ
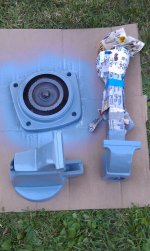
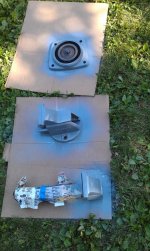
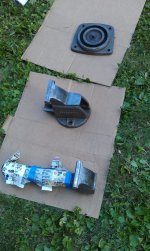
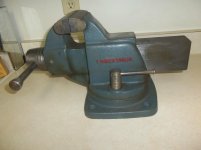
Getting ready for paint. Cleaned everything down with brake clean and taped off parts you dont want painted.

I used Rustoleum Machine Grey and applied 4 coats over a nice sunny Sunday.
 

Attachments

  • IMAG1618.jpg
    IMAG1618.jpg
    149.9 KB · Views: 112
  • IMAG1614.jpg
    IMAG1614.jpg
    151.7 KB · Views: 88
  • IMAG1613.jpg
    IMAG1613.jpg
    152.9 KB · Views: 98
OP
T

TBone69

Well-known member
Joined
Sep 9, 2009
Messages
56
Location
NJ
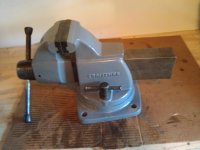
After a week of letting the paint dry/cure I realized the center bolt on the swivel should come out and well let the swivel swivel.

I had just picked up an aluminum hammer/mallet after a day of hitting garage sales and gave it a few whacks. Came right out and cleaned it up on the wire wheel and cleaned out the bore with the dremel and wire wheel.

The moveable jaw also has a 1/4 inch check ball oiler for the main screw and it was rusted up beyond use. I drove it out with a long drift. Cleaned up the screw bore again with wire wheel, some WD40 and scotch brite.

I didnt take too many pics of the reassembly as I was moving along and getting excited to finish it up.

I cleaned up some over spray, ran a tap thru the jaw bolt holes , lubed up the swivel, swivel bolt, and main screw with never cease, some regular grease on the machined area of the moveable jaw and a few drops of oil in the main screw bore. Still waiting in a new check ball oiler and will install as soon as it gets in.

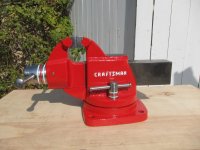
It works great and is nice and smooth with no play in it. They just dont make them like this anymore!

The salt water really took a toll on the shiny bits and I nicked the painte here and there but hey it's a vise and will be put to good use real soon for our Father Son Model A build.

I also have a vintage craftsman grinder of same vintage that will get a rebuild next. Then to a Dental lathe/grinder motor.

I also got a Delta Rockwell bench top drill press luckily that one sat above the flood line and just needed a good whipe down and some oil. It needs new power cords and maybe a belt but works great.

I'll be posting new threads as I start these projects.
 

Attachments

  • IMAG1760.jpg
    IMAG1760.jpg
    137.3 KB · Views: 318

fullthrottle24

Well-known member
Joined
Oct 22, 2010
Messages
367
Location
Ohio
Nice work, good luck with the other projects.
Love seeing old tools given a new life.
Now to see how many other vises you end up with!
 

DandDMachine

Well-known member
Joined
Feb 22, 2008
Messages
227
Location
Bloomington, MN
I love those old Craftsman vises. We had a customer bring in a 454 engine for a rebuild out of a 1970 Corvette that had also been submerged in Hurricane Sandy. Its amazing what that salt water can do to metal. Much like your vise it turned out great in the end.
 

7th Kahuna

Well-known member
Joined
Aug 4, 2012
Messages
1,704
Location
Los Angeles, CA
Beautiful job. Every time I see one of these storms, floods, fires, etc., I think about all the basements full of great old tools and wonder how many get trashed. Nice to see a couple getting returned to service. :thumbup:
 

oldldh

Well-known member
Joined
May 22, 2012
Messages
3,700
Location
Fairhope, AL
I really hate you!!!!:evil::evil:

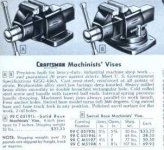
What you have is a Craftsman 5197 vise (see the attached Catalog page)...

I have been looking for one of them for a very long time...the 5197 and 5198 are the best vises Craftsman ever marketed...:drool::drool:

Your vise was made by Columbian (we think) and weighs 77 pounds...she is a STOUT 4 1/2" vise...best looking vise ever made!!!...(By the way, the 5198 is the Big Dog...5" Jaws and 107 pounds!!!!)

As I said before, "I REALLY, REALLY HATE YOU!!!:rocker::rocker:

Ya dun gud, Bubba...
 

Attachments

  • craftsman vise 1957.jpg
    craftsman vise 1957.jpg
    31.3 KB · Views: 111

oldldh

Well-known member
Joined
May 22, 2012
Messages
3,700
Location
Fairhope, AL
Here are some more photos of the 5196/5197/5198 series...

The two photos in a "verde blue" is an original, unrestored 5196 that sold on Ebay for $265.00 (including freight)...the 5196 is a four inch vise, smaller than yours...

The red one is just really nice...

I still really hate you!!!:evil::evil:
 

Attachments

  • cmanvise.jpg
    cmanvise.jpg
    118.7 KB · Views: 108
  • craftsmancolumbian.jpg
    craftsmancolumbian.jpg
    135.2 KB · Views: 128
  • nicecmcn4in.jpg
    nicecmcn4in.jpg
    125.8 KB · Views: 121
OP
T

TBone69

Well-known member
Joined
Sep 9, 2009
Messages
56
Location
NJ
I really hate you!!!!:evil::evil:

What you have is a Craftsman 5197 vise (see the attached Catalog page)...

I have been looking for one of them for a very long time...the 5197 and 5198 are the best vises Craftsman ever marketed...:drool::drool:

Your vise was made by Columbian (we think) and weighs 77 pounds...she is a STOUT 4 1/2" vise...best looking vise ever made!!!...(By the way, the 5198 is the Big Dog...5" Jaws and 107 pounds!!!!)

As I said before, "I REALLY, REALLY HATE YOU!!!:rocker::rocker:

Ya dun gud, Bubba...

Here are some more photos of the 5196/5197/5198 series...

The two photos in a "verde blue" is an original, unrestored 5196 that sold on Ebay for $265.00 (including freight)...the 5196 is a four inch vise, smaller than yours...

The red one is just really nice...

I still really hate you!!!:evil::evil:


Hahahaha. Yup 5197 it is, was finally able to make out Model 05197 on the handle.

I would have done the verde blue but couldn't find anything close. Figured machine grey was the next best option. It now matches my Delta/Rockwell drill press and Craftsman/Atlas 618 lathe.

I got great satisfaction putting it back into service and think I am falling into the vise sickness:) I need more!!!
 

Canoe50

Well-known member
Joined
Feb 8, 2012
Messages
234
Location
Rochester, NY
Nice job on the resto. Rustoleum has a color very close to that verde blue. Some guys here have mentioned it when restoring their Wiltons. I don't recall what it's called, but someone may chime in on that. I couldn't find it at Home Depot, but did see it at Ace Hardware.
 
To avoid these ads, REGISTER NOW!

Bricago

Well-known member
Joined
Mar 2, 2013
Messages
83
Location
Chicago
Once I had the moveable jaw out it took a little figuring to get the main screw out. There was a collar with set screw. Once the set screw was out I stuck a punch in the set screw hole and just spun the main screw.

Unfortunately I didn't get a good shot of the disassembly at this point. Started cleaning up the small bits on the wire wheel and spraying down everything with degreaser and or brake fluid.

Started cleaning up the machined areas with scrapers to remove the heavy crud and rust and finished them up with WD40 and scotch brite.

Hello,

Sorry to bump an old thread. I just got a 5196 that I'm trying to restore, and I had a couple of questions for you. The first is about the long set screw and rectangular piece that are in the bottom rear of the static jaw. Does the set screw remove completely from the rectangular piece? I was able to remove a nut, but I'm close to stripping out the hex set screw trying to get it out of the rectangle. Also, I can't tell if the tip of it actually threads into the larger main screw holding piece, or if it just butts up against it.

Second, where on the moveable jaw is the date stamped. You mentioned yours has the month and year. Mine has a lot of paint on it, so it might be buried, but I'd be grateful to know where to look.

Thank you.
 

AceofSpad3s

Well-known member
Joined
Oct 1, 2014
Messages
1,808
Hello,

Sorry to bump an old thread. I just got a 5196 that I'm trying to restore, and I had a couple of questions for you. The first is about the long set screw and rectangular piece that are in the bottom rear of the static jaw. Does the set screw remove completely from the rectangular piece? I was able to remove a nut, but I'm close to stripping out the hex set screw trying to get it out of the rectangle. Also, I can't tell if the tip of it actually threads into the larger main screw holding piece, or if it just butts up against it.

Second, where on the moveable jaw is the date stamped. You mentioned yours has the month and year. Mine has a lot of paint on it, so it might be buried, but I'd be grateful to know where to look.

Thank you.

Not the op but I got a 5196 so I might be able to help. On the static jaw, the date is towards the back of the slide, you will probably need to use some paint stripper or a wire brush if you cannot see it under the paint. Not sure about the set screw, I think it should come out but I have not done that. It should not thread into the main screw, it just buts against it.

Make sure to check for cracks near the jaw ledge, I got mine last week for $15 but did not notice 2 cracks. With one almost going down to the bottom of the base,:sad: ruined my weekend since it is tip top besides the crack, going to keep it in case I eventually find another one that needs donor parts. I have had pretty good luck with vises so it wasn't so bad, I got my 9400 for $50 so I got nothing to complain about. If yours has no cracks, you got a nice vise, looking forward to see what it will look like restored since I can't do it myself. :thumbup:
 

Bricago

Well-known member
Joined
Mar 2, 2013
Messages
83
Location
Chicago
Thanks for the reply, Ace. I'll look for that date tomorrow when I do a little clean up on the slide. As for the set screw, I think you might be referring to a different one--the one that locks a round collar to the main screw. Check out post #4 in the thread, first picture. Just to the left of the swivel bar is a small rectangular piece with a long screw passing through it. This is in the lower rear part of the static jaw. (photo 1) I'm really not sure what it does. I managed to get the nut off, but the forward tip of the screw either enters or butts up against the lower rear part of the bottom left piece in the post #4 picture--the guide for the main screw. The rectangle/screw will jiggle up and down a little, but I think the screw is rusted into the rectangle and possibly the guide piece.

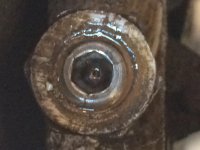
Another point I could really use your help with is the bottom of the main plate. There's a large screw head there (photos 2-3). It appears to connect to the center threaded post. I'm assuming it can be removed, but with the rust layer, I can't find any seams, so I'm not sure where the edges of pieces are. Do you know if the middle bowl shaped toothed wheel is permanently connected to the bottom plate, and just the center threaded bolt separates? Thanks for any advice.

photo_2.jpg

photo_3.jpg

photo_4.jpg
 

jreb10

Well-known member
Joined
Oct 18, 2014
Messages
329
Location
Westby, WI
Thanks for the reply, Ace. I'll look for that date tomorrow when I do a little clean up on the slide. As for the set screw, I think you might be referring to a different one--the one that locks a round collar to the main screw. Check out post #4 in the thread, first picture. Just to the left of the swivel bar is a small rectangular piece with a long screw passing through it. This is in the lower rear part of the static jaw. (photo 1) I'm really not sure what it does. I managed to get the nut off, but the forward tip of the screw either enters or butts up against the lower rear part of the bottom left piece in the post #4 picture--the guide for the main screw. The rectangle/screw will jiggle up and down a little, but I think the screw is rusted into the rectangle and possibly the guide piece.

Another point I could really use your help with is the bottom of the main plate. There's a large screw head there (photos 2-3). It appears to connect to the center threaded post. I'm assuming it can be removed, but with the rust layer, I can't find any seams, so I'm not sure where the edges of pieces are. Do you know if the middle bowl shaped toothed wheel is permanently connected to the bottom plate, and just the center threaded bolt separates? Thanks for any advice.


I've been fortunate to have a couple of this type of vise in the past. The set screw and rectangular piece you are referring to are intended to push against the base of the vise nut. By loosening the lock nut, you can adjust the set screw to push against the vise nut such that handle backlash is minimized, then tighten the lock nut back up. I don't recall if the set screw came all the way out on mine, but you should not need to completely remove it. Just loosen it enough to get it and the rectangular piece out, so the vise nut can be removed.

The large bolt head on the bottom is the head for the threaded end you see on the other side. It is a shoulder bolt, meaning the part below the threads that you cannot see is not threaded. It is intended to hold the base together with the static jaw bottom when swiveling the vise. Clean out the edges around the bolt as best you can and put in some penetrating oil to free it up. I should eventually push out. Be careful not to mar the threads, though.
 
OP
T

TBone69

Well-known member
Joined
Sep 9, 2009
Messages
56
Location
NJ
Thanks for the reply, Ace. I'll look for that date tomorrow when I do a little clean up on the slide. As for the set screw, I think you might be referring to a different one--the one that locks a round collar to the main screw. Check out post #4 in the thread, first picture. Just to the left of the swivel bar is a small rectangular piece with a long screw passing through it. This is in the lower rear part of the static jaw. (photo 1) I'm really not sure what it does. I managed to get the nut off, but the forward tip of the screw either enters or butts up against the lower rear part of the bottom left piece in the post #4 picture--the guide for the main screw. The rectangle/screw will jiggle up and down a little, but I think the screw is rusted into the rectangle and possibly the guide piece.

Another point I could really use your help with is the bottom of the main plate. There's a large screw head there (photos 2-3). It appears to connect to the center threaded post. I'm assuming it can be removed, but with the rust layer, I can't find any seams, so I'm not sure where the edges of pieces are. Do you know if the middle bowl shaped toothed wheel is permanently connected to the bottom plate, and just the center threaded bolt separates? Thanks for any advice.

photo_2.jpg

photo_3.jpg

photo_4.jpg

Yup mine was rusted in as well. Little penetrating oil and couple taps with an aluminum or brass hammer and it came right out. A press would work as well. Then clean it up with wire wheel.

Its a shouldered bolt which allows the vise to swivel. As for the set screw I don't recall taking all the way out.
 
OP
T

TBone69

Well-known member
Joined
Sep 9, 2009
Messages
56
Location
NJ
Hello,

Sorry to bump an old thread. I just got a 5196 that I'm trying to restore, and I had a couple of questions for you. The first is about the long set screw and rectangular piece that are in the bottom rear of the static jaw. Does the set screw remove completely from the rectangular piece? I was able to remove a nut, but I'm close to stripping out the hex set screw trying to get it out of the rectangle. Also, I can't tell if the tip of it actually threads into the larger main screw holding piece, or if it just butts up against it.

Second, where on the moveable jaw is the date stamped. You mentioned yours has the month and year. Mine has a lot of paint on it, so it might be buried, but I'd be grateful to know where to look.

Thank you.[/QUOTE

Take a look back in my pics. The rectangle piece in mine had a bolt, just loosened it up.
 

Bricago

Well-known member
Joined
Mar 2, 2013
Messages
83
Location
Chicago
Yup mine was rusted in as well. Little penetrating oil and couple taps with an aluminum or brass hammer and it came right out. A press would work as well. Then clean it up with wire wheel.

Its a shouldered bolt which allows the vise to swivel. As for the set screw I don't recall taking all the way out.

Thanks, Tbone. You nailed it. The shoulder bolt solution worked perfectly. :thumbup:

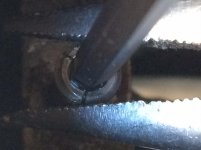
That set screw eventually came out. The solution was this: You can see in photo 1 above the screw going into the rectangular block with the nut flush against the block. I managed to get the nut off by prying the screw up a little and fitting an 11mm deep well socket over it. When I tried an 1/8" allen wrench in the screw it seemed to be slipping inside the head. I thought I was stripping it, but it turned out there were three hairline cracks causing the head to spread open when I twisted the wrench (see photo 1). I tried holding it closed with a pair of pliers while I turned it, but that didn't work (photo 2). Then I thought I could reattach the nut about halfway down the screw, add another nut in front of it as a locking nut, then turn the back nut to grab the screw and pull it out. As soon as I got the nut threaded on the solution was staring me in the face (photo 3). The nut acted like a clamp holding the screw head together, so I could reinsert the wrench and with a few gentle tugs (and a lot of PB Blaster) it backed right out.
 

Attachments

  • photo 4.jpg
    photo 4.jpg
    93.4 KB · Views: 22
  • photo 5.jpg
    photo 5.jpg
    105.1 KB · Views: 20
  • photo-58.jpg
    photo-58.jpg
    115.5 KB · Views: 24

Bricago

Well-known member
Joined
Mar 2, 2013
Messages
83
Location
Chicago
...going to keep it in case I eventually find another one that needs donor parts. I have had pretty good luck with vises so it wasn't so bad, I got my 9400 for $50 so I got nothing to complain about.

$50 for a Wilton 9400? That's just wrong and so right at the same time. Assuming I'm able to extract the headless jaw screw, would you consider selling a replacement from your 5196?
 

AceofSpad3s

Well-known member
Joined
Oct 1, 2014
Messages
1,808
$50 for a Wilton 9400? That's just wrong and so right at the same time. Assuming I'm able to extract the headless jaw screw, would you consider selling a replacement from your 5196?

Even came with the swivel base, I am surprised I got it. It was up for a hour before I found the craigslist ad, safe to say I got to the guys house in a hurry.

I would rather not part out the 5196, sorry. Knowing my luck, I will end up finding another vise that needs exactly what I just sold. Luckily, the jaw screws shouldn't be that hard to find. I would take one of the good ones into a hardware store and get the closest match. If it is too long you can just hack it down to the right length. The set screw that cracked should be easier since the head and length don't have to be the same, just the threads.
 

Bricago

Well-known member
Joined
Mar 2, 2013
Messages
83
Location
Chicago
Ace, thank your for the tips on the screws. I understand wanting to hang on to the originals. Parting out is always the last option. Are you looking for a new static or dynamic jaw?
 

AceofSpad3s

Well-known member
Joined
Oct 1, 2014
Messages
1,808
Ace, thank your for the tips on the screws. I understand wanting to hang on to the originals. Parting out is always the last option. Are you looking for a new static or dynamic jaw?

Static, the ledge where the dynamic jaw rests on has 2 cracks along the sides, one goes almost to the bottom and the other is about half way. It's weird because I have a 5" craftsman one from the 70"s that had the ledge break off entirely.
 

Bricago

Well-known member
Joined
Mar 2, 2013
Messages
83
Location
Chicago
I was reading this catalog description for the C-man 5196 and I'm curious about the circled part advertising the spring that prevents handle dropping. I'm in the early stages of restoring this vise, and it doesn't look like there is access inside the hub which is where I assume the spring is. Anyone have any information on this?

5196_page_edit.png
 

jrobb316

Well-known member
Joined
May 18, 2014
Messages
1,377
Location
WI
It should be like Athols, which is why people speculate that they made be the maker of these vises? If you take the sliding jaw all the way out and flip it upside down so you can see the screw, you will see it. On Athols, I use a 45 degree needle nose pliers as a pry bar against the casting to compress the spring to pull the cotter pin. I don't own one of these specific vises, so it may be a little different.
 

Bricago

Well-known member
Joined
Mar 2, 2013
Messages
83
Location
Chicago
...the ledge where the dynamic jaw rests on has 2 cracks along the sides, one goes almost to the bottom and the other is about half way. It's weird because I have a 5" craftsman one from the 70"s that had the ledge break off entirely.

Look what I discovered today when I got the paint removed from my 5196:
Cracks_Front.jpg

Cracks_Side.jpg

Crack_Right.jpg


Just what you were describing. I guess it wasn't "reinforced at all points of strain," like they said it was.
 

AceofSpad3s

Well-known member
Joined
Oct 1, 2014
Messages
1,808
Look what I discovered today when I got the paint removed from my 5196:
Cracks_Front.jpg

Cracks_Side.jpg

Crack_Right.jpg


Just what you were describing. I guess it wasn't "reinforced at all points of strain," like they said it was.

****, that ***** man. This makes me really wonder who made these, I think I heard of others having problems like this too.
 

jrobb316

Well-known member
Joined
May 18, 2014
Messages
1,377
Location
WI
From what I understand you 2 are not the first ones to have that issue on those vises. If it were mine I would braze it up since its not broke off, paint it up and use it.
 
To avoid these ads, REGISTER NOW!
Top Bottom