To avoid these ads, REGISTER NOW!

1956 Doall 16-SFP Rebuild

brent5631

Well-known member
Joined
Apr 7, 2008
Messages
217
Location
Dallas
Doall 16" Bandsaw Rebuild

I'm starting this thread to document the rebuild of my 16" Doall vertical bandsaw. Im hoping to get some feedback and advice as this is my first machine rebuild. I have read through all of APMech's thread several time and already used it to help with dissassembly of this one. I hope to get this machine in a good workable condition not necessarily a factory fresh restoration.

APMech's Thread for inspiration and goal:
http://www.garagejournal.com/forum/showthread.php?t=34928

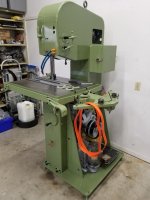
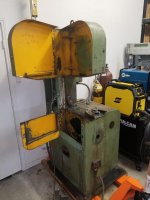
I picked this machine up last Saturday kind of on a whim. The previous week I browsed craigslist with all the normal buzzwords and was surprised when I saw an ad for a Doall bandsaw that was less than $1000.

This was the ad;


There wasn't very much to go on but after a quick text I got some pictures that explained a lot more.


So Saturday I picked up the saw and was informed that the seller had purchased it out of an auction in Dallas. I came from an aviation facility and appears to have cut large quantities of fiberglass and carbon fiber panels, (Confirmed by the 30 lbs of dust I vacumned out).


I currently have the saw mostly disassembled as that was the only way to get it out of the truck. Also, I was unable to test the saw at the sellers place and I wanted to be sure everything is in rebuildable shape before getting too far in. My biggest worry was the gearbox but I split the case last night and it appears to be in decent shape.


Disassembly Thus Far:


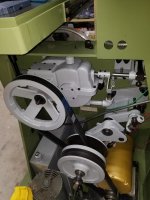
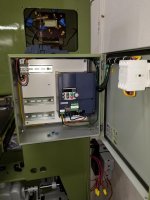
I had my suspicions before that the Vari-Drive was disabled or removed from the missing knob in the previous pictures. Upon opening the motor cabinet these were confirmed and you can see the vari-drive has been disabled for a while. They had a belt run from the air pump sheave up the gear box directly.
Also note the 4-5" of dust in the bottom of the cabinet. That was evident everywhere.


First I removed the Vari-Drive. After cleaning it a bit and removing the Bakelite pullies they appear in decent shape. No cracks and only some belt wear from the speed never being changed.


One of the sheaves cleaned up. Do not appear to be in bad shape.


One of the things I was most worried about. We'll see if it can fit in my lathe and get slightly resurfaced. The wheels appear to not have any crown. Which I thought odd after reading through APmech's Doall thread. Maybe the two wheel saws track easier. IDK


On a good note after taking off the job selector I found the face plate for it underneath. I was really happy about that because that makes the whole saw in my eyes.


Removed the motor. It appears to be well worn. It has almost 1/4" of endplay. I'll be looking for another one.


.


Removed the gearbox. It had this phenolic wedge underneath the gear selector. I didn't even notice it until way after the gearbox was removed. So much dirt on everything.


Opening the gearbox showed very little oil. I only had a small amount come out. Good news is the gears appear to be in decent shape. Being that this was locked into high gear most of its life none of the power was running through the gears. This gearbox is different from others I have seen in that it only uses two gear sets. High gear is 1:1 and the input and output lock together then low uses the other gear for reduction.


Not much wear. For the little use I expect to give it, it should last a while.
That is where I am right now. I need to finish disassembling the gearbox and I will rebuild that first before starting in on the rest of the machine.
 
Last edited:
To avoid these ads, REGISTER NOW!

NC Fabricator25

Well-known member
Joined
May 28, 2010
Messages
193
Hi, looks like you've got a great project to work on and that will be a lifetime saw when you get if finished. A metal BS about that size is on my wish list, but I haven't seen one any where near that price in my region. I prefer to buy older machines that need refurbishing, it fits my budget and I enjoy the process of getting a machine up and running that would have been scrapped.

How much does that weigh and how did you move it? Please keep the pics of the progress coming, I'm bookmarking this thread!

-David
 
OP
B

brent5631

Well-known member
Joined
Apr 7, 2008
Messages
217
Location
Dallas
How much does that weigh and how did you move it?
-David

I would say it weighs in at the 800lb range. The seller had a forklift so getting it on was easy.

I had help removing the table but once it is off I can move it myself. I just weighed it at 100lbs.

Then removing the motor and gear box plus both covers, to not damage them, made it much more manageable. I ultimately used an engine hoist and put it over top of the motor enclosure. I wrapped a strap down through the hole left by the gear box, jacked it up a bit, then moved the truck from underneath it. Once on the ground a HF furniture dolly move it around nicely.


tool_scrounge

Well-known member
Joined
Jul 20, 2010
Messages
4,211
Location
Southern California
If you are going to replace the motor, you want one of similar weight to preload the pulleys correctly. The one I saw on a similar 1957 SFP had the heaviest 1 HP three phase motor I ever saw. Alternatively, you could add weight to the replacement motor. Good Luck with the restore. They are nice saws.
 
OP
B

brent5631

Well-known member
Joined
Apr 7, 2008
Messages
217
Location
Dallas
Update #1:

I wanted to check in show everyone how the disassembly and rebuild has been going thus far. I first got started redoing the gearbox and I am really close to being able to get it put back together. I'll devote a whole update to the gearbox once it is completely done in a week or two.

I have finished disassembling the saw and started to strip the paint off this week. So, here is a few pictures of what I have done.


This is where I last left off. I still had the upper wheel and adjuster assembly installed.


This is the upper adjuster assembly. Pretty easy to remove just a section of threaded rod and a spring with a torrington bearing on it.


This is the bearing block that the upper wheel is held on with. A bolt pushes against the bottom and allows you to adjust the tilt of the wheel. The bearing are greasable through a zerk in the wheel. I bought new bearing that are fully sealed.


The mount that holds the upper bearing block. It pivots on those two mounts.


Everything fully removed.


Got a clean and strip disk and went to town for a couple hours.

That is about where I am at. A little more paint stripping inside the motor cabinet then I can start welding up the holes and doing body work on it. I actually started cutting out the bad section tonight, you can see in the last picture the long slot in the front. I cut out that whole section and will replace it and weld up the slot for the MIA power feed on the front also.

I also wanted to get feedback on what I believe the be the original color for the machine. I polished this section of paint so hopefully it shows up. It is sort of a greenish gray color. I kinda like it and was hoping to get it matched. i dont know what color the handles and such were though.

Let me know what you think a good color scheme would be. getting close to needing to get paint for the shell.
 
Last edited:

A_Pmech

Well-known member
Joined
May 8, 2007
Messages
8,002
Location
IL
It looks to me like you found a nicely rebuildable unit, Brent. The fact that both the drive sheave and gearbox are in good shape is excellent!

I see you're taking it down to the component level, so I have no doubt it will be a nice saw once you get it finished.
 
OP
B

brent5631

Well-known member
Joined
Apr 7, 2008
Messages
217
Location
Dallas
It looks to me like you found a nicely rebuildable unit, Brent. The fact that both the drive sheave and gearbox are in good shape is excellent!

I see you're taking it down to the component level, so I have no doubt it will be a nice saw once you get it finished.

Thanks, AP.
It certainly helps when I have good threads to compare to. I don't know if it will be anywhere the level that yours is but I'm hoping to learn some new things in the process.
I'm sure I'll be asking you for help when I try making etched data like you did.
 
OP
B

brent5631

Well-known member
Joined
Apr 7, 2008
Messages
217
Location
Dallas
Update 2 Gear Box Rebuild


Starting off with disassembly this is what the gearbox looked like when I first removed it.


Removing the covers to reveal the bearings.


Splitting the covers to see the insides.


Mmmm beautiful.


Everything removed.


Lowershaft removed. Looks to be in good shape.


Input shaft is pretty worn. Parts of it measure to .725” I’ll have to sleeve it.


Input shaft trued up. I ended up cutting it to .710” to clean it up.


Bored a piece of steel to make the sleeve. Ended up at .708 for a 2 thou press fit.


Heated it up with a propane torch and pounded it on. Would have been nice to have a press. Maybe one day.


Back in the lathe and turned to .750.


After it was turned I set it up in the mill. Aligned the shaft with a indicator. Then used a key cutter to create the 3/16” keyway. It originally had a woodruff key but the key cutter I had on hand was too small to cut the 607 woodruff key. So I cut two passes and made it a traditional keyway.


Worn out bronze bushing. This bushings counteracts the torque applied to the output shaft. It was ten or twelve thou oversized and was spinning inside the shaft. I got some new iolite bearing material from mcmaster and remade it.


Outside of the bronze bushing turned to slight press. I also used Loctite bearing retainer on it.
After it set up I turned the inside bore for a 2-3 thousandth running fit.


Visited the local bearing supply and after get the larger output shaft bearing from the warehouse I had all the bearings I needed. Only cost about $40.


Started to put the bearings and shafts back in. The lower shaft goes in first but don’t put the outer bearing on yet like I have shown here. I was unable to put the large upper gear in and had to take the whole thing apart since I couldn’t find my puller.


Here it is all together. I didn’t put the last bearing in because I still needed to seal it. I did that later but don’t have any pics of that.
 

sakurama

Well-known member
Joined
Oct 10, 2010
Messages
1,458
Location
Portland - the cool one.
Let me echo that you **** for finding such a deal - and you redeem yourself for restoring it and documenting it here. But you need to keep going since I'm looking for a project just like this and it's nice to anticipate what's in store.

Subscribed

Gregor
 
To avoid these ads, REGISTER NOW!

Team FAST

Member
Joined
Dec 5, 2011
Messages
6
You **** since I am in Fort Worth and theoretically had a shot at this too! Very nice job so far.

What did you paint the gearbox exterior with?
 
OP
B

brent5631

Well-known member
Joined
Apr 7, 2008
Messages
217
Location
Dallas
Ok, since there has been some more interest in the thread i'll take some time to catch everyone up. progress has been slow since I have bought a house and moved as well as done some home renovations since last summer.

Update 3

Once the saw was completely torn down I took to stripping all of the paint off in preparation for patching some holes and fixing a few dents.


i stripped it all with a clean and strip disk on an angle grinder. Only took a few hours to do the whole saw. Definitely made a mess though.


First hole to patch was the giant slot that was over the chip catch can.


Cut it down to the base.
Then patched it up with 16ga hot roll.


There were several holes where the wiring came in the side as well as a transformer for the light.


I cut all of that out and made a template.


Cut the shape out of 16ga.


Fit it to the hole and used **** weld clamps.


Tack weld, grind repeat. Good enough for a bandsaw.


i also filled several holes on the other side as well as the bolt holes on the front for the original blade welder that i dont have anymore. I did some minor body work then painted it.


There was a spot on the chip bucket that showed the original color fairly well. I took that to sherwin williams and got a gallon of alkyd enamel paint color matched.

well this is were i dont have a lot of pics in order so i'll just post up where i am currently. I was able to get the gearbox installed and both of the wheels refurbished with new urethane tires.


So thats where i'm at currently. You'll notice the background in the pictures has changed quite a bit. Thats the new house with 30X40 shop i moved into last june. I was expecting this project to be done by now but there always seems to be more important things coming up now.

i have most of the things i need to finish just need to get it all together.

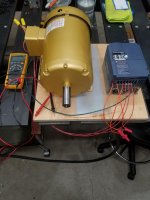
All of this plus a TECO VFD ready to go in.

hopefully that satisfies the picture fiends for a while.
 

jabberwoki

Well-known member
Joined
May 1, 2009
Messages
6,476
Location
puyallup wa usa
If you have any questions about the saw call this guy at Doall , his name is Ed Nichols and he`s their Sam the saw guy.
Great bloke to chat with 888 362 5572 ext 61221
 

donaldraypat

New member
Joined
Feb 4, 2017
Messages
1
I just bought a 1956 Doall 16" - B.F. bandsaw for 50.00. I put castors under it to be able to move it around easily. I have inspected it and so far the 3/4 hp Leeson 115 Volt motor works great. The only thing I have found wrong with it is the transmission is bound and a bit of rust on the blade and guides. I did have to wire it up. Even the belts are in good shape. After inspecting the transmission it is in good shape. Turns out the variable speed pulleys are stuck. Shouldn't take much to get it up and running!
 
Last edited:

Astro-Eric

Member
Joined
Aug 1, 2020
Messages
8
Location
TX
Just found this website. Very cool and perfect timing finding this thread.

I'm working on my gearbox on the same model bandsaw. I've been using the saw for 7-8 years in my garage. The input shaft and pulley were a mess when I bought the saw. This introduces some vibration to the saw. I also suspected that the oil pump was not working, as it was a bit noisy in the gear box section. Upon initial investigation, the pump appears to be stuck.

So this weekend, I decided to take on the repairs. Man, it was a bear to get the pulley off, the shaft is heavily galled.

I have the gearbox down to the final 2 shafts and can't see now to remove the input shaft. Do you recall how you removed the last shaft sections. It looks like the bearings need to be removed. But it's not clear which direction and how to remove these. The Input shaft appears to have a gear behind part of the casting that meshes with the secondary shaft. As I mentioned, it's not clear to me how to disassemble this last section. recall?

I'm new here and can't post any photos, but I have posted some on my website. The saw and gearbox are in pretty good shape. The gears look line new:

tinyurl.com/y6fm2lht

Eric
 

Astro-Eric

Member
Joined
Aug 1, 2020
Messages
8
Location
TX
For what it's worth, I was able to machine the input shaft without even completely removing the shaft from the gearbox. It was funny looking, but I this up turning between centers. Worked well. The gear box is in superb condition and reassembly is currently underway.
 

moreover

Well-known member
Joined
Aug 19, 2017
Messages
91
Location
Texas Hill Country
If he doesn't respond, here's some pics of the restore I'm slowly undertaking.

I'll make a post about it when it's finished. Still need to finish getting some sheet metal painted, wiring and hydraulic lines purchased.
 

Attachments

  • 20200722_202006.jpg
    20200722_202006.jpg
    58.4 KB · Views: 21
  • 20200819_164330.jpg
    20200819_164330.jpg
    81.2 KB · Views: 33
  • 20200901_151053.jpg
    20200901_151053.jpg
    86 KB · Views: 35
  • 20200818_204127.jpg
    20200818_204127.jpg
    83.4 KB · Views: 24

F-117HWK

Well-known member
Joined
Apr 17, 2012
Messages
283
Location
Virginia
Looks great bud, definitely get your own thread started and post up as many details as you can. These threads are a huge help for those of us still working on our restorations :rocker:
 
To avoid these ads, REGISTER NOW!
Top Bottom