To avoid these ads, REGISTER NOW!

1961 F100 4WD project

rabidsquirrel

Well-known member
Joined
Jul 17, 2010
Messages
397
Location
SE Pennsylvania
I bought this truck 6 or 7 years ago, for way too much money considering what I've had to do to it. I've finally decided that I needed to make a build thread. My fabrication skills aren't even in MP&Cs shadow, so please keep your expectations low.

It started out life as a 223 column shift wrong bed. When I got it it had been converted into a plow truck, with the original engine in poor shape and a floor shift transmission that I couldn't identify. Decided to rip all that out and put in a 460 with C6. Happened across that combo and an NP203 on Craigslist for $500 and snatched it up. At this point I still hadn't fully realized the nightmare that was the cab sheet metal. I had still thought "just needed some floor patches and steps".

Old drive train out, cleaning, cross member removal, mount layout (July 2016):

2.jpg


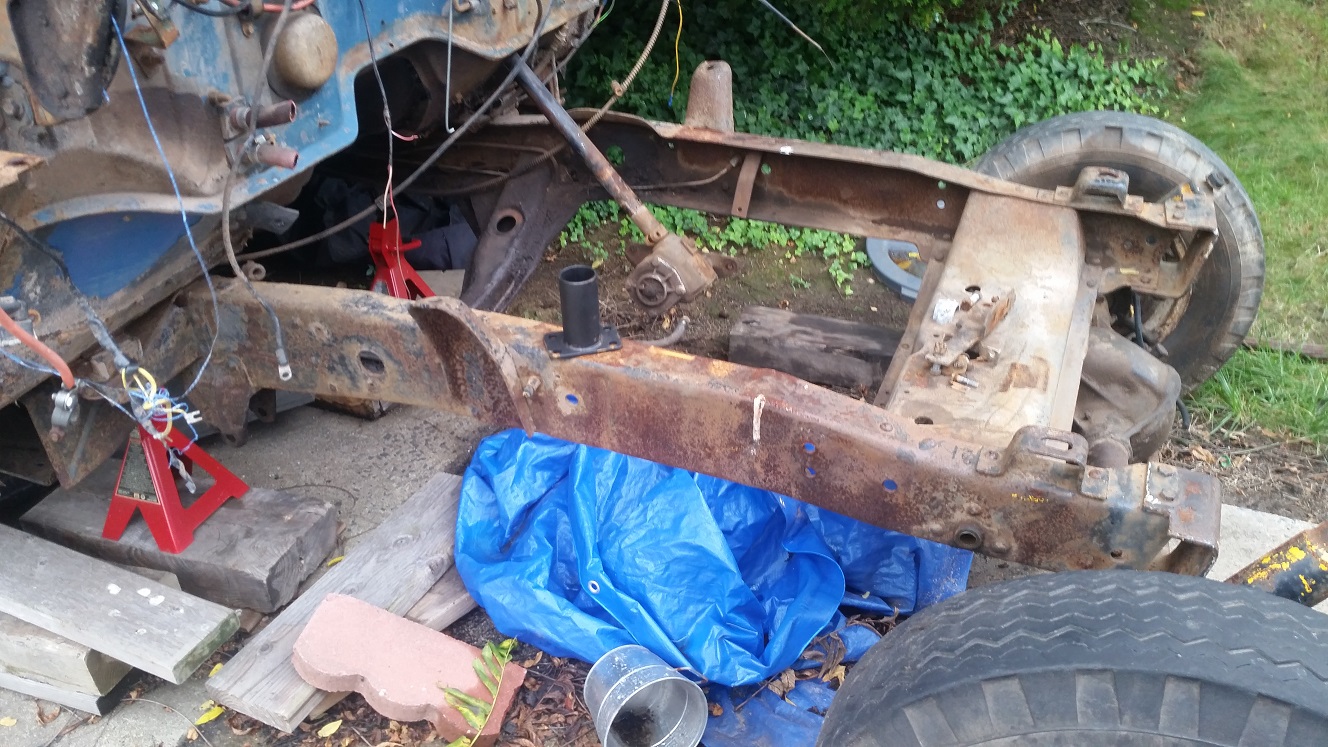
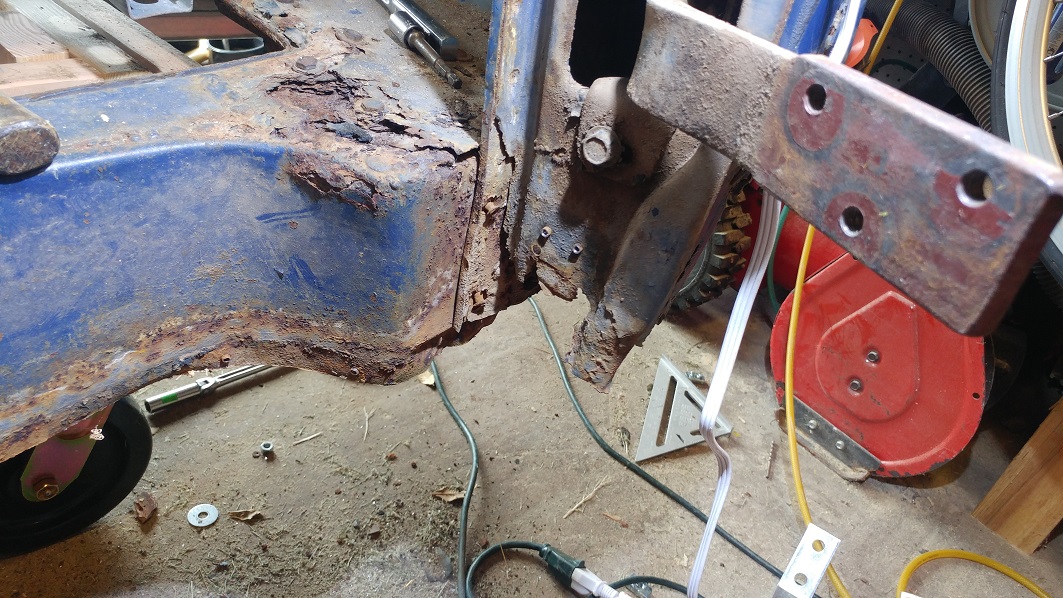
You can see a hint of my misery to come where the cab mount should be instead of that C channel.

Fast forward a bit (April 2017):

3.jpg


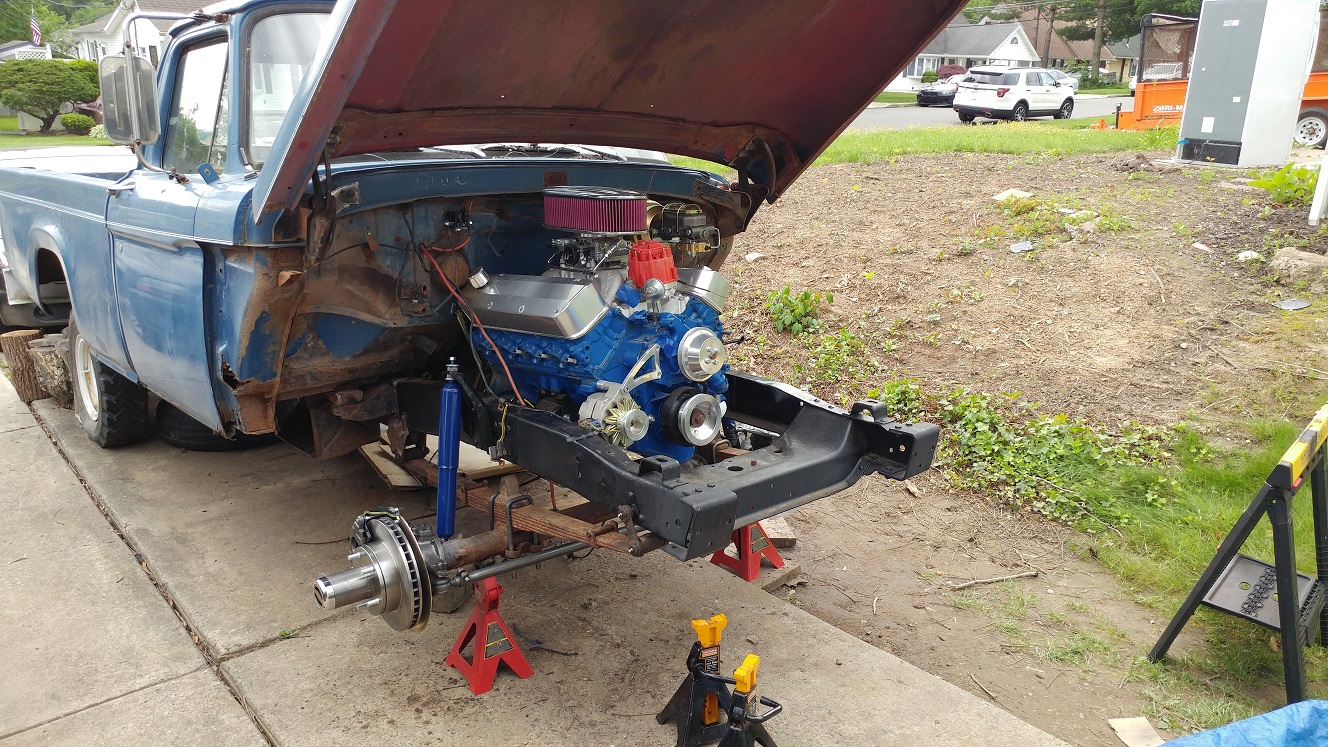
She fits, mostly. I had to make a mount for the transmission with a big old whooptiedoo for the front drive shaft. I'm not too happy with the way it is, and am hoping there's a better version I can buy. The old front springs do not like the added weight. New springs are on the very long list of things to buy.

Added disc brakes to the front, all new brake lines and rebuilt the rear drums, went through about 3 different exhaust manifolds and headers trying to find something to fit, fabbed up some crappy exhaust and some cherry bombs and two bolts holding the front clip on that leads us to here (August 2017):

test_drive.jpg


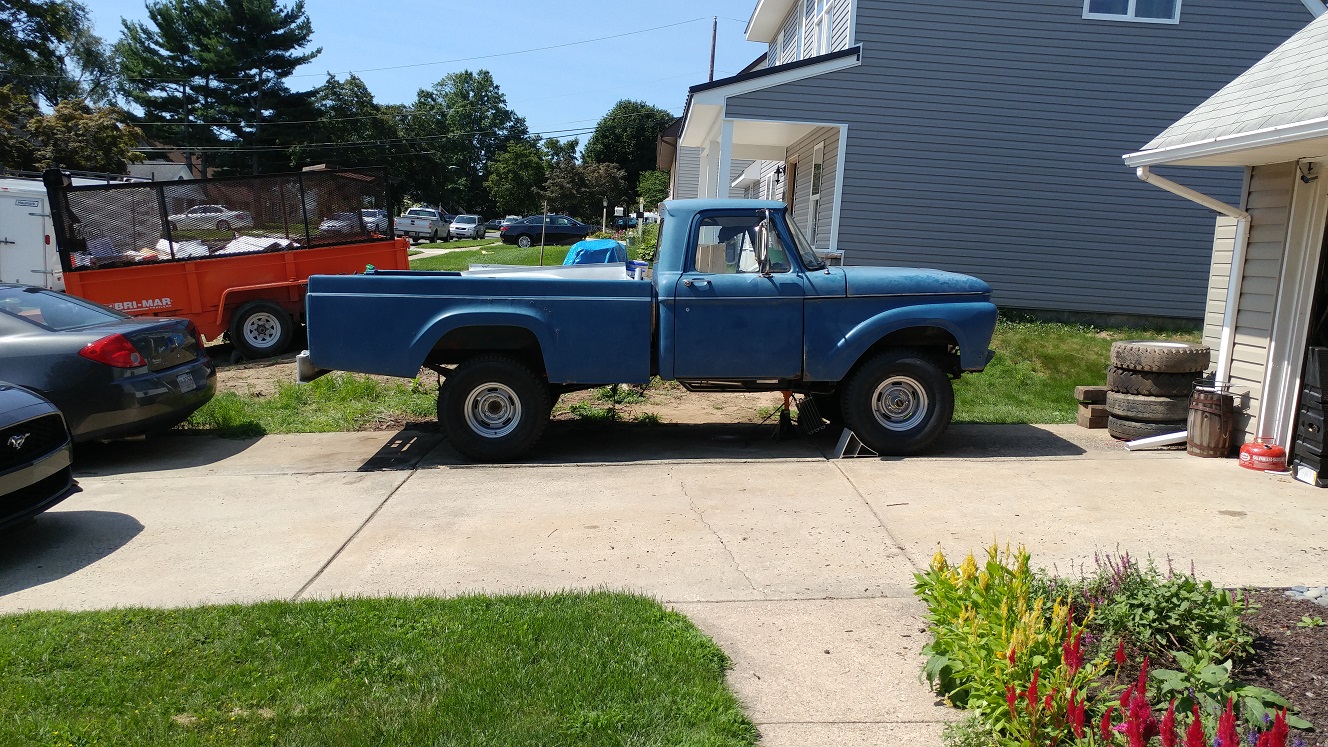
Before the first test drive rolled her back and forth on the driveway for a bit to figure out the twin sticks for the transfer case and to figure out if I was in 50/50 or split mode. Drove it around the block once, and it was pretty uneventful. I think the governor in the trans is sticking though.

I parked it and it sat for about 8 months, as my daughter was now just over a year old and I had other priorities. I still putzed around on the truck, and started buying some sheet metal for it. Some time after parking it I broke the step off and I really started looking into how bad the cab was.

Slowly marching on to July of 2018:

4.jpg


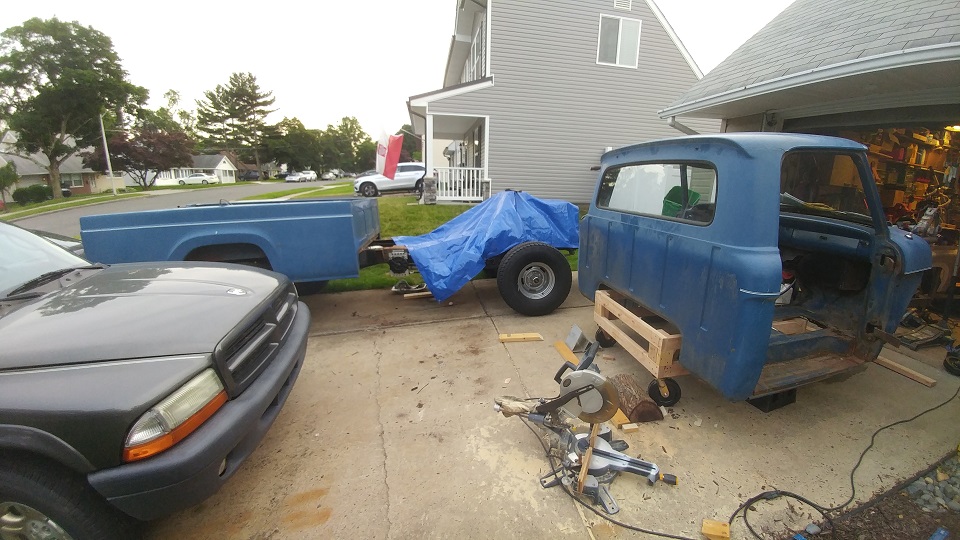
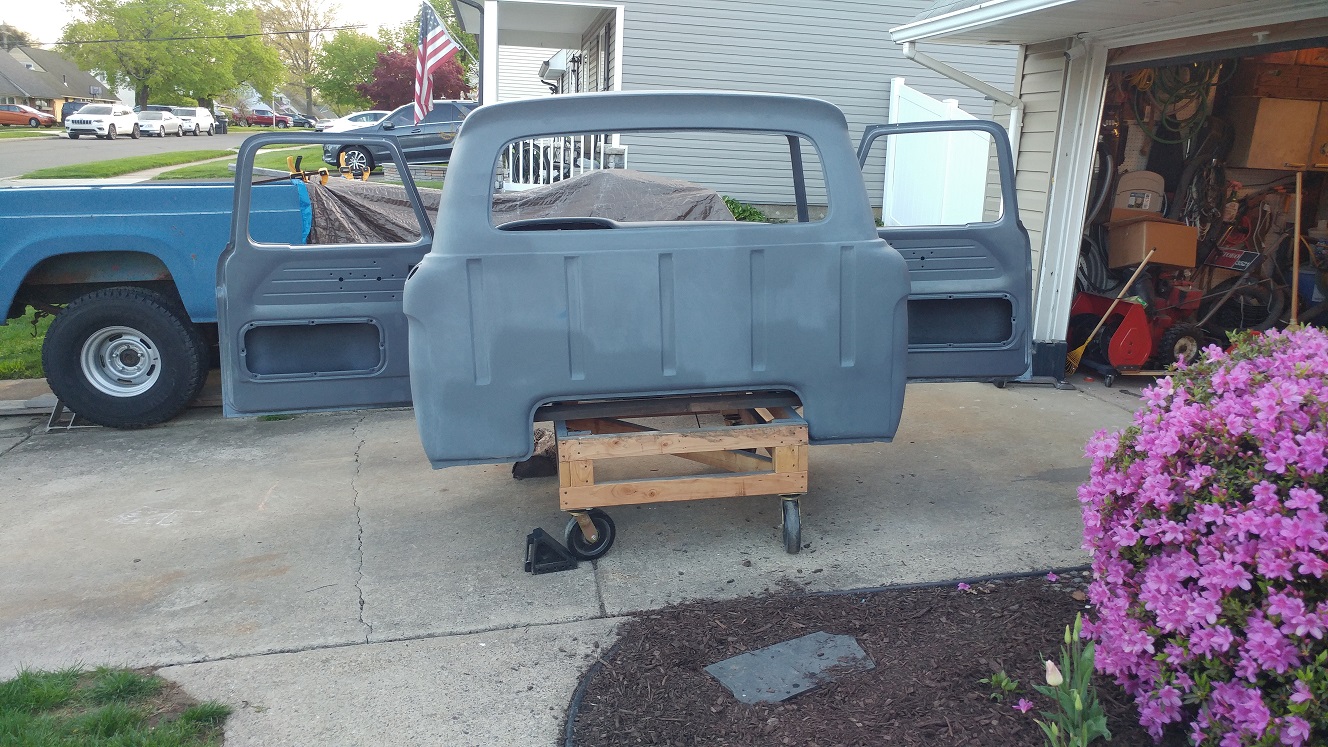
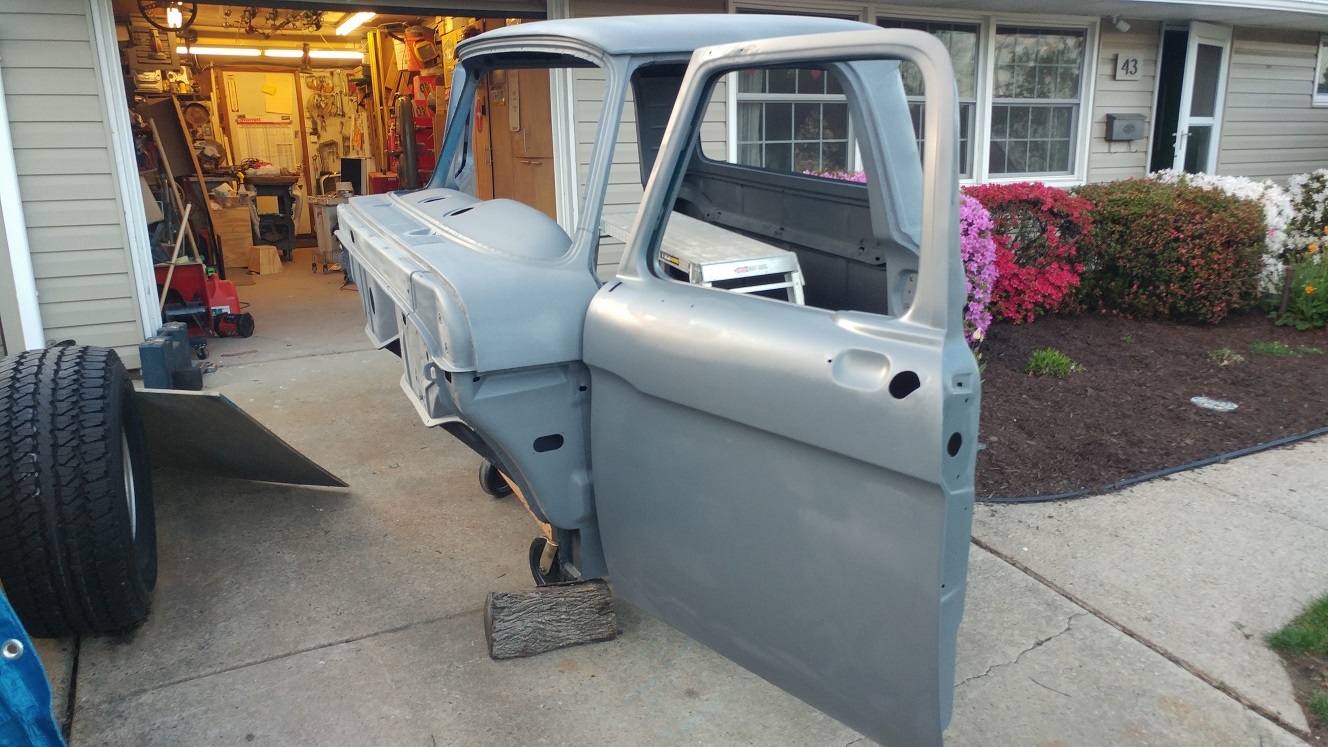
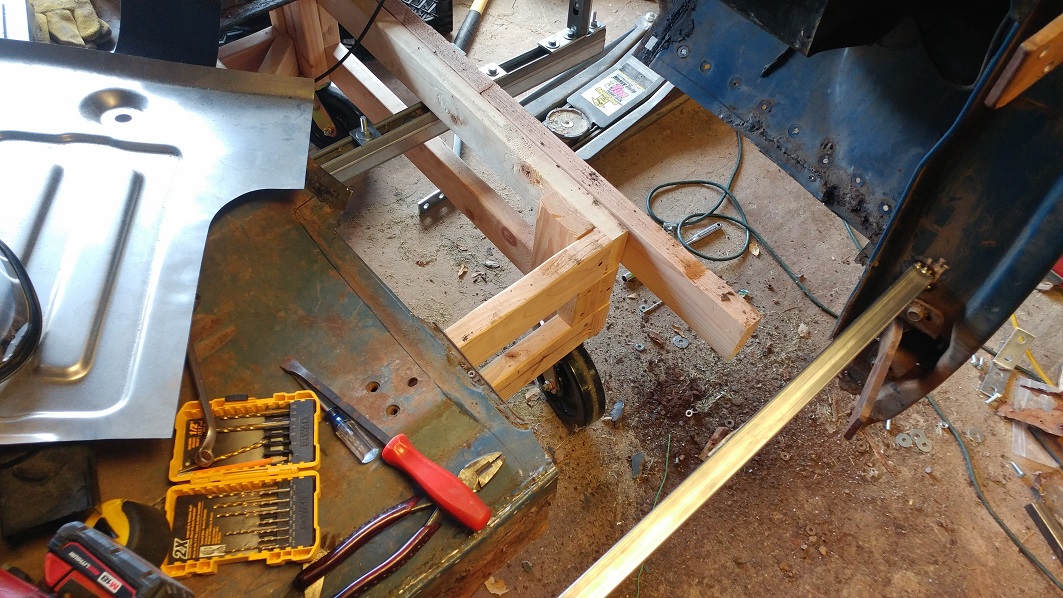
Getting the cab off and onto the dolly was... interesting. Couldn't grab anything down low because it was all rotted, had to clear the larger tires and the 460 put the top way out of easy reach.

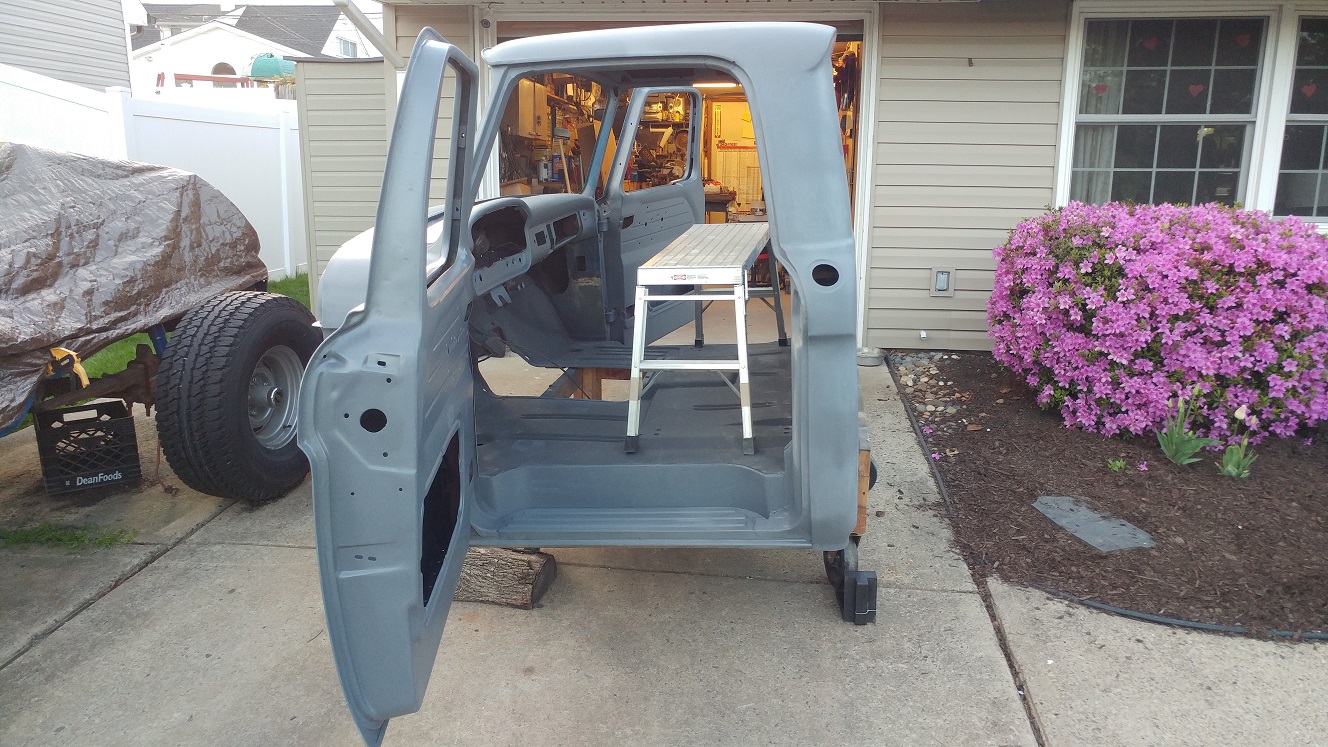
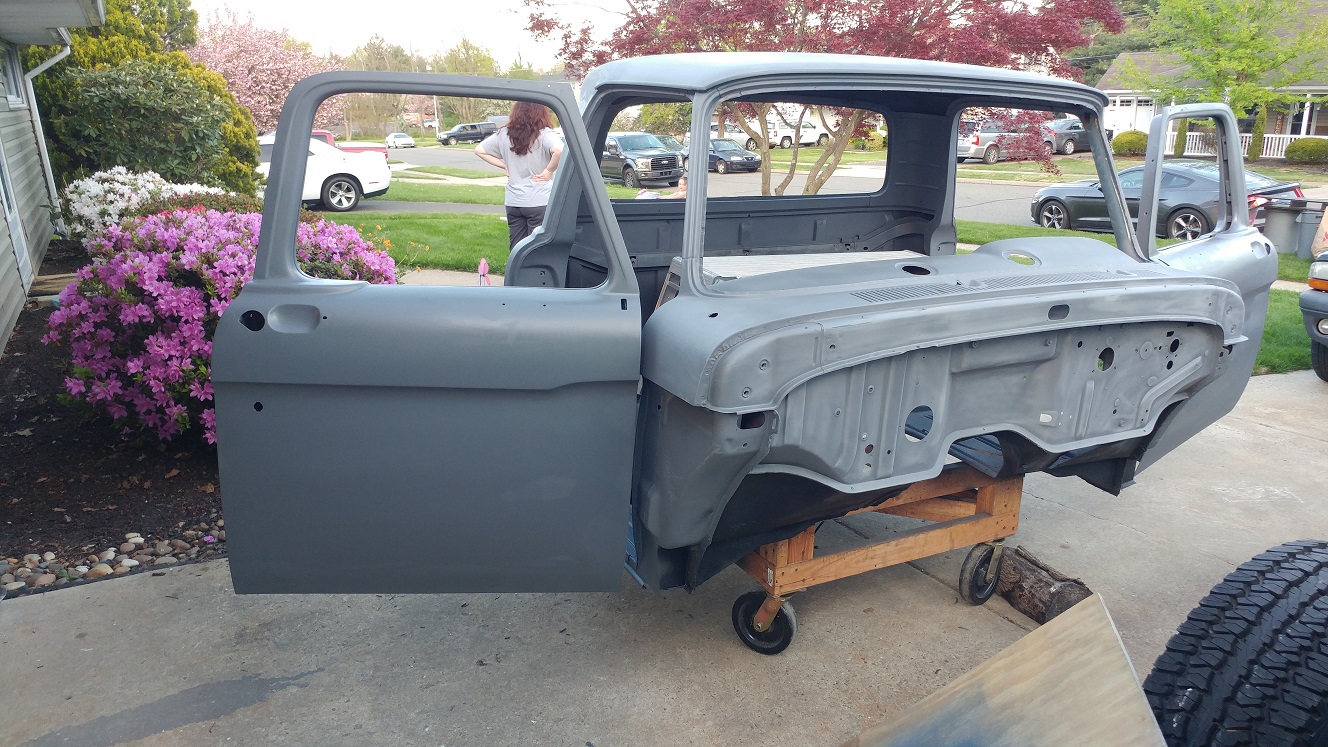
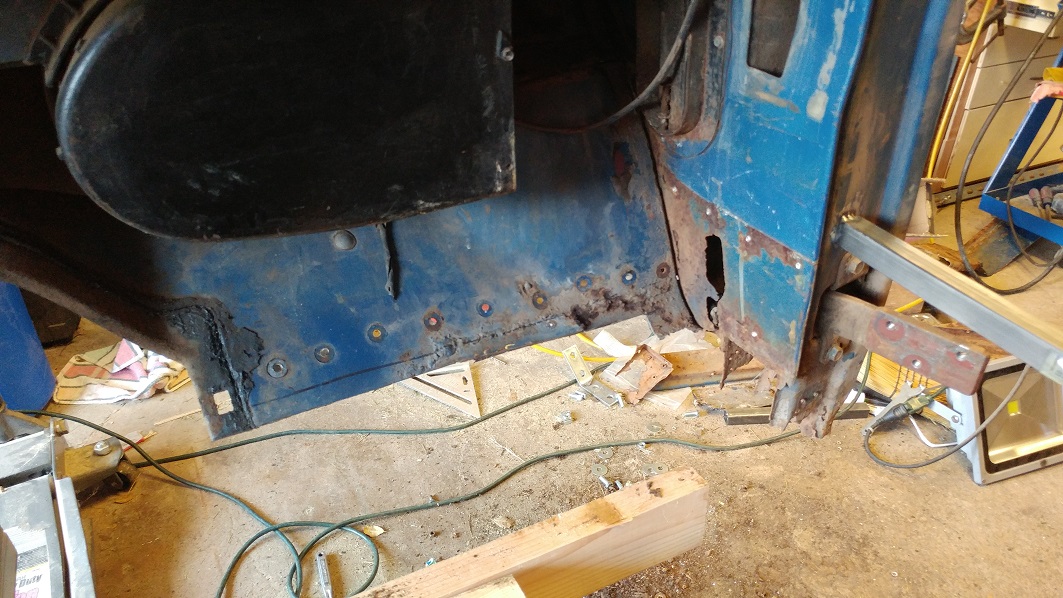
I've shared this before, this is my work space... At least it's something. My dad allowed me to store the doors and seat in his shed so I had a little more room. Just enough room left for me to rotate the cab on its axis.

5.jpg


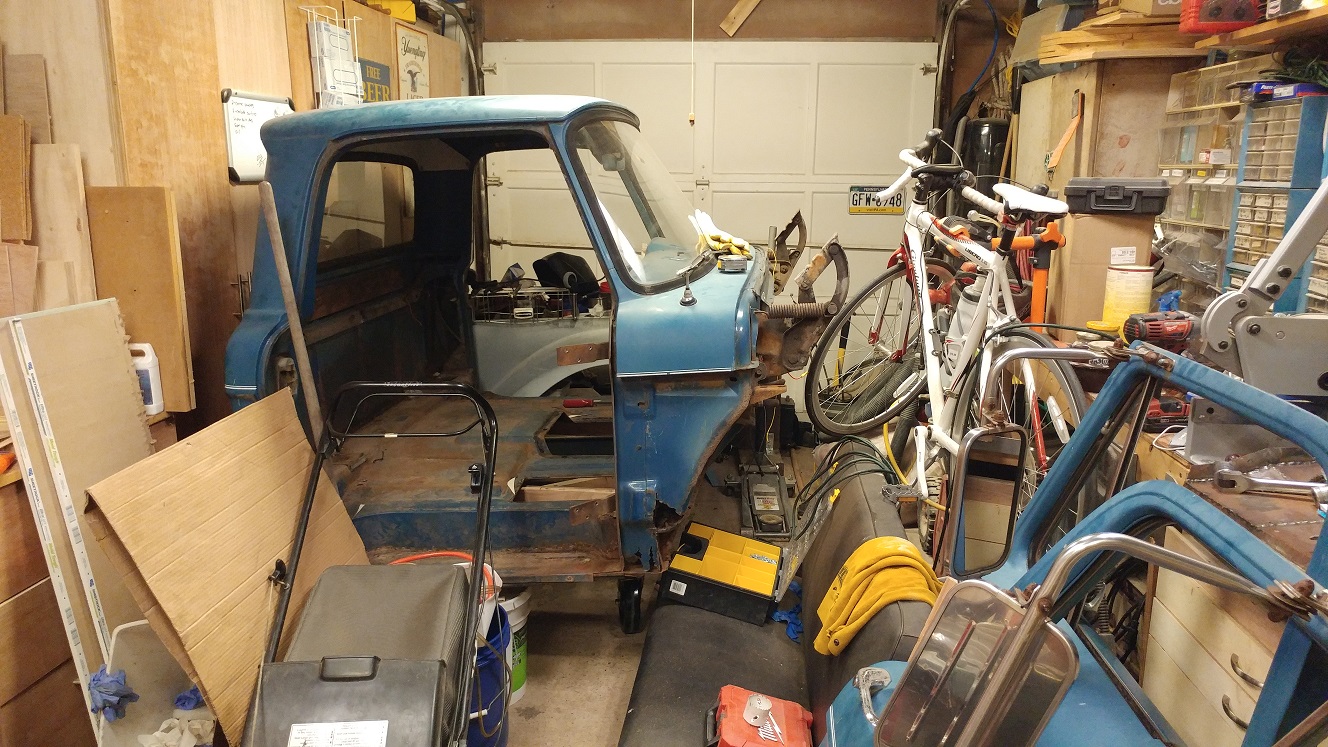
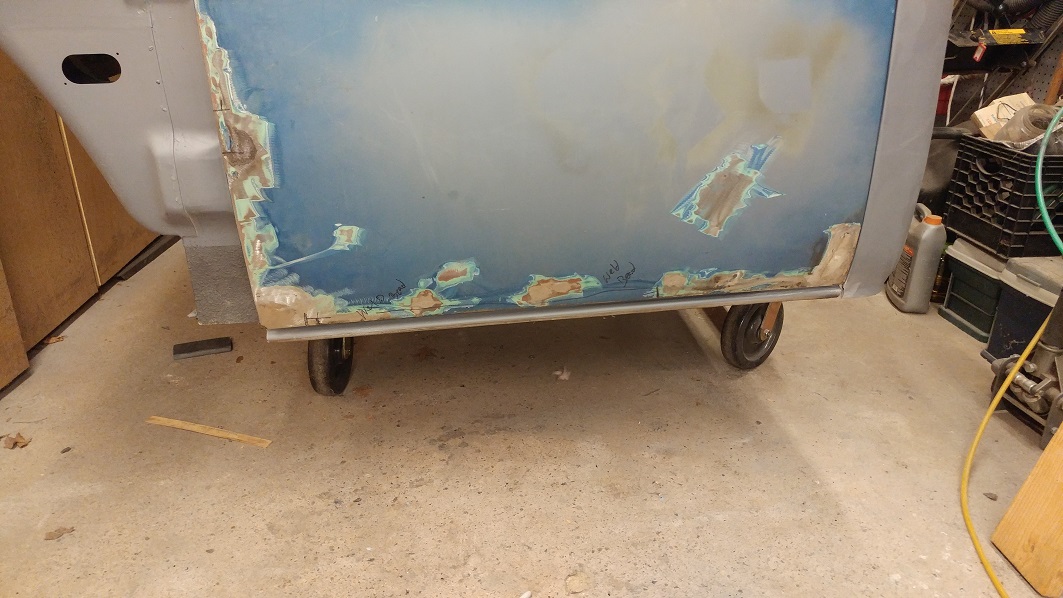
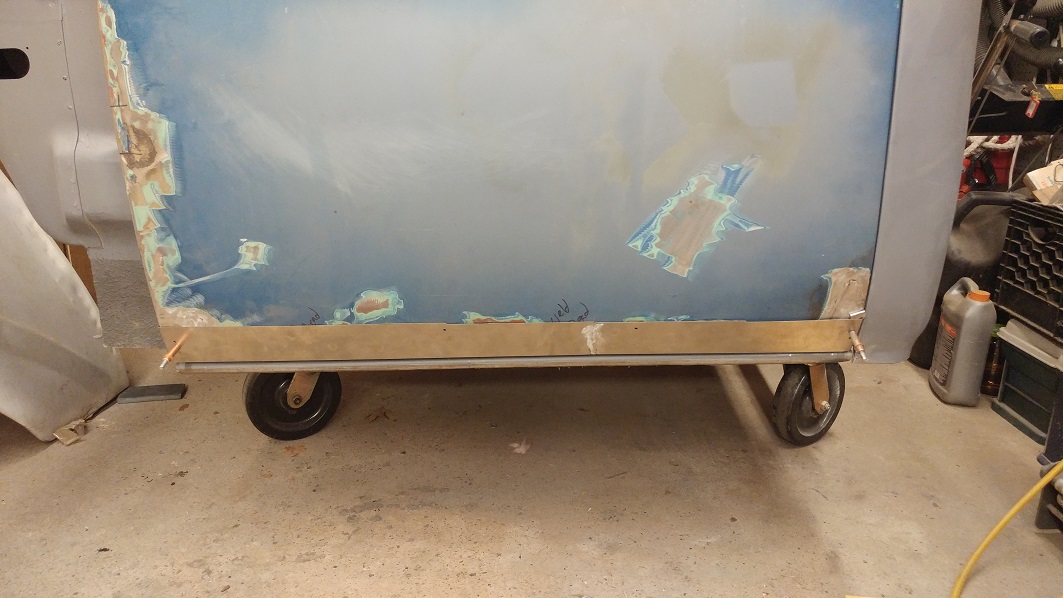
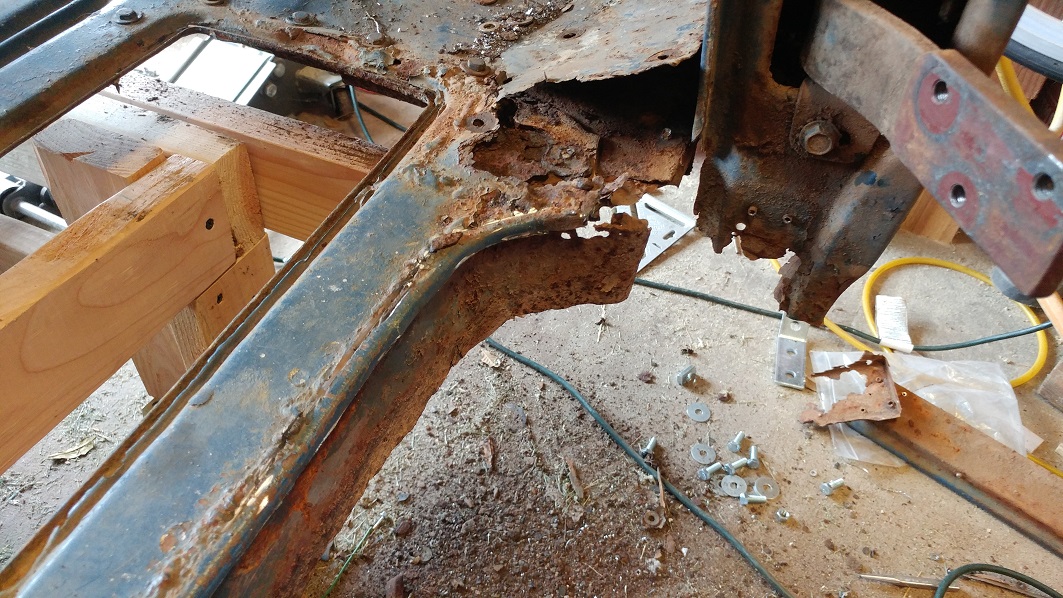
Lets get started with the archeological work!

6.jpg


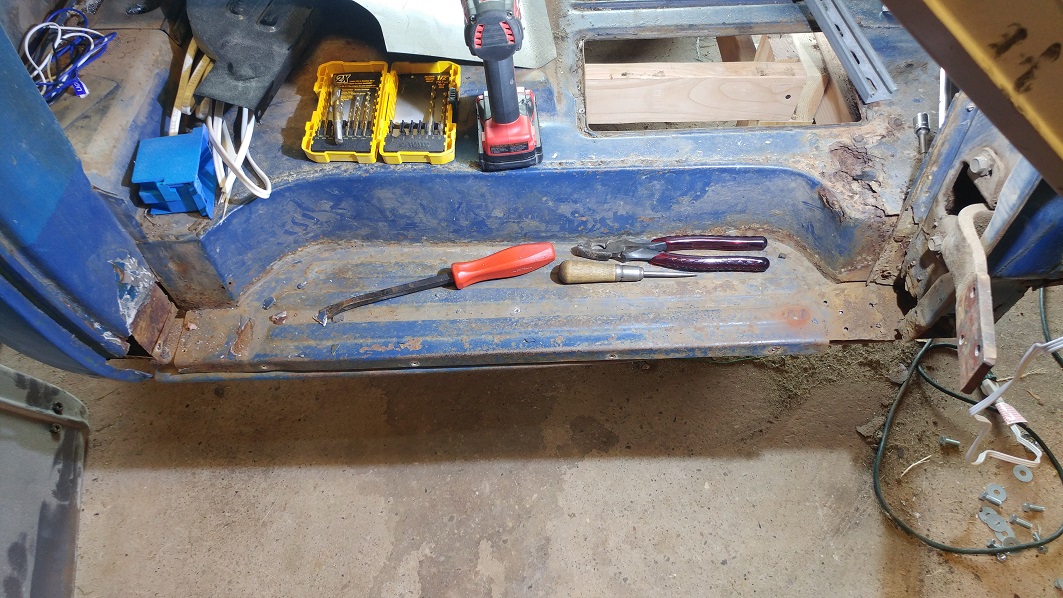
This is where I'm starting to really question how far over my head I am. Actually got a bit depressed about the whole project. I don't have any sheet metal or body work experience. I started looking for a used cab, but anything I found was just as bad. Plus I already had about $750 worth of replacement metal...

7.jpg


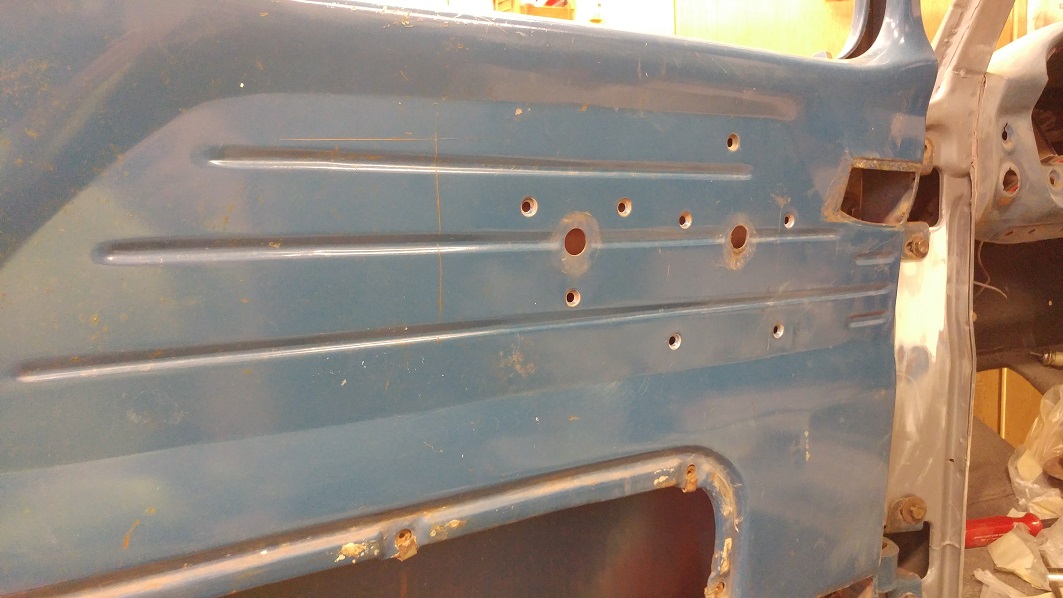
The step riser was scabbed over the existing rotted out originals, and the treads were replaced. Rockers never reinstalled, just some C channel. Everything was held together with aluminum rivets and rust.

8.jpg


9.jpg


10.jpg


Going to post this now and then reserve a few more posts underneath. Let me know if the pictures are too big.
 
Last edited:
To avoid these ads, REGISTER NOW!
OP
R

rabidsquirrel

Well-known member
Joined
Jul 17, 2010
Messages
397
Location
SE Pennsylvania
Passenger Cab corner. This is where I started after I ripped a step off. At some point the outer cab corners were poorly replaced, and inners left alone.

12.jpg

13.jpg

The first official fix. I had to take a break from cutting stuff out. I had to add something instead of removing... Rear sill corner (correct name??) is still there for reference. I eventually contacted flashbackf100s to be cut out of a cab, as they were way beyond my skill level. Multiple compound bends. I did try though, and came fairly close but it would have bothered me if I installed as is.

14.jpg

Another view. Cab is supported from the front too, not just that piece of tube. I did eventually brace more, but none of the measurements I took changed. My only real complaint with the project, once I buckled down and stopped my whining, is that I didn't have a good side to get references on. Both are equally shot.

15.jpg

Skip forward some more, jumping around a bit. These are the pieces I received from FlashbackF100s. Thrilled with them. On the floor is as received, installed is what I pared it down to.

16.jpg

Big jump - COVID quarantine allowed me to get most of the metal work done. on both sides. It took me about 1.5 years to go from cutting out metal to having the step installed on the passenger side. It took 3 months for me to finish the passenger side and driver side, cab mounts, and finish the underside.

17.jpg

I did really take my time on the passenger side dismantling it because I had to learn how to be able to put it back together.

Can't find the passenger side, so here's what I did on the drivers side. Similar process.

18.jpg


19.jpg

Thankfully CarolinaClassics started repopping these panels. I really wasn't looking forward to making them.


20.jpg
 
Last edited:
OP
R

rabidsquirrel

Well-known member
Joined
Jul 17, 2010
Messages
397
Location
SE Pennsylvania
Quick view from the drivers side, getting closer...

21.jpg

Her first time in the truck since she was about 4 months old. She's 4 here.

After decided to remove the old CB antenna. After I epoxy primered the whole cab I decided to weld in the back seam over the window...

22.jpg

Bought a cheapie paint gun and my first attempt with HVLP paint and epoxy primer.

23.jpg

Testing my lifting jig. 1.5" Angle, flat stock and leftover tube.

24.jpg

Sitting the cab on the frame for the first time in over 2 years. I needed to do this so that I could position the cab mounts and tack them in.

25.jpg

Yeah, that was interesting. I was able to do it with the engine hoist, ratchet straps, and a 4x4. My wife was also a huge help.

26.jpg

You can see how much metal I had to replace in this picture.

27.jpg

That factory undercoating held on pretty well. Went through two wire wheels.

28.jpg

Mostly clean. I think I went through two more cans of cleaner after this.

29.jpg

Seam sealer and epoxy primer.

30.jpg

Lizard skin. I forget if this was the sound or heat. I applied whichever was the correct order, and then top-coated it with their pain.

31.jpg
 
Last edited:
OP
R

rabidsquirrel

Well-known member
Joined
Jul 17, 2010
Messages
397
Location
SE Pennsylvania
This brings me to my current issue. I'm doing fit up on my drivers side door prepping for bodywork, and I cannot for the life of me get bottom left (hinge side) to come out any further. It seems like it needs to come out about another 3/8 to 1/2 inch. The rest of the door seems to be okay, as the problem is the worst at the bottom left and gets better in each direction. I'm fairly confidant my layout was correct, and I did not cut out the top bottom hinge bolt so I still had some sort of reference. My bottom hinge is maxed out all the way to the left (out), and I still can't get the door bottom out far enough. There isn't any sign of accident damage to the door, other than rust. Am I missing a way to shim this some how inside the door?

32.jpg

Door is flat with a straight edge. I've temporarily hung a fender on it to show how far in it really is. You can really see how far out it is here. Bottom of fender is aligned with the rocker panel at the bottom. This is probably the best picture I can get because of space limitations in my single car garage:

33.jpg
 

Offcenter12

Well-known member
Joined
Feb 3, 2018
Messages
151
Location
Seattle
Probably a lot more qualified people than me, but a few ideas anyway. Did you replace the section of the "A" pillar that the lower hinge mounts to? Repop parts aren't always exact replacements, hinge might not be in original location if so. I'm stumbling through a '59 Ranchero and new hinge pins are recommenced when doing doors so there's that possibility though you'd probably have noticed excessive movement there. Does the door fit flush on the interior at that corner? Everything else looks great so far.

John
 

Offcenter12

Well-known member
Joined
Feb 3, 2018
Messages
151
Location
Seattle
One more thought. Might be an optical illusion, but from that last pic it almost looks like the fender is the offending part, not the door. Can that bottom corner move inward any? I could be way off base though. Good luck!

John
 
OP
R

rabidsquirrel

Well-known member
Joined
Jul 17, 2010
Messages
397
Location
SE Pennsylvania
Probably a lot more qualified people than me, but a few ideas anyway. Did you replace the section of the "A" pillar that the lower hinge mounts to? Repop parts aren't always exact replacements, hinge might not be in original location if so.
John

I bought a CarolinaClassics repop, which seems pretty high quality. I only cut off halfway through the lower hinge mount, leaving me the top and middle two bolt holes for alignment. I'm pretty sure my layout is correct.

Does the door fit flush on the interior at that corner? Everything else looks great so far.

John

Strangely enough, it's very close. I need to look at the door itself more I think. And Thanks!

One more thought. Might be an optical illusion, but from that last pic it almost looks like the fender is the offending part, not the door. Can that bottom corner move inward any? I could be way off base though. Good luck!

John

The bottom of the fender is tight to the body, and is almost perfectly in line with the rocker panel. It's really weird, going north along the fender/door line it gets better the further up you go until it's perfect. Same thing going east, until it gets better until it's perfect where the rocker/cab corner meet up.

I feel like if the bottom of my lower hinge mount was installed the extra half inch out of alignment needed to correct this it would be obviously installed wrong. I need to take some measurements and compare this door to the passenger door.

I have messed with a couple 61-66 trucks but I cannot see your pics

That's odd, your the second person to say that. I'm able to see them on my computer, on my iPad through tapatalk, and on my phone on a different network.
 
OP
R

rabidsquirrel

Well-known member
Joined
Jul 17, 2010
Messages
397
Location
SE Pennsylvania
Just went out and looked again. I'm somewhat worried that I installed the rocker panels backwards, since they're tapered. But from what I remember they only fit one way, and barely.

Has anyone here installed these before? I put them in fat end towards the front of the truck.
 
OP
R

rabidsquirrel

Well-known member
Joined
Jul 17, 2010
Messages
397
Location
SE Pennsylvania
For those that aren't seeing the pictures, what are you using to view Garage Journal? Phone, computer, web page, tapatalk?

I threw the other door on because I'm impatient. Lines up perfectly. I'm reasonably sure that the drivers door isn't original. I'm going to measure the dimensions of the doors to compare them.
 

DTE

Well-known member
Joined
Jul 13, 2013
Messages
996
Location
North Carolina
I am on a lap top, never had this trouble before. Two different lap tops and no photos on either one.
 

Deadsquiggles

Well-known member
Joined
Nov 3, 2014
Messages
769
Location
Chesapeake, VA
Looking good. The sheet metal work looks good for not having any experience. As a fellow Ford guy, I’m definitely have to follow along with this.
 
OP
R

rabidsquirrel

Well-known member
Joined
Jul 17, 2010
Messages
397
Location
SE Pennsylvania
I am on a lap top, never had this trouble before. Two different lap tops and no photos on either one.

No pictures here either. On a laptop.

http://www.moderatelyconfused.com/images/F100/garagejournal/32.jpg

What happens when you directly click on that link? Do you see a picture? I hosted the pictures myself since I had more control of the layout that way, but it looks like it's only working for some people.

Weird, no pictures on my wife's phone. I feel like I remember reading about this problem before, and it was something about the bb code.

Those that can't see my pictures, are you using Chrome as a browser? I might have fixed it, should take about 15 minutes to propagate.

-edit-

Just got confirmation from the wife on Chrome that she can now see all the pictures. Apparently Chrome wants to see a SSL certificate, and if it doesn't it won't display the pictures.

Looking good. The sheet metal work looks good for not having any experience. As a fellow Ford guy, I’m definitely have to follow along with this.

Thanks. I'm not going to lie and say I metal finished everything, so there's definitely some bondo. Very thin though.

I think I figured out my door problem. I had read that it didn't matter which way the hinges went, but apparently they do. I flip flopped them and got a much better result, but now I have to play the adjustment game again.

I have to say, parts availability for this truck when I first started really sucked. It's much better now. There still is a decent amount of stuff though for 61-65 4wd trucks that they don't make though.
 
Last edited:
To avoid these ads, REGISTER NOW!

slowtwitch73

Well-known member
Joined
Apr 18, 2019
Messages
5,876
Location
Hellgate
Can see the pics now.. Firefox.

Awesome job, and hats off doing it with a little person in your life.

I have a friend with a running '69 F100 4x4 he keeps wanting to give me. Needs tires and who knows what else. Somedays I think 'hell yeah old running 4x4 for free' and other days I think it's a liability even for free.

If it was a F250 I'd be more inclined.. or if it was older.
 
Last edited:
OP
R

rabidsquirrel

Well-known member
Joined
Jul 17, 2010
Messages
397
Location
SE Pennsylvania
Project looks good and you're doing nice work.


Was the door ever reskinned ?

Thanks. Doesn't look like it. I hung the passenger door, and it fits like a glove. Did a quick radius comparison and it seems like my problem door has a tighter radius. Don't know if that was "in tolerance" back in the day.

Can see the pics now.. Firefox.

Awesome job, and hats off doing it with a little person in your life.

I have a friend with a running '69 F100 4x4 he keeps wanting to give me. Needs tires and who knows what else. Somedays I think 'hell yeah old running 4x4 for free' and other days I think it's a liability even for free.

If it was a F250 I'd be more inclined.. or if it was older.

Thanks. I can probably say I won't go for something that needs this much body work again. I don't mind fixing panels or floors here and there, but doing 75% of the structure was just too much.

I have pictures now, it all looks great !

Thanks!
 

NYBODYMAN

Well-known member
Joined
Sep 10, 2013
Messages
4,845
Location
NY
Looks good. Tough to say for sure without seeing in person but keep in mind that vehicles back then were not made with the precision and gapping that newer vehicles are. To me it looks like the fender is off. There are ways to massage that and make it better. A good rule of thumb when lining things up are steal a little here, steal a little there rather than try to make it all work in one shot. In other words, move the door a little, move the fender a little etc. This type of work takes a lot of experience and man hours. Just keep fuc*ing with it and you'll get it.
 
OP
R

rabidsquirrel

Well-known member
Joined
Jul 17, 2010
Messages
397
Location
SE Pennsylvania
Looks good. Tough to say for sure without seeing in person but keep in mind that vehicles back then were not made with the precision and gapping that newer vehicles are.

Yep, I've come to terms with that. "Acceptable" is what I'll be happy with since this will be far from a show truck.

To me it looks like the fender is off. There are ways to massage that and make it better.

I think you're right. When I built the lower cab corner I assumed they were at a 90 degree angle, but looking at pictures they are at a slight angle in towards the center of the cab. I think I'm going to make my changes to the fender structural support, because I don't need much and it'll be a hell of a lot less damaging to my undercoat.

A good rule of thumb when lining things up are steal a little here, steal a little there rather than try to make it all work in one shot. In other words, move the door a little, move the fender a little etc. This type of work takes a lot of experience and man hours. Just keep fuc*ing with it and you'll get it.

Thanks for the advice, that's what I ended up doing, and here's where I'm at so far:

34.jpg


Going to build up the bottom edge from left to right about 5/8 to 3/4 of the way with some weld, and then I think I'll be happy. Part of me wants to weld a strip on to the bottom all the way to have a tighter gap but if I start heading in that direction I'll never have this thing on the road again.

Can anyone ID the year of this door? I believe it's from a 65/66. The only thing that doesn't make sense is that it doesn't have any holes for the door card, and they weren't filled in.

35.jpg
 

Jazz1

Well-known member
Joined
Jan 3, 2016
Messages
4,184
Location
Thunder Bay On.
Ambitious project for sure,, ya know all the fun is in the build. Ive done a few frame offs, rust repair is quite tedious. Good job!
I passed on a running driving '63 ford pickup with factory 4x4 and a factory PTO operated 10K lb winch.
 

BORING HOP YARD

Well-known member
Joined
Jan 13, 2007
Messages
1,101
Location
Boring Oregon
Randy, (TimeWarpF100) that replied to you (post 10) would be a real good person to ask, he knows these trucks inside and out and does outstanding work.
 
OP
R

rabidsquirrel

Well-known member
Joined
Jul 17, 2010
Messages
397
Location
SE Pennsylvania
Small updates:

36.jpg


This should have been included in the previous post. Decided to cut my losses and get the gap closer to acceptable. Both doors have about equal rust issues, although the passenger side had it in worse spots to fix. All of it was along the bottom because of poor condition/missing seals. I didn't take any pictures because I forgot...

Fast forward quite a bit...

First coat of epoxy primer:

37.jpg


38.jpg


39.jpg


40.jpg


Some time before the above pictures I got impatient and had to spray some of the color I chose for the truck. I took one of the door panels and did a half-*** epoxy/high build/color test and got this:

41.jpg


Awful overlap, mediocre surface prep, slight orange peal, but no drips/runs.

I upgraded from my Harbor Freight gun to the Eastwood Concours 2. What a world of difference. The HF gun sprayed the epoxy primer fine, but I just could not get high build primer to lay.

That test panel was done completely with the HF gun, so hopefully it goes down better with a slightly higher quality gun. My cleaning methods have definitely improved too.

I have 2 coats of Kirker Perfect Prime on the cab now, and my plans for tomorrow (5/2) are to hit it with one more coat tomorrow morning when it warms up and then to start sanding tomorrow afternoon. If sanding goes well and the weather cooperates, I might try to shoot some color. Definitely on something that's easy to sand if it all goes south. :lol:

-edit-

More random stuff that I forgot: Welded the cab seam up, and I couldn't be more pleased. It looks so much better. I also need to keep reminding myself that this isn't going to be a show truck. If I let myself fix every single microscopic scratch, I'll never get it finished. I'm building this thing to enjoy it.
 
OP
R

rabidsquirrel

Well-known member
Joined
Jul 17, 2010
Messages
397
Location
SE Pennsylvania
Another small update:


42.jpg


Did another test shoot, this time on the full outer door, and the results are mixed...

I'm thrilled with the color and flake distribution. It looks amazing in sunlight. The orange peel is pretty bad however. First coat went down extremely smooth, looked great other than coverage. Then with the second coat I believe I tweaked the air pressure and I shot it a bit too far away. I corrected those mistakes on the third coat but it was already a lost cause.

My plan is to let the paint harden then sand it down and try again. I plan on narrowing my fan a little and going a bit closer with the gun and seeing if that helps. Maybe I'll use the flats on the back of the cab to test. They'll be a bit easier to sand down.
 
OP
R

rabidsquirrel

Well-known member
Joined
Jul 17, 2010
Messages
397
Location
SE Pennsylvania
Back again!

43.jpg


"Let me just paint the dash" turned into "Lets paint everything Sunday".

So how did everything turn out? This time time I got a glass like finish over most of the truck. I painted the back Friday, and it turned out better but not as nice as I would like. I've learned that there's a very fine line between putting enough paint on to flow out, and too much where your flake starts moving in a less desirable pattern and runs.

On the back of the truck I did what I mentioned before, closed down the fan a bit moved closer. That netted me quite a few runs in the paint and poor flake flow. On the rest of the truck I opened the fan all the way up and stuck with the same closeness. That seemed to do the trick.

Now on my to do list:
  1. Order paint, because I'm getting close to running out. Good thing I can get paint from Eastwood in less than two days.
  2. I'm going to have to finish sanding out my runs and then scuff the cab and shoot everything again once maybe twice depending how it turns out.
  3. Sand down my first door test piece and paint both doors inside and out.
  4. Assembly -
    This is where it's going to get tricky for me, since I'm doing this outdoors. I'm going to have to do this all in one long day to get everything weathered in. My thought process is:
    • Rebuild the mirrors with the stainless hardware kit, preferably on a rainy day
    • Put all the guts and windows back in the doors and mount the mirrors
    • Apply door gaskets.

      That's about all I can do ahead of time because I need to limit the weight to get this thing back on the frame.

      Then, on the big day:

    • Set the cab and bolt it down
    • Front and rear windows put back in
    • Hang doors
    • Enjoy?

My schedule:

The next two weekends are a no-go for me. My daughters 5th birthday party this upcoming weekend, and next weekend to the following weekend is our vacation. So everything I will be doing will have to be able to be accomplished after work. I plain on finishing the cab painting on Tuesday, since I have off.

After the cab is on I think I'm going to be taking some time off of bodywork and painting. I think I'm going to be rewiring the truck up and getting it running again because its been too long since I've heard it.

That's it for now.

Oh yeah, I am glad that I put up that shade canopy and put up some plastic on either side. Waaaaaaaaaay more over spray than what I saw with either primers.

-yet another edit-

I'm happy with about 98% of the body work that I did. There's a few dings that I missed, but I've decided to let them go because this isn't a show truck, and it's going to be used and abused.

Also, a question:

For those that have restored vehicles with cowls and cowl drains, what have you done to protect it? I realize that it's fairly late into the process, but all I have done so far is spray primer in there. Strangely enough, the cowl was the most solid part of the lower truck. I'm thinking about masking off the cowl and pouring some POR15 in there, and letting it run down and out through the drains in the front cab that I replaced.

Thoughts?
 

Benw455

Well-known member
Joined
Dec 20, 2005
Messages
752
Location
WV
Fantastic job. I need to quit complaining about space after seeing what you have done in your garage.
 
OP
R

rabidsquirrel

Well-known member
Joined
Jul 17, 2010
Messages
397
Location
SE Pennsylvania
Not sure about cowl or rust prevention, but paint looks great!

Thanks! For my first time, it didn't turn out too bad for a driveway paint job. I definitely shouldn't have went with a metallic for my first time though.

Fantastic job. I need to quit complaining about space after seeing what you have done in your garage.

Thanks. Honestly, up near the top of things that are making me happy right now is clearing the cab and all the parts out of the garage. I've been shimmying around this thing in the garage for the past three years...

Cab should be back on the frame this weekend. I spent two hours last night putting the drivers side door back together, using this helpful post as a guide:

Customcab;3283655 said:
Last Thursday; I successfully installed complete new parts minus door glass and vent glass into my 65 F100 doors. The process took about two hours once we figure out an easy way; I say we because; I believe it’s a two-person task due to alignment and working with glass. We attempted to follow a step by step illustration from a DC catalog; but found out some steps where easier doing it in the following manner; however every situation is different and I removed my old parts and glass about 14 months prior to reinstalling them, so we where little rusty from past removal.
I'll give a brief summary of some key issue’s to make removal of old parts a bit easier first. After all handles, door trim, access panel and armrest are removed. Release the door glass from the regulator arm; and place glass in the bottom of the door for removal further on during the process. Remove the regulator mechanism first (makes removal of the division bar easier). Note: Division bar are a tight fit to remove and install; we rotated them 180 degrees to remove (turn the lower mounting bracket that bolts to the top of the regulator towards the outside door skin during removal and install thru the access panel hole.
Once the regulator, division bar and door glass run are removed; we then removed the anti-rattlers, vent window & door glass; seem easier in this manner. Now your ready to install new parts.

INSTALLATION
We replaced all parts with new rubber seals, division bars etc, so my door frames where just a shell for this installation procedure.

1). Division Bar: Install it at about a 45-degree angle; turned 180 degrees opposite the way it mounts thru the access panel. Leaving it roughly at the same position laying at 45 degrees inside the door panel.

2). Regulator Mechanism: Install thru access panel; we attach loosely with four screws around the window crank stud (initially).

* Prior to installing door glass, we had to form the door glass run to the window glass, recommend holding down the door glass run on top of glass by one person, while the other person moles the door glass run over the curvature of the glass down along the glass towards the door glass (window) channel.

3). Door Glass: Once the door glass run are bent; install the door glass thru the top of the door panel and lower it to the bottom of the door and let it rest there until a further installation point.

4). Vent Window: At this point the door glass, regulator & division bar are inside the door panel; with the door glass and division bar laying down in the bottom of the door panel. Insert a nylon rope / string under outside of the rubber vent window seal; leaving a large portion expose at both ends to grasp when pulling the rubber seal lip over the door frame. (Our cord was about five foot long) probably too much hanging out but sometimes having extra is good.
We then installed the vent window using two screws along the A post and tighten them about 3/4 of the way. (Ensure the nylon cord is on the outside of the doorframe prior to this point). Go ahead and slowly pull the cord to over lap the rubber seal against the outside doorframe.

5). Division Bar: Side division bar into place; making sure the bottom attachment plate is over the top of the regulator mechanism to bolt to the inside two bolts to secure the bar to the regulator. -Edit- My notes: The nut for the screw above the window regulator needs to be drilled out and tapped for 12-24. It's a 10-24 as purchased. Also screw the top two screws (thru door frame) loosely into place. Ensure the vent window screw; that's inserted thru the horizontal portion of the vent rubber near the vent window handle is screw into the division bar at this time.

6). Door Glass Run: Remember this is now bent at a curved angle; Install thru the top of door, guide door run along the inside channel guide along the door handle side until the dove tail clip is resting flush into the groove in the channel (don't know proper name) that the door glass run slides into. This channel bar is vertical along the door handle side, bolted thru the door panel near door locking mechanism.
* Use a 3/8" thick wood stick to insert between door glass run trim to snap run into alignment holes; don't put pressure into curvature portion only along the top three snap holes and two side snap holes of the trim portions.
** We use a wood shim (wedge use to plum & align a typical house door) from your local hardware store as our stick to accomplish this task....

7). Door Glass: Lift door glass from bottom of door panel along division bar & door glass run trim. Once align with regulator arm attach with cam roller & clip, (I use new plastic cam roller but found that my original (E clip or Jesus clip) attach cam roller better than my new made in Taiwan clip).
Crank glass up about 1/3rd of the way out; have a person hold squarely the glass for proper alignment while another person tightens division bar bolts and screws; we also tighten the vent window screws securely at this time.

8). Anti-Rattlers: Anti- rattlers are the last item to install and can be snapped into place with your finger and with the thinner portion of the wood shim we use. There are real thin metal pieces on the ends of the Anti-rattlers; we place the ends along the outside of the division bar and door glass run.

After this step just reattach your door trim, armrest, handles and access panel. I feel it took me longer to type this out then installing new parts. The DC illustration really help and recommend due to having pictures for each step; but the main difference's between them and us when we installed the vent window step. Seem easier prior too division bar and window glass step.
Hope this helps any future installments. thumb.gif

Mitch (Just a Shade Tree Mechanic with a lot of Leaves Missing)
compute.gif

Found out the hard way the rear window is supposed to go in from the inside... Of course I had sealant everywhere when I discovered it. Hopefully new pictures on Sunday.
 
OP
R

rabidsquirrel

Well-known member
Joined
Jul 17, 2010
Messages
397
Location
SE Pennsylvania
It's alive!

44.jpg

Notice the meticulous detail in my Concour correct battery mount and fuel line installation. The wiring really ties everything together.

Since my last post:

  • Put the glass in the cab. Fixed the leaks in the windshield
  • Wired everything up
  • Seat installed
  • Steering box/column installed.
    • Ordered a power steering kit for this thing, which will let me get rid of the old Spearing wheel
  • Headers installed, had them ceramic coated.
  • Replaced the leaking transmission pan with a deeper cast aluminum one.
Fired her up tonight for the first time in three years. Once I had gas to the carb it lit right off. Sounds really good.

Time to order more stuff...
 
OP
R

rabidsquirrel

Well-known member
Joined
Jul 17, 2010
Messages
397
Location
SE Pennsylvania
Further adventures in DIY auto painting...

I'm finally getting better at spraying this single stage metallic. I've been working on the hood, and it's taken quite a bit of work. No metal replacement was needed, but there was quite a bit of small dents and a very large crease in the center rib, about an inch deep. I was able to fix that as well as some really bad oil canning (by stretching instead of shrinking. Completely opposite of what I thought).

I epoxy primed, filler primed, and then painted the hood. I had to stop after the first coat because of some type of oil contamination on the hood. I'm pretty sure that I was plugged into the wrong port on my compressor, after my water traps and before my oil condenser and desiccant dryer. I also had horrific tiger stripes, and some pretty bad scratches, so I started over again.

I watched a few Youtube videos (cliche, I know) and figured out my problem with the stripes was that I wasn't getting enough paint volume coming out of my gun, and I was holding the gun too close and moving too slow to compensate. I had a 1.3mm tip @ 28 PSI (paint calls for 1.2-1.4mm @ 8-10 PSI) and with the gun fully open I wasn't getting enough flow. I changed out to a 1.7mm and kept the pressure the same and everything was perfect. I'm starting to get the hang of it, and a big part of it is realizing that I do have time to make corrections. I am unsure though why I need to jack up the pressure so much though. At 10 PSI I wasn't getting anything out.

I think the only thing now is for me to get a bit of a slower activator for the temperatures here. The paint set up a bit fast on my second coat making my touch ups a bit tough.
 

v8nutz

Well-known member
Joined
Jan 29, 2020
Messages
93
Location
rocklin,ca
Painting can be such a *****. It's such a feel thing and if you don't do it all the time with the same materials it's tough to get a good result. Temp has a big effect too. I've usually been able to fix a not great clear coat with a color sand and buff but if the metallic isn't sprayed super even it will show forever. The Camaro in my avatar was my best paint job result.
 
OP
R

rabidsquirrel

Well-known member
Joined
Jul 17, 2010
Messages
397
Location
SE Pennsylvania
Another update. This one is going to be pretty long. Ordered the radiator support. There is no difference between the 4x4 and 4x2 radiator supports for '61-'64 F100s, despite what all the parts websites say. I'm thrilled with the Dynacorn repop, it was surprisingly well made and heavy.

I then started to break down my old front clip to get at the fender aprons that needed some drastic work. That took about two days to do. I only had to drill out four bolts. I spent about three hours getting my first victim cleaned up and went to hang it on the truck to see what I needed to add or cut out when I realized I had an issue. Nothing lined up, at all. Then a thought I had a few years ago came back to me. I couldn't figure out why the truck had a '65 grille in it. Sure, it's titled wrong as a '64, maybe that had something to do with it. I slowly realized that someone had swapped in a '65 front clip onto it.

I added my wrong '65 fender aprons to the scrap heap and ordered 'correct' ones for ~$160 a piece. I probably had that much labor into cleaning the old one, and that's before repairing anything. If you're not too worried about original sheet metal, that's the way to go. I have correct in quotation marks because on a '61 4wd truck the battery mounts under the passenger side floor on the frame. My box was rotted out and I wanted to move the battery anyway because I live in the salt belt. The only fender aprons that are made are for the 2wd trucks, which allows for the battery being installed on the firewall. I also ordered the battery tray for a 2wd truck.

Speaking of the battery tray, this is the wrong tray. It does NOT fit the '61-'64 trucks. This is the correct tray for a '61 2wd truck, which will fit in my application because I'm using the 'wrong' 2wd fender apron. Of course I only figured this out after I epoxy primer and satin black painted it.

In between all the above I started installing a power steering conversion kit I purchased from eBay. All in all, I can't really recommend the one I bought. Missing half the hardware, pump mounting bracket straight up wrong, supplied pressure hose had the end crimped at a weird angle relative to the other, and odd parts mixed into the box that weren't needed. I ended up spending more than if I would have taken the time to research it myself. I ended up getting an Ididit 28" floor shift tilt steering column.

While the paint was curing on the inner fenders and radiator support I buttoned up the power steering. After the paint was ready I started installing the body panels. I have this indented head stainless body bolt kit. It's been fairly hit or miss with the thread pitch. Several times it's supplied fine thread when I needed coarse, and vice versa. Over all I've been able to swap some hardware around. I would buy this kit again. One kick in the ***, all fender hardware is 5/16-24. I had a hell of a time finding 5/16-24 U nuts. I finally found a source on eBay.

Last week I bought a new alternator pulley and crank pulley, because when I started this adventure I decided I was going to do without power steering. 33" tires changed that pretty quickly. I also didn't like the fact that the steering column was permanently fixed to the steering box. I figured out what v belts I needed, and luckily they are a standard size so I was able to pick them up at Autozone today.

That leads to this Video. Warning, loud and ~27 megabytes. What a difference being able to turn the wheels with one finger versus that monster OEM wheel and all your might. Sorry for the crappy video, it's hard to hold the phone and reach in to turn the wheel.

Issues to fix:
  • Small leak on the pressure side at the gear box. Got another 1/4 turn on it, hopefully that's it.
  • Not making a full right turn. Doesn't appear to be binding anywhere, hopefully I just didn't have the gear box clocked right. Left hand turn seems a bit excessive right now.

I went out to the Carlisle truck show and picked up the rock guard, valance(??) and grille. Got really lucky with those. Met Flashback F100s out there.

Next up on my ever expanding to do list, in no particular order:
  • Waiting on a fuel tank relocation kit to come in. They're sold out everywhere.
  • Run fuel line to back of truck.
  • Move fan relay and mount battery tray and battery.
  • Add ground straps
  • Bodywork and paint fenders. I have a replacement set that aren't too bad. They aren't the wide radius like I want, but apparently the small radius did come on some factory versions of my truck so I'm somewhat factory looking.
  • Bodywork and paint rock guard and the piece that goes just under the hood and above the grille.
  • Install all the above.
  • Wire up the headlights and front turn signals.
While my painting has improved, now I need to work on my bodywork/blocking skills. Lots of little dips and dents are visible. I'm going to try something new with the fenders. I'm pretty sure when the truck is roadworthy I'm going to take it to my dads garage and respray the doors in place. They're pretty bad with tiger striping.

After I finish the list that's probably about it for this season. My goal at the beginning of the year was to drive the truck around my neighborhood a few times before winter, and maybe take it out and test the 4wd if we get a decent snow. It's starting to look like I might have a gas can in the bed with a hose sticking out of it, but honestly that feels safer than having the old one behind the seat.

Off the top of my head I've got 750-1000 hours into this thing this year. I've been putting off a few projects around the house that I need to get to. Another personal pet project in the wings is a 210 gallon freshwater fish tank that I'm converting over to saltwater/reef. I've had the bulk of the needed parts sitting in my office for 9 months now.

I'll try to update/get some pictures once Henri passes.
 
To avoid these ads, REGISTER NOW!
Top Bottom