To avoid these ads, REGISTER NOW!

1965 GMC build

OP
R

Robert Haas

Well-known member
Joined
Sep 30, 2010
Messages
1,749
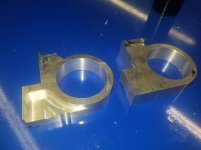
I then debur all edges and I end up with these

20190723_130748.jpg

Now over to the surface plate to do the first of several lay outs that I need to do.

First comes the lay out fluid, a simple type of ink that does not wash off with coolants or cutting fluids, the 12" Mitutoyo height gage with scribe attached is how I will lay out the first of several "lines" these are mostly just visual reference points. All actual dimensions are measured and confirmed during machining.

20190723_131201.jpg

Here is the center point of the bore laid out.

20190723_131254.jpg


Now onto the lathe. I will use a four jaw chuck as the part is to be bored off center.
20190723_132442.jpg


I confirm center with a dial indicator then begin the boring process. First is a series of holes using progressively larger drill bits to allow the boring bar to be used.

20190723_132721.jpg
 
To avoid these ads, REGISTER NOW!
OP
R

Robert Haas

Well-known member
Joined
Sep 30, 2010
Messages
1,749
Stepping up to larger and larger bits

20190723_133008.jpg

last hole is 1"


20190723_133137.jpg

The boring bar is now installed in the quick change tool holder.

20190723_133141.jpg


And the arduous process of boring to final size begins.

20190723_094559.jpg

final size achieved.

20190723_142753.jpg

That gets us to here, Lathe work completed.

20190723_142940.jpg
 
OP
R

Robert Haas

Well-known member
Joined
Sep 30, 2010
Messages
1,749
Now back to the surface plate and lay out for the mill is completed

I did one other process on the lath and cut a plug that fits the spindle on my rotary table

20190724_143352.jpg


Several individual tool paths are plotted and carried out.

20190724_144105.jpg

20190724_145604.jpg

20190724_150511.jpg


final profiling and cutting to final. note the thin (.0675") fin I will leave to weld to.

20190725_094558.jpg

20190725_104042.jpg
 

Attachments

  • 20190724_164831.jpg
    20190724_164831.jpg
    88.7 KB · Views: 86
OP
R

Robert Haas

Well-known member
Joined
Sep 30, 2010
Messages
1,749
Here is final mock up. will still need to drill and tap each piece for the 10-24 set screws that hold the tank in the brackets

20190725_104250.jpg

20190725_104257.jpg

20190726_085101.jpg

20190726_085342.jpg


welded and mounted

20190726_101635.jpg

20190726_101643.jpg

20190726_101702.jpg

It was a fun enough project and it came out exactly the way we needed it to.
 

jbmatth

Well-known member
Joined
Jun 3, 2013
Messages
5,681
Location
Northern Ok.
That is some pretty incredible work for a "simple" surge tank bracket. Just one of the many little details you've put into this build that will put it way over the top.

JB
 

stinkity stoink

Well-known member
Joined
Apr 8, 2007
Messages
730
Location
New Jersey
Wow ,Great work !!!! That is definitely something most people will not pay attention to with the hood up , let alone realize the time and effort that went into making it.
 
OP
R

Robert Haas

Well-known member
Joined
Sep 30, 2010
Messages
1,749
That is some pretty incredible work for a "simple" surge tank bracket. Just one of the many little details you've put into this build that will put it way over the top.

JB

Thank you, not so much over the top as not just some check book build. :thumbup:
 
OP
R

Robert Haas

Well-known member
Joined
Sep 30, 2010
Messages
1,749
Wow ,Great work !!!! That is definitely something most people will not pay attention to with the hood up , let alone realize the time and effort that went into making it.


For the few people that know what they are looking at, this build is like an easter egg hunt to the few that look at it for more then a glance.


I am building a bolt on bracket for the AC drier today. It is pretty cool but I won't boar everyone with another self serving pictography of the process. :thumbup:
 

zmotorsports

ALLIANCE MEMBER
Joined
Oct 20, 2009
Messages
21,332
Location
Northern Utah
For the few people that know what they are looking at, this build is like an easter egg hunt to the few that look at it for more then a glance.


I am building a bolt on bracket for the AC drier today. It is pretty cool but I won't boar everyone with another self serving pictography of the process. :thumbup:

Keep the pics of the little details coming Robert. Personally, I like the easter egg hunt of details. All of my builds have been the same way with the mindset of hiding things in plain sight. To the average person they look like they belong but to the trained eye they jump out and then lead to the next and the next and so on.

The devil is in the details.:beer:
 

iajonesy

Well-known member
Joined
Feb 8, 2009
Messages
2,467
Location
Iowa
I too like the photos and the little details I have seen in both of the builds. I get a lot of good ideas from your labors and appreciate your efforts to provide us with step by step photos and text. Keep posting and I'll keep stealing. Thanks.

Mike
 

Chateau Slate 66

Well-known member
Joined
Nov 4, 2008
Messages
408
Location
Twin Cites, MN
I do as well. I prefer not to clog up your thread with a bunch of "great job" posts, but rest assured that myself and many others follow your posts closely.
 
OP
R

Robert Haas

Well-known member
Joined
Sep 30, 2010
Messages
1,749
This build will have AC so I built a hanger for the drier. Bored this part on the mill. had a lot of chatter but it cleaned up by the time I got to final.

Did add a small detail using a ball end mill. :thumbup:

20190730_131447.jpg

20190730_135751.jpg

20190730_151437.jpg

20190730_173625.jpg
 
OP
R

Robert Haas

Well-known member
Joined
Sep 30, 2010
Messages
1,749
Have not posted much as I have been pretty ******* with other projects. However I have been getting a lot done on the GMC and as of late I have gotten into the plumbing and it has been enjoyable.

Start off with;

I re-did the exhaust system too. Using a different type of joint now as well as added a flex pipe to help isolate the system even further.

20200206_082247.jpg

20200206_082303.jpg

20200206_082317.jpg
 
OP
R

Robert Haas

Well-known member
Joined
Sep 30, 2010
Messages
1,749
Built a mount for the transmission cooler and built all the lines, as well as the mounts for the lines that bolt them to the chassis.

All one off just for this build.

20200215_150913.jpg

20200215_150921.jpg

20200215_150901.jpg

20200215_151138.jpg

20200215_151042.jpg

20200215_151103.jpg
 
OP
R

Robert Haas

Well-known member
Joined
Sep 30, 2010
Messages
1,749
I scrapped the Stainless steel fuel tank. I built an aluminum one, that is now fully plumbed too.,:thumbup:


20200215_150927.jpg

20200215_150941.jpg

20200215_150955.jpg

20200215_151011.jpg

20200215_151026.jpg
 
OP
R

Robert Haas

Well-known member
Joined
Sep 30, 2010
Messages
1,749
So here are the overview shots.

86276181_1580030068801682_3007018217244721152_n.jpg

86502258_1580939475377408_5017633506767929344_o.jpg

86288517_1580030102135012_4394876782289879040_n.jpg


Thanks for lookin'

I'm tired and heading home to take a nap:bounce:
 
To avoid these ads, REGISTER NOW!
OP
R

Robert Haas

Well-known member
Joined
Sep 30, 2010
Messages
1,749
Time line has been accelerated. Owner has reqested a fire up and test drive by June.

I feel the pressure building.
 

larry_g

Well-known member
Joined
Apr 28, 2007
Messages
16,872
Location
oregon
I sure the hell hope that your planning a glass floor in the bed so all this beautiful work does not get lost...

You also cannot post to many of the machining and detail work pictures.

lg
no neat sig line
 
OP
R

Robert Haas

Well-known member
Joined
Sep 30, 2010
Messages
1,749
I sure the hell hope that your planning a glass floor in the bed so all this beautiful work does not get lost...

You also cannot post to many of the machining and detail work pictures.

lg
no neat sig line


Yea this truck will be a Easter egg hunt for folks that actually take a minute or 2 to look at it.

As far as a detailed posts with some fabrication you are about to get bored to tears. This week I will begin the process of manually machining a full billet dash panel. out of a 35 LB chunk of 6061 Billet Aluminum.

I am going to set up a go Pro camera and shoot some time lapse.

I expect it to take me between 12 and 18 hours total mill time to widdle it out. I estimate the finished part will weigh less then 2 Lbs.
 
Last edited:
OP
R

Robert Haas

Well-known member
Joined
Sep 30, 2010
Messages
1,749
The one problem with building a first generation C10 GMC is they just do not get the love from the aftermarket that the same series Chevrolet's get. Case in point is the dash. There is probably 5o different companies building dashes for the 63 to 66 Chevy C10's and the options are rich. The lowly GMC is the redheaded step child with basically a handful of designs being sold and none of them offer what I need for this build. So it leaves me with no choice but to widdle one out myself.

Start off with 35Lbs of 6061 Aluminum, chuck it into the mill and machine the surfaces.


Then put the lay out die on it.


Grab a bunch of precision tools


Now start cutting everything away that is in the way.

20200220_095007.jpg

20200220_101259.jpg

20200221_121145.jpg

20200220_105109.jpg

20200220_115452.jpg

20200220_115819.jpg

20200220_131640.jpg
 
OP
R

Robert Haas

Well-known member
Joined
Sep 30, 2010
Messages
1,749
Rough it to shape then get it mounted on to my 75 year old 16" rotary table and start the daunting task of building a instrument panel.

20200220_132521.jpg

20200220_131652.jpg

20200220_141207.jpg

20200220_144934.jpg

20200220_183250.jpg

20200220_183257.jpg

20200220_193436.jpg
 
OP
R

Robert Haas

Well-known member
Joined
Sep 30, 2010
Messages
1,749
CNC technology has made processes like this completely obsolete. However I do not own a CNC so doing it manually is my only solution.

It will take tons of time but if I am patient, careful and accurate enough,.... I should be able to achieve an acceptable level of finish.
 
OP
R

Robert Haas

Well-known member
Joined
Sep 30, 2010
Messages
1,749
Got back on it yesterday only to crash the mill because I had my head up my *** and broke the thrust bearing out of the X Axis. spent most of the day doing a repair on that. Hope it works as my Italian Mill has no spare parts available and I would have to make my own and I do not have that skill set. Not yet anyway.

got to here before the crash

20200224_170828.jpg

20200224_172118.jpg

20200224_172844.jpg

20200224_174031.jpg
 

samss

Well-known member
Joined
Aug 20, 2014
Messages
502
Location
Conway, AR
Your craftsmanship is amazing, really. As stated by others, keep the pics coming, we don't always comment just to keep from cluttering up your thread. I still miss my '66 C10 Custom.
 
OP
R

Robert Haas

Well-known member
Joined
Sep 30, 2010
Messages
1,749
The Mill is back on line, I will never forgive myself for hurting it. I am the only operator it has ever known. I rescued it from the guy who bought it at auction and he never even unboxed it. It still had the factory shipping locks installed and was covered in cosmoline just like the day it landed on our shores back in 1978.:thumbup:

20180205_172108.jpg


My repair was intensive and I did everything I could to get it back to the operational status. I will cross my fingers and hope it is a durable repair. I have my doubts as welding cast iron is not my wheel house and I don't trust what I did to be up to my norms.
 
OP
R

Robert Haas

Well-known member
Joined
Sep 30, 2010
Messages
1,749
So I got the mill back up and was able to get to the part ready to be bored for the 7 instruments it will hold. I showed a picture of the cool part of my mill where I can swing the x/y axis and cut tapers. That allowed me to machine the sides at the 7 degrees from vertical.:thumbup:

20200226_081202.jpg

20200226_081209.jpg

20200226_081230.jpg

20200226_082317.jpg

20200226_082326.jpg

20200226_141020.jpg

20200226_173637.jpg
 

jbmatth

Well-known member
Joined
Jun 3, 2013
Messages
5,681
Location
Northern Ok.
Bummer on the mill, but glad you were able to get it operational again. The bezel is looking great by the way.

JB
 
OP
R

Robert Haas

Well-known member
Joined
Sep 30, 2010
Messages
1,749
Well the first phase is complete. Still need to add the bottom and get the steering column notch completed as well as final facing.

I'm pretty glad to have this off the mill for awhile.

20200227_104353.jpg

20200227_124208.jpg

20200227_144350.jpg

20200227_153350.jpg

20200227_160919.jpg
 
To avoid these ads, REGISTER NOW!
Top Bottom