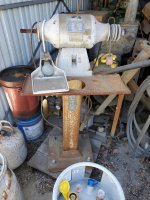
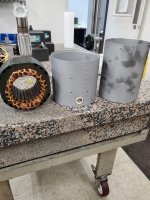
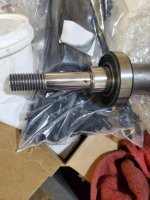
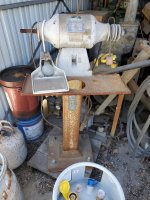
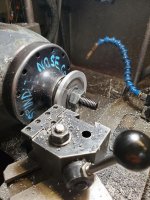
Hello, first post here. I found this sight looking into Baldor Grinder restorations. I got this grinder from a friend. It's been kicking around outside but mostly under a cover for who knows how long. At least the 20 years I've worked here. I asked my friend/owner if I could buy it without knowing if it ran or knowing much about Baldor Grinders and offered him $50. He agreed but after looking them up, I gave him $100 lol. Still didn't know if it ran. I hauled it over to my office and plugged it in. Low and behold it ran great with only minor bearing noise and no runout in the shaft. I tore it apart 3 weeks ago and now it's almost ready to put together. I am restoring/customizing it and going a bit crazy with it. I even pushed out the stator so I can powder coat the housing. I'm using all powder coat and no paint with custom colors and it's getting all new hardware. No spoilers on the final product but here is a couple pics including the spindle after cleaning and polishing.

You are using an out of date browser. It may not display this or other websites correctly.
You should upgrade or use an alternative browser.
You should upgrade or use an alternative browser.
1980 BALDOR 8107WD Restoration Project
- Thread starter Eric H.
- Start date
macgee
Well-known member
Hi Eric,
Welcome to GJ!!!
Awesome story and have to say you're doing the right thing. Don't worry about going a little crazy on the restore; it's worth it. You did a great job removing the rust.
Those grinders are high pedigree and you'll be more than happy after its all said and done. Looks like you have a nice and clean metrology room so you're no stranger to clean and well working machinery.
I do suggest replacing the bearings while it's all apart (you've probably already done this). Also check the runout on the spindles. Those windings look great.
Looking forward to seeing more photo's as you progress and this machine will happily serve you for many years to come and will look great in your shop. It's a very good investment.
Cheers
Welcome to GJ!!!
Awesome story and have to say you're doing the right thing. Don't worry about going a little crazy on the restore; it's worth it. You did a great job removing the rust.
Those grinders are high pedigree and you'll be more than happy after its all said and done. Looks like you have a nice and clean metrology room so you're no stranger to clean and well working machinery.
I do suggest replacing the bearings while it's all apart (you've probably already done this). Also check the runout on the spindles. Those windings look great.
Looking forward to seeing more photo's as you progress and this machine will happily serve you for many years to come and will look great in your shop. It's a very good investment.
Cheers
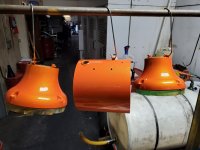
Bearings are already replaced. I used our micro blaster on the rust. The nozzle is only .060 and we run 50 micron aluminum oxide through it so it gets into all the small pores of the rust. It's like baking soda but a bit more aggressive. I ran it around the threads as well under magnification. No guards going back on this for buffing purposes but it will have a fine stone on one end. The spindle has no noticeable runout. I did not measure it but I spun it up in a lathe to finish polishing it with a live center and it ran perfectly smooth. Every piece of hardware is replaced except for the switch (new rubber cover though), capacitor and the 10-32 threaded rods that go through the housing. I even cleaned the wires lol. I'm just waiting for some powder I ordered so I can do the base but it is all blasted and ready. My friend is bringing me some of the internal coating for the windings, just so I can re-cote where the laminations contact the housing after pressing them out and back in twice. The interior of the housing is lightly powder coated. There is a twist to the laminations so they twist a bit going in so it took two tries to get the holes lined back up. The tube in the picture is the 6" tube I cut to use as a pressing tool on the laminations.
nadogail
Well-known member
May you enjoy that grinder, and good health for many years.
May you enjoy that grinder, and good health for many years.
Thank you and the same back to you!

No grinder pics yet but I'm almost done. I'm waiting for a part from our laser department and then that should be the last of it. The grinder is all back together and runs smooth & quiet. Only .0005 TIR on the spindle. Since I'm running it primarily for deburring and buffing, the wire wheel and buffing wheels are too narrow for the wheel nuts to contact the flanges without running spacers which I did not want. So I made these left & right wheel nuts out of 1.125 stainless hex stock. They're 1.5" long with a 1.0" counterbore to clear the unthreaded portion of the spindle.
Attachments


I got this finished up this evening after getting the new "motor plate" cut and powder coated. The first pic was taken 04-01-21 just 6 weeks ago. The second just now.
Here is the before & after.
Here is the before & after.
Attachments
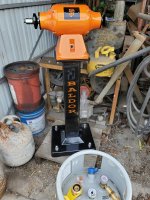
Few pics of the work.
Attachments
-
 20210424_093528_resized.jpg119.5 KB · Views: 46
 -
 20210501_084409_resized.jpg126.7 KB · Views: 45
 -
 20210428_153246_resized.jpg158.3 KB · Views: 45
 -
 20210422_173801_resized.jpg126.6 KB · Views: 40
 -
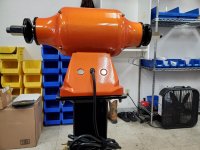 20210514_170647_resized.jpg149.1 KB · Views: 38
 -
 20210514_170621_resized.jpg143.5 KB · Views: 42
 -
 20210514_170539_resized.jpg134 KB · Views: 47
JoCoSawdust
Well-known member
Wow! Great work! I like the colors. Welcome to GJ!
Thanks, I am a big Giants fan but the color combo was by accident. I knew it needed paint and I've been wanting to try these "illusion" powder colors that mimick candy colors. I really like metallic orange so that's what I wanted for the main color and the black accents were an obvious choice. The motor plate was hammered badly so the SF logo just made sense with the color combo. I randomly searched Amazon for the orange metallic vinyl for the Baldor logo and was suprised how close the match was. I know the "Courier New" font is off a bit but it was free and I cut it on my wife's Cricut. I trued the wheel flanges as well as cleaned them up and ordered one new from Galco. I'd like to find the right side guards so I can run a wheel on the right. I Galco has them but expensive. If I find a guard and cover I'll make a billet steel rest.
I think I'm done now. I'd rather have a belt sander than a stone and don't have guards so I mounted a Multitool 2" x 36" attachment which took some special adapting to make it fit an 8" Baldor. As you can see in the pics the Multitool is meant for a much smaller hub than what's on the 8". I made a hub adapter and bored out the pulley for the 3/4" shaft. It mounted up nicely with the adapter, runs very smooth and the 3/4 HP grinder has plenty of power for it. The guard was powder coated black but poorly and it mounted with 6mm through bolts and nuts. I stripped a re-powder coated the guard, enlarged the thru holes in the guard to clear a 5/16 button head screw and tapped the .250 thick mounting plate 5/16-24 so there's plenty of thread and no more thru bolts and nuts.
Attachments
-
 20210614_091931_resized.jpg219.2 KB · Views: 21
 -
 20210617_174138_resized.jpg214.3 KB · Views: 18
 -
 20210618_102952_resized.jpg337.8 KB · Views: 17
 -
 20210618_111949_resized.jpg232.6 KB · Views: 16
 -
 20210618_165112_resized.jpg291.7 KB · Views: 16
 -
 20210626_131616_resized.jpg304.5 KB · Views: 17
 -
 20210629_150627_resized.jpg352.2 KB · Views: 18
 -
 20210629_150655_resized.jpg332.4 KB · Views: 19
 -
 20210629_150637_resized.jpg348.4 KB · Views: 27