To avoid these ads, REGISTER NOW!

1981 Yamaha 550 Seca Resurrection

Nessism

Well-known member
Joined
Nov 12, 2023
Messages
184
Location
Torrance, CA
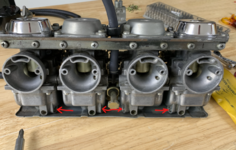
The float bowl drains are supposed to be accessible with the carbs on the bike. You need to switch the bowl sides so the screws angle to the outside of the bike.

Typically, motorcycles cylinders are numbered from left to right. You have it backwards.

Lastly, each float needle has a spring actuated tip. Varnish likes to stick them down, though. Make sure the spring is active on each needle. If not, remove the needle and soak them in carb cleaner spray. Not carb dip. That stuff will damage the viton rubber tip.

yamaha float bowls.pngyamaha float needle.png
 
To avoid these ads, REGISTER NOW!
OP
M

Max

ALLIANCE MEMBER
Joined
Jun 16, 2018
Messages
3,353
Location
Georgia
The float bowl drains are supposed to be accessible with the carbs on the bike. You need to switch the bowl sides so the screws angle to the outside of the bike.

Typically, motorcycles cylinders are numbered from left to right. You have it backwards.

Lastly, each float needle has a spring actuated tip. Varnish likes to stick them down, though. Make sure the spring is active on each needle. If not, remove the needle and soak them in carb cleaner spray. Not carb dip. That stuff will damage the viton rubber tip.

yamaha float bowls.pngyamaha float needle.png
Yep you are 100% right on the float bowls. I‘ll double check the float needles while I am there.
 

Nessism

Well-known member
Joined
Nov 12, 2023
Messages
184
Location
Torrance, CA
Just to clarify, regarding the needle spring tip, don't soak the entire needle in nasty solvent. Just soak the top half of the needle, where the spring is. You don't want to damage the rubber tip with chemicals.

What I do is first remove the little wire clip thing above the needle. Then, spray some carb cleaner in a bowl. Just 1/4" or so. Then press the tip down into the sauce. If the tip doesn't spring, allow it to soak upside down, with the spring tip in the solvent, but the rubber above it. Eventually, the tip will start to move. I take the needle and depress the spring tip over a clean paper towel. You will see black gunk come out of the needle as you depress it. Do this enough times until no more black crud comes out of the needle spring. That's when you know it's properly clean.
 

ericm

Well-known member
Joined
Apr 17, 2016
Messages
1,963
Location
Southern Oregon
Yep the float bowls are wrong in the second after rebuild pic. The drain screws should be to the outside where you can get to them when they're on the bike. Could just be the bowls that are swapped left to right, not the carbs. Good catch!
 
  • Like
Reactions: Max

driftpin

Well-known member
Joined
Dec 22, 2016
Messages
11,313
Location
Miami-Dade/Broward Co. Florida
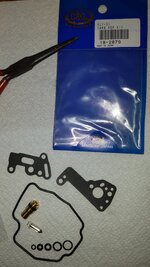
I recommend K&L o-ring/gasket sets, they are O.E.M. suppliers for Japanese bikes. They also provide many other components for Japanese motorcycles.

When you're faced with gunk like this master cylinder, K&L has kits for rebuilding them.

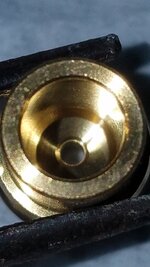
First, a K&L carb kit for a V-4 Japanese bike, second, a clean float needle seat, and. third, a master cylinder being disassembled for a K&L kit rebuild after many years of sitting.
20210329_172258.jpg20210329_170857.jpg20170903_142034.jpg
 
  • Like
Reactions: Max

Nessism

Well-known member
Joined
Nov 12, 2023
Messages
184
Location
Torrance, CA
No disrespect to @driftpin, but I hate K&L. I've had bad brake caliper seals, bad master cylinder kits, and their carb float valves, have weak springs, that can't hold up the weight of the float. I'd use OEM, or real Mikuni, parts, unless absolutely necessary, over K&N.
 
OP
M

Max

ALLIANCE MEMBER
Joined
Jun 16, 2018
Messages
3,353
Location
Georgia
First a shout out again to @Nessism for pointing out the mis-matched float bowl covers plus mentioning the springs on the float valves. As I mentioned earlier, the two outside carb bodies (#1 & #4) have to be in specific places so that the fuel delivery system works. I may have swapped #2 and #3 but I don't think so. So my mistake is most likely just with the float bowls. Which is a pain, as I did number parts and put them on numbered towels. But stuff did get moved around a lot, and carb cleaner would remove the numbers.

Taking the carbs off again meant that I had to separate them so I could remove the float pins. I wasn't sure whether I could see the float valve springs working or not so I pulled all of the pins and floats again. They were somewhat of a pain to remove but much easier this time.

I didn't check the float valves at first - I just dumped them in the spray cleaner. After two hours of soaking three of them are great. The fourth one didn't work right so it went in for another soak, so it was definitely something that I missed and that needed to be done. FWIW I already have two float valves and seals on order just in case. And it's two, instead of four, as they are $33 _each_. So if I can get the last valve to work correctly I'll button up the carbs again, otherwise I'll wait the month or two to get the parts I have on order and just do it all at once - new float valves/seats, new float pins, and new intake manifolds. Sigh.

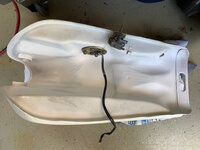
In other news the paint on the bottom of the tank came off in the vinegar and that area flash rusted on me in minutes. So I cleaned it off again and the tank now looks like this:

1715543927289.jpeg

So progress at least on the tank. All it needs now is to take the petcock off and drain the oil out before I start cleaning and filling it with gas. But that is going to wait for the carbs to be done.

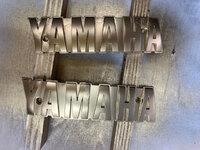
Speaking of the tank, the emblems have been a royal PITA. The gold spray really highlights any flaws on what you're painting so it's been multiple iterations of add epoxy, sand/file, spray, and then redo. Finally I decided that perfect was the enemy of good enough and that I was done.

Here is a shot of the gold only after several iterations:

1715544130848.jpeg

Here is a shot after filing and sanding the messed up areas in the above picture:

1715544170543.jpeg

And this is the "good enough" level. I still need to buy some matte outdoor rated clear to finish them. And let me note that is was quite the pain painting in the black on these bad boys...

1715544242622.jpeg

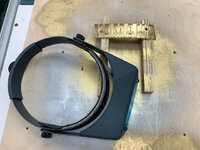
I don't stay at Holiday Inns and I don't have any sponsors. But I did use two things during this that I'd like to point out as being really handy. The first is an Optivisor, which uses real glass for the lenses and has a very comfortable headband:

1715544355731.jpeg

I couldn't have gotten the emblems painted properly without it.

The other is Simichrome, which is a polish made by Happich. It is absolutely great stuff on aluminum and works well on other metals as well. I used it to polish the carb float pins with the rag below so you can see the bad metal that it removed. On Al it will make something look almost like chrome, although it will dull over time if you don't clear coat it. My new starter push button got simichrome as a final step earlier.

1715544399710.jpeg
 

driftpin

Well-known member
Joined
Dec 22, 2016
Messages
11,313
Location
Miami-Dade/Broward Co. Florida
1715561517114.png


Here's a K&L carb rebuild kit, times four, yes, that's four individual K&L carb kits for your use. Jump quick if you want one package as it's four of the individual K&L kits in separate envelopes, and it is NOT a crappy '4 in 1' Chinese set, with poor tolerances and often incorrect hardware. $81 and free shipping, from Daytona Beach FL. This is the company (K&L) I mentioned in another earlier post.

As you see, it's float needle valves and seats (part # 44, 45, & 46), a float bowl chamber paper gasket, a couple O-rings and what appears to be the press-in cap for the air needle valve. I bet #48 is the float bowl drain valve screw O-ring, the smaller of the two shown. The larger O-ring may go on the part #33 needle, the needle can be seen on the fiche below. I'm not sure about that one, you probably have a good idea of where it goes from your disassembly. I always take lots of phone pics in disassembly, so I know where things belong upon reassembly. I make notes too.

1715562952754.png

https://www.partzilla.com/catalog/yamaha/motorcycle/1981/xj550h/carburetor-xj550h-j-k
The partzilla.com fiche diagram is sharper in reproduction than the Ron Ayres Yamaha website's picture.

I have used Ron Ayres Yamaha for mail order parts for decades. and am very satisfied with their service. If it's back-ordered, they will ship it once it comes in, and they will ship what they have, with order sheets explaining what they sent, and what will-be sent once it comes in.

These are the Mikuni downdraft carburetors I usually am working on. Four-square, you could say. A clean adjusted set is getting good $ these days.

1715564842222.png

1715564953608.png


Two things very important to the proper operation of the bike's fuel system, are proper float level and proper synchronization of the four carburetors one to another. The parts fiche of the carb has the float setting shown in a legend box for jet sizes & etc. Of course, that goes for a clean gas tank and gas-tight gas lines, a clean gas filter, a clean air filter and no air leaks anywhere.

Nessism hasn't had good luck with K&L, while I haven't had bad luck. I agree that OEM Yamaha is always best if you can get it.
 
Last edited:
OP
M

Max

ALLIANCE MEMBER
Joined
Jun 16, 2018
Messages
3,353
Location
Georgia
Thank you @driftpin At the moment I'm staying with OEM parts. I already have the gaskets and I've got the air intakes and valves/seats on order. Three of the four valves look good to me, and the 4th one isn't done yet - I'm going to use the ultrasonic cleaner next.
 
OP
M

Max

ALLIANCE MEMBER
Joined
Jun 16, 2018
Messages
3,353
Location
Georgia
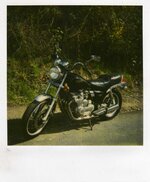
Here is a 650 Maxim I did a year or so back. I was able to find a TON of NOS parts including the carb sync tool. Still have it if you are interested. It really helped to fine tune the carbs.

Thank you for the very kind offer, but I already have the special tool to adjust the carbs. Fortunately I also have the special valve adjust tool.

You did an awesome job on restoring your Maxim. I am afraid mine won’t be quite as nice unless I decide to repaint it.
 

rd65

Well-known member
Joined
Sep 29, 2017
Messages
2,840
Location
Granite Falls, WA
A couple of old Yamaha's I flipped back in the bike shop days. These were both before we moved to the new store, so pre-2000.
Maxim came in with bent forks. He decided to not have it repaired and left it. After the lien letter was sent I picked it up. Straightened the forks, rode it a bit and sold it.
Radian came in on a tow truck. Owner had called and said he was riding it and "all the oil fell out", #3 rod was sticking out of the case. He mailed us the signed title. I bought a used engine and exhaust for it and had it painted and sold it.
 

Attachments

  • img069.jpg
    img069.jpg
    90 KB · Views: 11
  • img056.jpg
    img056.jpg
    127.7 KB · Views: 9
OP
M

Max

ALLIANCE MEMBER
Joined
Jun 16, 2018
Messages
3,353
Location
Georgia
Not a lot of progress on the Seca in the last few days as I am waiting on carb parts. Here is a little bit of stuff that I've done:

I finished the tank emblems and mounted them:

1715874480037.jpeg

Not perfect but worlds better than before.

When I got the Seca from my BiL the fairing was held on by three of seven rusty screws. I ordered the official part numbers from Yamaha and I got these.

1715874563469.jpeg

The more I thought about it, the more I was sure that black plastic screws are wrong. So I checked a bunch of online images, and they should be what I remember - clear. No joy on Zoro, but McMaster Carr had what I needed - and more. :) (McMC is kind of like Costco - you go there needing a few things and you leave with a lot more.) Anyway, here it is with much better plastic screws:

1715874711135.jpeg
 
OP
M

Max

ALLIANCE MEMBER
Joined
Jun 16, 2018
Messages
3,353
Location
Georgia
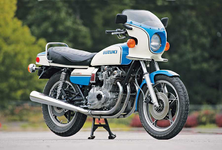
The clear plastic screws are less-distinct, they blend into the bike better. They're plastic to allow breakaway of the windshield if there's an accident, and the rider slams-into it. I like the fairing design, a distinctive integrated look with the other bodywork. It resembles the Suzuki Wes Cooley Replica GS1000.

1715876803379.png
I want the bike to be correct, so I used plastic screws, washers, and nuts. But if I’m going through the windshield of the Seca, I’ve already got some other pretty big issues coming up. :) I’m not picking on you, just noting…
 
OP
M

Max

ALLIANCE MEMBER
Joined
Jun 16, 2018
Messages
3,353
Location
Georgia
Well I am back from Hawaii. Did my Dad's memorial, scattered his ashes at sea, and started his estate work with the lawyer. It's sad, and I miss my Dad, but he had a long life (91) and he lived it exactly how he wanted to.

Before I left I ordered a set of intake manifolds and carb rebuild kits off of Ebay. Yeah, I know, I know. But they've been handy. Also, while I was gone, my order of official Yamaha parts came in as well. So let's look at them:

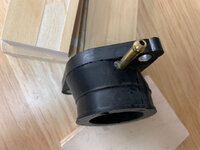
Here is an ebay intake manifold. Note that where the stem is attached the rubber is jutting out into the airstream:

1717779411158.jpeg

It also looks like there is a minimal, and perhaps not enough sealant on the stem:

1717779448866.jpeg

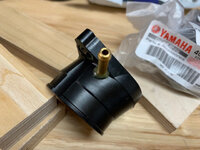
So let's look at a Yamaha intake manifold:

1717779491807.jpeg

1717779511096.jpeg

Nice clean edges on the stem (it might even be chamfered) and lots of sealant.

Needless to say I installed the Yamaha parts. :) I do think that if I had no other options the ebay parts could be tuned up a bit and likely be fine. They were also only $20 and the Yamaha parts were - well, I can't find my receipt. But they list for $260 and I think that I got them for about $200. So a huge difference in price.

And here are the Yamaha parts installed:

1717780123092.jpeg
 
OP
M

Max

ALLIANCE MEMBER
Joined
Jun 16, 2018
Messages
3,353
Location
Georgia
I mentioned that I bought the ebay carb rebuild kit as well. I figured for $20 why not. Initially I used the float pins and the float needle valves - not the full assembly, just the valve. No matter what I did, on the original needle valves I couldn't get the little spring loaded thing to move freely. So the old ones were not an option.

I've been ordering all of my parts from Yamaha Sports Plaza. And so far they've been great to work with. Unfortunately in my last order they shorted me the float pins and two of the float needle valves. When I noted the issue, they responded, found, and then shipped the parts in one day. But they are still on the way and not here. So the carbs as built have the ebay float pins (which I do not see as an issue) and two of the carbs have the ebay needle valves. That might be an issue, but I think that it's likely I'll be taking the carbs off again anyway.

Here are the carbs as they currently are:

1717780543725.jpeg

They look good, but there are the two needle valves I'm not sure about. I am also worried about the "T" that Yamaha calls the "pipe, starter conn". The way fuel goes into the four carbs is that the tank is fed to this "T" that feeds the two inside carbs. There are then fittings on the two inside carbs that have a pipe with gaskets to the two outer carbs. I replaced the gasket on the two tubes that go from the inner carbs to the outer ones. But on my Seca that T doesn't have gaskets and it's made out of plastic with integral ridges as gaskets. It doesn't seem that tight of a fit to me and it may leak. The one I could order for $60 looks metal and it has gaskets. And...

The tank is a mess. It's a mix of water/vinegar/oil/rust particles because I couldn't get the tank dry before it started to flash rust and I dumped in the oil to prevent more rust. So that mess is drained now, and I'm rinsing it with gas and then draining it. I've done two iterations of that rinse and I probably need to do 2-3 more. Then I'll gas it up and see if it runs. But in any case, I expect that due to the many reasons I've noted I'll have to remove the carbs again, and when I do I'll put the Yamaha needle valves in as well.

If it's not one thing it's another. But still I'm making progress, and I'm getting much better at working on the carbs. :)
 

APEowner

Well-known member
Joined
Oct 2, 2009
Messages
4,166
Location
Sunny, New Mexico
Somehow I missed this thread till now. When you had the cars apart did you knock the emulsion tubes out and make sure that they're clean? Not doing that is a common rookie carb rebuilding mistake and soaking the carb bodies is unlikely to clean them effectively.
 
To avoid these ads, REGISTER NOW!
OP
M

Max

ALLIANCE MEMBER
Joined
Jun 16, 2018
Messages
3,353
Location
Georgia
Somehow I missed this thread till now. When you had the cars apart did you knock the emulsion tubes out and make sure that they're clean? Not doing that is a common rookie carb rebuilding mistake and soaking the carb bodies is unlikely to clean them effectively.
I had to look up emission tube. Yamaha calls it a “nozzle, main”. I removed the upper assembly and sprayed carb cleaner through the tube. I know for sure that the tube is clear through, but as you point out I don’t know that the mesh is also clean. Thank you, and I’ll add that to my list the next time I have them off. Which will be sooner than later…
 

APEowner

Well-known member
Joined
Oct 2, 2009
Messages
4,166
Location
Sunny, New Mexico
I had to look up emission tube. Yamaha calls it a “nozzle, main”. I removed the upper assembly and sprayed carb cleaner through the tube. I know for sure that the tube is clear through, but as you point out I don’t know that the mesh is also clean. Thank you, and I’ll add that to my list the next time I have them off. Which will be sooner than later…
Very good. It's part #37 in the picture Driftpin posted. Remove the main jet and the washer that's under it and push it out the top. Even clean the tend to stick a little bit. I use a brass punch. You shouldn't have to wail on it but you're likely to need to give it a tap or two.
 
OP
M

Max

ALLIANCE MEMBER
Joined
Jun 16, 2018
Messages
3,353
Location
Georgia
Progress has been slow on the Seca but I have gotten a few things done. I am still having issues with junk in the tank, but I set that aside for the moment. So instead I rigged up a temporary tank using an empty and rinsed pre-mix bottle, a 1/4" fitting, and some fuel resistant metal epoxy. My temporary tank worked great with zero leaks or seepage:

1720627342189.jpeg

My cheap part liked this option as it was 1/2 the price of a plastic tank and I got to use the pre-mix in my yard equipment. :)

The great news is that using this approach I was able to start the engine. It also took less cranking than I would expect after 25-30 years. It didn't run that great (I didn't let it get warm) or that long (only had the float bowls full due to the leak) but it did run. So I know that the electrics and compression are at least sorta OK.

The bad news is that the carbs did leak at the t-fitting as I was afraid of. I've had the t-fitting on order for a month plus, but it isn't supposed to come in until the end of August. So between now and then I'll yank the carbs and give them a very thorough cleaning again. That also gives me a lot more time to flush out the tank.

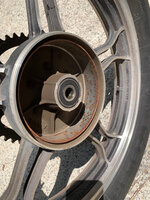
I also bought tires for the Seca. It was easier than I expected to figure out the right metric tires sizes. When I got the rear off I was greeted with this:

1720627892681.jpeg

Fortunately some sandpaper cleaned that up nicely. Also, in the old days I did all of my tire changes myself. I remember some swearing about it, but it always worked. So I changed both of the tires myself:

1720627969070.jpeg

1720627988420.jpeg

Initially I was holding off on getting new tires due to the expense and risk. But mentally it's a huge improvement. Now, instead of a basket case bike, I've got a bike with tank and carb issues. And if I need to I can roll it around the shop. For me at least that is a lot better. Besides the fuel system, the only other thing left to do is to rebuild the front brake and change the fluid. So while progress is slow, I am getting there. The next step is to travel to WA and build some cabinets for my daughter's new house. :)
 
Last edited:

KSJeff

Well-known member
Joined
Dec 19, 2011
Messages
764
Location
Andover, Kansas
That carbtune is a nice piece of kit. I still have mine out in the shop from my vmax tuning days. Good luck with your build. Looks like fun.
 
  • Like
Reactions: Max

Firebrick43

Well-known member
Joined
May 12, 2015
Messages
14,220
Location
West central Indiana
I have a 650 seca (non turbo) and have had a 650 maxim and a 600 radian in the past.

They are great bikes.

The valve depressor to change shims out is a live saver on these bikes.

As far as tuning a color tune and or an IR temp gun is a great way to tune each carb and resync. Adjust the idle circuit screws until each header tube is the same temp.

I normally use a color tune first to set the mixture on one of the outside cylinders and then match the other 4 to that one. After re syncing the carbs you check the temps one more time and then do a high speed pull, kill ignition and coast to a stop and check for light brown color on the plugs.
 
  • Like
Reactions: Max
OP
M

Max

ALLIANCE MEMBER
Joined
Jun 16, 2018
Messages
3,353
Location
Georgia
I have a 650 seca (non turbo) and have had a 650 maxim and a 600 radian in the past.

They are great bikes.

The valve depressor to change shims out is a live saver on these bikes.

As far as tuning a color tune and or an IR temp gun is a great way to tune each carb and resync. Adjust the idle circuit screws until each header tube is the same temp.

I normally use a color tune first to set the mixture on one of the outside cylinders and then match the other 4 to that one. After re syncing the carbs you check the temps one more time and then do a high speed pull, kill ignition and coast to a stop and check for light brown color on the plugs.
I agree that they are great bikes. Fortunately I already have the shim depressor and a good assortment of shims. Once I get the carbs redone and the engine running well I’ll adjust the valves and synch the carbs.
 

vwpieces

Well-known member
Joined
Apr 28, 2020
Messages
5,925
Location
Hills, PA
Somehow missed this thread.
Looking good.
Inside the tank doesn't look too bad. Electrolysis will clean that up well and it's cheap/easy to do. Solution will not harm paint.
One tip is to make sure the tank vents, cap may vent or it has tubes to a canister... but all should be clear to save you possible headache, wondering why it won't run right later.
 
  • Like
Reactions: Max
OP
M

Max

ALLIANCE MEMBER
Joined
Jun 16, 2018
Messages
3,353
Location
Georgia
It's been a bit over a month and I have some updates:

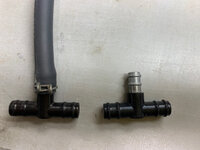
I finally got the T fitting from Yamaha late last week. The old one has a diameter of .373" and the new one is .390". That doesn't seem like much, but now that I have the carbs out again the old one is very loose and the new one is tight, so it looks like that issue will be resolved. The old one is on the left.

1723657506828.jpeg

A big shout out to @Nessism for giving me the link to the carb rebuild guide, and to @APEowner for noting the potentially clogged main nozzle. Is this clogged? :)

1723657540065.jpeg

So currently the first main nozzle is soaking in some pine sol. It's already sat in carb cleaner but that didn't get the holes clear. If the pine sol doesn't work I'll try heated pine sol in an ultrasonic cleaner next.

Along with the T fitting I decided to order some new carb drain screws as well. When I first owned the Seca I didn't understand about JIS vs. craftsman screwdrivers, so they were pretty chewed up over the years. It turned out that this was a good call, as one of them was so messed up that I couldn't get it out this time. I even tried epoxying a beater screwdriver to the head but that didn't work. So I had to go to an easy out:

1723657773133.jpeg

Easy outs are a last resort for me, because if the easy out breaks you now have a hardened piece of steel that you need to drill out. Fortunately the easy out lived up to its name and the screw is out. And the replacement was put in by a very nice Vessel screwdriver...

The next couple of weeks are pretty busy for me so I'll only be working on this part time. But when I've got updates I'll post them. Also, the front tire's bead won't seal up properly to the very clean rim, so I'm going to have to take it partially off and insert a tube. But that shouldn't be much of a problem to do. The old rims and tires were inch (kinda odd but understandable on a vintage Japanese motorcycle) and of course the new tires are metric.
 
OP
M

Max

ALLIANCE MEMBER
Joined
Jun 16, 2018
Messages
3,353
Location
Georgia
The carbs are now entirely cleaned out in all aspects, including drilling out the pilot jet covers and doing the pilot jets. :thumbup: All of the internal parts are all Yamaha as well.

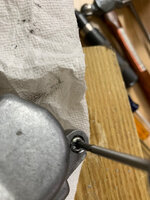
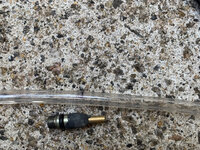
Checking and adjusting the float level was kind of a PITA. Yamaha has a special tool to do this, but I made my own. Remember the float bowl drain screw that I had to easy out? I drilled through the screw with a 1/8" drill bit. Then I took some brass tubing and used the fuel resistant epoxy to seal it in. Add in some tubing and I was all set.

1724523828941.jpeg

Note that there are small lines on the tubing at roughly where the brass tubing meets the epoxy. The spec is 2 mm below the carb body, +/- 1mm. Rather than mess with a ruler I just made the marks on the tubing, and that made it very easy to measure accurately.

The Yamaha tool uses the drain hole rather than the drain screw hole, and if I had the right diameter tubing that would have worked. But this was easier given what I had on hand.

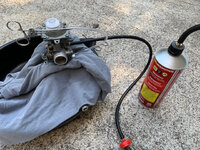
Here is the entire setup:

1724523989599.jpeg

The bubble on the top of the carb is there such that the carb is exactly level. The can to the right is the impromptu gas can that I made before. I was lucky and the outer diameter of the tubing was exactly the right size for a leak proof connection to the carb by just shoving it in. This is a carb with fuel connections on both sides so there is a cork I put into the other side. The carb drain hole is similarly corked.
In operation it was relatively simple - hold the can can up so it fills the carb, and then put the tubing with the scale in the right place to measure.

The hemostat isn't clamping the tube and there is still airflow - it's just there so the tubing doesn't hang down and drain the carb. Also, having the old t-shirt as a towel made it really easy to move the carb around a bit and get it level. Under the t-shirt is a vise that is very loosely on the carb.

Two of the carbs were within spec, and the other two needed to be adjusted 1 mm. So they are all good now.

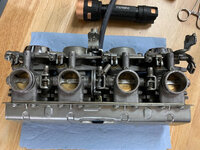
And here are the happy carbs - cleaned, float level set, and bench synchronized. Next step is to get them on the bike and run it for a bit. I haven't done the gas tank yet so I'll be using the impromptu tank.

I also put a tube in the front tire (both the rim and the tire are tubeless or tubed) and it held pressure over night so I am good to go there.

1724524486916.jpeg
 
OP
M

Max

ALLIANCE MEMBER
Joined
Jun 16, 2018
Messages
3,353
Location
Georgia
Using my temporary tank it started pretty easily considering it's been rotting in a garage for 25+ years. I ran it for 4-5 minutes such that the fins were too hot to touch. A bit more blue smoke (some, but not a cloud) than I would like, and it wouldn't idle without the choke. But it ran cleanly from idle to 6K+ and it rev'ed quickly with no flat spots the way I expected. And zero gas leaks from anywhere, so the new "T" fitting is doing its job.

The idle issue could be as simple as me needing to adjust the main idle set screw, as I had to mess with it when I worked on the carbs.

I'm done for the day. Tomorrow I'll adjust the valves, adjust the idle, and then hopefully have time to synch the carbs.

The vinegar approach on the tank didn't work that well for me. Probably pilot error, but there is more rust and junk in the tank than I would like. So I bought the KBS kit of cleaner, deruster, and coating. It gets high reviews for whatever that is worth. So once I get the valves and carbs good to go that will be my next step. Everything that I read says to really spend time on each step so it's done right, and I will.

After that it's put in the new parts for the front brake, flush it, and then time for a ride. I might actually have a real motorcycle once I get this stuff done. :)
 

casmurbax

Well-known member
Joined
Sep 25, 2012
Messages
2,761
Location
Wilton, NY
I had a friend that had one of these back in 1981. I remember riding it a couple of times it was quite fun to ride.
 
  • Like
Reactions: Max
OP
M

Max

ALLIANCE MEMBER
Joined
Jun 16, 2018
Messages
3,353
Location
Georgia
The valves are adjusted now. Only one valve had to be adjusted, and fortunately I already had the right shim for it. The upper head looked clean, had no rust, and there was lots of clean oil up there. So while there could be problems elsewhere, at least there aren't any visible problems there.

It's kind of funny in that I kept a log of each valve adjustment since I've owned it, and at the last one - in 1985 - I almost adjusted that valve but decided it was ok. :) If I had adjusted it then they all would have been good. Also, I last changed the oil/filter/plugs (and adjusted the valves) at 18.6K miles. I don't know how long I rode it after that until I gave it to my BiL. It's got 20.4K on it now so I don't think that he rode it that much.

This week has a lot of other activities, so it'll be next week some time when hopefully I'll have the tank cleaned out. Wish me luck.
 
OP
M

Max

ALLIANCE MEMBER
Joined
Jun 16, 2018
Messages
3,353
Location
Georgia
It took me more than a week, but I have the inside of the tank in great shape now. Using vinegar I wasn't able to get the rust out of my tank. A big part of the problem is that I just couldn't get the tank to drain completely, so there would always be some residual water left. Another issue was flash rust - no matter what I did a big chunk of the tank would rust again before I could get it dry. I'm not saying that vinegar can't work, but it didn't work for me.

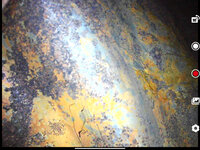
I have a cheap endoscope that uses a tablet, and here is a pic showing the inside after the vinegar treatment:

1728663628018.jpeg

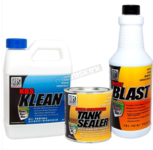
Years ago I used Kream on a rusted tank and it was a total failure. It's been so long that I can't tell you if I followed the process correctly then or not, but it left a bad taste in my mouth for that kind of approach. But I was pretty frustrated with my tank, so I had to do something. So I decided to try KBS's product which had good reviews:

1728663164272.png
I bought it from Dennis Kirk, and it was in stock, shipped fast, and no issues there. The process has three steps:
1. Use the KBS Klean to clean the tank.
2. Use the Rust Blast to remove rust and deposit some zinc on the metal.
3. Finish up with the tank sealer coating.

I'll get into the KBS process more with the next posts.
 
OP
M

Max

ALLIANCE MEMBER
Joined
Jun 16, 2018
Messages
3,353
Location
Georgia
One of the problems with using chemicals inside your tank is sealing all of the openings properly. The fuel cap hole is round so I was able to find a rubber plug at HD that worked well. But the petcock hole is oval, and the fuel sender hole is a large rectangle. I ended up using what KBS suggests which is good quality duct tape. It mostly worked, but I did still have some leaks no matter what I did. I think that had I spent more time here coming up with a better stopper solution I would have been better off. I did use fresh US made duct tape so YMMV with a different or batter tape.

Here is an example of the tape wrapping:

1728664050064.jpeg

The KBS Klean is mixed 50% with hot water. I used 1/2 the bottle with that much water each time for two separate washes. Each time that I washed it I flushed the tank with water and then dried it. (More or drying later.) I wasn't super happy with how clean it was so I re-did the wash again by reusing one of the washes I used before. If you let it sit a day or two the crud it picked up precipitates out so it's relatively clean to re-use.

You really need to do this step thoroughly. I put two 3 foot pieces of chain in the tank and I would rotate it and shake it for a couple of minutes. Then I'd leave it in a position to soak one part of the tank for 15 minutes. I did this process for a total of 2-3 hours each of the three times I cleaned it. It's a tedious process but it's critical to the later steps working. Depending on how well the tape was holding up, I might have to replace it during the process as well.

It took me awhile to figure out the best process for my tank and drying it. This is what I eventually came up with:
  1. Drain the tank as best as possible. This involved a lot of passes of trying to get the water to concentrate near the petcock and then moving the tank just right.
  2. Get out the yard blower and let that thing run into the tank for 5 minutes or so.
  3. Take the tank in the shop and note that water is still moving around. :-( Get out the heat gun and move the tank around so the water is concentrated around the fuel sender hole. Use the heat gun to evaporate the water in that area. Repeat - lots. It took maybe 10 passes to get all of the water dried out...
After the clean process the next step is rust. The process is similar to the clean but no chain this time. The solution is put in at 100% this time. And the instructions are bit different as you can't let any part of the tank dry out for more than five minutes. So my process was to move, shake, tilt, and turn the tank for a couple of minutes. Then set the tank down to rest in a specific position. Wait 4 minutes and then repeat ending in a different position. I did this for almost an hour and a half at which point I was done. Pour it out, rinse, and then dry totally.

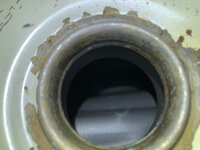
The rust cleaner also puts a zinc coating on the tank which really helped with the flash rust. This isn't the greatest photo, but here is the fuel fill after the rust treatment:

1728665059327.jpeg

You can see that there is still a bit of rust there, but it's largely gone without any large area of flash rust. The instructions say that some rust left is ok.

The final step is the coating. After my bad experience with Kream I spent a long time thinking about this before I decided to do it. After all, most of the rust was gone now and I could just use the tank at this point. Also if you botch the previous steps, or the coating step, the coating is very hard to remove so you can redo the tank. (They do sell a coating remover but I've got no idea how well it works.)

The coating is a different process in that once the coating is added you have to move/rotate/tilt/shift the tank for 30 minutes without stopping. The end result is that you want a thin coating over all of the tank. So I taped the tank, poured in coating, and listened to music as I worked out moving the tank for the next 30 minutes. No shaking here, just a constant gentle movement.

I filled the four sender screw holes with M6 screws as well the two petcock holes. After I had drained the extra coating I removed the screws and cleaned out the threads with Q-tips. I then put a different screw back in to make sure that the threads were both Ok and clean.

Also, after the Klean step I had a question for KBS. They were very quick to reply to both a phone call and follow up email so I was very happy with their level of support.

One issue that I had is that no matter what I do I can't fully empty the tank. So for the last bit of coating I tried to move the tank into different positions to try to thin out any remaining stuff and not have it puddle. If the coating is too thick KBS says that it may not adhere properly so there is some chance that I may have issues later. But so far from what I can see it looks great.

Here is what it looks like two days later:
1728665549225.jpeg

When you touch it it feels like glass. It really seems like the coating adhered well and is ready to protect my tank.

I still have to get the drained chemicals (Klean and Rust Blast) to a local recycling place, and at the moment I don't know if they'll take them or not. So that is a potential down side from this process. The coating was easy as I just drained it onto cardboard and then let it dry to go in the trash.

Also the vinegar submersion process messed up my tank's paint. The first immersion caused all of the bottom paint to flake off, but that was easily covered with Rustoleum. It's on the bottom so all it needs to do is not rust. But the second immersion caused some orange peeling on the upper paint plus it weakened the paint. So there are a couple of areas where the later duct tape peeled off my nice upper paint. So it looks like learning how to paint a tank is in my future as well. This is probably my fault as I immersed the tank two days the first time and three days the second time.

Anyway I have a good inner tank now and I can finish up the last bits. I need to synch the carbs, rebuild the front brake, and add a tube to the rear tire to have it mechanically done. And I need to clear up the title, which may involve a trip to CA. But hey, I'm retired so I have lots of time. :)
 
OP
M

Max

ALLIANCE MEMBER
Joined
Jun 16, 2018
Messages
3,353
Location
Georgia
I did get it running, insured, etc. But the motor isn’t quite running right now. I think that one of the coils is bad, but I haven’t had time to debug it. So I drained the carbs and it’s waiting for me to get more time to work on it again. Unfortunately other projects have been sucking up my time.
 

driftpin

Well-known member
Joined
Dec 22, 2016
Messages
11,313
Location
Miami-Dade/Broward Co. Florida
The quick & dirty (well, not really dirty) way to check the effectiveness of your ignition coils is to swap the suspected 'bad coil' for one which you believe to be good. One of the other coils, of course. That 'bad' coil should cause issues with the operation of that cylinder, to which it has been moved meaning that it won't get as-hot as a properly-operating cylinder would.

Use a thermal reading tool, a digital infrared thermometer [DIT], and take your reading just-below where the exhaust pipe emerges from the cylinder head. Try for the reading at the same place on each exhaust header. Also, the distance from the header to the DIT is important, if you hold it back a couple of feet, and expect it's going to read from a narrow point, like a laser pointer, well, it won't. At least, that's what my DIT directions say. The closer to the exhaust header to read the temperature, the better. Think of the reading area like a tapered cone, where the tapered end is the end of the DIT. The farther away from the exhaust header the DIT is, the wider an area it 'reads.'

If your ignition coils don't have this type of primary wire fastener into them then ignore the paragraph.
You ignition coil probably has a thick primary wire which is what the sparkplug boot attaches to. The opposite end attaches to the ignition coil, and it's probably held in-place by a coarse threaded plastic nut. Over the thick primary wire, and behind the coarse threaded plastic nut, is an oval-looking plastic washer called the olive. It's like a brass compression fitting on a copper plumbing line. It prevents the thick primary wire from slipping out of the place where it inserts into the ignition coil body. Make sure the coil primary wire is tight into the coil, and you can do this for both ends if you have the removable nut for the coil on one end, and also check the sparkplug boot, and the ignition primary wire going into it. On either end, if you remove the primary wire and it's got green crud/corrosion on it. you can just cut maybe 1/4" off the sparkplug wire, until you have removed the part which has the green corrosion. If the primary wires into the ignition coils are rigidly-attached and there's no threaded nut and 'olive' on each wire at the coil body, then you're only going to be able to look at the sparkplug boot end of the primary coil wire. It appears that the 550's coils have two primary wires from each ignition coil, so each coil feeds two cylinders/sparkplugs. Unless you have a sparkplug cap which is bad, or the primary high-tension wire to one cylinder is bad, I would suspect that if the coil windings were bad, then both cylinders energized by that ignition coil would be missing, and your bike would be operating on only 2 cylinders.

It sounds like people are interested to see your success, so be sure to post-up updates on your project. Good luck.
 
OP
M

Max

ALLIANCE MEMBER
Joined
Jun 16, 2018
Messages
3,353
Location
Georgia
The quick & dirty (well, not really dirty) way to check the effectiveness of your ignition coils is to swap the suspected 'bad coil' for one which you believe to be good. One of the other coils, of course. That 'bad' coil should cause issues with the operation of that cylinder, to which it has been moved meaning that it won't get as-hot as a properly-operating cylinder would.

Use a thermal reading tool, a digital infrared thermometer [DIT], and take your reading just-below where the exhaust pipe emerges from the cylinder head. Try for the reading at the same place on each exhaust header. Also, the distance from the header to the DIT is important, if you hold it back a couple of feet, and expect it's going to read from a narrow point, like a laser pointer, well, it won't. At least, that's what my DIT directions say. The closer to the exhaust header to read the temperature, the better. Think of the reading area like a tapered cone, where the tapered end is the end of the DIT. The farther away from the exhaust header the DIT is, the wider an area it 'reads.'

If your ignition coils don't have this type of primary wire fastener into them then ignore the paragraph.
You ignition coil probably has a thick primary wire which is what the sparkplug boot attaches to. The opposite end attaches to the ignition coil, and it's probably held in-place by a coarse threaded plastic nut. Over the thick primary wire, and behind the coarse threaded plastic nut, is an oval-looking plastic washer called the olive. It's like a brass compression fitting on a copper plumbing line. It prevents the thick primary wire from slipping out of the place where it inserts into the ignition coil body. Make sure the coil primary wire is tight into the coil, and you can do this for both ends if you have the removable nut for the coil on one end, and also check the sparkplug boot, and the ignition primary wire going into it. On either end, if you remove the primary wire and it's got green crud/corrosion on it. you can just cut maybe 1/4" off the sparkplug wire, until you have removed the part which has the green corrosion. If the primary wires into the ignition coils are rigidly-attached and there's no threaded nut and 'olive' on each wire at the coil body, then you're only going to be able to look at the sparkplug boot end of the primary coil wire. It appears that the 550's coils have two primary wires from each ignition coil, so each coil feeds two cylinders/sparkplugs. Unless you have a sparkplug cap which is bad, or the primary high-tension wire to one cylinder is bad, I would suspect that if the coil windings were bad, then both cylinders energized by that ignition coil would be missing, and your bike would be operating on only 2 cylinders.

It sounds like people are interested to see your success, so be sure to post-up updates on your project. Good luck.
Thank you. I suspect the coil because (besides running rough) the left two cylinders were still cool to touch while the right ones were warm.

I just finished my deck project today, but I’m traveling tomorrow for two weeks. After I get back the Seca is next. I’ll update with what I find.
 
To avoid these ads, REGISTER NOW!
Top Bottom