To avoid these ads, REGISTER NOW!

1st welds with new welder

BTL-A4

Well-known member
Joined
Feb 28, 2018
Messages
1,255
Location
Santa Clarita
I got my first welder: Primeweld MIG180.

SETTINGS
-1/8" thick steel tubing (1" sq.)
-0.030" (0.8mm) solid wire
-feed rate and voltage settings per the welder instructions (20.3V, 354 in/min)
-100% CO2, 27 liters/min
-240V power

COMMENTS/QUESTIONS
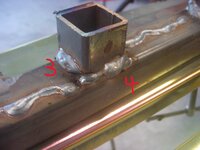
1. I found it hard to make a straight weld when I was making #9-11. These were the very first welds I've made. The rest (the upright ones, not the sideways ones-these are practice from another day under supervision with a different welder) are numbered in the order I made them. How do I make a straight line?

2. I rested the small pieces on the bigger piece and zapped it briefly to tack it on. I did not use any clamps or magnets.

3. What should I practice on? I have some sheet metal, and some more scrap steel tubing, but not much.

4. Are there better clamps that are quicker to clamp/unclamp? I'm using C clamps, but would like something faster. I have plastic spring clamps, but I'm thinking they will melt.

5. Are there better wire cutters that can be used with gloves on? I found my 6" ones tough to open and close with leather gloves on.

Thanks!
DSC01321.JPGDSC01322.JPGDSC01323.JPGDSC01324.JPGDSC01325.JPGDSC01326.JPG
 
To avoid these ads, REGISTER NOW!

whateg01

Well-known member
Joined
Mar 13, 2006
Messages
11,391
Location
doo dah, kansas, usa
What welding hood are you using? As mentioned, bright lights help, but if you are using a shade 13 fixed lens it's still going to be dark.

Use something as a guide for your supporting hand. Usually, you are welding a seam so you have a visual straight edge to follow. But it's still good to be able to weld in a straight line. It just takes practice.

You can keep practicing on the scrap you have. Or you can go buy some 1/8" thick (if that's the thickness you need to be able to weld, and others if you need to be able to weld a variety) metal to cut into practice coupons. Things like welding in a straight line, you can run one bead next to another.

Travel speed also takes practice to get right. It looks like you might be pulling the gun instead of pushing, but that could just be too fast travel speed. You should be pushing for gmaw and pulling for fcaw.

Clamps vary. I use c clamps sometimes. F clamps sometimes. Magnets sometimes. Kant twist sometimes. For speed, these are hard to beat. They come in various sizes.
Screenshot_20231010_211156_Amazon Shopping.jpg

Lineman pliers work pretty well but so do welding pliers. I have and use both. Others will say only use xyz. Find something that works for you. Those work for me.
 

Chris_Hamilton

Well-known member
Joined
Dec 2, 2012
Messages
1,023
I would recommend you get some flat plate, 1/8, and 1/4 to start with, and just work on running beads across the plate. You need to train yourself and your muscles to be able to go in straight lines. Start with scribing some straight lines, using a carbide tipped scriber across the plate. Space them out. Then try following the scribed line when running beads. Keep at it, it will come with practice.

Also you didn't mention what type of helmet you are using. If you are serious about this, get an auto darkening one that you can adjust the shade of the lens. It should help you see somewhat better along with what was recomended above about good lighting in your work area.
 

Crazyjake8493

Well-known member
Joined
Sep 26, 2014
Messages
3,974
Location
Upstate NY
As Walkers mentioned, the Welding Tips & Tricks.com website and Youtube channel are both fantastic. Jody is a great teacher and a credit to the welding community as a whole over the last decade.

If you don't have an auto-darkening helmet, get one. Even a cheap one from Harbor Freight will suffice, and it will be night and day difference (pun intended).
 

nadogail

Well-known member
Joined
Jan 23, 2009
Messages
32,006
Location
Coronado, CA
An Auto Darkening Welding Helmet will make your life better.

Vise Grip clamps are quick and easy to use.

Some Scrap Yards will sell you practice materials cheaply.

I have done a lot with repurposed Bed Frames.
 
Last edited:

Ohmthis

Well-known member
Joined
Jan 20, 2013
Messages
3,014
Location
Outside of Louisville KY
OP, just to add from above, Jody does a great job of talking the technique and then showing it. Weld pool manipulation and how to set up your body and hold the gun are foundational lessons.
 
OP
B

BTL-A4

Well-known member
Joined
Feb 28, 2018
Messages
1,255
Location
Santa Clarita
You need to see what you're doing. Set up some bright lights [ 2 x 500 watt ] on to what you're welding. It doesn't sound intuitive because you would think the welding arc would provide enough light. It doesn't in many cases.
I'll try better lighting. Right now, I'm doing it in the garage with what I think are bright lights, but I'll set up some extra and see (pun intended) how that goes.

What welding hood are you using? As mentioned, bright lights help, but if you are using a shade 13 fixed lens it's still going to be dark.

Use something as a guide for your supporting hand. Usually, you are welding a seam so you have a visual straight edge to follow. But it's still good to be able to weld in a straight line. It just takes practice.

You can keep practicing on the scrap you have. Or you can go buy some 1/8" thick (if that's the thickness you need to be able to weld, and others if you need to be able to weld a variety) metal to cut into practice coupons. Things like welding in a straight line, you can run one bead next to another.

Travel speed also takes practice to get right. It looks like you might be pulling the gun instead of pushing, but that could just be too fast travel speed. You should be pushing for gmaw and pulling for fcaw.

Clamps vary. I use c clamps sometimes. F clamps sometimes. Magnets sometimes. Kant twist sometimes. For speed, these are hard to beat. They come in various sizes.
Screenshot_20231010_211156_Amazon Shopping.jpg

Lineman pliers work pretty well but so do welding pliers. I have and use both. Others will say only use xyz. Find something that works for you. Those work for me.
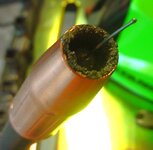
After looking at the welding pliers, I think what I need is something spring-loaded. They also have jaws that clean off the tip of the welder. How well does that work?

Yeah, I know I need "hood time". I just need to find the time and material.

I would recommend you get some flat plate, 1/8, and 1/4 to start with, and just work on running beads across the plate. You need to train yourself and your muscles to be able to go in straight lines. Start with scribing some straight lines, using a carbide tipped scriber across the plate. Space them out. Then try following the scribed line when running beads. Keep at it, it will come with practice.

Also you didn't mention what type of helmet you are using. If you are serious about this, get an auto darkening one that you can adjust the shade of the lens. It should help you see somewhat better along with what was recomended above about good lighting in your work area.
I have a place I can get scrap, but it's a drive. Next time I'm t here, I'll ask.

I do have an auto-darkening helmet. The HF 9.3 sq in green Titanium one. Got it on sale. I had it set at 12 and lowered it to 11.

If you have a comm college / votech with a welding program nearby, you may be able to buy some of their used metal at scrap price.

https://www.harborfreight.com/8-in-mig-welding-pliers-63513.html
We have an excellent welding program at the local community college. I tried to sign up but it was full. I teach at a high school that has a welding program, and that instructor also teaches at the community college. I *might* be able to ask if he'll show me some techniques after school. He did tell me to stay away from YouTube, but he did mention that Jody was decent.

Are welding pliers something I should get? I like t he spring-loaded feature and it seems like they'd be good for cleaning the tip. How often do the rest of the features get used?

Thanks everyone! I was going to post more photos, but it seems I need to watch some videos and see what the beads are supposed to look like. Then practice. Then practice some more.
 

nadogail

Well-known member
Joined
Jan 23, 2009
Messages
32,006
Location
Coronado, CA
Welding Pliers would be very helpful if you are doing Metal Inert Gas Welding.

I am doing Shielded Metal Arc welding
 
Joined
Mar 12, 2012
Messages
22
We have an excellent welding program at the local community college. I tried to sign up but it was full. I teach at a high school that has a welding program, and that instructor also teaches at the community college. I *might* be able to ask if he'll show me some techniques after school. He did tell me to stay away from YouTube, but he did mention that Jody was decent.

I just finished a 7 week Intro to Welding at the local community college. Lecture was primarily YouTube videos 😜 with ~7.5 hours of lab each week welding (stick, MIG, TIG, then rudimentary fabrication [sheet metal w/ shear, brake, and spot welding, etc]).

Personally I thought the YouTube content from weld.com (Bob Moffatt was one of the better presenters) was excellent. They had dozens of videos on all of the different processes, and it was easiest to go in to the channel and just search on what you were interested in.

But ya, as others said, start out by just getting good at running repeatable flat beads. That and **** joints is all we would do for the first two days of each process. From the weld.com videos I knew what good welds should look like, and once I had the physical manipulation down (straight beads, correct angle for the process, dragging/pushing, etc.), would then (trying to be methodical) experiment with the voltage/amperage/wire feed/arc length until I got good welds. Once you can do the flat welds, then moving to inside or outside corners becomes much easier and you understand what machine adjustments might be required.

[My searching for more welding and fabrication topics has brought me back to GJ after a long absence ... I couldn't see the pics in the threads without logging in so finally reset my password.]
 
To avoid these ads, REGISTER NOW!

jonesg

Well-known member
Joined
Mar 15, 2010
Messages
1,698
Location
northern Maine/
plant the elbow of your free arm on the table , use your free hand on the same arm to guide the gun.
lean against the table or sit on a stool to eliminate your body swaying.

watch him closely at 3:50


Jswain

Well-known member
Joined
Apr 26, 2013
Messages
2,463
Location
Calgary, AB
Mostly good advice so far, biggest thing is keep on welding! When you make a few welds and they look similar/problematic spend some time researching and see if you can figure out why, then adjust and go from there.

Cheap practise = 4x4" squares of 1/4" flat bar. Run beads straight across the whole thing tucked beside one another til the whole plate is full. Flip it over and do it again. Let it cool ever now and then.

Once you master the flat weld cut them 2" and do lap welds, then t joints etc.

Clean all the metal prior to welding. Good practice to get into. Clamp it to the table as well so it isn't moving while your trying to weld.

Visegrip 11r for clamping to the table, definitely get a decent set of MIG pliers & keep your nozzle cleaned out after every session.

Have fun and post pictures of your progress, even if it looks like you're having none
 

sqznby

Well-known member
Joined
Oct 26, 2013
Messages
982
Location
Coastal NC
Get yourself a pair of Welper pliers. There's a reason to have mig pliers with a mig machine.
Get comfortable before you start welding.
 

no704

Well-known member
Joined
Apr 27, 2016
Messages
5,224
All I use is CO2. Never had any issues. And the spare bottle can be used in the kegerator too!
 

Sumboodie

Well-known member
Joined
Mar 20, 2021
Messages
10,706
Location
AK
Get a can of welding spray, also known as Nozzle Kleen, nozzle gel, Cooter Dip. It'll make cleaning the tip much easier.
It cleans easy without. Often just a couple taps, worse a twist or two with welding pliers.
 

Sumboodie

Well-known member
Joined
Mar 20, 2021
Messages
10,706
Location
AK
100% CO2 shielding gas doesn't sound beginner friendly from what I'm reading online. I've only used C25 on MIG and never seen straight CO2 used in any of the fab shops I've worked at :dunno:
C25 makes for a cleaner weld.
 

Maddog3355

Well-known member
Joined
Feb 25, 2018
Messages
128
Are you welding in your Sunday clothes? If you are get you a good set of welding gloves and a welding jacket. Looks like your trying to free hand it. You might need to prop your elbow on the table for more stability.
 

Sumboodie

Well-known member
Joined
Mar 20, 2021
Messages
10,706
Location
AK
For straight lines, marking a straight line near your bead with a sharpie, soapstone, etc helps.
 
OP
B

BTL-A4

Well-known member
Joined
Feb 28, 2018
Messages
1,255
Location
Santa Clarita
I got welding pliers at my LWS. They are made in India. The spring-loaded feature really makes them easier to use.

I have a leather apron, sleeves and gloves. I weld in jeans, old running shoes (I know, they should be leather) and a t-shirt.

I'm watching videos from weld.com and looking at how he holds the torch and situates himself.

At this point, I think I would also benefit from a class or some lessons. I don't want to develop bad habits.
 

engineer2

Well-known member
Joined
Dec 13, 2009
Messages
11,814
Location
Chicago burbs
It cleans easy without. Often just a couple taps, worse a twist or two with welding pliers.
True. We used both. When I was a welder, we sprayed a couple of time a day and your welding pliers took care of the rest.
 

Jswain

Well-known member
Joined
Apr 26, 2013
Messages
2,463
Location
Calgary, AB
100% CO2 shielding gas doesn't sound beginner friendly from what I'm reading online. I've only used C25 on MIG and never seen straight CO2 used in any of the fab shops I've worked at :dunno:
If you had your welder in a seperate room from the gas cylinders and somebody swapped the two you would be hard pressed to notice. Some mig welders weld nicer with CO2, I believe it's inductance dependant.

I've tried both with my miller 250 and I'd damn near say it prefers co2

A beginner definitely ain't noticing
 

no704

Well-known member
Joined
Apr 27, 2016
Messages
5,224
Small giveaway pocket screwdriver works well for cleaning up the nossile. Tip dip is highly recommended for longer jobs, but just makes a mess on the couple minute burn.
 

Chris_Hamilton

Well-known member
Joined
Dec 2, 2012
Messages
1,023
All I use is CO2. Never had any issues. And the spare bottle can be used in the kegerator too!
Some generalities.....If you are doing thicker material (over 1/8") then straight CO2 works fine. Thinner material better to use 75/25. Straight CO2 gives deeper penetration because of a hotter arc. It can spatter more but much of that is dependent on the user, his machine and the cleanliness of the material.
Personally I would recommend 75/25 just because it is more noob friendly and easier to weld thinner material. Whichever you choose MIG welds are hard due to the carburizing effect of CO2 (carbon) on the molten weld puddle. Not really an issue though unless you are trying to planish welds on sheetmetal. Then you are better off using a TIG or even gas. But that is another subject for another thread.:)
 

kerrynzl

Well-known member
Joined
Nov 8, 2013
Messages
5,054
Location
Tauranga, New Zealand
For straight lines, marking a straight line near your bead with a sharpie, soapstone, etc helps.

@BTL-A4 for a novice welder, I recommend a chalk line each side of the weld for a guide.
After a while it is not needed.

When you first start welding you only see "glare" under the helmet, then you will see the wire and puddle. [then it is easy]
 

Sumboodie

Well-known member
Joined
Mar 20, 2021
Messages
10,706
Location
AK
@BTL-A4 for a novice welder, I recommend a chalk line each side of the weld for a guide.
After a while it is not needed.

When you first start welding you only see "glare" under the helmet, then you will see the wire and puddle. [then it is easy]
I've had to tape a rag around my head if the sun or lights are bright and reflecting the inside of the lenses. Helmet at the back.
 
To avoid these ads, REGISTER NOW!
Top Bottom