To avoid these ads, REGISTER NOW!

1st welds

cspcrx

Well-known member
Joined
May 2, 2014
Messages
608
Location
Phoenix, AZ
I picked up a Hobart 210mvp a month ago and finally got a subpanel installed with 220 so I could try it out.

Prior welder was a 110v HF Dual Mig that I ran Lincoln flux core wire in. Today I was able to put a couple of welds on some 1/4 steel plate. I am using 0.030 wire with 75/25 gas, I have never used gas before. I used the settings on the side of the lid, 6/60. I only got to run two welds before my wife informed me the pantry was full of ants! Put and end to the fun. I plan on taking a few one on one classes from the LWS here in town in June.
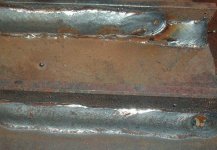
Weld #1


Weld #2


Side shot shows it cause a bit of deformation in the base plate and shot of bottom.


Is this normal, again never welded with gas? When I open the valve the flow gauge pegs. I pull the trigger and it drops. So I set it to 20 cfm based on where it drops to. Is this the proper way to set it?
 
To avoid these ads, REGISTER NOW!

tarbellb

Well-known member
Joined
Apr 17, 2011
Messages
5,738
Location
Oregon
Good looking first welds there. Thicker stuff is so much nicer to practice on.

For the gas, I think your running way to high of pressure. I have a Miller 220v welder (similar) and it recommends to run the pressure around 35CFH/18LPM I believe.

What does it do if you have it sitting at say, 35CFH? Does it drop substantially?

Others on this forum will definitely be able to sort this out for you.
 

Twisted Sid

Well-known member
Joined
May 23, 2013
Messages
748
Location
CA
Not bad at all for the first ones with that machine.
I'm no expert but I would suggest turning the gas down like tarbellb said and I would also say to slow down on your passes a little. Try doing little Cs with the gun.
 

zkling

Well-known member
Joined
Jan 23, 2007
Messages
16,939
Are you setting your gas meter by CFH or LPM? It should be set around 15CFH, which is the black scale. If you have it set at 20CFH (black scale) dynamic (with the gun trigger depressed, gas flowing) then your line flow side gauge is wonky.
 
OP
C

cspcrx

Well-known member
Joined
May 2, 2014
Messages
608
Location
Phoenix, AZ
Thanks all. Shows how a quality welder can even make a self taught hack make metal stick and look ok.

That is what was confusing me. Only one way to hook this thing up. Open the valve on the bottle and the picture shows what i get.

When i pull the trigger it drops and it seems the adjuster knob adjusts what it drops to. I set it to drop to about 20 cfm, on the black sale. It may be just under but not over. I hear gas come out when i pull the trigger and based on the welds it is getting shielding.

It just doesnt seem right to me, and again i have no real formal training, that the guage would work that way.
 

Ign

Well-known member
Joined
Jul 7, 2006
Messages
12,769
Location
Butte Peak ND
#2 looks a lil cold tun up the heat a bit

Or just too much wire speed or too little travel speed.

OP don't be married to their settings, although it seems they did at least pull their heads out for the chart in the 210MVP - so it's a good place to start. The chart in the Ironman 210 reco's everything WAY too cold and I've never trusted charts since. Also why I don't trust the concept of Autoset.
 
OP
C

cspcrx

Well-known member
Joined
May 2, 2014
Messages
608
Location
Phoenix, AZ
Thanks all. I am going to do some more to work on my travel speed and working the puddle. Been watching a lot of the videos on the welding tips and tricks site for mig welding.

I was not doing any circles, cursive Es, or any of those techniques. Just straight travel.

I still feel like something is odd with the way this gauge reads. It came with the welder so i posted on the hobart site to see what they say.

Thanks all for your feedback! I am working on this as my plan is to make some cross brace plates for my car. Need to get things right first.
 

CGT80

Well-known member
Joined
Aug 29, 2014
Messages
862
Location
IE, SoCal, USA
The left gauge shows flow, not pressure. Mine will sit where I want to set it to, and then it drops just a bit when I pull the trigger. The right gauge is pressure and you can't adjust anything on that side, as it just reads out what amount of pressure the bottle has in it.

Those welds are not bad for a new welder. I like to use a bit of a whipping motion or z pattern, similar to how I was taught to use 6010 stick in community college. I use 20-20 cfh for the gas setting, and the chart is right on for my Miller 135, but I will tweak it to match the type of bead/arc I need for a particular joint.

1/4" is a bit thick to learn on, as the material isn't cheap. 1/8" is what I would prefer to start with, if I was in your shoes again. When you have a good technique for 1/8", step it up to 3/16" or 1/4".

Warping like that is very common. The weld will pull the metal together, toward the side you put the heat into. It can be easy to lay a nice bead, but laying a nice bead and not turning your work into a pretzel is another story. Look for even tie in at the edges of the weld. You can see the HAZ or heat effected zone on the back of the plate and tell that you likely have some good penetration. I have found that the z motion helps to get a flatter bead, which ties in the sides better.

Always grind your metal if you want the best possible weld. Also grind a spot for the ground clamp. Welding through mill scale isn't as good as welding through clean metal. If I am in a hurry or the part isn't that important, I will skip grinding. The smaller 135 machine, that I have, is often pushed closer to it's limit, so grinding helps. When I use my brother's miller 252, it will blow through just about any mill scale or light rust and penetrate. If you get into TIG welding or welding aluminum, this stuff will be even more critical. Steel is more forgiving.
 

Angry welder

Well-known member
Joined
Sep 8, 2014
Messages
119
Location
Alabama
Also I wanted to add that miller has a app that you can get for your phone. It helps with welder set up. You tell it what your welding and how thick of material what type of welding your doing either mig, tig or stick and it will give you your welder settings. Once again every operator is a little different so you still need to be able to fine tune your welder to you, but its a good place to start.
 

strength_and_power

Well-known member
Joined
Apr 26, 2015
Messages
1,393
Good start with your welds. If you are welding in a draft free area, 10-15cfh is all you need. If you start to see porosity or pinholes then you will need to turn it up a touch. I keep all my fans pointed at my legs so the welding table has still air.
The heat from the weld will definitely cause the material to warp, less so if you were to clamp it down to the table on either side. Over time you will learn where and how much it is going to pull and can use it to your advantage. Practice makes perfect
 
OP
C

cspcrx

Well-known member
Joined
May 2, 2014
Messages
608
Location
Phoenix, AZ
Thank you everyone. It is clear there is a problem then with the valve on the flow side. I will contact Hobart Monday about it.

I really appreciate your tips. The 1/4 plates were not bad really. The metal supply place has a huge bin full of them and another ful of random scraps they call the artist bins. They sell it by the pound. But i will compare it to some small 1/8 plates next time to see if those are less costly.

Thanks again. See what Hobart says on the regulator, ill let you know.
 

Zeke

Well-known member
Joined
Aug 13, 2009
Messages
17,176
Location
Long Beach CA, the sewer by the sea.
I'm also of the opinion that you need to keep the settings you have for that fillet weld and slow down your travel. Spend more time at the toes of the weld by using what many call a cursive 'e' motion. It's an e instead of a c because each time you make the e part you advance to the next semi circle/
 
Last edited:
To avoid these ads, REGISTER NOW!

sberry

Banned
Joined
Jun 18, 2005
Messages
35,747
Location
Brethren, Michigan
I wiggle a little, mostly have the machine set hot and let it do all the work it will with minor input from me. The second one was the second bead, I have the original somewhere where we run about 3 inches from the chart out of the box, this was second bead after turning a 210 compact wide open.
 

Attachments

  • DSCF1855.jpg
    DSCF1855.jpg
    143.8 KB · Views: 129
  • Hob set test.JPG
    Hob set test.JPG
    79.7 KB · Views: 116

zkling

Well-known member
Joined
Jan 23, 2007
Messages
16,939
Thanks all. Shows how a quality welder can even make a self taught hack make metal stick and look ok.

That is what was confusing me. Only one way to hook this thing up. Open the valve on the bottle and the picture shows what i get.

When i pull the trigger it drops and it seems the adjuster knob adjusts what it drops to. I set it to drop to about 20 cfm, on the black sale. It may be just under but not over. I hear gas come out when i pull the trigger and based on the welds it is getting shielding.

It just doesnt seem right to me, and again i have no real formal training, that the guage would work that way.

Did you buy the machine new? If so I think I would give Hobart a call. I don't know whom they currently use for their gauge supplier. It may actually be flowing the set amount. You welds don't have any symptoms of a lack of shielding gas so it may just be a quirk with that gauge.
 
OP
C

cspcrx

Well-known member
Joined
May 2, 2014
Messages
608
Location
Phoenix, AZ
Yes i purchased it new so i will be calling them Monday.

Thanks for the tips, i will try slowing down and like several said spending more time at the toes or front of the weld puddle.

I am watching craigs list for a good porta band so i can cut them in half and actually see how it looks from a penatration standpoint. Based on the low discoloration on the base plate i am guess its not very good.
 

CGT80

Well-known member
Joined
Aug 29, 2014
Messages
862
Location
IE, SoCal, USA
When you slow down on the bead, you will probably get more discoloration on the back side, showing the penetration of the heat. I would not expect the weld to penetrate all the way to the back side of the bottom plate. It seems like it would take too much heat and cause too many problems with the part.

Cutting the section is a great idea though. That way you will know what is going on. I have only cut a few items and I have tried destructive tests on a few pieces.
 
OP
C

cspcrx

Well-known member
Joined
May 2, 2014
Messages
608
Location
Phoenix, AZ
Hobart confirmed that the flow gauge is not functioning correctly and they are putting a new regulator in the mail, should have it Wednesday. Wasn't hoping for warrantee work so quickly but I like how quickly and easily they are addressing it.

This weekend being a long weekend I will give it a try again.
 

Roverbo

Well-known member
Joined
Oct 25, 2012
Messages
289
Location
Denmark
Is this normal, again never welded with gas? When I open the valve the flow gauge pegs. I pull the trigger and it drops. So I set it to 20 cfm based on where it drops to. Is this the proper way to set it?

I can read that you´ve contacted Hobart and they will send you an exchange. But: The way i have learned to set the regulator: First turn flow all down (contra-clockwise on my Migatronic regulator). Then open the valve on the bottle. Then set flow on regulator. As I remember, there was even a warning, that opening the bottle with the regulator set on could blow the overpressure valve or destroy the manometer.
Nice first weldings, btw. You could practice in keeping a more even travelspeed, doing small cursive "e"s. Follow the front of the puddle.
 
OP
C

cspcrx

Well-known member
Joined
May 2, 2014
Messages
608
Location
Phoenix, AZ
I appreciate the tip. The new one arrived yesterday. It is in Miller packaging and looks different than my current regulator. I will read through the instructions and use your tips.

Thanks for the feedback on the welds. I also signed up for 2 hours of one-on-one welding with an instructor at the LWS. They offer one-on-one welding classes. Bring my machine and gear in they supply the material and gas. Excited to get some help so I can start making my plates.
 

Roverbo

Well-known member
Joined
Oct 25, 2012
Messages
289
Location
Denmark
I also signed up for 2 hours of one-on-one welding with an instructor at the LWS. They offer one-on-one welding classes. Bring my machine and gear in they supply the material and gas. Excited to get some help so I can start making my plates.

Sounds great. You can learn a lot in 2 hours. You´re lucky on your side of the pond, to have this opportunity. My impression on this great forum is that it´s more normal to do more things, like car repairs, woodworking, welding etc. on an amateur- or part-time basis in the US, than here in Denmark. We have certified weldingschools, but they are for the fulltime professionals or apprentices at technical schools.
Same thing goes for the suppliers here. Many dealers want sell you a thing, unless you are a registered costumer (have an account as a pro).
 

sberry

Banned
Joined
Jun 18, 2005
Messages
35,747
Location
Brethren, Michigan
We also got a lot of people that are working on sheet they shouldn't be and they are professionals. Lots in construction and auto repair, the amateur is no worse and often better.
 

toofart

Well-known member
Joined
Sep 27, 2013
Messages
280
Location
Qc
I have a 210 as well and I use 6/50 on 1/4 inch plate and travel a bit slower.
 
OP
C

cspcrx

Well-known member
Joined
May 2, 2014
Messages
608
Location
Phoenix, AZ
Thanks i will try that. I was going to measure the wire speed and us some of the web charts based on the speed and try that as well.

Need to get more and some disks to remove the scale.
 

CGT80

Well-known member
Joined
Aug 29, 2014
Messages
862
Location
IE, SoCal, USA
Need to get more and some disks to remove the scale.

check out the leigh valley abrasives web site. I use the 5" flap discs for my angle grinder in 40 and 60 grit. They run under $3 each. Shipping is something like 15 bucks, so it pays to order a decent amount. My favorite flap disc brand is CGW, which is Camel grinding wheels. Their discs are 6-10 bucks each at local suppliers. They work a little better than the LV, but LV has a lot of great stuff. My last order was just over $300 from them. They have bench grinder wheels for great prices, die grinding carbide burrs, wire wheels, mini discs for the 90 degree die grinder and tons more.
 

sberry

Banned
Joined
Jun 18, 2005
Messages
35,747
Location
Brethren, Michigan
I use a 1/4 grinding wheel about 95% of the time. Buy them anywhere and one that cost a dollar is only slightly less as good as one cost 2 and it only slightly to the one cost 3 and for general light work its hard to tell them apart.
 
Last edited:

sberry

Banned
Joined
Jun 18, 2005
Messages
35,747
Location
Brethren, Michigan
My small machine sits on hi most of the time. Its a deliberate deal to turn it down. Many welds are short but because the setting is for 1/4 don't mean the material has to be. Short, down, fast, small parts tack so much better on hi settings.
This machine welds 10 gage well wide open.
 
To avoid these ads, REGISTER NOW!
Top Bottom