To avoid these ads, REGISTER NOW!

Between 265 & 485 SQ/FT 2 Car condensed version.

Workspaces sized between 265 and 485 squarefeet.

stubbsrodandcustom

Well-known member
Joined
Aug 30, 2012
Messages
70
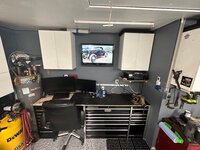
Figured I would put the most recent photo first.

garage32.jpg


So I had picked some minds in the general chat for a while over the years. Finally have gotten things and a plan to move forward through it all. I was fighting alot of variables for my 2 car garage. Main one early was the washer and dryer in the garage. I had tool boxes, **** everywhere, and no real storage that was worth a damn.
So here was what I thought 7 yearsoldgarage1.jpg

oldgarage2.jpg
oldgarage3.jpg

So I fought and fought with a way to make things work around and a way to impact the house in a good way for future resale. A few years after these photos, I had enough, I needed to get better with things. The kitchen needed a revamp so I decided to do the dining room that is hardly used also. So here is the main fix of how I got some more room, washer and dryer flipped location on the same wall. Full built in cabinet system etc. Worked like a dream and my wife loves it. Everyone who has come over is amazed by how good it looks and when the doors are closed its out of sight out of mind.

washer 1.jpg

So that netted me more room. I needed to get rid of the crapsman boxes so I spent a few bucks and got a US general. Bang for the buck its a great box, and I have all the tools in 1 box instead of multiple. The red box is my grandfathers old box he used in shops, I use it to hold my vice and grinder now. Please bear with me as this is the start of showing you where we went from since 2015 to 2022. So without further delay, here is the front of the garage as it sat in December of 2022. The move of the overhead cabinets to the entry wall from the house also made a nice difference in usable room in here. More cabinets to come soon.

garage3.jpg

I work from home after Covid BS. So my wife has the spare room as an office, I have the garage. So this layout actually worked out well for putting two computer screens and making a desk out of my box also. garage1.jpggarage2.jpg

So a few notable upgrades was the change from a window unit in my outside access door to a 18k btu mini split heat pump. This layout has been working decent, but still too cluttered and I vowed for 2023 that this will be minimal clutter, and finishing alot of lingering projects. Floor clutter is a main issue I fight. The orig motor out of my Model A is on a stand with wheels so its easy to push against the wall. The welding cart is just what it is and a necessary evil in what I do in here. Engine hoist, I may have to put it in a lean to outside honestly... But I will say that gaining function of my side door again has been great. The mini split is so much better than the window unit.

mini1.jpg

Other thing I did was install an attic stairwell, decked about half the garage up there. Its a crawl space only but it stores some things that are needed but out of sight and makes my life easier. Stay tuned for more of the journey on the latest updates.....
 

Attachments

  • garage33.jpg
    garage33.jpg
    662.5 KB · Views: 19
Last edited:
To avoid these ads, REGISTER NOW!

Jeepnmon

Member
Joined
May 31, 2014
Messages
12
Location
Yorktown, Virginia
Looks great and thanks for sharing your journey! I had similar challenges with our former home of 16 years, then we moved states last year and now I have a clean slate and a detached 485 sq ft. garage that I'm working on getting to the point where you're at.

I'm currently researching a mini-split and not sure about sizing. Most calculators indicate a 12000 BTU unit would be fine up to 500 sq. ft. Why did you end up with a 18000 BTU unit? What brand/model did you choose? Thanks!
 
OP
S

stubbsrodandcustom

Well-known member
Joined
Aug 30, 2012
Messages
70
So far in 2023, this is a few of the things I have tackled. 1 was the unsightly dryer vent still in the garage. That helped move the workbench/box back to the wall 7" and opened up more floor space. At that time I figured I would prepare for more overhead cabinets also, so I slid the TV over, and hid the wires in the wall for it. That cleaned things up alot also. The water heater has always been an issue, had a raised base that was not needed since its installed in a garage and is electric. So I got the engine hoist, picked it up and set it on the ground. I upgraded compressors twice now, I got an oil less crapsman 4 years ago, that thing died in 2. So I upgraded to the 30 gallon Dewalt from tractor supply. Great piece honestly for the price point. I really wanted a 40 gallon but went this way due to limited space. I will be getting alot of overhead cabinets soon to bump the storage up and clean up things. I guess you could call this a full purge of old junk, selling things off that have no use in my life or take up room. Throwing away alot of things also. So Here is a before and after of the same area.

garage4.jpg

garage7.jpg

The t8 fixture above the box will be coming down soon, just havent had time to pull it out.

Second major upgrade was getting rid of the steel rack I built to hang on the wall. Downsizing, and adding an electrical outlet to the door end of the garage is a major upgrade also.

So to do that, I opted for cutting the bottom 6" of sheetrock and drilling holes for the romex. Worked like a charm.

garage9.jpg

garage10.jpggarage11.jpggarage15.jpg

So this also had another reason, I have been tired of the pressure washer being on the floor, tripping over it etc. So I made a shelf, got a 50 foot hose reel and upgraded this area to have a wall mount pressure washer. Its removable if I ever need to move it or use it elsewhere. I never knew that a pressure washer hose could be so flexible, nice upgrade all in all. So here is my preliminary steel racks, Pvc pipe screwed to the wall. I plan to purge over half my steel due to not fabricating as much anymore. When you do fab work you tend to keep the small pieces so you don't have to buy more full sticks but that takes room and adds clutter. So this gave me a place for my car wash buckets, foam cannon etc. And if you can tell I turned this wall into the display wall for now until I get the cabinets up and make decisions on what stays or goes.

I finally got garage door openers also and that has been a huge game changer along with new insulated doors. I had to add in the boxes for the garage door openers and fix some wiring but the decked attic made doing that so much easier. No photos of that but you get the idea. Hopefully next update will be cabinets addition. But I think you can get the picture, of where I am trying to go with things, Clean and workable shop. Hopefully this year I will grind the failed epoxy coating and polish the concrete or do something cause this looks bad for sure.
garage16.jpg
 

Attachments

  • garage8.jpg
    garage8.jpg
    722.1 KB · Views: 25
  • garage6.jpg
    garage6.jpg
    853.5 KB · Views: 27
  • garage5.jpg
    garage5.jpg
    599.5 KB · Views: 29
OP
S

stubbsrodandcustom

Well-known member
Joined
Aug 30, 2012
Messages
70
Looks great and thanks for sharing your journey! I had similar challenges with our former home of 16 years, then we moved states last year and now I have a clean slate and a detached 485 sq ft. garage that I'm working on getting to the point where you're at.

I'm currently researching a mini-split and not sure about sizing. Most calculators indicate a 12000 BTU unit would be fine up to 500 sq. ft. Why did you end up with a 18000 BTU unit? What brand/model did you choose? Thanks!
Congrats on the clean slate man. Yeah the older homes always are a fight for sure. Calculations normally include insulation on the walls, I do not have any in my walls but 10 inches in the attic and insulated doors so I aimed a bit higher on my calculations. It was perfect all in all for what I have here. Heat it can add 10 degrees in 15 minutes, and it can take the garage from outside 90 degree to mid 70s in 30 min roughly.

Unit I went with was a Boreal, its made by Gree just their budget brand. Was 1300 for the whole thing from my local HVAC supplier. Another 100 for upgraded line set and 100 for the covers. So 1500 parts all in on this was a no brainer.
 
OP
S

stubbsrodandcustom

Well-known member
Joined
Aug 30, 2012
Messages
70
Thank you! I'll add Boreal to my possibilities although it probably depends on whether my local supplier carries it. Where are you located? I'm in Yorktown, VA.
I am in Houston Tx. Yeah see what your local supplier has for sure. I know the Carrier ones have good reviews also, I wouldn't be afraid of a Gree also If they have them. I remember a few years ago finding a mini split was tough now the HVAC suppliers have them in stock around here at least. The energy consumption vs the window unit is night and day.
 
To avoid these ads, REGISTER NOW!
OP
S

stubbsrodandcustom

Well-known member
Joined
Aug 30, 2012
Messages
70
So No real updates over this last weekend, went out of town with the family, came home and was stir crazy and needed to be productive.... So started by painting the ceiling in the garage, I'm working on matching texture on the repair place but still working on that, I have figured it out to get it pretty close. Now to fix the joint issues one of these days. But at least I covered the dingy smoke discolored paint, and got the garage door support brackets looking better also.

garage19.jpg

And I got a good deal on ebay for a used Marantz receiver; Don't know where it will reside once cabinets are installed but may put a drop down and house it under one of them. Cant complain for 100 bucks as my old Kenwood was having a source issue
 

Attachments

  • garage20.jpg
    garage20.jpg
    435.6 KB · Views: 28
OP
S

stubbsrodandcustom

Well-known member
Joined
Aug 30, 2012
Messages
70
Alright, weekend updates.... Damn Ikea cabinets have gotten easier to assemble.

Here we go.
So we started off with the 2 over the workbench/desk.

IMG_5066.jpg

Then moved on to the Two above the compressor.

IMG_5068.jpg

So When your'e working alone you have to improvise to hold things up. Two Boxes on top of the floor jack to hold the cabinet in place till I got it mounted.

IMG_5069.jpg

So here we are most of them installed. 1 was shipped with parts missing, so I am awaiting another 15" tall x 30" But you get the idea.

IMG_5071.jpg

IMG_5073.jpg

Then did some cleaning and organizing up front. and enjoying the new cabinet space. We're getting there finally. You may notice the Marantz is gone, and the Kenwood back. Long story short, the Marantz had a video switch issue, awaiting a shipping label to send it back, so the search continues. May have to add some outlets real soon in a few more places. I think I may finally install the hose reel hanging from the celling finally also soon. Thinking about a pull down extension cord plugged into the other duplex outlet on the garage door circuit. The only boxes left in garage are ebay sale items and the big box I was using for the cabinets is the interior panels for the 56 so that goes bye bye soon also.


IMG_5074.jpg

This is finally my vision coming to fruition.
 

Attachments

  • IMG_5072.jpg
    IMG_5072.jpg
    1.2 MB · Views: 23
  • IMG_5070.jpg
    IMG_5070.jpg
    1.3 MB · Views: 22
OP
S

stubbsrodandcustom

Well-known member
Joined
Aug 30, 2012
Messages
70
Few updates.... Finally decided to get the floors done, polyurea with chips called Domino. That paved way to when things went back some major changes. The big box we pulled off the casters and dropped on the floor. Added a proper computer workstation etc and extra work bench. Got a cheap 150 dollar crapsman cabinet for the corner by the doors, this now is for detail supplies along with the cabinet above it. This was a great upgrade to split things up in here.

Before Grinding... The cheap old epoxy let go in alot of areas....
garage30.jpg


Fully ground, coated and cleared....

garage31.jpg

Next day. 26 hours and the garage went back to normal service.

garage32.jpg


The new workbench layout with proper work station for my day job. I picked up a old Wilton vice for 100 bucks, works flawless... My Rock Island is great, but sometimes I need the pipe jaws the Wilton has below the normal jaws. Still trying to figure out how to best utilize these two in here. May have to mount the Wilton on a wall mount to better use my space.

garage33.jpg

And the other boxes and entry and egress doors.

garage34.jpg


There is still alot of fine tuning I need to do, the drill press is a huge one on the list right now of finding it a permanent home in here, but since I don't use it all the time it may need to rest where its at and just be used on extension cords for now.
 

HogDude

Well-known member
Joined
Dec 25, 2020
Messages
220
Location
Nebraska
Excellent! Maybe when you’re finished and have a few minutes and you wouldn’t mind, post a few pics of your new cabinets innards. For those of us who are more on the visual side.
 
To avoid these ads, REGISTER NOW!
Top Bottom