To avoid these ads, REGISTER NOW!

2 Drywall Questions

Todd.Brock

Well-known member
Joined
Jul 15, 2008
Messages
4,250
Location
Cincinnati
I have a 22deep by 20 wide 2 car garage. Trusses run front to back. Drywall is perpendicular to joists. I need to repair a 4ft. Wide section on one side from front to back that suffered some water damage. Should I hang new drywall perpendicular, or could I run a piece parallel with joists? Not sure what the best way to hang that repair would be.

Second- In our Master Bedroom with cathedral ceiling- there is a drywall joint that has cracked and opens and closes with the seasons. I assume it’s screwed directly to a truss. Any recommendations on how to keep it from opening back up after I tape it and mud it again ?

3505644b730874cadd5031872394e435.jpgh
 

Attachments

  • 3505644b730874cadd5031872394e435.jpg
    3505644b730874cadd5031872394e435.jpg
    523.8 KB · Views: 0
To avoid these ads, REGISTER NOW!

Movover

Well-known member
Joined
Jan 14, 2015
Messages
585
Location
Central Maine
Last problem I had with a crack in drywall was over the door, it was because it was moving with the header. After numerous bouts with fiber tape and different compounds I went with a painters caulk and smoothed it out real well with a wet paper towel then painted over it and haven't touched it since. That was 6 years ago
 

pcmeiners

Well-known member
Joined
Aug 13, 2009
Messages
7,948
Location
In the only town in Pennsylvania, Bloomsburg.
If it was done with fiber tape, that is the main issue, paper tape and compound should do it, plaster would be stronger.
If not my solution would be to remove the tape and filler, re-tape with first coat of auto body filler, which needs to be below sheet rock surface; I use body filler as it is stronger then compound or plaster for tough issues like this. Fiber tape *****
 

d300

Well-known member
Joined
Sep 15, 2017
Messages
109
Location
Oregon high desert
In the garage, run the rock any direction you want, just insure that you have adequate bearing around the perimeter for screws. **** edges will almost always develop a bulge when you mud it up unless you feather it out a long way or build a recessed joint.
https://cdn2.tmbi.com/TFH/Step-By-Step/display/FH98SEP_DRYWBJ_04.jpg
In the bedroom, if the crack moves with the season then your building is either not very tight and the relative moisture content is a problem or the rock on the trusses and walls is not properly separated and the summer heat causes differential expansion. Hard to fix that.
 

KenC

Well-known member
Joined
Dec 20, 2009
Messages
2,592
Location
oklahoma
In the garage, run the rock any direction you want, just insure that you have adequate bearing around the perimeter for screws. **** edges will almost always develop a bulge when you mud it up unless you feather it out a long way or build a recessed joint.
https://cdn2.tmbi.com/TFH/Step-By-Step/display/FH98SEP_DRYWBJ_04.jpg
In the bedroom, if the crack moves with the season then your building is either not very tight and the relative moisture content is a problem or the rock on the trusses and walls is not properly separated and the summer heat causes differential expansion. Hard to fix that.[/]

You can help with the bulge by using a version of this:
http://wilcotools.com/butthanger/butthanger.html

But made with scrap plywood and 1/8" shims, like this:
http://www.wordclim.org/drywall-****-joints/
He uses an eight inch backer, I use the longest that will fit the hole.

**** joints between trusses or studs. The shim and screws pull it below the surface .

If you do this at the crack and don't screw to the problem truss, it may help.

It'll definitely cure the ' **** hump' issue.
 

KenC

Well-known member
Joined
Dec 20, 2009
Messages
2,592
Location
oklahoma
In the garage, run the rock any direction you want, just insure that you have adequate bearing around the perimeter for screws. **** edges will almost always develop a bulge when you mud it up unless you feather it out a long way or build a recessed joint.
https://cdn2.tmbi.com/TFH/Step-By-Step/display/FH98SEP_DRYWBJ_04.jpg
In the bedroom, if the crack moves with the season then your building is either not very tight and the relative moisture content is a problem or the rock on the trusses and walls is not properly separated and the summer heat causes differential expansion. Hard to fix that.[/]

You can help with the bulge by using a version of this:
--link removed because it lead to a **** site???--


**** joints between trusses or studs. The shim and screws pull it below the surface .

If you do this at the crack and don't screw to the problem truss, it may help. to be clear: two repairs, in the cavity on either side of the crack, but not screwed in the location that cracks.

It'll definitely cure the ' **** hump' issue.
 
Last edited by a moderator:

mrpizza

Well-known member
Joined
Nov 1, 2011
Messages
2,935
Location
IL
Very interesting advertising on that third website!!! Its ****
 
To avoid these ads, REGISTER NOW!

csp

Well-known member
Joined
Mar 23, 2010
Messages
5,720
Location
Franktown, CO
Edit your post and delete the bad URL.

I make lots of drywall repairs and use plywood backers wherever there isn't a stud to join new drywall to. Haven't had one crack or fail in any way yet.
 

DCarr2

Banned
Joined
Dec 12, 2015
Messages
1,339
Location
Akron NY
If it was done with fiber tape, that is the main issue, paper tape and compound should do it, plaster would be stronger.
If not my solution would be to remove the tape and filler, re-tape with first coat of auto body filler, which needs to be below sheet rock surface; I use body filler as it is stronger then compound or plaster for tough issues like this. Fiber tape *****

Part of the reason people have a dislike for fiberglass tape is because they dont know how to use it, and apply it incorrectly.

Contrary to popular belief, when you apply self sticking fiberglass tape to a crack, and then mud over it, The mud, while it will get squeezed through the holes, generally wont connect to the other holes, so instead of having mud on all sides of the tape, you have mud on 3 sides, and on the 4th side - the important side, you typically end up with 4 billion dimples.

Which ofcourse makes the repair fail.

Instead, mud first, THEN set the fiberglass tape into the mud, then trowel it out and let it set before applying more mud.

Also, plaster, lime and plaster of paris, has a tendency to NOT stick to drywall. Actually, plaster doesnt even like to stick to itself.

However, as bar as bondo vs plaster with hardness, not sure which goes harder, but I do know, depending on your gauge, you can make for an extremely hard plaster finish.

So dont forget to follow these steps when fixing drywall cracks:

1) take a utility knife, and V out the crack, use a duster to clean up the V.

2) mix up durabond 45/90 to the consistancy of cake mix? maybe a little thicker.... and fill the V, and the surface 1" on either side... then lay your mesh tape.

3) let it set... Play on GJ... for an hour.

4) coat it with easy sand, or the goop in the grey bucket with the blue lid, 2-3 coats, and feather it out so its nice and flat.... playing on GJ and drooling over all the pictures between coats.

5) sand smooth, prime, paint.

6) take a picture and put on GJ. :thumbup::beer:
 
OP
T

Todd.Brock

Well-known member
Joined
Jul 15, 2008
Messages
4,250
Location
Cincinnati
Thanks all for the feedback guys! I really appreciate that. Missed the link, but I could imagine what it had. I’ll post up pics when I get the repair going!
 
OP
T

Todd.Brock

Well-known member
Joined
Jul 15, 2008
Messages
4,250
Location
Cincinnati
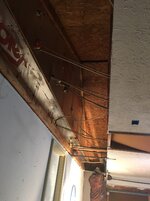
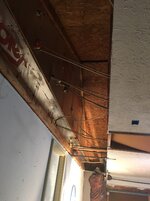
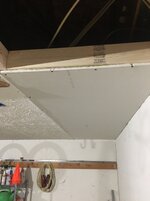
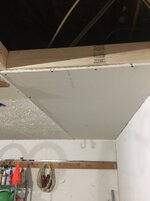
Made a little progress last night. Ended up having to tear out good drywall towards the back because it had sagged so bad over 30 years. I tried pulling it up with some screws but they just popped through. Tonight is planned to finish hanging and then taping mudding and stamping over next couple of nights. I put a 2x4 against the rafter so I pad plenty of meat to screw to. I also put a cross support at 4ft and 8 ft to support middle and end of board.

0cc74c7806ea91a20eb711fe00fc61d8.jpg93fde92600adbe5cd1b9b29143eeb850.jpg
 

Attachments

  • 0cc74c7806ea91a20eb711fe00fc61d8.jpg
    0cc74c7806ea91a20eb711fe00fc61d8.jpg
    469.8 KB · Views: 0
  • 93fde92600adbe5cd1b9b29143eeb850.jpg
    93fde92600adbe5cd1b9b29143eeb850.jpg
    365.2 KB · Views: 0

wssix99

Well-known member
Joined
Mar 2, 2011
Messages
5,162
Location
Chicago, IL
Second- In our Master Bedroom with cathedral ceiling- there is a drywall joint that has cracked and opens and closes with the seasons. I assume it’s screwed directly to a truss. Any recommendations on how to keep it from opening back up after I tape it and mud it again ?

If that's indeed the case, then remove all screws and then put a piece of sheet metal behind the crack to act as a mending plate. Glue the metal to the drywall if you can with construction adhesive. Then use fine thread drywall screws to attach the drywall to the plate but not the truss. (It should move independently of the truss.)

Typically, I would think that the installer actually missed the truss in this situation and it's just not firmly attached.
 
OP
T

Todd.Brock

Well-known member
Joined
Jul 15, 2008
Messages
4,250
Location
Cincinnati
99- Thanks for the feedback. I will have to try that. I have some left over flashing that would probably work perfect. I measured the existing drywall and the gypsum measured a true 1/2”. The paper was another 1/16” maybe. The reason it looks off - and the reason I measured three different scraps- is the new board is the side that is tapered. I assumed it was 5/8” too. The wall between the house and garage is 5/8 but ceiling is 1/2”

I got another 8ft sheet blocked in and hung last night. I only am doing it after work and before kids go to bed b/c there bedrooms are on other side of wall...

Off to YouTube to learn the art of ceiling stomping!
 

wssix99

Well-known member
Joined
Mar 2, 2011
Messages
5,162
Location
Chicago, IL
99- Thanks for the feedback. I will have to try that. I have some left over flashing that would probably work perfect.

Yep. You can even get it back there without removing drywall. If you cut two slots perpendicular to the seam and then cut all the loose crumbly stuff out of the seam, you can put two screws in the metal and use them as "handles". Press the metal in the slot and slide the screws/handles left and right along the slots you cut to maneuver the rest of the mending plate behind the drywall and in front of the wood.
 
OP
T

Todd.Brock

Well-known member
Joined
Jul 15, 2008
Messages
4,250
Location
Cincinnati
That’s pretty slick ! I’ll have to try that .

For tonight, I wrapped up hanging by finishing the center section. I guess the easiest way to to tape against the existing stomped side it to sand it smooth, tape and then retexture the whole thing?
 
To avoid these ads, REGISTER NOW!
Top Bottom