To avoid these ads, REGISTER NOW!

2 Sluggo's Garage

taumac

Well-known member
Joined
Aug 30, 2011
Messages
8,104
Location
Brooksville, Fl
Hey thanks for subscribing. To not confused you I created a thread called my shop which was my first t garage thread and then created the 5 stitches thread. You'll see part 1 and part 2 in some of my signatures. Part 1 is my shop part 2 in 5 stitches. If I knew back then I could have had Ryan change thread name it would have all been in one thread. Reading part 1 then 2 will give you more understanding of some decisions I made over past years.

Have a good one, Gerard

Florida GJers ( FGJ)
http://www.garagejournal.com/forum/group.php?groupid=117
The 5 Stitches Garage
http://www.garagejournal.com/forum/showthread.php?t=211899
 
To avoid these ads, REGISTER NOW!
OP
R

rmalkow2

Well-known member
Joined
Jun 26, 2009
Messages
4,087
Location
Brighton, MI
It's been awhile since I've been able to sit down and organize pictures and post some progress. But plenty of work has been happening in my garage and I've tried to remember to take pics as I go. Sometimes it's hard to remember that step and I get anxious to finish a project and have to stop to remember to take pictures along the way.

So here is a small improvement that I've meant to get at for a long time. Some overhead retractable cord reels. I've had the trouble light for over a year as a Christmas present and never got it hung up. I recently picked up the extension cord reel at an industrial auction cheap so is seemed like a good time to hang them both. Using a piece of left over angle bracket material I had after the previous installation of my overhead storage rack I was able to hang both reels side by side. A garage sale power strip was also added to the angle bracket to allow both items power.
This will be a great upgrade for future car repairs when light and power are needed under hood.
cord reels.jpg

More improvements to come on the next posts. Now to get this pictures organized.:D
 

taumac

Well-known member
Joined
Aug 30, 2011
Messages
8,104
Location
Brooksville, Fl
Those can be very useful additions to the garage. On the extension cord reel. Check to see if has a circuit breaker. Sometimes you can't run big saws or like a blower on there cause of high amp draw. If that doesn't I know the strip bar has I think 10 amp breaker. If it becomes a issue you can always add another box where you plug garage door in. Usually its a 2 plug outlet and you can easily change box and add 2 more. Or plan B is to use something like this.
qa5eta7e.jpg

Plug it in to the other outlet and over to your reels than no worry about tripping the breaker on strip bar.

Have a good one, Gerard

Florida GJers ( FGJ)
http://www.garagejournal.com/forum/group.php?groupid=117
The 5 Stitches Garage
http://www.garagejournal.com/forum/showthread.php?t=211899
 
Last edited:
OP
R

rmalkow2

Well-known member
Joined
Jun 26, 2009
Messages
4,087
Location
Brighton, MI
Those can be very useful additions to the garage. On the extension cord reel. Check to see if has a circuit breaker. Sometimes you can't run big saws or like a blower on there cause of high amp draw. If that doesn't I know the strip bar has I think 10 amp breaker. If it becomes a issue you can always add another box where you plug garage door in. Usually its a 2 plug outlet and you can easily change box and add 2 more. Or plan B is to use something like this.
Plug it in to the other outlet and over to your reels than no worry about tripping the breaker on strip bar.

Have a good one, Gerard


Good suggestions Gerard. Normally I don't use these drops for high current draw items because I have other wall outlets but you never know what the future will bring. Overall electrical will be something I need to re-assess before the build is considered complete someday.
 

taumac

Well-known member
Joined
Aug 30, 2011
Messages
8,104
Location
Brooksville, Fl
OP
R

rmalkow2

Well-known member
Joined
Jun 26, 2009
Messages
4,087
Location
Brighton, MI
Space Swap

I decided a small step in making better use of space was to re-arrange some placement of existing cabinets. I have this large road case that is currently full of Model A Ford parts and until I sell them off it has to stay in the garage. It is on wheels but is really heavy to move around and always seemed to be in the way of some other cabinet or workspace. So I'm looking around constantly where to move it.
Meanwhile I've been operating under the design idea many have used here n GJ where tool cabinets are located under a work bench. I had one small roller cabinet under my bench and hope to have more someday. But for now it seemed logical to store the heavy cabinet under the bench and not have it to constantly move around. Much easier to move the lighter, smaller roller cabinet as needed. I believe this is a temporary thing but for now its been a good solution to a logistics problem that has been plaguing me for awhile.
I'm learning that some amount of constant re-arrangement is needed to fine tune the use of limited space.

Original bench setup with small tool cabinet underneath and misc oil change stuff.
cab swap 1.jpg
Opposite side of garage with large blue road case and bins full of parts.
cab swap 2.jpg
New bench setup with heavy road case neatly stored out of the way.
There was still room next to it for the oil change stuff.
cab swap 4.jpg
Opposite side of garage with room to get at my large cabinets with only smaller items to roll around for access. Its a small thing but really makes a difference.
cab swap 5.jpg
 
OP
R

rmalkow2

Well-known member
Joined
Jun 26, 2009
Messages
4,087
Location
Brighton, MI
Slaying Medusa's Head
What had started out years ago as a supposed good idea for holding all the short scraps of steel that accumulate after projects had turned itself into a real monster. For many years I've had this metal 5 gal bucket setting under my drill press and kept tossing in scrap metal pieces thinking it will be easy to find when the next project comes around. The problem is I kept putting more and longer steel items in the can and not taking much out for use. It eventually became the Medusa's Head you see here.
medusa 1.jpg
And from this side view it was now lurking in wait every time I walked past it to snag my leg or give me a scrape.
medusa 2.jpg
Well the other weekend it caught me for the last time and I ended up with a nice bruise and the determination to kill this beast once and for all. So a bit of long needed re-organization was in order. I took the bottom half of an existing cabinet and cleaned out all the kids old sports equipment. Some went to my grown and moved out kids, some went to trash, some to Salvation Army and a few pieces into a storage bin. This freed up enough space to house the bucket with only short pieces of steel as well as the medium length pieces and bonus room for a few other items that needed storage space. All can now be closed up behind the cabinet door and easily accessed when a project comes around.
cab swap 3.jpg
And the pathway to my drill press and beyond is now open and free from potential leg damage.
medusa 3.jpg

Even small organization projects are bringing great satisfaction and positive progress.
 

taumac

Well-known member
Joined
Aug 30, 2011
Messages
8,104
Location
Brooksville, Fl
OP
R

rmalkow2

Well-known member
Joined
Jun 26, 2009
Messages
4,087
Location
Brighton, MI
Corner Change
Finally got to tackle a big job that I've long awaited. Actually 2 jobs in one as I've been looking for the best spot to store bicycles and the quest ended up also forcing me to totally revamp one of the original storage corners in my garage. I've tried layouts for the bikes on just about every wall space I have but they all were also normal walk thru areas. Either coming in/out of the garage or past a work bench area. To hang full size bikes any of those spots would mean handlebars sticking way out into the walk path.
So the final result was the only corner left that was being used for random storage with a simple wooden shelf unit I had built when we first built this house 20 years ago.
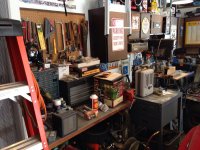
The south west corner with original shelves.
sw corner old.jpg
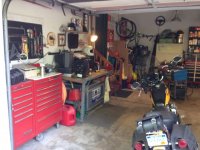
And actually just prior to that picture I had two cabinets on the west wall. These were moved around from the old south wall make over and I eventually just realized I did not need both cabinets and was just using them to collect junk. So the junk is gone and one cabinet remains with useful tools and supplies. The other one is listed on CL.
west wall 2 cab.jpgone cab remains.jpg
Next was removal of the old wooden shelves. Easy enough with a screw gun but man were they nasty. Years of dust and spilling various things into the wood had ruined some of it anyway. I'll re-purpose some of the 2x4's and other pieces. The rest goes to the burn pile out back. Now a clean corner ready for its new purpose.
sw corner empty.jpg
And the end result is a new home for mine and the wife's bikes. Plus there is room for hanging my step ladder next to them. And then still room for my air compressor to remain near its 30amp outlet.
sw corner new.jpg
On a final note I had previously bought some gear wall tracking and bike hanger brackets from Lowes because it looked like a clean simple solution to hanging the bikes. It will work well enough but I found that the plastic track pieces are pretty soft and require extra screws to really support the weight. I somewhat overkilled the final number of fasteners used because the first attempt had them pulling thru the soft plastic especially when I initially pre-drilled thru holes and chamfered the holes. This seemed like a good idea at the time but made the remaining plastic track too weak. So I like the track wall concept but highly recommend reinforcing very well how you attach to your wall if heavy weight is to be hung on it.

All in all a very satisfying project as the bikes are finally hung up when not used and that trashy corner is much cleaner looking than ever. It's enjoyable to complete small projects and see things taking shape little by little.
 
OP
R

rmalkow2

Well-known member
Joined
Jun 26, 2009
Messages
4,087
Location
Brighton, MI
That's a nice lateral file cabinet. Too bad you can't keep the matching set.

Have a good one, Gerard

Ya they really do a good job storing items and I actually have more of them in my basement as well. I got them cheap from a previous employer who had a sale of old office equipment. So I know if I really need another one someday I can bring one back up stairs to the garage. Right now I'm on the road of thinning down and getting just to what I need to function in the garage. I love having the open wall space to possibly use for new tools or equipment in the future rather than just junk storage.

Thanks.
 

Mr. 360

Well-known member
Joined
Nov 23, 2012
Messages
662
Location
Bowmanville, Ontario
Great reclamation of space there, looks so much bigger! Probably makes the garage feel nicer to work in when it's cleaner too I would think, at least for me it does.
 
OP
R

rmalkow2

Well-known member
Joined
Jun 26, 2009
Messages
4,087
Location
Brighton, MI
Great reclamation of space there, looks so much bigger! Probably makes the garage feel nicer to work in when it's cleaner too I would think, at least for me it does.

Yep it feels bigger to me too. At least I can turn around and not always bump into something when working on a project. The garage space still has a ways to go but I'm making slow progress.
 
OP
R

rmalkow2

Well-known member
Joined
Jun 26, 2009
Messages
4,087
Location
Brighton, MI
Paint Rack
A little additional upgrade to the west wall tonight. Doing various clean up and paint projects means I need to keep spray paint and cleaners handy but too much clutter on my work bench. So, by shifting my storage cabinet left slightly it solved a couple issues. One was making a more accessible space for my second roller cabinet and second was wall mounting the other twin Pic-A-Nut cabinet and removing half the shelves to fit taller spray paint cans. It also provided enough room for storage of all car polishes and waxes.

Before:
View attachment 350215

After:
View attachment 350217
 
OP
R

rmalkow2

Well-known member
Joined
Jun 26, 2009
Messages
4,087
Location
Brighton, MI
Well for some reason the pictures from the prior post did not upload properly so trying that again.

Before:
one cab remains.jpg

After:
west wall after.jpg
 

don long

Well-known member
Joined
Mar 31, 2012
Messages
8,841
Location
southern california
Looks like you have made some great progress in the garage with all of the changes
How about another shot of the whole garage again.
maybe a before and after would be interesting!

Congratulations
Don
 
OP
R

rmalkow2

Well-known member
Joined
Jun 26, 2009
Messages
4,087
Location
Brighton, MI
Looks like you have made some great progress in the garage with all of the changes
How about another shot of the whole garage again.
maybe a before and after would be interesting!

Congratulations
Don

Thanks Don. I've been thinking the same thing recently that maybe I should take a panoramic shot at this stage. Probably after Saturday as I'm getting ready for a garage sale this weekend and its getting temporarily filled up again. Hopefully with stuff people want to give me money for and save me hauling it away!
 
OP
R

rmalkow2

Well-known member
Joined
Jun 26, 2009
Messages
4,087
Location
Brighton, MI
I was able to complete a small but important task last night by re-hanging my various fire extinguishers. I now have one of these on every wall of the garage so they are easily accessible no matter where I'm working. I hope everyone out there building out their dream garage spends a few bucks on some of these.
Safety first folks!!!!
fire ext.jpg
 
OP
R

rmalkow2

Well-known member
Joined
Jun 26, 2009
Messages
4,087
Location
Brighton, MI
I've been doing some small improvements lately but in the name of better organization. One of the themes I have in mind as I re-organize my garage is to re-purpose some older vintage metal cabinets. Especially if they are industrial or transportation related in subject matter. Previous examples were using the pair of old Pic-A-Nut shelf units.
This latest little project involves a cool small cabinet I found some months ago on CL that was used to store industrial hose supplies and fittings. As you can see from the before shots the outside top lid was blemished with some bad surface rust spots that unfortunately hurt the overall blue paint. Yet some great graphics were still intact. The inside and other outside surfaces were perfect condition.
Imperial 1.jpgImperial 2.jpg
I thought about re-painting the whole box lid but did not want to lose the graphics and I don't feel skilled enough to try and reproduce them accurately. So I've ended up with this compromise. I lightly scuffed the lid surface with a fine pad and loosened all the surface rust and flaked paint. Wiped it clean and first coated it with Permatex rust treatment which turns the rust to a hard black coating. Then sprayed the lid with matte finish clear to give it a protective top coat surface.
imp 1.jpgimp 2.jpgimp 3.jpg
While I can't say its beautiful it serves my purposes. First to preserve the box and its history, to make it useful again and, in keeping with the theme a place to store all my misc pieces of rubber hose/tubing, fittings, clamps, springs etc. All stuff I had scattered around the garage in multiple places and could never find when I needed it.
Now its all within easy reach. Another small satisfaction.
 
To avoid these ads, REGISTER NOW!
OP
R

rmalkow2

Well-known member
Joined
Jun 26, 2009
Messages
4,087
Location
Brighton, MI
Just in case it was looking like all I do in the garage is re-arrange the garage. I actually spent some hours today working on the Hot Rod project. Grinding, wire brushing and priming the frame and, cleaning up the rear axle cutting off old tabs and suspension mounts that will not be used.
Things got scattered and the garage got dirty and yep it was fun!
work day 7:3.jpg
 

taumac

Well-known member
Joined
Aug 30, 2011
Messages
8,104
Location
Brooksville, Fl
****, don't worry about it. If you look at mine I've been just moving stuff I side to another for years. LOL. Its your place and you do what you want with no worries about what anyone thinks cause its your garage. Keep plugging along brother.
 
OP
R

rmalkow2

Well-known member
Joined
Jun 26, 2009
Messages
4,087
Location
Brighton, MI
It was another busy day in the garage yesterday. With perfect weather and my vacation week coming to a close I was glad to once again accomplish some things that don't happen as fast when work gets in the way.
My buddy (Sluggo #1) came over in the morning and we changed the rear shocks on his minivan and then after taking care of some other business he came back in the afternoon and we replaced the left front strut on his van.
In between and after these jobs I cleaned up the garage a bit putting away the last few remnants of last weeks dismal garage sale. Then got some quality time in finishing up the clean up and paint of the hot rod frame and rear axle.

attachment.php

Rusty rear axle before:
attachment.php


Ford 8.8 rear axle after:
attachment.php
 

Attachments

  • frame primed.jpg
    frame primed.jpg
    139.5 KB · Views: 1,665
  • rear axle before.jpg
    rear axle before.jpg
    141.6 KB · Views: 1,663
  • rear axle after.jpg
    rear axle after.jpg
    140.9 KB · Views: 1,671
OP
R

rmalkow2

Well-known member
Joined
Jun 26, 2009
Messages
4,087
Location
Brighton, MI
Progress Report

I'm not sure if I consider this process half way yet or really where I might be on any sort of timeline but I thought it was time for a step back to take an overall look at progress so far. Sometimes I get caught up in the details and need to step back and look at the big picture.
But here are a few before and after shots of the garage and progress made this far to improve functionality.

This was the south wall when I started.
attachment.php

And the south wall now. Maybe not pretty yet but definitely more functional.
attachment.php

This was the cluttered west wall before.
attachment.php

The west wall now that serves primarily for storage except for my drill press that I can actually stand in front of now and use.
attachment.php

And the north wall that was totally piled up with stuff and projects and had no open floor space to walk through.
attachment.php

North wall now. I can work on all sides of the hot rod frame, get to storage cabinets and still get another car into the garage for general repairs when needed.
attachment.php


All in all its been a worthwhile journey and a definite improvement. I feel I have a long way to go yet with layout and organization before I decide on a final paint scheme. But I'm happy to this point because while I can make improvements one week to the garage itself, I can also take time to work on a project. I now actually have room to do either or both.
 

Attachments

  • north wall 7:7-1.jpg
    north wall 7:7-1.jpg
    61 KB · Views: 1,598
  • beginning 5.jpg
    beginning 5.jpg
    148.8 KB · Views: 1,601
  • west wall 7:7.jpg
    west wall 7:7.jpg
    61.5 KB · Views: 1,607
  • beginning 4.jpg
    beginning 4.jpg
    146.8 KB · Views: 1,614
  • south wall 7:7.jpg
    south wall 7:7.jpg
    59 KB · Views: 1,619
  • beginning 1.jpg
    beginning 1.jpg
    147.5 KB · Views: 1,627

Mr. 360

Well-known member
Joined
Nov 23, 2012
Messages
662
Location
Bowmanville, Ontario
Garage is looking great. Nice to have a project and space to work in too. Nothin like some good old fashioned rust removal on that rear end, good work!
 

Alexbn921

Well-known member
Joined
Aug 22, 2013
Messages
579
Location
East Bay Nor Cal
Subscribed. Nice work rearranging your shop. I like the bike too, although I prefer my Mt bike. Its hard to cram all our stuff into a small space, but with some thought, stolen ideas:bounce: and hard work it can be made to work.
Looking forward to following along.
 
OP
R

rmalkow2

Well-known member
Joined
Jun 26, 2009
Messages
4,087
Location
Brighton, MI
Garage is looking great. Nice to have a project and space to work in too. Nothin like some good old fashioned rust removal on that rear end, good work!

Subscribed. Nice work rearranging your shop. I like the bike too, although I prefer my Mt bike. Its hard to cram all our stuff into a small space, but with some thought, stolen ideas:bounce: and hard work it can be made to work.
Looking forward to following along.

I like your garage!

Thanks guys. I'm enjoying following your threads as well, stealing an idea here and there and learning new tricks.
 

metalhead140

Well-known member
Joined
Jan 15, 2013
Messages
1,456
Location
NSW, Australia
Nice work on the project! Good progress on the garage I reckon, going from an unworkable space to one organised enough to actually work in is a huge step forward!
 
OP
R

rmalkow2

Well-known member
Joined
Jun 26, 2009
Messages
4,087
Location
Brighton, MI
Nice work on the project! Good progress on the garage I reckon, going from an unworkable space to one organised enough to actually work in is a huge step forward!

Yes it is for me. I look forward to continued improvement too.

Nice post. I'm really glad you posted that not only for us but for yourself. I also look back at posts to see process I've made cause while doing it it can be hard to head way you've made. Keep up the great work.

5 Stitches Garage
http://www.garagejournal.com/forum/showthread.php?t=211899
Florida GJ Group
http://www.garagejournal.com/forum/group.php?groupid=117

And you are right that it is for myself as much as anything. I'm already looking at even these progress pics and seeing things I should do over. Keeping the record of changes definitely helps.
 
OP
R

rmalkow2

Well-known member
Joined
Jun 26, 2009
Messages
4,087
Location
Brighton, MI
back in post #46, is that a model A frame I see?
BTW, thanks for subscibing to my thread. I hope to have more stuff done soon!

Yep it's a 1929 Ford frame I'm preparing for a hot rod build. Lifelong dream of mine to build my own hotrod. But realistically be a long term project.
 
OP
R

rmalkow2

Well-known member
Joined
Jun 26, 2009
Messages
4,087
Location
Brighton, MI
It's been a few weeks since I've had any time to make actual garage improvements. Been out of town a bit and tending to other needs around the house. But yesterday I finally took care of one job that has been needed for months now. Re-connecting my main air compressor. When I started this project I had to take down my retractable hose reel and move my compressor to facilitate all the other bench and cabinet moves and to tear out some old shelves. Well one thing led to another and the hose reel got kicked around to be stored and the compressor sits idle. Meanwhile I have no meaningful air supply and am using my little portable pancake unit for small jobs.
So yesterday I re-located the hose reel, ran the air hose along the south wall and positioned my compressor once again next to its dedicated outlet.
air reel 2.jpg
Trying a new location for the hose reel. Originally I had it hung from the ceiling and slightly off center of the garage. It was a mostly traditional shop location to have the reel overhead but did not always lend itself to best function especially when I needed to reach outside the garage door threshold. So this time I'm trying a wall location just next to my work bench and closer to the garage door. I'm hoping this will not only give easy access to air right at the bench but still allow the hose to reach all over the garage and out to the driveway.
air reel.jpg
The compressor ends up pretty close to it's original location but is not easily accessible to turn on and off as required. They way it was buried by my old wood shelf and other junk I could barely reach the wall plug and forget access if it ever needed service. At least now I can easily reach it as needed. I still think there are future refinements to how I have it located that will maximize space but for now this is an improvement and I once again have air supply. My priorities with installing he components this time was not just to slap it up but focus on use and easy access.
compressor new.jpg
 

metalhead140

Well-known member
Joined
Jan 15, 2013
Messages
1,456
Location
NSW, Australia
Nice. I still have to work out what to do with my garage for air. Running a hose over to the hoist every time I want to use it isn't exactly ideal!
 

HSpencer

ALLIANCE MEMBER
Joined
Nov 28, 2010
Messages
2,854
Location
South Central US
The shop is going great. Nice looking work projects. I think you have made superior progress and are now having a very nice comfortable place to work. Thanks for posting the pictures. Looks like all you need now is time to work your projects.

Best Regards
Herb
 
OP
R

rmalkow2

Well-known member
Joined
Jun 26, 2009
Messages
4,087
Location
Brighton, MI
Nice. I still have to work out what to do with my garage for air. Running a hose over to the hoist every time I want to use it isn't exactly ideal!

I still have more permanent work to do as well. But I understand where you are. Even before buying a simple hose reel that retracts I was always dragging out and putting away a hose every time I needed air. Someday I hope to run some dedicated hard lines and have multiple outlets along one or two walls. But I've learned to take small steps of progress and stay functional.

The shop is going great. Nice looking work projects. I think you have made superior progress and are now having a very nice comfortable place to work. Thanks for posting the pictures. Looks like all you need now is time to work your projects.

Best Regards
Herb

I think we all need that valuable resource but you are right. Time is a precious commodity as I'm still working full time and still have that "honey do" list around the house.

Thanks again for the encouraging comments.
 
OP
R

rmalkow2

Well-known member
Joined
Jun 26, 2009
Messages
4,087
Location
Brighton, MI
Since I was motivated to make small garage improvements this weekend I did one other upgrade that's been on my list for a long time.
I had put together a garage TV setup using left over stuff and a cheap GS small TV. Just to get it and an old VCR running I had just set it all in a stack on one end of my workbench which was ok but not desirable as it takes up a lot of usable bench space.
attachment.php


I've had a sturdy wall amount swing arm for holding a TV for a long time and never used it. I even tried to sell it a couple times but no luck so it finally got put to use. I was able to mount the swing arm so it fits the TV/VCR combo neatly between the new air hose reel position and a shelf.
attachment.php


Now I can swing the TV easily at different angles depending on where I am in the garage and play a little background entertainment while working on projects. I also wired the VCR sound into my amplified speaker system for better sound quality. The best part is the re-claimed bench space which can now keep another tool box handy or be used as work space
attachment.php
 

Attachments

  • bench tv old.jpg
    bench tv old.jpg
    137.5 KB · Views: 1,407
  • bench tv new.jpg
    bench tv new.jpg
    135.6 KB · Views: 1,403
  • bench without tv.jpg
    bench without tv.jpg
    139.6 KB · Views: 1,408
To avoid these ads, REGISTER NOW!
Top Bottom