To avoid these ads, REGISTER NOW!

2 Sluggo's Garage

OP
R

rmalkow2

Well-known member
Joined
Jun 26, 2009
Messages
4,087
Location
Brighton, MI
My collection of rusty metal keeps growing!

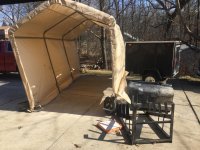
Picked up a surprise CL purchase yesterday after work. A surprise meaning when do you ever expect to find two WWII era airplane belly tanks for sale at a reasonable price in my area of the world. I've searched and kept my eye open for just one for a long time but seems like everything is far away from me. These were an hour drive down just over the Ohio border and after a little negotiation they were loaded in my truck. They actually came from Michigan and this seller (antique dealer) bought them out of a barn where they were sitting.
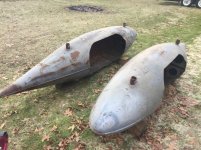
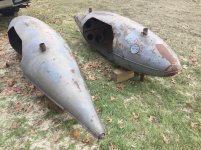
They look to have been sitting in dirt which rusted through the middle section skin. Someone years ago had cut them out for what looks like seating and also welded some pipe through the front and back to mount them somewhere. Not made for real axles even though it first looks that way. I'm guessing they were a kids ride or maybe on display in front of a typical VFW Hall.
Anyway the front nose sections and rear tail sections can be saved. In my goofy way in the future thinking, one of these could possibly become a tribute type belly pan streamliner. I have always admired the shear ingenuity of those cars and the courage of the guys who built them. For now I will be their caretaker and keep them from rustling away or going the crusher.
I'm still trying to figure out just what type of plane they were used on and have done a bunch of internet searching but no result yet. Also have not found any markings on them yet either. There are two internal baffle plates in each, one in front of the cut out area and one behind but no other guts, fuel lines, valves etc.
If anyone has any ideas what they were used on let me know.
:beer:
attachment.php

attachment.php

attachment.php
 

Attachments

  • IMG_2545.jpg
    IMG_2545.jpg
    150.5 KB · Views: 565
  • IMG_2546.jpg
    IMG_2546.jpg
    152.6 KB · Views: 569
  • IMG_2547.jpg
    IMG_2547.jpg
    149.9 KB · Views: 560
To avoid these ads, REGISTER NOW!
OP
R

rmalkow2

Well-known member
Joined
Jun 26, 2009
Messages
4,087
Location
Brighton, MI
Bob, rust or no rust they are awesome..:thumbup:

Thanks 1/2cup, they are a couple pieces of history for sure!

LOL, Think your trying to one up Don there? Those are cool. What’s your plans for them.

No attempts to one up Don Long here. On the contrary, he inspires me to think bigger and up my game a little. But he's in no danger of me catching up any time soon.
Thoughts/plans are to someday build a replica belly tank racer. These are the right teardrop shape as opposed to the newer versions that are more straight body shape. But that project is a ways off in the distance behind other more pressing goals. I have to do more research as well on constructing a frame etc. This was purely an opportunistic purchase because they rarely become available in my neck of the woods.

Bob
 
OP
R

rmalkow2

Well-known member
Joined
Jun 26, 2009
Messages
4,087
Location
Brighton, MI
Back on the Auction Trail

I just can't resist a good industrial auction with very good pricing.

Picked up some new to me shop equipment today won at auction last week. The 20 ton press was listed as a "Pittsburgh" brand, aka HF 20 ton press. At the final price of $81 plus commission and tax I thought I was still doing good since HF sells them for $189 less any coupon. When I picked it up today I was pleasantly surprised to find it was a much heavier and sturdier frame and not made by HF, It only had a replacement Pittsburgh brand bottle jack on it. Hence their listing mistake. I was also surprised to find it had an air cylinder installed to allow pumping the hydraulics with air rather than only by hand. Also had a dial indicator and some tooling pieces included. A couple of bonus features I did not count on. So I'm pretty happy with the deal.
attachment.php

attachment.php


Item #2 was a fabricated steel stock rack. I've been wanting a smaller design for a long time and most auction racks are from big shops and just too big for a home shop size. This one is perfect at 48" tall by 31" wide. It will fit nicely in my shop and allow me to get my steel supplies more organized. At $30 plus commission and tax I don't think I could buy the raw steel and make it myself cheaper. And the bonus here was it came with a bunch of round bar stock still on it that also made it into my truck.
attachment.php

attachment.php


The last item was a Troy Built gas powered pressure washer. 5.0 HP Honda motor and 2600 PSI pressure rating and a partial gallon of degreaser solution.
attachment.php
 

Attachments

  • IMG_2554.jpg
    IMG_2554.jpg
    141.8 KB · Views: 435
  • IMG_2556.jpg
    IMG_2556.jpg
    137.8 KB · Views: 440
  • IMG_2553.jpg
    IMG_2553.jpg
    125.9 KB · Views: 439
  • IMG_2557.jpg
    IMG_2557.jpg
    134.4 KB · Views: 441
  • IMG_2555.jpg
    IMG_2555.jpg
    122.8 KB · Views: 446
OP
R

rmalkow2

Well-known member
Joined
Jun 26, 2009
Messages
4,087
Location
Brighton, MI
Thanks 1/2 cup. I like then as well. I guess it's partly the opportunity for a good deal on something I want and also partly the challenge involved in winning something and using the right bidding strategy. The thrill of the win and all.
I'm pretty selective these days but do look for specific things I want for the shop or think I can flip for profit.
Lot's of fun in the hunting and bidding.
 

1/2 Cup

Member Emeritus
Joined
Apr 28, 2012
Messages
19,283
Location
Shepparton. Victoria. Australia
Thanks 1/2 cup. I like then as well. I guess it's partly the opportunity for a good deal on something I want and also partly the challenge involved in winning something and using the right bidding strategy. The thrill of the win and all.
I'm pretty selective these days but do look for specific things I want for the shop or think I can flip for profit.
Lot's of fun in the hunting and bidding.

Bob, it sounds like we are on the same page when it comes to an Auction..:thumbup:
 
OP
R

rmalkow2

Well-known member
Joined
Jun 26, 2009
Messages
4,087
Location
Brighton, MI
Video Test

One of my GJ goals this year is to learn how to add the occasional video file to my posts here. I have never tried it before so if this actually works there will be a usable link here to a simple video I made to test out the whole process.

attachment.php


Attachments

  • IMG_2532.jpg
    IMG_2532.jpg
    120 KB · Views: 436

taumac

Well-known member
Joined
Aug 30, 2011
Messages
8,104
Location
Brooksville, Fl
Video Test


One of my GJ goals this year is to learn how to add the occasional video file to my posts here. I have never tried it before so if this actually works there will be a usable link here to a simple video I made to test out the whole process.


attachment.php


Great buys at the auction. That’s a really nice press and I’m something I wish I could have. I subscribed to your YouTube channel. Looking forward to seeing more videos from you.
 
OP
R

rmalkow2

Well-known member
Joined
Jun 26, 2009
Messages
4,087
Location
Brighton, MI
Thanks for checking out the video guys. I still need to hone my video making skills and would like to learn a better way to tie the link into a picture or icon within a given post. But I wish I had done this during the barn build as I took some videos of the work in progress. After seeing others on GJ include short videos it really makes some projects come to life. I'll try to selectively find useful times to use it and not just boring video clips.
 

xtremek

Well-known member
Joined
Apr 13, 2012
Messages
11,603
Location
St. Johns, Mi
It's official, I hate you. ;) Let me add, you ****. If a belly tank or press come up missing, please don't head to the middle of the state to look for them. Nice scores.
 
OP
R

rmalkow2

Well-known member
Joined
Jun 26, 2009
Messages
4,087
Location
Brighton, MI
It's official, I hate you. ;) Let me add, you ****. If a belly tank or press come up missing, please don't head to the middle of the state to look for them. Nice scores.

Haha,
C'mon over I just let out the doberman and he's good and hungry! :eyecrazy:

But really, thanks for checkin in here and the rusty lust over my new/old treasures.


Bob
 
OP
R

rmalkow2

Well-known member
Joined
Jun 26, 2009
Messages
4,087
Location
Brighton, MI
Work Light Upgrade

I've always had halogen work lights on hand, probably like many others but to be honest I don't use them all too often especially in summer cause they are just too hot to be near. The light is bright but I find myself using them less and moving them around to store in the shop. I hate things that take up space but don't get used. So like many of my other lighting fixtures I decided to go with an LED version. I had some Menards rebate money so I decided to look at LED work lights and picked out this 2500 lumen version.
attachment.php


It's a nice size but lighter and since there is no real heat issue it does not need that glass front lens like halogen lamps. I've had one of those glass lenses shatter on me before.
attachment.php


I tried it out tonight after dark just to see how much general light it will give and it lit up the totally dark garage pretty good. Well, at least it illuminates my current mess in the garage almost too well. I can see having a couple of these around and if aimed properly on a work area it will give plenty of light. I also like that you can get many different sizes. My goal this time was medium size and a $30 budget. But, I can see having one smaller and one larger model in the future. And I think I'll be more likely to use this in more situations than the old halogens.
attachment.php
 

Attachments

  • IMG_2564.jpg
    IMG_2564.jpg
    132.3 KB · Views: 283
  • IMG_2561.jpg
    IMG_2561.jpg
    130.2 KB · Views: 277
  • IMG_2560.jpg
    IMG_2560.jpg
    124.6 KB · Views: 282
To avoid these ads, REGISTER NOW!
OP
R

rmalkow2

Well-known member
Joined
Jun 26, 2009
Messages
4,087
Location
Brighton, MI
Ya, not the first mess I've created. After a first look I thought **** I'm just shining a spot light on a messy garage has dumb is that. Then realized hey it's a garage and I'm probably not the only one. I did go out the next day and put some stuff away properly and the balance of clean up will be this weekend.
 

rubberrodder

Well-known member
Joined
Jul 6, 2007
Messages
616
Location
Tacomatose Wa.
Hi Bob,
Just checking in on you thread and saw the belly tanks. those are a great score and could make a neat project. I was thinking a cool go-kart tribute tanker or a even a small engined full on streamliner. I did notice the previous owner hacked the drivers opening into what is normally the "side" of a belly tank car. All the ones I have seen done were split along the seams so as to make an upper and lower half. This made it easier to build the internal structure and access all the mechanicals when finished.
Watching all the Bonneville guys on the H.A.M.B. and Jalopy Journal boards has ruined me socially!:lol_hitti
 
OP
R

rmalkow2

Well-known member
Joined
Jun 26, 2009
Messages
4,087
Location
Brighton, MI
Bob, I had the same problem with my halogen flood. If you haven't already thrown yours away you can convert the halogen heater with a LED replacement bulb.

https://www.amazon.com/gp/product/B0747L5S5V/?tag=atomicindus08-20

Thanks Bob and yes that's a really good idea. After I picked out the the lamp I purchased I did have to spend time looking at all the other potential goodies. (While in the candy store a kid can still dream right?)
I saw those replacement bulbs as well and wondered about that. They make so many replacement LED bulb types now I should not be surprised. We will see, I may yet try one of those in an old halogen lamp.
 
OP
R

rmalkow2

Well-known member
Joined
Jun 26, 2009
Messages
4,087
Location
Brighton, MI
Hi Bob,
Just checking in on you thread and saw the belly tanks. those are a great score and could make a neat project. I was thinking a cool go-kart tribute tanker or a even a small engined full on streamliner. I did notice the previous owner hacked the drivers opening into what is normally the "side" of a belly tank car. All the ones I have seen done were split along the seams so as to make an upper and lower half. This made it easier to build the internal structure and access all the mechanicals when finished.
Watching all the Bonneville guys on the H.A.M.B. and Jalopy Journal boards has ruined me socially!:lol_hitti

I too am Bonneville dreaming more and more this year. Mainly because I'm toying with the idea of going to Speed Week this year. (Assuming the weather cooperates.)
Initially I was sad about the large cut out right on the seam of the tank but after some research about P-38's I now understand why. It turns out that the mounting flange and connections to the plane were actually in that very spot on these tanks. See picture I found online. I think my tanks were likely used as some sort if kids ride and so that existing mount area was simply cut bigger and the insides gutted.

attachment.php


Yes the guys making belly tankers likely rotated the tank 90 degrees, split the tank halves and then patched that cut out area. This allowed for a removable top body half. If I ever get to make a car from these I would do the same thing. So far I only have dreams and plans swirling in my head but mostly around making some sort of tribute belly tanker. I don't know that I would ever race one but it would be fun and a challenge to re-create one.
 

Attachments

  • P38 Tank 1.jpg
    P38 Tank 1.jpg
    21.4 KB · Views: 453

rubberrodder

Well-known member
Joined
Jul 6, 2007
Messages
616
Location
Tacomatose Wa.
I too am Bonneville dreaming more and more this year. Mainly because I'm toying with the idea of going to Speed Week this year. (Assuming the weather cooperates.)

I know the feeling. I've been planning Speed week for almost 5 years.::sad: I keep saying "next year...next year!":D
Also, check out Bobby Greens "Old Crow Speed Shop" for his belly-tank. 168 mph with a flathead 4cyl model B engine.
 
Last edited:
OP
R

rmalkow2

Well-known member
Joined
Jun 26, 2009
Messages
4,087
Location
Brighton, MI
I know the feeling. I've been planning Speed week for almost 5 years.::sad: I keep saying "next year...next year!":D
Also, check out Bobby Greens "Old Crow Speed Shop" for his belly-tank. 168 mph with a flathead 4cyl model B engine.

I have seen his belly tanker on TV and read a little about it. Pretty cool old school racer he has made. I've also been saying I'll get to Bonneville for years but never make it. This summer I have an opportunity because I have to travel to Washington state for my son's wedding the week after and both he and my daughter now live in SLC so I'm hoping to stop there for speed week and then travel onto the wedding the following week.

Bob looking forward to when you have a crack at the belly tank..:thumbup::thumbup:

Right now it's just totally a dream in my head so don't hold your breath waiting on me. But it's not every day these tanks become available so I had to snap them up.
 
OP
R

rmalkow2

Well-known member
Joined
Jun 26, 2009
Messages
4,087
Location
Brighton, MI
Tool Box Enhancement

As I was cleaning out some stuff from my basement I re-discovered some very dense foam pieces that I had previously salvaged and saved for some project. Well the thought came to mind to try and use it like I've seen others do on GJ and fill a couple tool box drawers making the individual cut outs for some tools.
I chose screwdrivers, nut drivers and ratchets as those things seem to roll around when loose in the drawer the most. Thought this would make things tidy and always at easy reach.
I think it worked out pretty well. It took a bit of learning curve to get good at making the cut outs and this foam dulled the knife blade pretty quick but I think I will like the end result and using tools this way.

attachment.php


attachment.php


There's still a little room for additions to the ratchet/extension drawer.

attachment.php
 

Attachments

  • IMG_2565.jpg
    IMG_2565.jpg
    143 KB · Views: 447
  • IMG_2566.jpg
    IMG_2566.jpg
    145.2 KB · Views: 446
  • IMG_2567.jpg
    IMG_2567.jpg
    147.5 KB · Views: 446

jon72vega

Well-known member
Joined
Apr 17, 2013
Messages
3,445
Location
Niles Michigan
Tool Box Enhancement

As I was cleaning out some stuff from my basement I re-discovered some very dense foam pieces that I had previously salvaged and saved for some project. Well the thought came to mind to try and use it like I've seen others do on GJ and fill a couple tool box drawers making the individual cut outs for some tools.
I chose screwdrivers, nut drivers and ratchets as those things seem to roll around when loose in the drawer the most. Thought this would make things tidy and always at easy reach.
I think it worked out pretty well. It took a bit of learning curve to get good at making the cut outs and this foam dulled the knife blade pretty quick but I think I will like the end result and using tools this way.

attachment.php


attachment.php


There's still a little room for additions to the ratchet/extension drawer.

attachment.php


Bob,
Nice work on the tool shadowing!
 
OP
R

rmalkow2

Well-known member
Joined
Jun 26, 2009
Messages
4,087
Location
Brighton, MI
Two weekend jobs.

One planned……….


Project number one for last weekend was to replace a wheel bearing assembly on my friends 2005 Toyota Prius. Did lots of good ole You Tube research and quickly realized this is not an easy job. The sealed iron bearing assembly attaches to an aluminum steering knuckle. That's a bad corrosion recipe especially in our salted road winter environment of Michigan. The bearing assembly slip fits into a machined pocket in the knuckle and then attaches with 4 bolts.

We got all the bolted on parts off pretty easy and even the four bearing assy bolts. But, getting the bearing assy out and free of the knuckle was an adventure of epic proportions. We used heat, penetrating fluid, air hammer/chisel, hammers of various sizes, more het, more fluid, more pounding and the thing would not budge. We had almost every tool I own strewn about the floor of the new barn.

attachment.php


Oh I almost forgot the slide hammer we rented for this purpose that did not work. The bearing just laughed at us as being feeble mortal Sluggo's.

:Homer: DOH! Finally my slow brain remembered that I had a new to me 20 ton press just purchased at auction up in my house garage. So we unbolted the entire steering knuckle headed up there and while keeping one hand with crossed fingers and the other one pumping the press slowly we got that sucker to pop out. It took a lot of pressure but it finally separated and without damaging the steering knuckle. :bowdown: Thank you God!

After that it did require quite a bit of corrosion removal to slip the new one in place but we got it all back together and it even worked! :willy_nil
When it's time to do the other side we at least know to just pull the knuckle and use the press. It will save us at least a couple hours of useless beating and banging by hand.
Sorry no finished pictures as I was too excited just to have it done and hey it's a Prius. Pics are not that exciting.

:3gears: Every car repair needs a test drive so we cleaned up and headed for my favorite BBQ and Blues joint for a plate of ribs.

attachment.php
:beer:
 

Attachments

  • IMG_2580.jpg
    IMG_2580.jpg
    108.3 KB · Views: 376
  • BBQ.jpeg
    BBQ.jpeg
    18.3 KB · Views: 376
OP
R

rmalkow2

Well-known member
Joined
Jun 26, 2009
Messages
4,087
Location
Brighton, MI
And One Not Planned………


For the past year and half I've had one of those Harbor Freight fabric cover garages in my side driveway with a project Jeep and lots of other stuff stored in it awaiting the barn completion.
Now that's done and most things moved out of that temp garage I was starting to dismantle it. I had taken the end panels off but the frame and sides/roof were still in place. It's been pretty sheltered by my house from traditional winds from the west and was anchored down with stakes in the ground as well as heavy weights on the corner legs.

So I thought……. :shocking:

On Sunday I came home from church to find it had literally lifted straight up in the air, turned itself 90 degrees and crashed back down. I wish I could have seen that happen. Somehow it missed hitting the Jeep, a van parked right next to it, a trailer, a huge maple tree and my F150 without scratching any of them. It did knock over the garbage container and a pretty heavy steel rack but no other damage. It landed so hard that the ground stakes actually impaled themselves back into the ground at it new location.

Since the wind was still gusting about and it looked like it wanted to sail away again I had to drop everything and quickly take it apart. Hence project #2, unplanned for the day but quite necessary.

After Pictures.
attachment.php

attachment.php
 

Attachments

  • IMG_2581.jpg
    IMG_2581.jpg
    149.3 KB · Views: 380
  • IMG_2583.jpg
    IMG_2583.jpg
    146.2 KB · Views: 375

1/2 Cup

Member Emeritus
Joined
Apr 28, 2012
Messages
19,283
Location
Shepparton. Victoria. Australia
Bob, that reads like a marathon effort you guys put in to get the bearing out.

I can appreciate what you have been through as I recently completed the bearings on the MG F and that was a press job and my 20 t unit struggled.

Regards
 
OP
R

rmalkow2

Well-known member
Joined
Jun 26, 2009
Messages
4,087
Location
Brighton, MI
Garage Goodies

I stopped at Hobby Lobby on the way home from work today and I was looking for only one thing but instead came home with an arm load of fun stuff. Some new signage for the garage. They are in a big week of 50% off home decor items which includes all metal and wood signs and other items. Even a new hat was 50% off. A great sale that goes until March 10th if anyone is looking to pick up some cool stuff for cheap, now is the time. They have quite a good selection of fun items for the garage or man cave.

attachment.php
 

Attachments

  • IMG_2587.jpg
    IMG_2587.jpg
    101 KB · Views: 344
OP
R

rmalkow2

Well-known member
Joined
Jun 26, 2009
Messages
4,087
Location
Brighton, MI
Bob, nice scores. :thumbup:

Signage like that just really adds to a garage..:thumbup:

Great scores Bob. I too look forward to the belly tanker build some day!

Thanks guys. Normally I'm looking for vintage signs but this particular store carries a lot of pretty cool guy stuff for decorating and at 50% off I couldn't resist.

"Some Day" are the key words for those belly tanks. For awhile they will be in the dream stage within my mush for brains until I can find time and parts.
 
OP
R

rmalkow2

Well-known member
Joined
Jun 26, 2009
Messages
4,087
Location
Brighton, MI
More toolbox organization…

I'm starting to really like the whole foam drawer liner idea. Previously I did this for some drawers in my house garage too box. Now I'm realizing that my main box in the barn also needs organization badly. While working on my buddy's car a couple weeks ago we were digging all around for the right sockets and ratchets etc. Simply because my tool drawers were a mess in there. So I have lots of foam left and am really starting to enjoy this neat look and layout.

This weekends project was layout and cutting foam for one drawer that will hold ratchets, breaker bars, and various extensions. After many years of just tossing tools loose in a drawer I'm a bit surprised this is so attractive to me but maybe old dogs can learn a new trick or two.
Given the winter like weather I'm still "enjoying" here it's a nice job to do at the kitchen table too.

attachment.php
 

Attachments

  • IMG_2596.jpg
    IMG_2596.jpg
    146.7 KB · Views: 585
To avoid these ads, REGISTER NOW!
Top Bottom