jon72vega
Well-known member
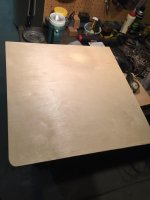
Bob,
Nice job on the cabinet base!
Nice job on the cabinet base!

SUN Test Stand Refurb….continued.
This past weekend I got after this project and have basically completed it for display and light use. I'll call this a light restoration because I simply wanted it to look presentable as a display/storage item in my garage. I don't intend to restore it functionally except maybe for the volt meter if that's simple to do. The other instruments I would never use and I just like the overall look of old SUN test stands.
Here's the before look:

The bottom cabinet paint was not savable. I tried to polish it to look respectable but there was just too much surface rust. So it got sanded all around and inside compartments then sprayed first with a coat of 3M Rust Preventer which turns all the previously rusted areas black and leaves a nice paintable surface.

Then I gave it a coat of black primer purposely to start with a dark base. The only close Hammered effect blue paint I could find locally was a little lighter than the original color so I was hoping to tone it down as much as possible. Not sure if that trick really works but it went on as a smooth primer base at least.

Then I gave it a good coat of the final blue color which turned out pretty good. The only sad news is regarding the front door decals. I had carefully masked off the two decals hoping to save them. they were somewhat torn up and had pieces missing already but I would have kept them original if possible. But unfortunately they were so fragile that even the easy release painters tape puled off more of each decal. The top smaller one used to say 6 & 12 Volt and that is almost completely gone now. The bigger SUN Star logo had portions missing originally but now has more pieces torn off. So I'm looking for replacements now. I've found a local guy that prints the big decal on vinyl and I'm hoping he can also replace the smaller decal for me as well.


Here's a picture found on the web of what the decals should look like.

For those of you that remember Linoleum floors, the base cabinet top surface is a black Linoleum piece that has fake marble streaks through it. Definitely '50's era design and it cleaned up pretty nice and got a coat of vinyl/rubber protectant for a little shine.
It will make a good addition to the garage and I'll enjoy looking at it every time I go out there. It also has enough storage capacity to be a bit useful as well.

Bob,
That cabinet turned out GREAT!
Good job!
Bob its great to have a colour theme in the shed and you have nailed it.
I agree 1/2 Cup. Always had a mix of uncoordinated cabinets and storage yet it will feel more of a complete place with consistent colors. I hope to paint the ceiling and walls later this year as well. Make it cleaner, brighter and also with a color theme. After 25 years it badly needs a makeover.
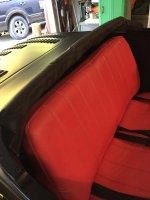
The cabinet looks great, but what the hell is on top of it in that last picture???


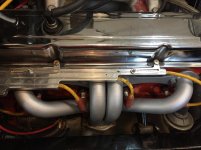
I've used VHT header paint on motorcycle exhausts after bead-blasting them, and they stay pretty-good for several years, and then, it's time to do it again. You could leave them alone and just watch them get worse, but the exhaust will last longer if you re-do them. Most bike exhausts aren't cheap.
Thanks driftpin,
That's good info from some actual experience. If it lasted a couple years I'd be totally happy and then just repaint them again as long as the header metal is good. On a car like this it's really easy to remove and replace them.


Pretty good start for a rookie. Does vinyl shrink like leather? Isn't that how they get the leather seats to look so nice? Or do they warm it up and then when it cools, it tightens up?
There are so many tricks to learn, always fun when you learn them after you did the job! Everyone had to start somewhere, you are miles ahead of me, I have not done any upholstery yet.
.......I actually though about heating the cut vinyl piece but, DOH that thought only came to me as I was glueing up the door panel.
I think for the other door I will cut the piece and then lay it out in the sun to warm up before I glue it to the wood panel. It will be another good experiment and learning experience.......