To avoid these ads, REGISTER NOW!

2 Sluggo's Garage

OP
R

rmalkow2

Well-known member
Joined
Jun 26, 2009
Messages
4,087
Location
Brighton, MI
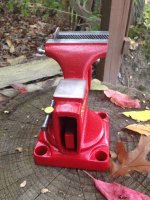
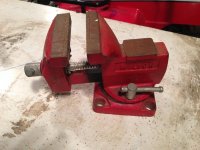
After 24 hours in the Evaporust bath the big parts come out like this. Maybe hard to see in the pics but they get a pretty black coating from the chemical reaction. But getting the loose rust off first with the wire wheel helped speed up the chemical results.
Next step is polish with wire wheel and spray a coating of clear 3M rust preventer which will turn it all black again and convert any really small rust deposits to a paintable oxide finish.
attachment.php


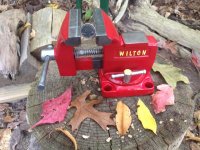
I actually got the primer pain coat on last night but have to take more pics at that stage yet.
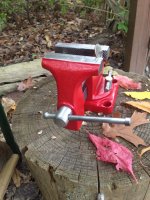
 

Attachments

  • Erie Vise Evaporust.jpg
    Erie Vise Evaporust.jpg
    58.5 KB · Views: 1,212
To avoid these ads, REGISTER NOW!

taumac

Well-known member
Joined
Aug 30, 2011
Messages
8,104
Location
Brooksville, Fl
I believe that maybe we are motivating each other. LOL. 2 big items out way is huge plus the extra cash doesn't hurt. That's a really cool vise and can't argue about the price. I love cool unique vises. Great job saving that one.
 
OP
R

rmalkow2

Well-known member
Joined
Jun 26, 2009
Messages
4,087
Location
Brighton, MI
Thanks for the comments guys. And yes I do believe one of the motivating factors to get a project going is to see someone else on GJ doing it. I'm sure the time frame varies for everyone but eventually a part of me says, Hey, I can do that too!

Regardless of the reasons I'm determined to continue progress on this vise. Got some gray primer on it now and next will be some detail polishing of small areas before the final color goes on. Hopefully it will be ready for its big reveal in a couple days.
attachment.php

attachment.php
 

Attachments

  • Erie Vise Primer 1.jpg
    Erie Vise Primer 1.jpg
    41.6 KB · Views: 1,196
  • Erie Vise Primer 2.jpg
    Erie Vise Primer 2.jpg
    43.2 KB · Views: 1,196

Grumblebum

Well-known member
Joined
Aug 10, 2015
Messages
1,940
Location
Wollongong Australia
Just read through your thread over the last couple of evenings, actually think I finished it last night but fell asleep :)

Anyway great to see a functioning working garage. The problem with reading all pages of a thread (that has taken a long time to evolve) all at once is like watching a tv series box set DVD (or even VHS!) all in one go and then it's the end and you want to know what happens next...

Have a good weekend. Cheers Grumblebum.
 
OP
R

rmalkow2

Well-known member
Joined
Jun 26, 2009
Messages
4,087
Location
Brighton, MI
Grumblebum,
Thanks for the kind comments and for reading this small thread. Like a lot of folks on GJ I mostly enjoy learning tips and tricks from what other members already know. And there's good fun in it as well. For my thread it started (like others before me) as a way to also remind me of where I've been and where I'm going with the garage. I doubt I'll every have anything fancy even though I do have dreams of a separate larger shop building. But it's always going to be a place for everyday jobs and occasional fun projects.
 
OP
R

rmalkow2

Well-known member
Joined
Jun 26, 2009
Messages
4,087
Location
Brighton, MI
Ok, time for the finished product of this little Erie vise restoration. This is really my first attempt at dolling up a vise for other than general working use.

It started out this way when I bought it for $5 at a local barn sale.
attachment.php


After the clean up and de-rusting, primer and then three final coats of Duplicolor Dark Blue Metallic paint it's done. I polished a bit on the jaw faces and the anvil surface. Decided to paint the handle ball ends with the same Metallic Blue and then hand letter the cast in lettering with some light blue Sign Painters One Shot.
My hand shakes more than it used to as it's been a long time since I did anything with a small lettering brush. I'm definitely needing to practice more.
attachment.php

attachment.php

attachment.php

attachment.php
 

Attachments

  • Erie done 4.jpg
    Erie done 4.jpg
    65.5 KB · Views: 1,154
  • Erie done 3.jpg
    Erie done 3.jpg
    70.9 KB · Views: 1,153
  • Erie done 2.jpg
    Erie done 2.jpg
    64.5 KB · Views: 1,152
  • Erie done 1.jpg
    Erie done 1.jpg
    62.8 KB · Views: 1,152
  • Erie Vise Rust 1.jpg
    Erie Vise Rust 1.jpg
    70.5 KB · Views: 1,149
OP
R

rmalkow2

Well-known member
Joined
Jun 26, 2009
Messages
4,087
Location
Brighton, MI
Thanks Taumac and 1/2 Cup. You are very kind. It's a good learning process and I see some things I would do different on another one but thats part of the fun of the process. I've learned a lot by watching the vise experts here on GJ.
 
OP
R

rmalkow2

Well-known member
Joined
Jun 26, 2009
Messages
4,087
Location
Brighton, MI
That looks fantastic, have you decided where you are going to mount it ?

Thanks Grumblebum. As of now I have no thoughts of where to mount it or display it. I'm not is any hurry to sell either. For the interim it will go back in storage as I would like to start on another one now that I have the bug. I've got a bunch of candidates lined up that all need restoration.
 
OP
R

rmalkow2

Well-known member
Joined
Jun 26, 2009
Messages
4,087
Location
Brighton, MI
I'm getting into this vise restoration gig and working my way through some easier ones before I tackle a bigger old vise.
This one I call "Low Hanging Fruit" because it did not need a lot of work. Only rust was light surface stuff on the exposed metal parts. Took care of that easily on the wire wheel. It was completely dis-assembled and the painted portions scuffed good with a scotch write pad, cleaned again, primed and painted a few coats of some left over bright red rattle can I had on the shelf.
Then lubed a little and, re-assembled for final detail lettering. I was originally going to use white paint but changed at the last minute to some bright yellow. I like it better. The yellow pops off the red background and is more of an industrial shop color as well.

Before
attachment.php


After
attachment.php


attachment.php


attachment.php


attachment.php


attachment.php


Yes it's nothing fancy and it's just a China made Wilton open screw vise. But it gives me some practice and chances to try out some technique without screwing up something more expensive.
 

Attachments

  • Lil Wilton 5.jpg
    Lil Wilton 5.jpg
    72.1 KB · Views: 1,043
  • Lil Wilton 4.jpg
    Lil Wilton 4.jpg
    70.4 KB · Views: 1,033
  • Lil Wilton 3.jpg
    Lil Wilton 3.jpg
    73.9 KB · Views: 1,031
  • Lil Wilton 2.jpg
    Lil Wilton 2.jpg
    74 KB · Views: 1,030
  • Lil Wilton 1.jpg
    Lil Wilton 1.jpg
    74 KB · Views: 1,031
  • IMG_2172.jpg
    IMG_2172.jpg
    139.2 KB · Views: 1,037
OP
R

rmalkow2

Well-known member
Joined
Jun 26, 2009
Messages
4,087
Location
Brighton, MI
Last weekend the garage had to return to its "Everyday Repairs" status as I had an unexpected overheating failure in my 1995 F-150. Of course it had to fail me on a day when I needed to drive it to work. Usually it just sees short trips around town on weekends. I'm sure it had been slowly losing fluid for awhile but never a puddle on the ground because it was boiling away when warm via leaking seals where the side tanks are mechanically crimped to the core.

So this old and leaky……
attachment.php


Got replaced with this nice new one.
attachment.php


I suppose I could have had it repaired but a new one was pretty cheap and fast to get so it could all be swapped out in one day last Saturday.
But you know how some jobs go, you start repairing one thing then the item right next to it looks bad. This led to replacing the thermostat and when that housing came off it was rusty so it needed cleaning and painting, then the radiator support under the radiator was rusty and that needed re-paint, then the hose clamps needed some TLC and of course there were new hoses. But all in a good days work and a truck back on the road.
 

Attachments

  • rad 3.jpg
    rad 3.jpg
    42.7 KB · Views: 971
  • rad 4.jpg
    rad 4.jpg
    59.5 KB · Views: 977
To avoid these ads, REGISTER NOW!
OP
R

rmalkow2

Well-known member
Joined
Jun 26, 2009
Messages
4,087
Location
Brighton, MI
Next project up was going to be another vise but I started on a clean up and organization day in the garage today and decided to finally start on restoring an old Delta drill press I had bought earlier in the year.

attachment.php


It was an old industrial use model mounted on a home made table/stand. I'd rather have it set up as a regular bench top model so I've been gathering parts such as a bottom base and table section.
The base is actually a Craftsman piece but will accept the column diameter and work out perfectly. The process is underway of cleaning, painting and re-assembly.

attachment.php
 

Attachments

  • DP base old.jpg
    DP base old.jpg
    48.6 KB · Views: 955
  • DP old.jpg
    DP old.jpg
    61.3 KB · Views: 955
OP
R

rmalkow2

Well-known member
Joined
Jun 26, 2009
Messages
4,087
Location
Brighton, MI
Good call on using a new radiator and going the extra mile with the ancillary bits as well rmalkow.

Give you a little piece of mind.:thumbup:

Very right thinking 1/2cup and exactly what I had in mind. I hate fixing one thing to get down the road a bit and some other small part lets you down. Especially since its not a new truck to begin with.
 

xtremek

Well-known member
Joined
Apr 13, 2012
Messages
11,603
Location
St. Johns, Mi
My neighbor lady has a drill press just like yours that she wants to get rid of. I'd love to restore one, but I'll never have the time.
 

taumac

Well-known member
Joined
Aug 30, 2011
Messages
8,104
Location
Brooksville, Fl
I've have had some issues with those Ford rads. I've tried patching the plastic but didn't work. Your right they are cheap enough to just put a new one in.
 
OP
R

rmalkow2

Well-known member
Joined
Jun 26, 2009
Messages
4,087
Location
Brighton, MI
Looks like the drill press will clean up nicely, I like your idea using the CM base as it looks more period correct.:thumbup:

Regards

Thanks 1/2cup. Not totally sure what I'l do with it when finished but it might be a Christmas present for someone in the family. I don't really need another DP but it was "one of those good deals" I could not pass up.

My neighbor lady has a drill press just like yours that she wants to get rid of. I'd love to restore one, but I'll never have the time.

If you have room to store it and the price is right, a project for another day…..

I've have had some issues with those Ford rads. I've tried patching the plastic but didn't work. Your right they are cheap enough to just put a new one in.

Ya, it's not something you can easily patch on this design. They used a mechanical crimp as opposed to the old method of brazing metal tanks. The plastic tanks are crimped to the core with a gasket. Over time it will eventually fail. The new replacement was only $109 and available same day. If I had taken it to a qualified Rad shop it would cost at least that much and taken days to get back. I generally like to repair original things but this was not cost effective.
 

taumac

Well-known member
Joined
Aug 30, 2011
Messages
8,104
Location
Brooksville, Fl
On the DP how do you raise and lower the head? I do see a cable and small pulley on top. Sure looks like something worth restoring.
 
OP
R

rmalkow2

Well-known member
Joined
Jun 26, 2009
Messages
4,087
Location
Brighton, MI
On the DP how do you raise and lower the head? I do see a cable and small pulley on top. Sure looks like something worth restoring.

As an industrial setup with a fixed table they had a heavy counter weight hanging under the table with that cable coming up through the column, through a couple small pulleys and then attached to the top of the head. This made it easier to raise and lower the head as it was loosened from the column.
I will not use that cable and weight as I have a separate column mount table now that can be raised or lowered to adjust for different work heights.
 
OP
R

rmalkow2

Well-known member
Joined
Jun 26, 2009
Messages
4,087
Location
Brighton, MI
Progress so far on the DP was to get the base cleaned, scuffed, masked off for prime and paint. I'm using a Rustoleum Hammered Silver since I have enough on hand to paint everything. The bare plate surfaces I will polish up and coat with wax once the paint is good and cured.
attachment.php
 

Attachments

  • DP base painted.jpg
    DP base painted.jpg
    48 KB · Views: 896
OP
R

rmalkow2

Well-known member
Joined
Jun 26, 2009
Messages
4,087
Location
Brighton, MI
Next part up for cleaning is the column. I pulled off the head unit and proceeded to give the column a good cleaning with the cup wire brush. Mostly just surface rust so it came out pretty good and got a good wipe down with light oil for now.
attachment.php


After a bit of "tuning" of the column hole in the base with emery paper the column slid in place with light taps of the dead blow hammer and was locked down with its clamp and bolt.
attachment.php
 

Attachments

  • DP column cleaning.jpg
    DP column cleaning.jpg
    50.3 KB · Views: 900
  • DP column and base.jpg
    DP column and base.jpg
    45.9 KB · Views: 899
OP
R

rmalkow2

Well-known member
Joined
Jun 26, 2009
Messages
4,087
Location
Brighton, MI
The Drill Press restore project is still ongoing but slow progress this week as work keeps getting in the way of fun stuff in the garage. Or after a long day it whips my **** and I'm too tired to work too many hours in the garage.
But I did manage to make a little forward progress by cleaning up and painting two parts. First is a locking collar that I purchased to add a little extra support under the new table.
attachment.php


Next is the table itself. This is the before look as purchased off eBay.
attachment.php


And after a good scrubbing with my Simple Green/water mix and a couple different brushes, some sanding and scraping off old paint drips, primer and then the same Hammered Silver top coat its also done and slipped onto the column resting on top of the new lock collar.
attachment.php


I still will sand both exposed metal surfaces on the base and table before final assembly. I'd like them to look cleaned up but functional. Trying to decide whether to prevent future rust on exposed surfaces with a coat of wax or spray on some clear coat.

Now that all the easy parts are done the next job is to take apart the head and clean, polish, paint everything there before final assembly. I'm hoping to make some progress on that this coming weekend. :dunno:
 

Attachments

  • DP lock collar.jpg
    DP lock collar.jpg
    39.8 KB · Views: 834
  • DP table before.jpg
    DP table before.jpg
    48.7 KB · Views: 839
  • DP table after.jpg
    DP table after.jpg
    52.4 KB · Views: 841
To avoid these ads, REGISTER NOW!
Top Bottom