To avoid these ads, REGISTER NOW!

2 Stage Compressor Pump Rebuild

bczygan

Well-known member
Joined
Nov 4, 2009
Messages
22,002
Location
DETROIT! Arsenal of Scrappers
INTRODUCTION

This is a tear down and potential rebuild for a Craftsman
'Professional" 60 Gallon vertical Air Compressor I picked up for $60. The seller said it was getting old and taking a long time to build pressure, so I was not blind sided. But having no experience with air compressors, I didn't know if it would be usable as is, or would need an immediate rebuild. I didn't know if it was even possible, if the parts were available or worth the cost and effort.

Here's a link to the manual:
https://c.searspartsdirect.com/mmh/lis_pdf/OWNM/L0310410.pdf

Here's the specs:
Model No. 919.165612
Running HP 2.9
Bore 2.375
Stroke-High Pressure .54"
Low Pressure 1.45"
Voltage-Single Phase 240/60/1
Minimum Branch Circuit Requirement 15 amps
Fuse Type Time Delay
Air Tank Capacity - Gallons 60
Approximate Cut-in Pressure 145
Approximate Cut-out Pressure 175
SCFM@ 40 psig 9.6
SCFM@ 90 psig 9.0

Looks like this:
919.165612.png


It's an "oil free" direct drive unit (Loud), but louder than it should have been. I hooked up an electrical circuit and ran it. It took 40 minutes to get to 125PSI and had a metallic clanging rattle that shouldn't have been there. Noticeable even to my untrained ears.

I wondered if parts were available, so I called a local air compressor company. They thought parts would only be available from Sears. I checked the internet and found differently. There are parts available all over the place, but some aren't cheap.

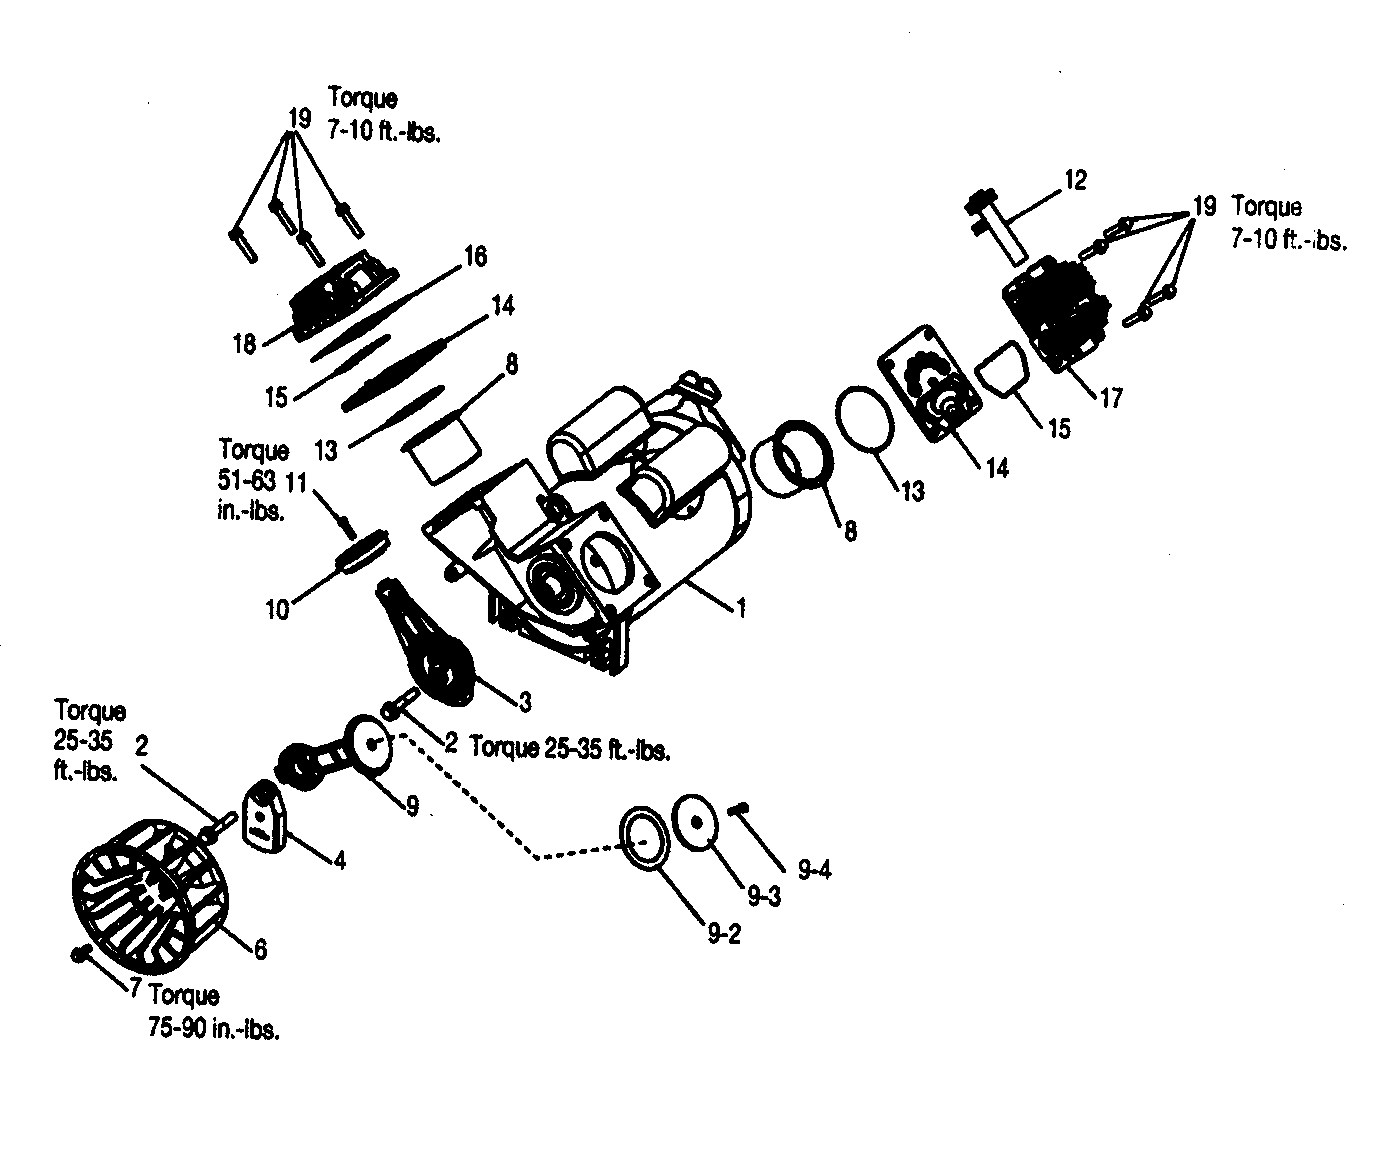
So the next step is a tear down to see exactly what needs doing.

Bill
 
Last edited:
To avoid these ads, REGISTER NOW!
OP
B

bczygan

Well-known member
Joined
Nov 4, 2009
Messages
22,002
Location
DETROIT! Arsenal of Scrappers
TEAR DOWN

I'm using this guide for the tear down. It is similar to this unit, but not exactly the same:
http://www.searspartsdirect.com/Craftsman/air-compressor/model-919165612-repair/0703000/repair-guide/air-compressor/how-to-rebuild-the-pump-on-an-air-compressor.html

I am finding that it is a pretty simple design, and fairly easy, even for me, to disassemble.

First thing to do is take off the plastic shroud. It's two pieces. The larger one, that covers the motor, is held on by one torx screw on the end. It has fingers that connect it to the other part.
20160330_120833_zpszd6ck02v.jpg


The other part covers the pump. It is held on by 2 torx screws.
20160330_120820_zps6rcuigcs.jpg


This is the view from the motor end. Note the torx screw put back on so it doesn't get lost. The black plastic tube sticking up at an angle is the so called intake muffler. Doesn't seem to do much. It is sticking out of the head of the low pressure stage.
20160330_120813_zpsjyhnterh.jpg


Here's a link to the parts list for the pump:
http://www.searspartsdirect.com/model-part/919165612/0247/0703000/50023095/00002.html

An exploded view of the pump.
50023095-00002.png


A view from the pump side. The heads have been removed.
20160330_115827_zpsf375hd78.jpg


Low pressure side, looking down into the piston sleeve.
20160330_115837_zpsyo8jdsaq.jpg


Time to remove the fan.
20160330_121349_zpsorcynbd3.jpg


Fan removed. Note the piston and sleeve for the high pressure stage, on the left, has also been removed. You are looking at the two piston rods and eccentrics on the shaft.
20160330_115823_zps6tj6qksu.jpg


2 photos of the high pressure plate. Kind of grody.
20160330_115723_zps5pdiy3ps.jpg

20160330_115716_zpshjkohl2n.jpg


The low pressure side looking into the piston sleeve. There are some problems here that I will discuss presently.
20160330_115810_zpsiwwjxitf.jpg


Underside of the head on the high pressure side. Only this side has a gasket.
20160330_115712_zpsme5nqyoy.jpg


Valve plate assembly for the low pressure side:
20160330_115712_zpsme5nqyoy.jpg


Connecting rod cap on the low pressure side. Note the blow by pattern of wear on the edge. I believe this is where a lot of pressure loss is.
20160330_115503_zps3fggdhlo.jpg


Piston sleeve on the high pressure side. Note how it has a very shallow travel compared to the other side. The wear pattern on the sleeve is also fairly uniform, and the fit is tighter than the other side. Both, I believe, still need to have new compression rings, a wear item.
20160330_115637_zpsvuotsdfx.jpg


Low pressure head:
20160330_115520_zpsvd9i9kp7.jpg


High pressure piston with it's compression ring.
20160330_115621_zpsebpukf04.jpg


See next post for diagnosis.

Bill
 
Last edited:
OP
B

bczygan

Well-known member
Joined
Nov 4, 2009
Messages
22,002
Location
DETROIT! Arsenal of Scrappers
DIAGNOSIS AND PARTS EXAMINATION

During the tear down I noticed a few things.

The major fault I noticed was a lot of wear and part of it missing, on the low pressure compression ring. It seems to have caused a lot of blow by. Compression rings are wear parts and should be replaced in any case.

There are also a number of O-rings, and I would replace these in any case.

The head gasket on the high pressure side was destroyed on disassembly and must be replaced. I wonder why the low pressure side has none.

The high pressure valve plate is badly rusted or corroded in part, so I will replace. Should the low pressure one be replaced as well? How do I check these?

Should the piston sleeves be replaced or just cleaned up?

There is dirt everywhere. I will blow as much off as I can. How do I clean these parts?

And one last big thing. The low pressure piston rod and bearing came off OK, but the high pressure one may need a puller. And there is a grinding feel and sound when it is rotated.

I think the bearing is bad. Since the rod is OK, I wonder if I can source bearings and just press in a new one.

Any suggestions on other things to do, and how to recondition this compressor, are very welcome.

Bill
 
Last edited:
OP
B

bczygan

Well-known member
Joined
Nov 4, 2009
Messages
22,002
Location
DETROIT! Arsenal of Scrappers
CONCLUSION AND PARTS PRICING AND ORDERING

Parts prices:

Compression ring low pressure side DAC-308 $8.29 Ebay (Included in kits below)

Cylinder sleeves (D25837) (2) K-0650 (Incl. both O-rings, compression ring and screw) $41.00 Ebay

Valve plate $27.94 Ebay (Incl. both O rings) Replace just one?

Head gasket $3.99 Sears

Connecting rod O-ring (2) 5.79 Sears (Included in kits above)

Cylinder head O-ring (2) $14.38 Sears (Included in kits above)

High pressure rod bearing NTN 6909LLB $42.13 NSK

Low pressure rod bearing TPI 6203LLB $13.60 Ebay 4.95 locateballbearings.com 9.95 ship

Turns out that Sears has 2 rebuild kits not listed on their web page. No stock numbers either. And the high pressure one is needed to get one necessary part not available any other way (The HP piston assembly - #10). They are:

HP (High Pressure) Ring Kit
Contains parts numbers:
8 10 11 13 15 16
Which are sleeve, piston assembly, screw, 2 O-rings and head gasket.
$73.68

LP (Low Pressure) Ring Kit
Contains parts numbers:
8 13 15 20 21
Which are sleeve, 2 O-rings, compression ring and screw.
$57.67

Summary:
It will cost just around $200 in parts to do a complete job.
HP kit from sears. $73.68
LP kit from Ebay $41.00
Valve plate $28.00 Ebay
HP rod bearing $52 shipped

This project is now on the back burner based on these prices. I can get the oiled compressor going for a lot less.(Hopefully)

Will list here, the best prices I find, for the needed parts. - Done

Bill
 
Last edited:
OP
B

bczygan

Well-known member
Joined
Nov 4, 2009
Messages
22,002
Location
DETROIT! Arsenal of Scrappers
REBUILD AND REASSEMBLY

This post will have to await a decision about whether to rebuild the compressor or not.

The decision is made. I WILL rebuild the compressor.

Will have to wait for some income though.

Bill
 
Last edited:
OP
B

bczygan

Well-known member
Joined
Nov 4, 2009
Messages
22,002
Location
DETROIT! Arsenal of Scrappers
TESTING

This will be where I report on any improvements to the operation of the compressor.

Or describe the explosion that happened when I put things back together wrong...

Bill
 
Last edited:

beamrider

Well-known member
Joined
Jan 21, 2013
Messages
533
Location
Columbus OH (displaced from Wheeling)
It's called "Pre-posting." That way, he can edit the posts with the appropriate content, and end up with a coherent presentation without having 58 people posting in between each post with comments. Comes out nice looking when the plan comes together.
 

Packard V8

Well-known member
Joined
Mar 16, 2009
Messages
7,380
Location
Spokane, WA
Good plan. I didn't even think those were rebuildable. Keep track of the costs and time, because when completely rebuilt, it will still be a cheap, noisy compressor with a short operating life span. Will be good to know if it's a cost-effective investment of your time and money.

jack vines
 

theoldwizard1

Well-known member
Joined
Feb 22, 2011
Messages
43,106
Location
SE MI
The sleeve kit is $41 for a single cylinder.

You are going to be about $125 out of pocket, plus your original $60. If it last 5 years, it is not a bad buy. Could you turn around and sell it for >$200, maybe. How nice is the paint (not that that is really THAT important).


So Bill, how many compressors do you actually own ?
 

golferguy

Active member
Joined
Dec 4, 2015
Messages
35
Location
Mid state Ga.
Had a 6.5 hp model just about the same as yours and don't think it was 2 stage. A piece of **** to start with and would not even attempt to rebuild. It's noisy, cheaply made,pulls in a lot of moisture. I'd tap the tank with a hammer at bottom. Probably sound a lot different than top. I'd try and buy the complete cyl. assy. if wanting to repair.
 
OP
B

bczygan

Well-known member
Joined
Nov 4, 2009
Messages
22,002
Location
DETROIT! Arsenal of Scrappers
The sleeve kit is $41 for a single cylinder.

You are going to be about $125 out of pocket, plus your original $60. If it last 5 years, it is not a bad buy. Could you turn around and sell it for >$200, maybe. How nice is the paint (not that that is really THAT important).


So Bill, how many compressors do you actually own ?

Paint is good, and that cost is reasonable to me, for a compressor like this. I need it to power my metal shop and blast cabinet. Or I might use it in the woodworking shed when I get the oiled Campbell Hausfeld working.

There are 3 other compressors. Two of them are pretty portable. The Porter Cable pancake, which is very handy, and a Small 2 tank portable. Then there is the 220V Craftsman horizontal with 2 wheels.

For now, the two hand carry ones are my users.

Eventually the two verticals will serve the wood and metal shops and the horizontal will serve the automotive shop. These shops are in different sheds, some distance apart, so having separate compressors works out good. The two hand carry ones will just be for wherever. One may go to the hangar. May seem excessive but I picked these up for cheap. $40 to $60 except the big vertical, which was $125 IIRC.

So my next task is to check out the 220V horizontal Craftsman. Need to rig up an outlet.

Bill
 
Last edited:
OP
B

bczygan

Well-known member
Joined
Nov 4, 2009
Messages
22,002
Location
DETROIT! Arsenal of Scrappers
Some important questions. If anyone has answers, please let me know.

Must the valve plates be replaced in pairs?

Should the cylinder sleeves be replaced as a matter of course?

The high pressure side has an assembly that includes the compression ring. Does this assembly come apart so the new compression ring can be installed, or must it be bought as an assembly? Photo:
20160330_115621_zpsebpukf04.jpg


Note to self: Compressor needs mounting feet/pads and bolts. Also missing screw for shroud and air filter.

Bill
 
Last edited:
To avoid these ads, REGISTER NOW!

469 runner

Well-known member
Joined
Jan 5, 2006
Messages
353
Location
North Carolina
I had to replace a broken rod in one like this years ago. A 6HP Craftsman, 33 gal. tank. I was really impressed with how cheaply made these are. Having said that, I did replace the rod/piston and cylinder that was scarred from the rod that let go. While not my main compressor, that was 10 years ago and it still works as good as new.

The rod/piston assembly did not even have a wrist pin, the piston is designed to rock in the bore during the revolution of the crank. Never saw that before and must cause a huge amount of blowby.
 
Last edited:
OP
B

bczygan

Well-known member
Joined
Nov 4, 2009
Messages
22,002
Location
DETROIT! Arsenal of Scrappers
I had to replace a broken rod in one like this years ago. A 6HP Craftsman, 33 gal. tank. I was really impressed with how cheaply made these are. Having said that, I did replace the rod/piston and cylinder that was scarred from the rod that let go. While not my main compressor, that was 10 years ago and it still works as good as new.

The rod/piston assembly did not even have a wrist pin, the piston is designed to rock in the bore during the revolution of the crank. Never saw that before and must cause a huge amount of blowby.

I am seeing this as well. Just this side of cheesy. And the cost of parts is adding up.

Note to others: Sears has rebuild kits for the low and high pressure sides that don't show up on the web. I will outline them.

The Campbell Hausfeld, in comparison, is beefy and industrial, plus it has oil.

Maybe I should investigate getting that one going first. Needs a belt and some plumbing to deliver the air. Missing a cover on the pressure switch.


Bill
 
OP
B

bczygan

Well-known member
Joined
Nov 4, 2009
Messages
22,002
Location
DETROIT! Arsenal of Scrappers
Photos of the machine
EXAMINATION

When I purchased this compressor, the seller grabbed off the power cord and all the air supply plumbing off the side after I handed him the money. He sold it cheap and wanted to save what he could. I didn't argue.

So with a cursory examination it would need these things:

Cord and plug

Bushings and washers for the feet and mounting bolts and sleeves.

Cover for the pressure valve.

New belt

Change and top up oil.

Air supply plumbing coming out the side of the tank.

I'll get some more detailed photos.

Bill
 
Last edited:

theoldwizard1

Well-known member
Joined
Feb 22, 2011
Messages
43,106
Location
SE MI
Paint is good, and that cost is reasonable to me, for a compressor like this. I need it to power my metal shop and blast cabinet.
Sand blasting takes a LOT OF AIR ! I did not see the volume specs (CFM) on that unit. My guess is that it does not make enough volume to blast for more than a couple of minutes. If you are patient, the big tank and high pressure will help.

Same is true true for sanders, die grinders and cut off wheels.
 
OP
B

bczygan

Well-known member
Joined
Nov 4, 2009
Messages
22,002
Location
DETROIT! Arsenal of Scrappers
sand blasting takes a lot of air ! I did not see the volume specs (cfm) on that unit. My guess is that it does not make enough volume to blast for more than a couple of minutes. If you are patient, the big tank and high pressure will help.

Same is true true for sanders, die grinders and cut off wheels.

9@90

The 24" Trinco blast cabinet that I have has 6 and 12 CFM guns available for it. That is another project item. It needs some new parts including nozzles for the gun.
standard24.jpg


The CH is 9.1@90, but has the advantage of being oiled, but when I got it I remember it being very loud. I hope that was because it was in a small shed, and not because it needed repair.
 
Last edited:

G_P

Well-known member
Joined
Jul 11, 2010
Messages
7,135
Location
Central CT
Personally, I would invest your money into the oiled CH compressor. It's a much better unit overall.
 
OP
B

bczygan

Well-known member
Joined
Nov 4, 2009
Messages
22,002
Location
DETROIT! Arsenal of Scrappers
BCZ, I knew that a person could rebuild them, I didn't know how expensive. I was told that they were cheaper to repair than the oiled compressors.

Rich,

Yeah, some people who have said I rebuilt mine for $50 or $60, must have done it a few years ago.

It may be that the best way to buy the parts is in kits that Sears has, but doesn't list on their page, one for the high pressure side and one for the low pressure side. In fact, it is necessary, because one needed part (#10) only comes in a kit. I'll list them in the write-up.

Turns out the total parts price is just under $200.

Time to fix the CH oiled compressor instead.

Bill
 
Last edited:
OP
B

bczygan

Well-known member
Joined
Nov 4, 2009
Messages
22,002
Location
DETROIT! Arsenal of Scrappers
Personally, I would invest your money into the oiled CH compressor. It's a much better unit overall.

Yes,

Good advice.

I think that one is going to be first in line. Looking into it tomorrow.

The Craftsman will eventually need to run though.

Bill
 
Last edited:

theoldwizard1

Well-known member
Joined
Feb 22, 2011
Messages
43,106
Location
SE MI
BCZ, I knew that a person could rebuild them, I didn't know how expensive.
That is one of the few oil-less compressor that has replaceable cylinder liners as well as pistons and rings.


Bill, how much do you want for the tank ? (and no, I am not paying $60 for it !)
 
OP
B

bczygan

Well-known member
Joined
Nov 4, 2009
Messages
22,002
Location
DETROIT! Arsenal of Scrappers
That is one of the few oil-less compressor that has replaceable cylinder liners as well as pistons and rings.


Bill, how much do you want for the tank ? (and no, I am not paying $60 for it !)

That is actually a good idea (That I already thought of), to use it as additional storage capacity. If I don't rebuild it, I may do that.

Trying to source a belt for the other one. It takes a BT31 Durkee-Atwwood, which is a poly-V 490J6. Buy it online for $5 plus $12 shipping, or pick it up locally for even more ($18-20).


Bill
 
Last edited:

Kev442

Well-known member
Joined
Jan 15, 2009
Messages
5,386
Location
Wi
I paid $379 for my 60 gallon oil less brand new in 1998. Investing even 50% of that cost in repair is a waste of money and time. They have a 50% duty cycle and will not run a blast cabinet. An oiled compressor is needed at a much higher duty cycle rating.

When I wanted a 60 gallon compressor for my pole building, I considered a new oiled at $6-800 and decided against it as I had bought an 80 gallon for the garage already. I bought a sears 2 HP 30 gallon horizontal twin from the mid 70's for $50. I got paranoid about the tank and wanted vertical anyway. I bought a 60 gallon tank from a dead oil less for $60 (HA!). The oiled twin is on the oil less tank for a total investment of $130. It will fill in about 9 minutes. It runs a cutoff and impact well, but I still do not consider it blast cabinet rated. Frankenpressor has been running about 4 years now. I only pump to 125 psi, going to 175 would probably take an additional 8 minutes.

I bought another sears horizontal for $50 with the idea of two pumps will run a blast cabinet. I have not done so yet. I have a spare pump at the least and run it a couple times a year to keep it it usable.
 
Last edited:

whateg01

Well-known member
Joined
Mar 13, 2006
Messages
11,212
Location
doo dah, kansas, usa
All compressors that run at a high rpm are going to be loud. I have a big quincy pump that isn't in use yet, but I have a friend who has a smaller quincy pump that is very quiet. I hate my Huskee (CH rebadge) because it's so loud. Most of the time, I don't need huge CFM, so it would be great to replace the pump with a quieter one. Someday, it would be great to afford a screw compressor.

Dave
 

Packard V8

Well-known member
Joined
Mar 16, 2009
Messages
7,380
Location
Spokane, WA
Someday, it would be great to afford a screw compressor.

Got 3-phase power? I'd make you a great deal on a Kaeser AS25hp rotary screw compressor.

jack vines
 
Last edited:
To avoid these ads, REGISTER NOW!
Top Bottom