To avoid these ads, REGISTER NOW!

Below 265 SQ/FT 200 Square Foot Tiny Texas Workshop

All workspaces below 265 squarefeet.

goofiefoot

Well-known member
Joined
Jun 24, 2016
Messages
196
Location
Rockport, TX
foundation.jpg

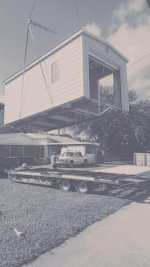
I am excited to kick this off! I have always wanted a dedicated workshop, and while I've been able to work in my garages of the past, it's been a dream to design and build a space for my projects, hobbies, and "me time."

A little background - we moved to the Texas coast last year from Austin. Our Austin house had a decent sized garage, and I was able to organize and work freely within that space, plus I built a nice storage shed in the backyard to hold extra stuff.

currentgarage.jpg

The garage in our current house is much smaller. While technically a 2-car garage, it's only 20x19'. My kayak cart is on wheels, but it's 14x5' and I am constantly moving it around to accommodate project work. Ideally, I'd love to actually park my wife's car in here, and just use it as a garage.

So...

The Workshop


plans1.jpg

plans2.jpg

I made a simple gable-roof shed plan for the workshop. The foundation is 10x20' (200 square feet is the maximum I can build in my backyard without building permits, per the city). 8' walls, 9:12 roof pitch, 6' wide doors - I wanted to maximize the space for working, without having to take out any of our trees.

While I paid to have the slab poured, I will be building the workshop myself - learning as I go. I have experience with framing, siding and interior finishing, yet I am new at shingle roofing, full insulation, and from-scratch electrical layout.

I will run electricity from our house panel on a dedicated breaker for full (small) workshop capability. My current tools are all 120V, but I do want the option to upgrade to 220V pieces in the future.

This is a small space, and it will provide the challenge of keeping things neat and organized. I will be experimenting with different layouts and setups to maximize the space, and my productivity. I currently do most of my work with a table saw, miter saw, circular saw, drills, and hand tools. I hope to incorporate a router station, planer and/or jointer, drill press, and maybe even a welder.

I will be documenting my progress here and on my Make it Goode YouTube channel (link in my signature). Follow along, give advice, ask questions, and enjoy the ride!
 
To avoid these ads, REGISTER NOW!

driftpin

Well-known member
Joined
Dec 22, 2016
Messages
11,193
Location
Miami-Dade/Broward Co. Florida
I think lots of people are interested in small-space utilization. This looks like a good start. I have something similar at one house, though I went the pre-manufactured route, a metal-roof, galvanized-frame, plywood underlayment/Hardie-Board sided building, gable roof, w/a roll-up full-width door on one end peak-gable vents on either end, two small windows for cross-flow ventilation, and a passageway impact door on one long wall. I ran a new 100 amp service and had installed a branch panel with multiple 240V and 120V outlets on the walls. The concrete pad is the floor, there is no wood floor to the structure, though it's pre-built.

I suggest you go bigger rather than small on the electric service. I also have Costco LED double head motion-detector floodlamps outside and Costco 4 ft double-array LED shop lights inside, running below the ridge beam and lighting on the underside of the above head-high shelf over the workbench.

I bet you've seen some of the other 'small-space' structures or garage spaces on-here, plenty of good references.
 

Attachments

  • garage-2 ft -8 ft shelf.jpg
    garage-2 ft -8 ft shelf.jpg
    115.5 KB · Views: 183
  • detached garage security lights.01.jpg
    detached garage security lights.01.jpg
    107.5 KB · Views: 181
  • lark shed detached garage elec.01.jpg
    lark shed detached garage elec.01.jpg
    123 KB · Views: 172
  • Gladiator and Kennedy  workbenches.jpg
    Gladiator and Kennedy workbenches.jpg
    117.4 KB · Views: 186
  • Lark building on crane.jpg
    Lark building on crane.jpg
    76.9 KB · Views: 180
OP
G

goofiefoot

Well-known member
Joined
Jun 24, 2016
Messages
196
Location
Rockport, TX
The first video is live -

Check it out. I walk through my plans around building the shop, and show footage from the slab pour.
 
OP
G

goofiefoot

Well-known member
Joined
Jun 24, 2016
Messages
196
Location
Rockport, TX
I think lots of people are interested in small-space utilization. This looks like a good start. I have something similar at one house, though I went the pre-manufactured route, a metal-roof, galvanized-frame, plywood underlayment/Hardie-Board sided building, gable roof, w/a roll-up full-width door on one end peak-gable vents on either end, two small windows for cross-flow ventilation, and a passageway impact door on one long wall. I ran a new 100 amp service and had installed a branch panel with multiple 240V and 120V outlets on the walls. The concrete pad is the floor, there is no wood floor to the structure, though it's pre-built.

I suggest you go bigger rather than small on the electric service. I also have Costco LED double head motion-detector floodlamps outside and Costco 4 ft double-array LED shop lights inside, running below the ridge beam and lighting on the underside of the above head-high shelf over the workbench.

I bet you've seen some of the other 'small-space' structures or garage spaces on-here, plenty of good references.


Awesome! Sounds like a great workspace.

I do plan to run the most power I can to the building, around 75-100 amp, based on my main panel. I will have interior and exterior lights and plugs, since this is a big part of my backyard now. Since humidity is a BIG factor here on the coast, I'll also have a AC in place to keep things comfortable.

I may even add a front deck for additional work and hang out space later on down the line - I have room for about a 10x10 area.
 

captain14

Well-known member
Joined
Dec 19, 2012
Messages
7,025
Location
Near College Park Maryland 20740
I’ll stop in and view your progress. As I read the initial post and you mentioned the 10’x20’ size, I was thinking about have an outside space to set up on to increase your space. Can you add a cover over that later on after the structure is up?

Plan for more electric than you might need when you dig your trench. It doesn’t cost
Too much more to add it while the trench is open but to repeat it again in a few years.
 

RogueFab

Well-known member
Joined
Jun 27, 2013
Messages
430
Location
Oregon
This is a cool (tiny) build! Reminds me of a "she shed" but without the nice ring... a "he shed". haha
 

hardtop5000

Well-known member
Joined
Apr 26, 2021
Messages
98
Location
Ngunnawal country
Hey Jason – I watched your video. The shed among the trees is going to look good.

What are the dimensions of the kayak cart and is it staying in the garage?


Justin
 
OP
G

goofiefoot

Well-known member
Joined
Jun 24, 2016
Messages
196
Location
Rockport, TX
I’ll stop in and view your progress. As I read the initial post and you mentioned the 10’x20’ size, I was thinking about have an outside space to set up on to increase your space. Can you add a cover over that later on after the structure is up?

Plan for more electric than you might need when you dig your trench. It doesn’t cost
Too much more to add it while the trench is open but to repeat it again in a few years.

I have room for about a 10x10' deck off the front, and I'm seriously considering it. If I do, I may do some sort of pergola for extra shade (though the trees work just fine).

I'll be consulting an electrician on my power - I'm hoping I can maximize the service from my existing box.

This is a cool (tiny) build! Reminds me of a "she shed" but without the nice ring... a "he shed". haha

Man-box? (no, that doesn't sound any better). :D

Hey Jason – I watched your video. The shed among the trees is going to look good.

What are the dimensions of the kayak cart and is it staying in the garage?

Thanks! The kayak cart itself is 108"x33"x32". That will definitely stay in the garage. It's the same height as my truck's tailgate, so I can easily lock the wheels and slide the big Hobie right on and off.
 
OP
G

goofiefoot

Well-known member
Joined
Jun 24, 2016
Messages
196
Location
Rockport, TX
My dad came down over the weekend to help with framing. I was extremely thankful to have him there, as we knocked a lot out! We've built things together over the years - deer blinds, decks, boat upgrades - but nothing to this level. It went fairly smooth (I did slip with the razor saw, cutting bird's mouths, and will have a nice little scar from that one), and I have an ideal point to continue working on my own as time allows.

framing1.jpg

framing2.jpg

framing3.jpg

framing4.jpg

My next video showing all this work will go live later today, so I will post that link so you can see the work in real time (sorta).
 
OP
G

goofiefoot

Well-known member
Joined
Jun 24, 2016
Messages
196
Location
Rockport, TX
I didn't get near as much "big" stuff done this week, but the workshop is coming along. I built the end gables, and reinforced them across the rafters with 2x4 straps.

roofsheath1.jpg


roofsheath2.jpg


roofsheath3.jpg


Putting the OSB roof sheathing on by myself was a challenge, but by the time I finished, I had developed a workable strategy. About halfway through, I found myself stuck on a ladder, holding the 4x8 sheet in place, with nothing to secure it. I tried calling my wife (who was in the house) but her phone was off. I got it figured out, but I definitely learned some lessons on preparation with that one.

roofsheath4.jpg


Finally, I was seeing some pretty extreme frame racking, so I broke down and bought some OSB (for $45/sheet :mad: ) and reinforced the corners. It's back to level, and rock-solid now!

roofsheath5.jpg


It's really starting to look like something now, and I have a better feel for the final space. I think it will do nicely for my purposes.

roofsheath6.jpg


I'll post the next video link below.
 
OP
G

goofiefoot

Well-known member
Joined
Jun 24, 2016
Messages
196
Location
Rockport, TX
This episode is a little longer - lots to cover with building the eave frames and reinforcing them, sheathing the roof, and adding the OSB corners.

Check out Episode 3:
 

captain14

Well-known member
Joined
Dec 19, 2012
Messages
7,025
Location
Near College Park Maryland 20740
Thanks for the update on the shop project.

All projects require blood to make them worthwhile.

Did it require a hospital trip for stitches?


The reason while I mentioned using the front area as part of the shop was years ago in a woodworking magazine (Workbench?) someone had a similar sized shop with an outside area accessible via French doors and tools could be used outside on nice days while reducing the residual sawdust.

Any plans for a transom window above the garage door at the front?

I’ll watch the videos I a few minutes.

Do yourself a favor and get the Little Giant work platform for $40. Your feet will thank you after standing on the rungs all day. I used one last summer on my step ladder while stripping paint and painting on my front window shutters. It will fit on your Gorilla Ladder your using. It fits both my step ladder and the multi position ladder like yours.
 
Last edited:
OP
G

goofiefoot

Well-known member
Joined
Jun 24, 2016
Messages
196
Location
Rockport, TX
Thanks for the update on the shop project.

All projects require blood to make them worthwhile.

Did it require a hospital trip for stitches?


The reason while I mentioned using the front area as part of the shop was years ago in a woodworking magazine (Workbench?) someone had a similar sized shop with an outside area accessible via French doors and tools could be used outside on nice days while reducing the residual sawdust.

Any plans for a transom window above the garage door at the front?

I’ll watch the videos I a few minutes.


I didn't go get stitches, but it was a pretty decent cut that needed attention. I have some nerve damage on that hand, so I don't really feel those types of things. Doesn't stop it from bleeding though. :D

I do plan to put in french doors, and will mostly likely build the 10x10 deck out front for expanding my work area. I didn't frame up for transom windows, and don't plan on adding them.

Thanks for watching the videos! I love making them, though they take quite a bit of extra work. The more views I get, the more worthwhile. I'd appreciate subscriptions to the channel, too, if you're up for it.
 
OP
G

goofiefoot

Well-known member
Joined
Jun 24, 2016
Messages
196
Location
Rockport, TX
This week I worked on getting the shop as closed in as I could. We've been getting a ton of rain down here, and I'm concerned about the constant moisture on all this raw wood.

I started out finalizing the fascia boards so I can start planning the roof installation.

fascia1.jpg

fascia2.jpg

Working by myself, I rely a lot on clamps and leverage (plus tons of up-and-down on ladders). To get things sealed up as much as possible before the next big storm, I focused on finalizing the sheathing on the walls. I'm using 1/2" styrofoam insulation panels to act as sheathing and vapor barrier, and taping it up with sheathing tape. I will attach Tyvex to the OSB corners to shore this all up, too.

fascia3.jpg

fascia4.jpg

I got this all done and taped the night before the last big storm came in. We got well over 5" of rain, and it kept out a decent amount of water. My next big focus is the roof, and hopefully I can get most of it done this weekend between rain storms. It's starting to look like a buiding!

fascia5.jpg

The next video will go live later today, and I will post that up here once it's ready. I appreciate y'all following along!
 
OP
G

goofiefoot

Well-known member
Joined
Jun 24, 2016
Messages
196
Location
Rockport, TX
How do you tackle large projects by yourself? My tip this week - use clamps, lots of clamps. The new episode is live!


As always, I'm open to feedback, suggestions, advice, and musings!
 

captain14

Well-known member
Joined
Dec 19, 2012
Messages
7,025
Location
Near College Park Maryland 20740
Just watched your YouTube video this afternoon. Good progress going on but if your getting a lot of rain I would consider getting enough tarps to protect the OSB plywood from the rain. It doesn’t take much to damage that type of plywood I think.

Is the product you used from Lowe’s firm enough to act as siding for the time being prior to installing something else?

I’ll be glad to see you get it under roof. Plenty of YouTube videos out there showing different styles of roof shingling. I did my 10x8 shed 27 years ago by reading books and reading the instructions on the package. I only called a friend to help me cut the ridge vent and install the ridge cap. Remember this was way before the Internet and YouTube.

I added this to my last post and you might consider this work platform when your working on your ladders. I painted shutters last fall using this on my step ladder and my feet felt better than just standing on the rungs

The Little Giant does fit on the Gorilla ladder assortment. I have several Gorilla ladders. I found mine on CL last fall. Just pulled this off the net for an example.


Good luck and keep posting.


Sent from my iPhone using Garage Journal
 
OP
G

goofiefoot

Well-known member
Joined
Jun 24, 2016
Messages
196
Location
Rockport, TX
Just watched your YouTube video this afternoon. Good progress going on but if your getting a lot of rain I would consider getting enough tarps to protect the OSB plywood from the rain. It doesn’t take much to damage that type of plywood I think.

Is the product you used from Lowe’s firm enough to act as siding for the time being prior to installing something else?

I’ll be glad to see you get it under roof. Plenty of YouTube videos out there showing different styles of roof shingling. I did my 10x8 shed 27 years ago by reading books and reading the instructions on the package. I only called a friend to help me cut the ridge vent and install the ridge cap. Remember this was way before the Internet and YouTube.

I added this to my last post and you might consider this work platform when your working on your ladders. I painted shutters last fall using this on my step ladder and my feet felt better than just standing on the rungs

The Little Giant does fit on the Gorilla ladder assortment. I have several Gorilla ladders. I found mine on CL last fall. Just pulled this off the net for an example.

Thanks!

I got the roof covered this weekend - one side complete with shingles, the other with tar paper for now (my hope is to have the full roof done by this coming weekend.

The insulation panels are fairly rigid, now that they're nailed to the 16" studs. I wouldn't trust them in hurricane-strength wind, but they'll serve for now.

The work platform for the ladder is awesome. I missed that part of your earlier post - I wish I paid better attention. That would have saved a ton of wear and tear on my feet!

I appreciate you following along and offering the insight. It's super-helpful!
 
Last edited:
OP
G

goofiefoot

Well-known member
Joined
Jun 24, 2016
Messages
196
Location
Rockport, TX
I got a lot done on the roof this week, just not all of it. I'm learning a ton as I go - namely, my own work process and making each step as efficient (and safe) as possible.

Putting down the tar paper by myself was cumbersome. It has a mind of its own, and I'll admit, I said one or two not-nice words through this process.

roofing1.jpg

On the other hand, the drip edge was even easier than I expected. I actually enjoyed this part.

roofing2.jpg

I tried different approaches to installing the shingles. The best way was to move up vertically (diagonally, with the offset courses) with 6-7 sheets at a time to minimize going up and down the ladder. Finding a magnetic wrist band in my garage for holding the nails was a game-changer, too.

roofing3.jpg

I got one half of the roof complete with shingles, so I'll be working on the other half and the ridge shingles to finalize everything out. I'll be happy to have this part done. I'm really not a fan of ladders.

roofing4.jpg

I'll post the link to this week's video shortly. Stay tuned!
 

m6z

Well-known member
Joined
Sep 13, 2019
Messages
2,325
Location
Missouri
Nice work.

I hope to build something very similar in the next year or two.

Did you pour a footer for the slab?
 
To avoid these ads, REGISTER NOW!
OP
G

goofiefoot

Well-known member
Joined
Jun 24, 2016
Messages
196
Location
Rockport, TX
Have you ever tackled a shingle roof by yourself?

Follow along as I learn by doing on this week's episode of the tiny workshop build!
 
Last edited:
OP
G

goofiefoot

Well-known member
Joined
Jun 24, 2016
Messages
196
Location
Rockport, TX
Nice work.

I hope to build something very similar in the next year or two.

Did you pour a footer for the slab?

Yes, I did contract out the concrete and he poured a 12-inch footer all the way around. Feel free to reach out with any questions - I've learned a TON! :LOL:
 

captain14

Well-known member
Joined
Dec 19, 2012
Messages
7,025
Location
Near College Park Maryland 20740
Jason

I just watched today’s video. Bet you are glad to have one side completed.

I have a couple of questions. Did you use a stake at the base of the ladder to keep it sliding further away at that steep Angle?
It’s not fun belly surfing the ladder down.
Last summer when I had to reattach my ridge vent and repair some shingle nail pops, I made this arrangement to keep the ladder from sliding. See photos.


Are you installing a ridge vent? Your shingles should last longer I believe.

When I installed shingles on my shed I used a 2x12x8 as a walking plank so I didn’t have to move the ladder as much. I believe I had about a 4 foot walking plank between the two ladders. Granted I laid the shingles left to right instead of a vertical/diagonal run like you did.

You said you used certain words at times during the build process. I call those action words that can either be a noun or a verb.
 

Attachments

  • 0F1F24E8-2DF0-4B6D-856E-2817E3189EA4.jpeg
    0F1F24E8-2DF0-4B6D-856E-2817E3189EA4.jpeg
    5.5 MB · Views: 108
  • 3816E3B9-4640-4B2D-85DA-2F1B0DBBE456.jpeg
    3816E3B9-4640-4B2D-85DA-2F1B0DBBE456.jpeg
    7 MB · Views: 94
  • 15A04985-0FA8-46F9-B9EA-44BF9B7865A9.jpeg
    15A04985-0FA8-46F9-B9EA-44BF9B7865A9.jpeg
    5.6 MB · Views: 78
  • EB5B396B-02B3-444D-A37D-AAF8B3383012.jpeg
    EB5B396B-02B3-444D-A37D-AAF8B3383012.jpeg
    2.7 MB · Views: 86
OP
G

goofiefoot

Well-known member
Joined
Jun 24, 2016
Messages
196
Location
Rockport, TX
Did you use a stake at the base of the ladder to keep it sliding further away at that steep Angle?
It’s not fun belly surfing the ladder down.
Last summer when I had to reattach my ridge vent and repair some shingle nail pops, I made this arrangement to keep the ladder from sliding. See photos.


Are you installing a ridge vent? Your shingles should last longer I believe.

When I installed shingles on my shed I used a 2x12x8 as a walking plank so I didn’t have to move the ladder as much. I believe I had about a 4 foot walking plank between the two ladders. Granted I laid the shingles left to right instead of a vertical/diagonal run like you did.

You said you used certain words at times during the build process. I call those action words that can either be a noun or a verb.

I have staked the ladder in certain situations. I found if I can match the ladder angle with the angle of the roof it's much less likely to slide, especially with our soft sand ground. Believe me, it's always on my mind.

No ridge vent on this one. I considered it, but since I'm vaulting the interior ceiling in line with the rafters, I wanted more room for insulation - a ridge vent would require air space baffles for movement. I can always add one later (though I don't want to) if need be.

"Action words" - I like it!
 
OP
G

goofiefoot

Well-known member
Joined
Jun 24, 2016
Messages
196
Location
Rockport, TX
I got the roof done!!! Feels good to know that's complete, and I can take a break from the extension ladder for a while. We've had a couple of good storms since, and it seems to be doing its job keeping the rain out!

roofwindows1.jpg

Once that was done, I wrapped the OSB corners in house wrap to get the walls sealed up before the siding goes on. My kiddo was interested in helping me, and she got to operate the air stapler (under heavy supervision), and had a blast with that.

roofwindows2.jpg

I got the windows installed, flashed, and trimmed up. That all went fairly smooth, and they look good.

roofwindows3.jpg

roofwindows4.jpg

I'm getting a better idea of the space now that I have these openings complete. Next steps are to install the door, put up the siding, and get the soffits up. Then it should be completely dried in and ready to start on the electric and interior!

roofwindows5.jpg

The next video is live, and I'll post the link below! Check it out, and as always, feel free to send me your questions, thoughts, and advice. It's all greatly appreciated!
 
OP
G

goofiefoot

Well-known member
Joined
Jun 24, 2016
Messages
196
Location
Rockport, TX
Below is the link to the new video, where I complete the roof, wrap the corners, and install the windows.

Check out all the progress:

Thanks for everyone who is following along here, as well as the YouTube channel. Much appreciated!
 
Last edited:

captain14

Well-known member
Joined
Dec 19, 2012
Messages
7,025
Location
Near College Park Maryland 20740
Jason

Thanks for the weekly YouTube video. Glad to see your helper had her safety glasses on. Safety First, Everyone Goes Home.

Site security made rounds during the house wrap session.

Couple of questions-you moved so fast doing the ridge cap, did each piece get 4 nails?

The side walls don’t get house wrap installed like on the corners? I have only seen it installed all the way around and cut diagonally in the windows and secured to the window frames.

Another use for the multi tool I see.

Does it feel like a shop inside yet?
 
OP
G

goofiefoot

Well-known member
Joined
Jun 24, 2016
Messages
196
Location
Rockport, TX
The side walls don’t get house wrap installed like on the corners? I have only seen it installed all the way around and cut diagonally in the windows and secured to the window frames.

Another use for the multi tool I see.

Does it feel like a shop inside yet?

I used the foam insulation panels to act as both sheathing and vapor barrier - this was a cost decision since OSB is so darn expensive right now. This is why I overlapped and taped the house wrap onto the foam, to act as much of a vapor barrier as possible. A builder friend pointed out that I should have made a better sill plate for the windows to avoid water collection and rotting. He gave me some tips to seal it up as it stands to hopefully avoid this using some heavy duty sealant. That, along with the self-adhesive flashing, I should be ok.

I definitely have a better feel for the interior space now that the windows are in, and I'm really looking forward to laying out all my stuff inside. Once I get my siding on, I'll start laying out the electrical - I think it will really start feeling like a shop then.

Thanks again for following along!
 
OP
G

goofiefoot

Well-known member
Joined
Jun 24, 2016
Messages
196
Location
Rockport, TX
The door is installed! I can close the shop up and lock it! I had other priorities this week, so the door is the only progress, though, I won't say it was easy. I took my time, used clamps, and got it all square and plumb. Can't ask for more than that!

I picked up the french door off the rack at Lowes. It's a steel door, and HEAVY. My next door neighbor came along to help pick it up from the store, and I was thankful he was there to help get it in and out of the truck.

door1.jpg

Maneuvering it around in the shop to get it into place wasn't too bad, and I was able to finalize the install by myself. Using the clamps to get it into its final resting place was the ticket.

door2.jpg

door3.jpg

I was able to get the flashing around it, trim it up, and then, as I was finalizing this weeks video, my lever handle showed up, so I installed that as well. I'm still waiting for the deadbolt to show up, but I can lock it as it stands.

door4.jpg

door5.jpg

All in all, I'm pleased with how it turned out. I'm ready to start on the siding now - a process I've been dreading since the 4x8 Hardie panels are so darn heavy.

door6.jpg

The next video is live and I will post that below. Thanks for following along!
 

captain14

Well-known member
Joined
Dec 19, 2012
Messages
7,025
Location
Near College Park Maryland 20740
Jason

I watched the video earlier. What’s the plan for the French doors and prying eyes? I know the light will be great in the shop with those doors.
What was the silver tape product you installed
Prior to the door going in? I’ve see it applied before but can’t think of the name. Something to do with water penetration.

The only tip I can give you for the siding is to do the back first and then the long side you can’t see from your house! By the third side you’re be a subject matter expert. If you saw an interesting install on YouTube post a link too. I can’t really say I’ve seen or looked for any installation videos.

During nice weather and the doors open will give you a much better and bigger work area.

I didn’t see you prime the backside of the door trim. Was that just stock pine? I always prime all 6 sides of any wood I install that will be exposed to the outside elements. The AZTEC type of material seems to be the choice in my area.
 
OP
G

goofiefoot

Well-known member
Joined
Jun 24, 2016
Messages
196
Location
Rockport, TX
I watched the video earlier. What’s the plan for the French doors and prying eyes? I know the light will be great in the shop with those doors.
What was the silver tape product you installed
Prior to the door going in? I’ve see it applied before but can’t think of the name. Something to do with water penetration.

The only tip I can give you for the siding is to do the back first and then the long side you can’t see from your house! By the third side you’re be a subject matter expert. If you saw an interesting install on YouTube post a link too. I can’t really say I’ve seen or looked for any installation videos.

During nice weather and the doors open will give you a much better and bigger work area.

I didn’t see you prime the backside of the door trim. Was that just stock pine? I always prime all 6 sides of any wood I install that will be exposed to the outside elements. The AZTEC type of material seems to be the choice in my area.

I wasn't super thrilled about the full-lite french doors for just that reason, however, this was what was in stock. I didn't want to wait months to get another option. My backyard is fenced, I work from home, and most of my neighbors are retired (and watchful), so I'm not any more concerned about prying eyes than I am the rest of my house. If I feel it's an issue, I can always either apply an adhesive window film, or purchase replacement glass with the built-in blinds.

The silver material is self-adhesive flashing - same material I'm applying around the windows and outward facing wall of the door. I cleaned the floor well around the door opening and laid it down, then applied the silicone over the top to completely seal the sill plate.

Great tip on starting from the back! The 2 videos I am referencing are THIS ONE and THIS ONE. I'll have to build a block up from the ground to ensure each panel is level and at the right height,

I initially planned a roll-up door similar to a storage unit, but found this french door as a much less expensive option, and I know it's completely sealed. Plus, it won't take as much to get in and out, keeping my AC from overworking.

The door and window trim is Hardie (concrete board) trim, so there is no need to prime the back. I will prime the exposed edges before I start painting just to ensure everything looks nice.

I do appreciate you following and along and offering the feedback! This is a fun project, and I'm glad I have someone watching my back! :D
 

964haus

Well-known member
Joined
Nov 1, 2010
Messages
498
Location
Vancouver, BC
Great build! Reminds me of the shed I built a few years ago with the assistance of my dad as well. Really love the construction of these smaller spaced, and looks like a job well done. Satisfaction points are high with this build I suspect!

Cheers,
M.
 
OP
G

goofiefoot

Well-known member
Joined
Jun 24, 2016
Messages
196
Location
Rockport, TX
I'm a little late in updating. I've been working on the siding, and I'll admit - this is NOT my favorite part of the build. The panels are heavy, the dust when cutting sticks to everything, and installing by myself, I'm not able to get the accuracy I was hoping for. That said, it's coming along, and I just have the upper gable ends left to install before I start working on the soffits.

I ended up using boards stacked at the base to "hold" the panels in place while I attached them. I used window shims to level them, and deliberately left a gap between panels, which I'll seal with caulk, to replicate the expansion seams on our house that has actual stucco.

siding1.jpg

I've been using the Kreg Rip-Cut for long cuts for a while, and it does pretty good on these panels, especially with the Diablo Hardie blade I bought for my circular saw. Unfortunately, the plastic lock mechanism on the Rip-Cut came apart. Fortunately enough, it gave me an excuse to buy a new track saw! ;)

siding2.jpg

siding3.jpg

Did I mention this stuff is dusty?! I was using a N95 face mask, but probably would have been safer with a respirator on.

siding4.jpg

At the end of it all, I'm pretty pleased with the results. It's not perfect, but I can hide imperfections with caulk, paint, and trim.

siding5.jpg

Next step is to finish out the upper gable ends, then get the materials to do the soffits. I'm looking forward to the exterior being sealed off. The next video will go live later today, and I will post that when it does!
 
OP
G

goofiefoot

Well-known member
Joined
Jun 24, 2016
Messages
196
Location
Rockport, TX
The Hardie siding episode is live. Watch how I work with these large, heavy panels, make some mistakes, yet keep the build moving:


captain14

Well-known member
Joined
Dec 19, 2012
Messages
7,025
Location
Near College Park Maryland 20740
Jason

I just watched another edition of the shop build. My back hurt just thinking about 75 pound panels, let alone lifting, carrying and holding them in place.

You mentioned you were getting frustrated at the end of each day. Maybe limit yourself to 3 panels a day? I know when I do painting projects around the house- trim, shutters, porch columns,etc- I try to limit myself to 4-5 hours max so I don’t get tired to rush through things and make a mistake.
I’m not familiar with the panels you used. Do you have to prime and paint everything? What about water splashing on the sidewalls from the ground- will that cause damage.

You know the rules, each project requires one new tool purchase. Overall I think the job is going well.

When it started raining, you only had to
Place the tools inside the shop instead of having to carry them around to the garage so they can stay dry.

When you get to work on the seams, please show us how you are going to do it. If it’s caulk, will that be a regular maintenance issue?
 
To avoid these ads, REGISTER NOW!
Top Bottom