To avoid these ads, REGISTER NOW!

20x23 2-Car

calereeves

Well-known member
Joined
Dec 31, 2012
Messages
87
Location
Eagle River, Alaska
20x23 2-Car organization/facelift in Alaska

Edit: I've finally gotten some more work completed, so here's a "before" and "current" shot.

attachment.php

cc2f9d1386bc29bc719b27572bdca40f.jpg


__________________________________________________________
I've been lurking around for a little while looking at some ideas, so I'll go ahead and post up my progress. I finally got around to cleaning some of the dust and dirt out a couple of days ago after I finally finished up the transmission rebuild on my 65 Rambler wagon. Now I'm finally started on the garage.

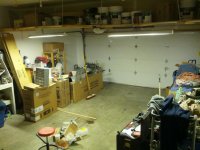
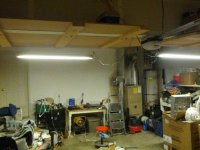
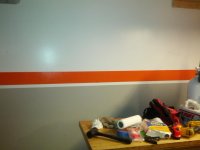
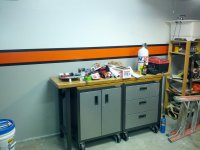
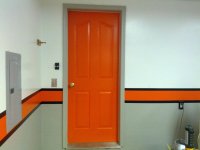
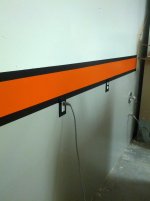
We just bought the house in July and now that we've finished all of the moving in, I've finally been able to push the wife to get rid of all the **** that we're not using in the house. All of the stuff on the right side of the first pic is the "****." The stuff on the left is all of the 'garage stuff' that I'll be finding new places for once I'm finished with the garage organization. I'm going with a Harley orange stripe between a dark grey lower and a white upper/ceiling. Eventually I'll get around to doing a dark grey epoxy floor, but that won't happen until I've built a shed to move everything into while I'm doing the floor.

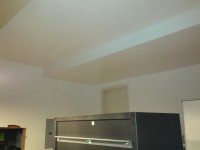
When we moved in the walls were unfinished...I managed to get them mostly painted in a gloss white before we moved everything in. Tomorrow I'll be painting the ceiling, and if Home Depot is open, I'll finish up the walls. For the finished product, I'm planning some built-in cabinets and some far-upgraded lighting. The goal is to have everything finished by the end of winter (Here in Alaska, that means sometime around March or April...yet to be determined...) just in time to get my Harley out of storage in the lower 48 for riding season.

I'm hoping by posting this I'll keep myself accountable and actually keep working on the garage until it's finished!
 

Attachments

  • IMG_20121224_140305.jpg
    IMG_20121224_140305.jpg
    140.4 KB · Views: 569
Last edited:
To avoid these ads, REGISTER NOW!
OP
C

calereeves

Well-known member
Joined
Dec 31, 2012
Messages
87
Location
Eagle River, Alaska
Sadly I've got the furnace and hot water heater eating up a chunk of floor space. I'm planning to build a shed adjacent to the garage in the spring with a connected pass through door right next to the hot water heater. I'm debating whether I want to enclose the two with a removable wall and redo the combustion air ventilation... I think it would make the garage look a lot nicer, but I'm not sure if it's worth the hassle right now. Anybody else enclose their mechanical systems in the garage to hide them? The enclosure could possibly make a good logical place for the back side of a bar if I did it right......
 

Attachments

  • IMG_20121224_140320.jpg
    IMG_20121224_140320.jpg
    148.4 KB · Views: 2,983

HSpencer

ALLIANCE MEMBER
Joined
Nov 28, 2010
Messages
2,854
Location
South Central US
With proper venting and meeting codes and safety, I would look at a closet of sorts for the furnace and water heater. That would make a big difference in the garage usage. I might build something that easily removes for access to servicing the items. You will want to think this out, so you don't violate code and safety or restrict access for servicing.
You then have a blank slate to begin.
 
OP
C

calereeves

Well-known member
Joined
Dec 31, 2012
Messages
87
Location
Eagle River, Alaska
I was envisioning something with slotted top and bottom sill plates so if maintenance on the systems was necessary, simply loosening the nuts on the anchor bolts would allow you to slide the wall out of place. I need to read up some more on the code requirements for the fresh air inclusion.
 
OP
C

calereeves

Well-known member
Joined
Dec 31, 2012
Messages
87
Location
Eagle River, Alaska
Thanks! I got the front part of the ceiling painted today, and put another coat of white on the top half of the walls. The clutter is killing me in the garage right now, with everything pulled away from the walls getting ready for the grey and orange, its a nightmare!

My driveway was iced over this morning and because of the slope I couldn't get out to get to Home Depot today. Hopefully we'll get some snow tonight so I can make it out of the driveway tomorrow and pick up the grey and orange paint on the way home from work. I'd like to finish up the paint work by thursday so next weekend can be spent getting all of the gladiator stuff laid out and hung on the walls.

Hopefully more progress tomorrow!
-Cale
 

Attachments

  • IMG_20130101_134629-1.jpg
    IMG_20130101_134629-1.jpg
    157.3 KB · Views: 304
  • IMG_20130101_173726.jpg
    IMG_20130101_173726.jpg
    175.5 KB · Views: 261
  • IMG_20130101_173746.jpg
    IMG_20130101_173746.jpg
    142 KB · Views: 329
OP
C

calereeves

Well-known member
Joined
Dec 31, 2012
Messages
87
Location
Eagle River, Alaska
Got a test wall almost finished. I found the closest thing I could to "Harley Orange" at Home Depot. It's a Behr color, I'm drawing a blank on the name, but I'll post it later when I find the paint chip again. There will be a 1.5" wide black stripe above and below the orange, but I wanted to let the grey and orange cure overnight before I mask off for the black.

I also picked up two 4-light 48" fluorescent fixtures to replace the crappy single-bulb fixtures that were already in there. I'll install the new fixtures tomorrow and get rid of the hanging fixtures the previous owner hung below the shelf. I'll likely repurpose the hanging lights for a work bench light and who knows what else.
 

Attachments

  • IMG_20130102_221546.jpg
    IMG_20130102_221546.jpg
    149.6 KB · Views: 205
  • IMG_20130102_225139.jpg
    IMG_20130102_225139.jpg
    150 KB · Views: 189
Last edited:
OP
C

calereeves

Well-known member
Joined
Dec 31, 2012
Messages
87
Location
Eagle River, Alaska
Got my first wall finished. I'm really happy with the color scheme I went with, but the paint bled under the edges of the tape a little in the texture. I used the "edge lock" scotch blue tape and made sure to make several passes over the edge before I painted, but it still didn't prevent bleed-through.

I also got my 4-bulb fluorescent fixtures installed...WOW. I'd planned to only install them on the front side of the support beam running across the garage, but I'm definitely going to install them on both sides now, after seeing the HUGE difference with these put up.

I've gotten the other two walls cleared out now, and plan to paint them tomorrow. It was worth putting up the lights today rather than finishing the paint.
 

Attachments

  • IMG_20130103_223012.jpg
    IMG_20130103_223012.jpg
    137.5 KB · Views: 230
  • IMG_20130103_223034.jpg
    IMG_20130103_223034.jpg
    141.8 KB · Views: 188

JimVonBaden

Well-known member
Joined
Dec 2, 2011
Messages
15,716
Location
Northern Virginia
Looks really nice!

I did mine in halves. Moved the stuff from one side to the other while painting and doing the floor. It was a LOT of work! But, in the end it was worth it. See my build (20X20 Slow Build).

By the way HD orange?

Jim :cool:
 

55cadillacking

Well-known member
Joined
Apr 26, 2012
Messages
1,959
Location
Calgary
I used the "edge lock" scotch blue tape and made sure to make several passes over the edge before I painted, but it still didn't prevent bleed-through.

I hate that. I have found Frog Tape to be the best, but it still isn't perfect. Your colour scheme looks great, regardless.
 
OP
C

calereeves

Well-known member
Joined
Dec 31, 2012
Messages
87
Location
Eagle River, Alaska
Thanks, Rick, tomorrow morning when I mask for the rest of the black stripes I'll get some of the green stuff.

Jim, that is as close as I could get to HD orange by using the Behr color chips. I was hesitant to use a t-shirt for the color matching and I don't have anything metal small enough to take with me for color matching. I'm really happy with the way the Orange came out. My wife even likes it and suggested I paint the man door that color with grey trim. I'm going to build a horseshoe shelf similar to what you had in your old garage above the overhead door.
 
OP
C

calereeves

Well-known member
Joined
Dec 31, 2012
Messages
87
Location
Eagle River, Alaska
Just a little bit of progress tonight, got the grey on the two remaining walls. I'm still debating whether I want to continue the color scheme across the inside of the overhead garage door, or just leave it the color it is. Thoughts? Hopefully first thing in the morning I can drag my **** out of bed and get the orange on before an appointment I have at lunch time so that I can finish up the black after I get back. Ideally I'll finish up all of the paint tomorrow, but somehow life seems to get in the way sometimes.......


By the way, the hole in the wall you can see on the left wall is a hole I cut to access the 60ish square foot dead space area under the stairway landing. The landing creates a split-level landing in the main entry, with a 4' high dead space, approximately 8' x 7' with a wierd angled kick out for the stairs. I've got a door sitting out of the picture that I need to cross cut and install to finish out that little free 'bonus storage' area.
 

Attachments

  • IMG_20130105_001824.jpg
    IMG_20130105_001824.jpg
    141.5 KB · Views: 217

tjc1965

Member
Joined
Jan 15, 2011
Messages
18
I was envisioning something with slotted top and bottom sill plates so if maintenance on the systems was necessary, simply loosening the nuts on the anchor bolts would allow you to slide the wall out of place. I need to read up some more on the code requirements for the fresh air inclusion.

That would work, but you wouldn't have quick enough access in an emergency -"hey, is that smoke coming from there?". Looks like about a 3 ft wall on the LH side, maybe 7 feet on the front? A pair or doors on the front hinged on the sides and latched in the middle will hide stuff, but give you quick access to service /inspect. Hollow core doors with louvers added are pretty cheap, or even 3/4" plywood would work.
 
OP
C

calereeves

Well-known member
Joined
Dec 31, 2012
Messages
87
Location
Eagle River, Alaska
It's just a little shy of 4' x 6'. I hadn't really considered emergency access, but for simple maintenance I was planning on adding a door in front of the furnace to change filters, light pilot lights, etc. I think I'm going to go with corrugated metal roofing panels for the wall covering on this thing, with a 2x4 stud frame behind it. I'll probably do exactly what you suggest and put two doors on the front that completely open the front side. One can be opened easily in emergency/maintenance situations, and if the unit ever needs to be replaced, both can be opened for easy access.
 
OP
C

calereeves

Well-known member
Joined
Dec 31, 2012
Messages
87
Location
Eagle River, Alaska
Got the rest of the paint done today, and decided on a similar scheme for the man door as well. Ran out of black paint to finish up the man door, so I'll have to tackle that and the additional lighting after another trip to Home Depot in the morning.
 

Attachments

  • IMG_20130105_185351.jpg
    IMG_20130105_185351.jpg
    131 KB · Views: 181

JimVonBaden

Well-known member
Joined
Dec 2, 2011
Messages
15,716
Location
Northern Virginia
Thanks, Rick, tomorrow morning when I mask for the rest of the black stripes I'll get some of the green stuff.

Jim, that is as close as I could get to HD orange by using the Behr color chips. I was hesitant to use a t-shirt for the color matching and I don't have anything metal small enough to take with me for color matching. I'm really happy with the way the Orange came out. My wife even likes it and suggested I paint the man door that color with grey trim. I'm going to build a horseshoe shelf similar to what you had in your old garage above the overhead door.

Looks good, and I think your wife is likely right about the door.

Jim :cool:
 

DesertRat64

Member
Joined
Jul 5, 2011
Messages
19
Location
The great Southwestern Desert
the paint bled under the edges of the tape a little in the texture. I used the "edge lock" scotch blue tape and made sure to make several passes over the edge before I painted, but it still didn't prevent bleed-through.

Like Jim said, the Frog Tape works as good as any that I have used. Your paint scheme looks nice and will really improve the looks! That bonus storage area under the stairwell will be perfect for the stuff that you don't need to get to very often. Keep the pictures coming - it's looking great! :beer:
 

Kevin54

MEMBER EMERITUS
Joined
Jan 12, 2005
Messages
29,341
Location
Urbana, Ohio
attachment.php


Is that a shadow on the wall behind the overhead heater or are you having some sort of combustion problems? If that is soot and not a shadow, you had better get that checked out PDQ.

As far as closing the furnace and heater in, code may dictate that you are not allowed to. My furnace sets in a closet, but I have fresh air intake on it. My water heater sets in another closet, but I have louvered doors on it.

You may want to check into doing the same thing. Build your framework, and put everything behind louvered doors. In looking at the pic, I'm assuming the water heater is electric and the other two heaters are gas? Do you have separate flues for both, or did you tie the overhead flue into the furnace flue?
 
OP
C

calereeves

Well-known member
Joined
Dec 31, 2012
Messages
87
Location
Eagle River, Alaska
Is that a shadow on the wall behind the overhead heater or are you having some sort of combustion problems? If that is soot and not a shadow, you had better get that checked out PDQ.


It's just a shadow, the unit was serviced a few months ago and is functioning properly. Good catch, though!

Do you have separate flues for both, or did you tie the overhead flue into the furnace flue?

They're all three gas, and they share a common exhaust flue. There's a fresh air intrusion hole in the wall on the other end of the garage. When I enclose the three systems, I'll be moving the air intrusion duct into the enclosure.
 

Attachments

  • sharead exhaust.jpg
    sharead exhaust.jpg
    140.9 KB · Views: 94
  • fresh air.jpg
    fresh air.jpg
    154.9 KB · Views: 75
OP
C

calereeves

Well-known member
Joined
Dec 31, 2012
Messages
87
Location
Eagle River, Alaska
I hate that. I have found Frog Tape to be the best, but it still isn't perfect. Your colour scheme looks great, regardless.

Here's a side-by-side comparison of the the Frog Tape verus the Scotch brand "Edge Lock" tape. The frog tape has a comparison picture on the front of the container that shows something similar...I took that as simply marketing, but it was much more correct than I could have imagined!
 

Attachments

  • edge lock.jpg
    edge lock.jpg
    142.6 KB · Views: 251
  • frog tape.jpg
    frog tape.jpg
    170.1 KB · Views: 253
To avoid these ads, REGISTER NOW!
OP
C

calereeves

Well-known member
Joined
Dec 31, 2012
Messages
87
Location
Eagle River, Alaska
Looks good, and I think your wife is likely right about the door.


Thanks, Jim. Finished the door this evening, and I'm very happy with the overall look. I also added some black outlet covers to the two receptacles that touch the black stripe, and for the light switch by the door I got a diamond plate aluminum cover.


My trip to Home Depot tonight yielded an additional 4-bulb fluorescent fixture that, along with another matching unit currently installed in my daughter's room (replacing that with a ceiling fan tomorrow) will bring my total in the garage to 16 installed bulbs, plus 4 more that are in hanging two hanging fixtures. Hopefully I'll get the fan installed in my daughter's room and get the two fluorescent fixtures put up in the garage tomorrow so I can finally start putting things in their proper places!
 

Attachments

  • IMG_20130106_202149.jpg
    IMG_20130106_202149.jpg
    164.9 KB · Views: 102
  • IMG_20130106_195637.jpg
    IMG_20130106_195637.jpg
    164.2 KB · Views: 94
Last edited:
OP
C

calereeves

Well-known member
Joined
Dec 31, 2012
Messages
87
Location
Eagle River, Alaska
My latest quandry is what to do about the god-awful stairs going into the house. The existing OSB stairs have crappy drywall on the sides with no sort of finishwork or edging, and no color or coating on the OSB. Very ugly. I'm at a loss on what to do about them...they're actually built in and the garage floor is placed around them (crawl space construction below the garage slab) so there's no way to really rip these out and start over. I've considered casing them in about 2" of concrete then epoxy coating them to match the floor when I get around to it. The other option as I see it is to put some leftover laminate flooring on the treads and figure out some sort of cover for the edge of the drywall. That'd be the simplest option, but I don't know if I'll be able to come up with anything I'll ever be satisfied with.
 

Attachments

  • IMG_20130106_195707.jpg
    IMG_20130106_195707.jpg
    147.8 KB · Views: 82

JimVonBaden

Well-known member
Joined
Dec 2, 2011
Messages
15,716
Location
Northern Virginia
My latest quandry is what to do about the god-awful stairs going into the house. The existing OSB stairs have crappy drywall on the sides with no sort of finishwork or edging, and no color or coating on the OSB. Very ugly. I'm at a loss on what to do about them...they're actually built in and the garage floor is placed around them (crawl space construction below the garage slab) so there's no way to really rip these out and start over. I've considered casing them in about 2" of concrete then epoxy coating them to match the floor when I get around to it. The other option as I see it is to put some leftover laminate flooring on the treads and figure out some sort of cover for the edge of the drywall. That'd be the simplest option, but I don't know if I'll be able to come up with anything I'll ever be satisfied with.

I would either tile them, or use stair treads and risers on them. They would look really good with like a white marble or black granit you could get as leftovers from a countertop place. Not too expensive either.

Looking really good. I like the door and wall socket plates.

Jim :cool:
 

FlyBy

Well-known member
Joined
Feb 26, 2008
Messages
407
Location
NE Ohio
Usually with painters tape used like that I lay the tape, and then give the edges a single coat of the main wall color. This way, if it bleeds, then it just matches the rest of the wall. Then once that dries, lay the new color on top.
 
OP
C

calereeves

Well-known member
Joined
Dec 31, 2012
Messages
87
Location
Eagle River, Alaska
Usually with painters tape used like that I lay the tape, and then give the edges a single coat of the main wall color. This way, if it bleeds, then it just matches the rest of the wall. Then once that dries, lay the new color on top.

I would have never thought of that. I'll definitely have to try that when we redo our kitchen. Thanks!
 
OP
C

calereeves

Well-known member
Joined
Dec 31, 2012
Messages
87
Location
Eagle River, Alaska
I would either tile them, or use stair treads and risers on them. They would look really good with like a white marble or black granit you could get as leftovers from a countertop place. Not too expensive either.

I looked at some peel and stick vinyl tile yesterday, called black iron, but they didn't have it in stock. A slate grey or black is what I'm after, but apparently those are special order items. The counter top leftovers is a great idea though... I've seen stacks of sink cutouts on CL several times, wouldn't have thought to use that. Thanks!
 
OP
C

calereeves

Well-known member
Joined
Dec 31, 2012
Messages
87
Location
Eagle River, Alaska
Haven't done much over the last couple of days, except find out that one of the coil springs on my garage door opener broke. I have somebody coming out tomorrow to replace both, and I'm seriously considering upgrading to a jackshaft opener after the springs are replaced. It was going to cost me about $100 locally for the springs, or $250 installed from a local shop....having never done it and reading posts on here about trouble adjusting springs, I figure it's worth it to be able to call somebody back out if it breaks or jumps the drum soon.


I'm going to ask the guy what he'd charge to come back out and install a liftmaster 3800 in a couple of weeks.
 

Kevin54

MEMBER EMERITUS
Joined
Jan 12, 2005
Messages
29,341
Location
Urbana, Ohio
I agree with Jim Bon Baden, Marble or tild would looks good. BUT, if you do a tile, get something that has a tecture, OR put cement board down, hit it with a sander a little to smooth it up, maybe some bondo on the edges and then Epoxy Paint. OR....how about coverong them with something like Trex Deck boards, OR, put some Laminate on the tread and risers, then cover the sides with something like a beadboard,

As far as the torsion springs, you can do it yourself as long as you have two good arms, and a couple of pieces of Rebar or steel bar that fits in the hole of the hub. You need two pieces of rod. Insert, turn, hold while you insert the other bar, lather, rinse, repeat. :lol: I know when I put my dads new door on his garage, you had to have seven full wraps. Oh yea, mark your hub also so you can count the revolutions. I could also do around five by hand rolling it around, but the last two full revolutions take a little bit of effort. And make sure you have a wrench in your pocket to tighten the square headed bolt.
 
OP
C

calereeves

Well-known member
Joined
Dec 31, 2012
Messages
87
Location
Eagle River, Alaska
The guy ended up coming out to install the new springs while I was at work. I'd say it was money well spent--$250 for a fresh set of springs, a new roller on one side, and a new bracket where the draw bar connects to the door. And I didn't have to lift a finger, or worry about setting the torsion correctly!

Now that that's out of the way, in the morning I'll be getting an early start to paint the rest of the ceiling, install two more 4-bulb T8 fixtures, and hopefully begin building my overhead cabinets on one side of the garage. I'll either start cabinet work or my enclosure for the mechanical systems... we'll see how froggy I'm feeling once the paint/lighting is done.


As for the steps, lots of great ideas have been presented, thanks for those! I think I'm going to settle on some of the remaining laminate flooring I've got from the PO's refloor job. I've got boxes of the stuff leftover, so I think a nicer set of steps that match the hallway you step up into will be a good tie in.
 
OP
C

calereeves

Well-known member
Joined
Dec 31, 2012
Messages
87
Location
Eagle River, Alaska
Oh yeah, before I get to work on the garage, I gotta run to Sears and pick up my most recent purchase--4 twin-packs of Gladiator gearwall panels that were on clearance for $24.99 each :) $100 for an 8x8 section is phenomenal for the gearwall! I bought up the last four packs they had in stock, and if I see more come along, you better believe I'll pick it up. I'll have every wall of the garage covered in it at that price...
 
OP
C

calereeves

Well-known member
Joined
Dec 31, 2012
Messages
87
Location
Eagle River, Alaska
I like that a lot. All of the hall closets and two of the bedrooms use those same louvered bi-fold doors, so it would tie in nicely with the rest of the house.... Definitely an option I hadn't thought of. Thanks!
 
OP
C

calereeves

Well-known member
Joined
Dec 31, 2012
Messages
87
Location
Eagle River, Alaska
Ever heard that song "one step forward and two steps back?" I got two coats of white on the ceiling and another coat of white on the walls where there were some holidays.

Then... I got ready to install the lights, had the wiring ready to run, drilled a small hole in the ceiling and cut it slightly larger to feed the wire down the channel between the joists...only to find that at the glulam beam running across the garage the direction of the joists changes perpendicular. So I had to cut access holes in the ceiling to fit the drill into the space to drill through 3 joists to be able to run the wire so its on the same switched circuit as the other two.
 

Attachments

  • IMG_20130112_151553.jpg
    IMG_20130112_151553.jpg
    142.2 KB · Views: 85
  • IMG_20130112_162830.jpg
    IMG_20130112_162830.jpg
    155.8 KB · Views: 99

ShumanSS6.0

Well-known member
Joined
Nov 11, 2012
Messages
55
Location
Minnesota
Just when you think you are on a roll, there is always a curveball thrown. I don't have a Harley but that paint job is bad a$$! If I were you I would double and triple check code requirements for the mechanical, insurance companies aren't so simpathateic if something bad were to happen. Not worth a clean look if it increases your chances of KABOOM. Can't wait to see the Gladiator! Keep up the good work!
 
OP
C

calereeves

Well-known member
Joined
Dec 31, 2012
Messages
87
Location
Eagle River, Alaska
No joke! I haven't finished yet, at a hockey game with the family tonight, that pic is how I left it, but I got the hard part finished. I'll tidy up and patch the holes tomorrow after I hang the lights.
 

bknudtsen

Well-known member
Joined
Mar 30, 2009
Messages
103
Location
Issaquah, WA
Thanks. Sweet TBSS! I asked around at work, seems that as long as I have fresh air intrusion INSIDE the enclosure I'm good.

There is also a minimum stand off clearance for the front of the furnance. It should be printed on the inside of the front panel.
 
OP
C

calereeves

Well-known member
Joined
Dec 31, 2012
Messages
87
Location
Eagle River, Alaska
The steel bollard set into the concrete ( the " wife post") is the edge of the required standoff, and the enclosure will sit just outboard of that. Good catch though!
 

Corvette Joe

Well-known member
Joined
Nov 2, 2012
Messages
63
Location
reno
Move to reno from Eagle River in July. Hows the weather. Sunny and cool here. I just built a shop .
 
To avoid these ads, REGISTER NOW!
Top Bottom