
You are using an out of date browser. It may not display this or other websites correctly.
You should upgrade or use an alternative browser.
You should upgrade or use an alternative browser.
25' x 25' blank canvas
- Thread starter Scott V
- Start date


Here are a few of the challenges I ran into with this latest group of panels;
First thing was I began to notice on the first set of panels that the connector screw heads weren't lying flat in all places. It's noticeable since they are reflective. I've done my best to use the bubble level on my drill but it's not good enough and hard to do when up higher on the ladder. So why not get another tool? I picked up this drill guide at Sears for $30 and it works great getting the mounting holes nice and square to the panel face.

First thing was I began to notice on the first set of panels that the connector screw heads weren't lying flat in all places. It's noticeable since they are reflective. I've done my best to use the bubble level on my drill but it's not good enough and hard to do when up higher on the ladder. So why not get another tool?
I picked up this drill guide at Sears for $30 and it works great getting the mounting holes nice and square to the panel face.


Thanks for your reply Scott V. I think I'm gonna do the conduit runs in my build, My son is an electrician so he knows how to bend the stuff, to me keeping the rodents out of the wiring is a plus plus. Keep posting, great thread. Definitely an awesome build.
Chris
Chris
dr_obson
Well-known member
First off I'm loving that you are not doing drywall, I'm so over it. Second I would say Black for the beam it would match the panel gaps.
Last edited:
all torque
Active member
Scott, I really like what you're doing and can't wait to see the finished product.
Terranova
Well-known member
I wanted to use a drill guide on my cabinets but the one have is my fathers and doesn't have a shaft to chuck up to, just a threaded chuck, and none of my drills have threaded mounts for their chucks. And it's a weird thread too.
The plywood looks great. And the finish washers are a tasty touch. Well done.
The plywood looks great. And the finish washers are a tasty touch. Well done.
Thanks guys. 
Some more photos to post; the next challenge will be how to treat the windows. The windows themselves are nice thermopane with a dark aluminum casing but the original rough framing wasn't set in the wall level.


This shows how far off they are from being level vertically....


Originally I was going to design a window frame like this and have the same 1/2" offset follow around it-

...but after some experimenting I found it won't really work the way the windows are set in the rough framing. So here is the next easiest concept; I plan to frame the window in nice 3/4" birch with the laminated edge showing, and have it stand off from the window frame 1/2" giving it a float. I'll have to shim the birch casing to get it level but it shouldn't be too tricky. Hoping for this look:
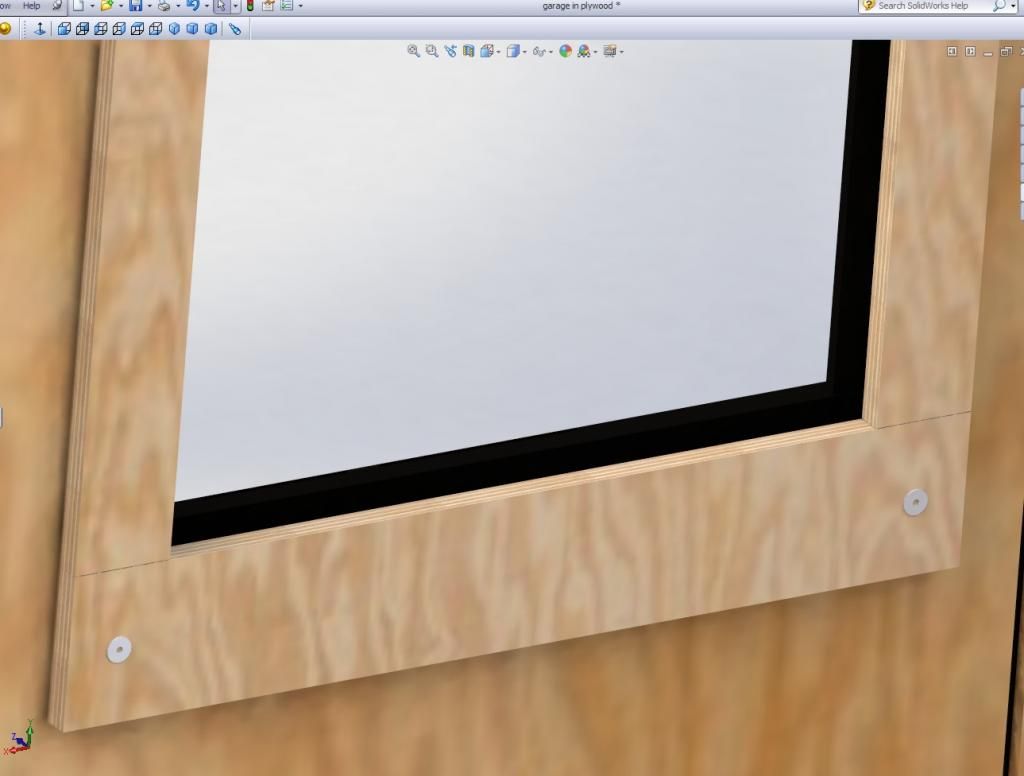
I tossed up some 1x4 finished scrap just to see and I think it will look good...


Some more photos to post; the next challenge will be how to treat the windows. The windows themselves are nice thermopane with a dark aluminum casing but the original rough framing wasn't set in the wall level.
This shows how far off they are from being level vertically....
Originally I was going to design a window frame like this and have the same 1/2" offset follow around it-
...but after some experimenting I found it won't really work the way the windows are set in the rough framing. So here is the next easiest concept; I plan to frame the window in nice 3/4" birch with the laminated edge showing, and have it stand off from the window frame 1/2" giving it a float. I'll have to shim the birch casing to get it level but it shouldn't be too tricky. Hoping for this look:
I tossed up some 1x4 finished scrap just to see and I think it will look good...
Last edited:
Well it's been a few weeks since my last update so thought I'd toss a few photos up on the latest and greatest. Last I left off I was building/moving a shed. The village wasn't happy with my encroachment so I disassembled what was complete and moved it to an approved spot in the backyard. Wasn't too bad except for the floor. Managed to get it to a hand cart and muscled it to the yard fairly easily. We're relocating the cedars in the SPring that we just planted.


The paint master hard at work...


The village wanted hurricane clips for the rafters...

Rafter stitch plates are fun but a baby sledge is mandatory...

Since we're going to have the shed out in the open I figured the wife could use some sunshine inside. Found an $18.00 vinyl window at Menards that will get trimmed in;

Debated whether to install a metal roof or shingles. Went to YouTube to learn how to do shingles.

Went with the textured OSB primered trim to save time since the weather was due to turn that day. It was already snowing in this pic.

The paint master hard at work...
The village wanted hurricane clips for the rafters...
Rafter stitch plates are fun but a baby sledge is mandatory...
Since we're going to have the shed out in the open I figured the wife could use some sunshine inside. Found an $18.00 vinyl window at Menards that will get trimmed in;
Debated whether to install a metal roof or shingles. Went to YouTube to learn how to do shingles.
Went with the textured OSB primered trim to save time since the weather was due to turn that day. It was already snowing in this pic.
Got half the roof shingled and woke up to this the next day (last weekend)...

Managed to get it almost complete out in the the snow. Always fun being on a ladder with snow. Have to get the cap shingles on this weekend, finish the trim and frame the window in. All-in-all it came out really nice considering I did it all from scratch. I took photos of the framing of one in the Home Depot parking lot to cheat a little... I didn't have the door on even 10 minutes and the wife started piling stuff in it.

Managed to get it almost complete out in the the snow. Always fun being on a ladder with snow. Have to get the cap shingles on this weekend, finish the trim and frame the window in. All-in-all it came out really nice considering I did it all from scratch. I took photos of the framing of one in the Home Depot parking lot to cheat a little...
I didn't have the door on even 10 minutes and the wife started piling stuff in it.

Looks great, nice work!!!
A few questions for ya. I know the clean, modern look you are going for and was wondering why you didn't move some of the electrical around before putting up the plywood. Couldn't all of the conduit been hidden?
And did you think about using deeper mud rings to make the outlets flush with the plywood and then buying wood outlet covers and staining to match?
A few updates for the garage; Got the heater in and loving it out there now. Have shared a few photos in the AC/Heat sub forum already. Big Maxx 50k BTU unit. Garage was already plumbed and vented from a previous heater so just had to get the mount to work with the existing flu pipe. Used a $20.00 kayak hoist from Menard's to hang it. Went so smoothly.

Made a mock up of the heater to get the mount perfect for the existing flu pipe. The PO had a longer type heater in there before so the gas line and electrical didn't line up but the flu pipe came out nearly perfect.


Have to change the gas feed input and drip pipe configuration but other than that it's been working great. Keep it @ 45-48° when I'm not out there. It doesn't run too long to warm it up and maintain 55-60 considering only the ceiling and one wall is insulated so far. It's been in the teens at night here and it's so awesome to go work out there with heat.

Have the thermo temporarily installed on the wall until I can pull the plywood panel off to drill it.


Made a mock up of the heater to get the mount perfect for the existing flu pipe. The PO had a longer type heater in there before so the gas line and electrical didn't line up but the flu pipe came out nearly perfect.
Have to change the gas feed input and drip pipe configuration but other than that it's been working great. Keep it @ 45-48° when I'm not out there. It doesn't run too long to warm it up and maintain 55-60 considering only the ceiling and one wall is insulated so far. It's been in the teens at night here and it's so awesome to go work out there with heat.
Have the thermo temporarily installed on the wall until I can pull the plywood panel off to drill it.
Last edited:
Hey thanks. Ya I've been learning as I go. I've made a few mistakes here and there and looking back I've had hindsight on some issues. I want to build a cabinet unit on the wall that is finished so some of that will probably get covered up. I regretted cutting the slot for the conduit going to the heater after I found I could have run it higher up and out of sight.Looks great, nice work!!!
A few questions for ya. I know the clean, modern look you are going for and was wondering why you didn't move some of the electrical around before putting up the plywood. Couldn't all of the conduit been hidden?
And did you think about using deeper mud rings to make the outlets flush with the plywood and then buying wood outlet covers and staining to match?
And yes I'm still playing with ideas for the outlets. I know I can get some pretty thick mud rings but still aren't sure how to dress all the outlets or if I like the edge treatment I did on these panels. I try to do as much as I can with the time I have out there so sometimes I rush to complete a goal and don't always think it all through prior.
And as for the conduit showing near the ceiling; I'm hoping the ceiling treatment I do will cover a lot of it. In order to have it in relatively the same place I need to bump it around the top wall plates so it almost has to come through some of the panels. On this outlet I added I couldn't go through the beam supports so I bent the conduit to follow like the other. I suppose I could have bored through the top wall plates and gone through the attic. Hindsight is 20/20. :-/

Picked up a nice air tool rack for a little more organization.

North wall is almost complete. Now that the shed is done I can pile a whole section of stuff out there.

With the bitter cold weather already hitting Chicago I had to scramble to cover some of the holes in the ceiling to keep heat in. Had some sample material for windshield sun screen from work lying around so stapled it around the previous attic access for now. The dummy contractor put 9" in pieces in place of the 7" joists so now they stick up above the floor in the attic. Those will be fun to cut down...

Found some cool LED corn bulbs on Amazon that put out 6,000 lumens so had to try one out in the Ikea aluminum lamps. Puts out some nice white light. Might go with these when I add more of those lights.


Thought I'd toss my laser cut Blackhawks head on a wall to keep it from getting banged up. Go Hawks! (I'm sure that'll stir some Canadian hockey fans, lol)

North wall is almost complete. Now that the shed is done I can pile a whole section of stuff out there.
With the bitter cold weather already hitting Chicago I had to scramble to cover some of the holes in the ceiling to keep heat in. Had some sample material for windshield sun screen from work lying around so stapled it around the previous attic access for now. The dummy contractor put 9" in pieces in place of the 7" joists so now they stick up above the floor in the attic. Those will be fun to cut down...
Found some cool LED corn bulbs on Amazon that put out 6,000 lumens so had to try one out in the Ikea aluminum lamps. Puts out some nice white light. Might go with these when I add more of those lights.
Thought I'd toss my laser cut Blackhawks head on a wall to keep it from getting banged up. Go Hawks!
(I'm sure that'll stir some Canadian hockey fans, lol)
dubber
Well-known member
Nice looking shed. Just in time it seems.
bonecrrusher
Well-known member
Fear the feathers!
Been busy chipping away at the walls the past couple of months. Time for some updates:
Got most of the North wall completed with the exception of the top corner which I will finish once I move the Camaro back to the South wall. I really like how the look is coming together. Had to scramble to get this side cleared and moved the cars around so the wife could get her Escape in during the brutal cold snap we experienced in November. My heater has been awesome.


Having a drain in the floor definitely has it's advantages. After the cars drop all the road slop I can squeegee it right down the drain.

Found out the hard way where I had air leaks. Big door faces West and we had some -30 wind chills blowing. Heater was working over time until I got some drafts closed up and put double weather seals on the side of the door.

Cleaned up the messy side and got started on the South wall after the holidays;


Still been combing Home Depot stores for the connector bolts but realized I'm taking a risk and spending way too much money doing it this way. Turns out these are fairly hard to find. Found a supplier in the UK and bulk ordered 100 shorter ones for a great price. Should see them show up soon.

Got most of the North wall completed with the exception of the top corner which I will finish once I move the Camaro back to the South wall. I really like how the look is coming together. Had to scramble to get this side cleared and moved the cars around so the wife could get her Escape in during the brutal cold snap we experienced in November. My heater has been awesome.
Having a drain in the floor definitely has it's advantages. After the cars drop all the road slop I can squeegee it right down the drain.
Found out the hard way where I had air leaks. Big door faces West and we had some -30 wind chills blowing. Heater was working over time until I got some drafts closed up and put double weather seals on the side of the door.
Cleaned up the messy side and got started on the South wall after the holidays;
Still been combing Home Depot stores for the connector bolts but realized I'm taking a risk and spending way too much money doing it this way. Turns out these are fairly hard to find. Found a supplier in the UK and bulk ordered 100 shorter ones for a great price. Should see them show up soon.
Last edited:
With the experience I gained on the first wall, I know what hiccups to look for now and getting the 2nd wall up is going much faster with less surprises. Getting the first panel perfectly level is KEY to the how the rest line up. Starting with a good floor gap gives me the wiggle room I need to get the tops aligned perfectly, which is key to the clean lines. The panels have to be perfectly square when the garage isn't...


dubber
Well-known member
Its funny i was actually thinking about your garage last night while shopping at Loblaws. Love that look.
Kevin54
MEMBER EMERITUS
What are your intentions for the ceiling?

vintagespeed1956
Well-known member
that soffit material would be a good fit in your garage, square edges matches your paneling and i-beam. looks good!
Yep I concur! And it should be fairly easy to install with the 9'6" ceiling height. I've looked at a lot of grooved metal options and none have had any appeal to me besides the soffit material. I found a company that does grooved metal panels in a dropped ceiling arrangement but they won't quote me so I'm guessing they only want to do commercial jobs.
The final finished look I'm leaning towards for all my cabinet work on the North wall will mimic something like those in this photo. I'm looking at some cool ideas utilizing Ikea Akurum basic cabinets and installing Baltic Birch finished like the walls with aluminum extruded handles and pulls. Not quite as fancy but similar in look and function.

I've sourced the extrusions in bulk and hope to pull off something like this on all the doors and drawer faces: (rough Photoshop...)

I've sourced the extrusions in bulk and hope to pull off something like this on all the doors and drawer faces: (rough Photoshop...)
Modern Jess
Well-known member
Loving the progress on your garage. I really like the panel-with-spacing look!
On a side note; spent some quality time in the garage with my 19 yr old nephew during his long Christmas break. He's got the hobby bug and I'm more than happy to feed it, so we like hitting different hobby stores on a Saturday adventure. We recently found a big one with tons of cool stuff. I stumbled across the 1/32 slot car area and had to drop some play money on some bad-*** looking Group C cars. That got me wanting to dig out my old 1967 Revell track. We took the old train board out of his basement (that I built 10 years ago) and set it up in the garage for the Revell layout. It had been decades since I set this track up, and with a little work it was up and running. The transformer was blown so we hooked it up to an 18v drill battery. We had some fun nights out there!


Terrovan
Well-known member
Great work! A quick question though, where did you source the extrusions from? Do you have any part numbers or code? Cheers!
dubber
Well-known member
That looks like a great time. Great action shots!
Great work! A quick question though, where did you source the extrusions from? Do you have any part numbers or code? Cheers!
I found a couple of sources. Here you go:
http://www.aluminumsys.com/products/aluminum-extruded-handles/
http://www.cabinetknobsandmore.com/126-27-904.html
sanatarium
Well-known member
Wow this looks really neat. I love your idea for the wall system. The biggest advantage I see is being able to access the inside of the wall later on if you want to reconfigure electrical etc. Cool!


dubber
Well-known member
dark grey for sure!
RangerSVT
Well-known member
Great build thread! I love the way the plywood looks! Thanks for taking the time to do progress pics!
Modern Jess
Well-known member
The final finished look I'm leaning towards for all my cabinet work on the North wall will mimic something like those in this photo. I'm looking at some cool ideas utilizing Ikea Akurum basic cabinets and installing Baltic Birch finished like the walls with aluminum extruded handles and pulls. Not quite as fancy but similar in look and function.
Just wanted to mention that if you're still planning on using AKURUM cabinets, you are most likely going to have to rejigger. Ikea just end-of-lifed the 25-year-old AKURUM line, and replaced it with the new SEKTION line. The two cabinet systems are not interchangeable, so this may (or may not) affect you.
I have AKURUM installed in my kitchen, plus more in my garage and workshop. I am pretty bummed about this change, as it will make it more difficult to change / replace items down the road.