RTM
Well-known member
Internet Archive had a Manual section. You can see if they have yours. If not scan and upload, and some future GJ person will love you.

Internet Archive had a Manual section. You can see if they have yours. If not scan and upload, and some future GJ person will love you.
Any news on this? Having the same issue although I’m pretty sure mine is my pressure switch bleeding down. Fortunately I have another waiting just need to grab some new line since the wiring and airline are on opposite sides of the original(thanks Ingersol Rand).


Well, this project did keep you out of the bars for a while. Plus it sounds like there was some mental stimulation going on.Meanwhile, this job was taking longer than expected and I didn't have any "air compressor" jobs that were getting held up, so I moved the heavy thing in and out a few times, returning the big convertible to its spot overnight. I had yet to drill the tank and noticed there were new oil drips on my cleaned-up floor under the air compressor.
Where were these coming from as it was THE COMPRESSOR HEAD that was leaking oil, right???
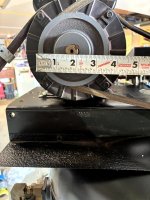
Look carefully at this photo.
See what is still above the compressor on the wire shelf? Yes! It's my battery powered chain saw. It was the chain saw leaking oil onto the compressor head all the time!!! There was never anything wrong with the compressor other than the leaking check valve which I don't have a replacement for since I ruined the new one.
Well, what to do now. I'll have to have a think on this one
I keep a couple sheets of pig mat under mine.Before I started working on it I wanted to check out my options and that’s why I started the thread. I got sidetracked by the good sale on the Harbor Freight replacement. It took a little time to check out the old one and I had a big duhhh moment when I realized the oil on the head of the compressor hadn’t originated there, but from the stuff stored above it. I realized the chain saw has been located over the compressor for two years or so and had not been leaking, but that isn’t unexpected with a chain saw to leak some bar oil after a while. My fix for that? I put a baking sheet underneath it. Problem solved!