To avoid these ads, REGISTER NOW!

3/4' Maxline IN WALL install - tips needed

bedn0009

Well-known member
Joined
Mar 1, 2014
Messages
309
Location
Hudson, Wisconsin U.S.A.
All,

I'm installing a 3/4" Rapidair Maxline kit into a new build (open walls) and I intend to run the air lines in the walls and floor joists as much as possible, with a total of 3 drops (see attached marked with "x"). I am planning to do some woodworking/light paint spraying.... possibly a impact wrench... was thinking a retractable reel near the garage doors.

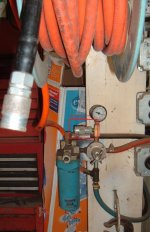
  • What considerations do I need to account for for moisture respective to the elevation of the lines I'm running? Should everything carry to a single low spot off the main run?
  • Does it make sense to go from 3/4" to 1/2" on my drops? Do I have to?
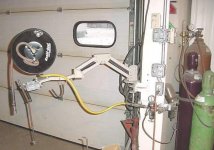
  • Are there any examples here of "through wall" installs?
  • If not, how would I plumb from teh wall cavity to the surface mounted outlet?
  • Should I do a loop, or in my situation, is a straight line sufficient?

Thanks

Floor.jpg
 
Last edited:
To avoid these ads, REGISTER NOW!

Jeff Ivers

Well-known member
Joined
Apr 9, 2010
Messages
2,555
Location
Oklahoma
I understand your desire to hide the lines for aesthetics. However isn't the Maxline kit designed for special o-ring compression fittings to attach to the line and tapered pipe thread to go into the outlets? If you put this fitting on the line in the wall, don't you then need to do a 90 degree fitting to come through the wall into a union and then another 90 degree fitting to screw into the outlet? Doesn't this add significantly to the cost and complexity? Every outlet needs to have a tee and moisture bleed off arrangement. If you go this way, please keep us posted on how you end up doing it and how much additional cost it added.
 

james.work.90

Active member
Joined
Nov 22, 2013
Messages
26
I don't have pics but I went in wall. I would suggest getting a few 3/4 or 1/2 pipe thread street 90s and close *******. (I forget what size goes into the back of the wall blocks). With a 2x4 wall you will not be able to make the bend into the back and the blocks are designed for you to come into the top when surface mounting. Hopefully that makes sense but go get some galvanized streets and ******* you're gonna need them. I piped down to the o ring max line to pipe thread fitting and then put the street 90 and a close ****** to thread the aluminum wall block onto. Just check all your connections really well and juice up the system and let it sit. I had one leak from the attic...luckily I could get to it topside without tearing open drywall. Other than that the stuff is awesome and I'm very glad I did it.
 

Jeeper

Well-known member
Joined
Dec 25, 2006
Messages
2,124
Location
Round Rock, TX
Hit the rapidair website. They have some photos there with various installations. Per what James said, you can do in wall using the parts he mentioned. Here is a pic of using a 90*

maxline8.png
 

speedoo51

Well-known member
Joined
Sep 5, 2010
Messages
49
Location
rocky hill, ct
I did Maxline in my shop this spring..Had some issues with pipe threads leaking and if you want to disassemble tube from fitting cause of mistake it will take two men and a boy as once tightened the tube conforms/compresses to the fitting barbs, yes there is an o ring to seal but barbs keep the tube from sliding off the fitting, not just the ferrel/nut...I would not do inside exterior walls or interior walls unless you can access the back side at any time..Finding a leak or adding a line/drop would be an issue..Think about process for assembling; I see nothing but a pain, i.e., how do you hold whats in the wall while trying to tighten block? Previous post pic?..But if you must then do so...Best to have some pitch to main line remembering that first drops even though not used may collect the moister..Unrolling the tubing and making round at fittings can be fun too!! I have a few extra fittings if any one needs, pm me..
 

sands35

Well-known member
Joined
May 29, 2012
Messages
936
Location
St. Joseph, MI
Pressure test it prior to buttoning up the walls. Treat the lines like electrical or plumbing lines where you need nail protection, etc.

(IMHO - a bad idea, but it's your garage)

What I'll do eventually is put a loop around the ceiling. That way I can add a drop anywhere I want later.
 
To avoid these ads, REGISTER NOW!

speedoo51

Well-known member
Joined
Sep 5, 2010
Messages
49
Location
rocky hill, ct
Pressure test it prior to buttoning up the walls. Treat the lines like electrical or plumbing lines where you need nail protection, etc.

(IMHO - a bad idea, but it's your garage)

What I'll do eventually is put a loop around the ceiling. That way I can add a drop anywhere I want later.

In the "loop" make sure you have room to move the loop just in case of the adding a drop, have to cut some tube out but have to spread the tube apart by about the same amount to get the fitting in..I have 12' ceiling and put the loop on the walls high enough to clear heat pipes, big doors etc...Plus I wouldn't fall that far..;)
 

FunkyfullWidth

Well-known member
Joined
Oct 3, 2011
Messages
1,238
Location
Three Rivers, ma
This post is perfect timing. My 3/4 kit just showed up 3 days ago. I'm using this as an excuse to do a major overhaul. I'm going to run the air, and since I moved in i've only had 4 outlets total in my garage all on the same wall tied together by conduit... I pulled down the bottom panels of osb and will build a dummy wall so to speak. I'm going to nail 2x4 strips horizontally down my wall then use the gaps to put the air lines and run my electrical for new lights and outlets under the mezzanine then put the osb back of course.. This way I don't have to drill 50 holes through all my studs. especially since my studs are 2x6, I wouldn't want to have a bunch of 1 1/4 holes every where to fit the 3/4 line. It measures about 1 inch od.

It'll be easy enough to pull a few panels off If I ever need to make changes and i'd really rather not see conduit or tubing that seems impossible to get perfectly straight unless you use a thousand clamps when the kit only comes with 20. No pictures yet. I'm doing electrical first to get an idea of how i'm running everything.
 

sberry

Banned
Joined
Jun 18, 2005
Messages
35,747
Location
Brethren, Michigan
I am not sure about all the fancy pipe but 3 is a good number and its not a problem to add a T after. In this kind of garage it simplifies so much to stay with one size, 1/2 is plenty.
On the front I have a dedicated reel for outdoor but at the side don't have a hydrant but the reel serves both in and out. Most of this wasn't finished at the time of this pic but has been or subject to be tailored.
 

Attachments

  • air hose reel.JPG
    air hose reel.JPG
    33.7 KB · Views: 90
Last edited:

sberry

Banned
Joined
Jun 18, 2005
Messages
35,747
Location
Brethren, Michigan
I know that you can see this to the contrary in some f my pics, some have been removed or basically discontinued but I do not use an air coupler at this point, I screw the hose whip to the wall outlet. It may go to a reel or a different manifold similar to the OP's thoughts or a fixed whip or fixed appliance.
The only user connection in my shop,,, or should say standard connection is at the tool. I never move hose, if I need air I have a reel or hose reaches it plumbed on. In the OP case one reel of 25 may be sufffecient along one side, a whip for the bench and another 50 ft to cover outdoor well as indoor.
I have seen some pitiful setups, some pitiful commercial ones the insurance co shoudl have a fit over with absolutely unneeded hoses on the floor all day long for cept the cheap azz owner in the front aint got a clue its.
When you in wall or under floor pipe you got to run what you brung. It gets harder to fix as needs change or the vision doesn't work out.
My own system is not bad, it works just fine but could use a reman just for simplification. I might think of this as a port on the wall could have the end plumbed any way you wanted. There is no real advantage of a loop here but you could regulate before entering the wall, its way easier in life to use a single regulator system in this type of garage. Keeps all the pressures the same, if there is some compelling reason a guy can always tap ahead of it
 
Last edited:

sberry

Banned
Joined
Jun 18, 2005
Messages
35,747
Location
Brethren, Michigan
These could or should be a hybred system, maybe 85 % hidden, would even be tempted to run a hose out of wall or hide in ceiling and drop the vert on the surface and to tell the truth here a home run of 1/2 for each piece wouldn't take much more pipe. Wouldn't need any enclosed splices
In the pic above might drill a hole thru the ceiling shove pipe down to C which I would make hardware store parts even a galvanized T with a drip on the bottom and could rotate parallel with the wall, put in a reducing bushing to hose or reel npt thread.
A little similar to this get up where fittings and taps are added after the regulator.
You can see if you look close I boxed the coupling that is abandoned, all the user is fed from 2 other whips or manilfolds and the hose reel in the pic.
 

Attachments

  • air reg combo hyd.jpg
    air reg combo hyd.jpg
    141.6 KB · Views: 46
Last edited:

ford33

Well-known member
Joined
Feb 26, 2011
Messages
2,118
Location
Chicago, IL. USA
You may want to consider adding shut-off valves near the top of each branch of the circuit. If you develop a bad leak in a drop you can shut-off the air to that drop and still allow the use of the other locations. With the valve you cannot isolate the components.
 

FunkyfullWidth

Well-known member
Joined
Oct 3, 2011
Messages
1,238
Location
Three Rivers, ma
Bringing this post back up to add pictures.

I padded out my wall to run my air lines and electrical and it worked out pretty good. Here's the outlet.


How the outlets look


I just need to order some 3 gang blank covers and cut a hole and i'll be happy. With my 13 foot tall ceilings I didn't want to have to run the tube and the drops that high up. I much prefer the hidden, cleaner method.

I just tied this short section into the compressor and turned it on. So far zero leakage with around 3/4 of a turn after snug on the fittings. Very happy with this set up.

Here's how I tied an outlet into the bench. I wanted to mount a 1/2 T to the underside of the bench so I ground some flats on the fitting and used a u-joint strap through a piece of angle iron, weded a tab and bolted it in place.


I still need the cover and a mount for the rigid pipe but it's going to work nicely.
 
To avoid these ads, REGISTER NOW!
Top Bottom