To avoid these ads, REGISTER NOW!

30 X 40 X 14 On the River

biodiesel

Member
Joined
Oct 9, 2013
Messages
13
Location
North West Ohio
Well after lurking on the site for a long time it is finally my turn to show what I have been up to. After spending much time looking at all of the quality builds on this site I have learned many things. And it is truly amazing the amount of ideas and little details you can pick up on by looking at other peoples builds. I have been putting of posting my build as it is not nearly as elaborate as many of shops that others have put together. But I have finally decided to share my build as a way to show thanks to the community and maybe help someone with their build.

Another reason this project has taken so much time is that I was also building my house at the same time as the building.
Along with working full time and going back to college to finish up my engineering degree. At times it seemed like a bit to much but it is finally wrapping up.

Ok about time to get to what people really care about in these threads.
THE PICTURES!!

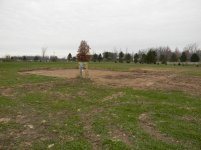
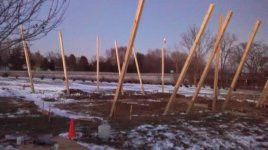
The start of this build was back in November of 2014.
Here is the site prepped and ready for the building to be delivered. You can see I have electric ran to where the front of the building will be. This is so that we could power our camper to live in while the house was being built.
 

Attachments

  • 2014-11-09 04.51.17.jpg
    2014-11-09 04.51.17.jpg
    147.7 KB · Views: 93
  • 2014-11-09 04.51.44.jpg
    2014-11-09 04.51.44.jpg
    145.3 KB · Views: 84
To avoid these ads, REGISTER NOW!

MacTexas

Well-known member
Joined
Mar 25, 2005
Messages
1,673
Location
Granbury Texas
In my travels this year I have seen a number of creeks and rivers out of their banks. I can see the river in the background of picture and it looks close. Any worries?
 
OP
B

biodiesel

Member
Joined
Oct 9, 2013
Messages
13
Location
North West Ohio
We had a bunch of rain here along with everyone else. Here is a shot down by the river. Still have quite a ways to the building about 80 feet away with another 9 feet of rise. So I don't think it will ever reach that high!! :bowdown:
The outlet at the bottom of the picture is the natural drainage from the sump hole in the house basement. It has a check valve in the line and we have a sump pump for backup.
n8forAdhtQpjEExtcqlQer5qPXhMCUlQh7hYm_m-MC0CZTuGFqnKcsmDk8I7P84Qam2gcbsCKdNe58P3JitMyhaxrbKOO80PDN-1DpKEYBtGEirEj4IXqAeyf2Y2q6wEtnYqwET9cLf31Z0P6llTnFBnF7jxACpLvBGgcU-hiNzB29CWwjl0lL1VneFxfCRGpAQo_l30Gl0o9Yb0bk9uIKgyG6dzBNq_3everAfffyPqa7IXhK-iIdUM0HS0jwn40Pmp4W1EXliTNKpbcUYY0EaWthAFtYmrPpkcttee1tSc0aU0YH8qz_vTqXicdRdHHUKxO6wW3QGWUyBlKo1lHn-DT0tt_xv64AISATh-LrradvZ9dmADk9NUjNK_DLkk08EATiEE9bD_OCMB3CX9y4tsTAPQhqhphyYtbT7tP4PcdGNoVxKKi0gtLN1P-Nkn9IupBOTJyT4jJ7LwX2-crfj6afp_Q2xadaYRbS4kcE0X5oFYlJZTDlMUFTaJM50NPCFRTCm1PqBM81DSA-wXhLyTprcYmiTksLoHW0C3tfM=w1034-h775-no
 
OP
B

biodiesel

Member
Joined
Oct 9, 2013
Messages
13
Location
North West Ohio
Here is the first day after the building was delivered. We started around 11am after we picked up the auger attachment from the rental place. Marked all the holes then dug them. Next we dropped concrete cookies in the bottom of the holes. Then we nailed 2 treated blocks on the side of each post and dropped the poles into each hole.
 

Attachments

  • IMG_20141121_174046242.jpg
    IMG_20141121_174046242.jpg
    122.2 KB · Views: 41
  • IMG_20141121_174026166.jpg
    IMG_20141121_174026166.jpg
    101 KB · Views: 34
To avoid these ads, REGISTER NOW!
OP
B

biodiesel

Member
Joined
Oct 9, 2013
Messages
13
Location
North West Ohio
Then it was time to square up the posts and run the wall framing.
IMG_20141122_162807532_zpsvzdszcs4.jpg


IMG_20141123_155144510_zps5oka4eks.jpg


IMG_20141123_155205424_zps7jsizwdt.jpg


IMG_20141201_10420345_463178143814361_3539888593875206271_n_zpsphbznpli.jpg


IMG_20141201_10407930_463178133814362_6481928040962769142_n_zpsinj98wcr.jpg


Then with some help from a friend and his bucket truck it was time to set the trusses.
IMG_20141207_101240476_zpsbd3a2j3c.jpg


IMG_20141207_101257964_HDR_zpsugnyjm5m.jpg


IMG_20141207_101621399_zpslxfvpjnt.jpg


IMG_20141207_135756299_zps4gbft6t2.jpg


IMG_20141207_135809255_zpsldpx9xzl.jpg


IMG_20141207_160847828_HDR_zps4gy2wv94.jpg


IMG_20141207_135809255_zpsldpx9xzl.jpg
 
OP
B

biodiesel

Member
Joined
Oct 9, 2013
Messages
13
Location
North West Ohio
Ok time for some updates. I have been busy the last couple of weeks with the unexpected warm weather. So I have not had time to get this thread updated to bring us up to present time. But it has given me some time to start putting a shed up to house my waste oil boiler. This boiler will heat the shop and the house.

Here are a couple current pictures of the shed. Then we will go back to the shop build from last year. The other shed was built by the previous owner. I am building the boiler house to match it. They are spaced 8 feet apart in order to put a fenced in area for my sons chickens. You can see him in the background checking on the girls.

IMG_20151205_111309698_zpsx5d1ps3w.jpg


The Shed sets on a 12 X 12 concrete pad that I had poured when the shop floor was done.

IMG_20151205_111254405_zpsgyviyqtc.jpg


You can see the oil totes that are full of vegetable oil and motor oil. I set these on the pad with a skid loader. The oil will feed my home made boiler.
IMG_20151205_111251045_zpscgvae6oz.jpg


IMG_20151205_160822045_zpsxtdjlzod.jpg


IMG_20151205_160834742_zps9meq26mx.jpg


IMG_20151206_150932176_zpsg5bt9ozv.jpg

Guess you can get a sneak peek at how the building sets as of now.
IMG_20151206_150944492_zpsgmq4xkgp.jpg
 
OP
B

biodiesel

Member
Joined
Oct 9, 2013
Messages
13
Location
North West Ohio
Here is a picture after we set the trusses and started putting the roof on.
At first it was a little slow getting the roof metal on as my fear of heights didnt help. Although after a while I got the hang of it and finished out the second side with just help from the wife.

IMG_20141221_145448711_zpsdqgwmkc7.jpg


Once the roof was done the rest of the metal was done by just myself and the wife. Since she was helping hang all the side metal she didn't get a chance to get many pictures of it going up.

The wagon platform was really handy with the tall side walls.

IMG_20150501_214306441_zpsnr8t3kia.jpg


IMG_20150502_161955951_zpswlv78vid.jpg


IMG_20150502_082837842_HDR_zpsouzd6ijv.jpg


IMG_20150503_144156495_zpslcwummj9.jpg


IMG_20150503_144218313_HDR_zpsluqhb3qm.jpg


Lots of late nights trying to get it weather tight.

IMG_20150525_241123370_zpsdlxxbchl.jpg


IMG_20150525_012552888_zpssyrd6uwz.jpg


Here you can see the drag behind the mower. My son spent much of the summer driving around the lot trying to get the ground smooth so we could get grass planted around the house. At least all the rain we had this spring and summer was good for growing grass

IMG_20150525_092845848_HDR_zpsukefv3ol.jpg
 
OP
B

biodiesel

Member
Joined
Oct 9, 2013
Messages
13
Location
North West Ohio
Once I had the building sealed up it was time to put insulation on the outside down to the frost line and then rough grade the ground to hold it in place.

This side of the building only required a small buildup of dirt.

IMG_20150726_193127380_HDR_zpsnynvkhhr.jpg


This end required about 3 feet of extra dirt. I got it somewhat close with my poor earth moving skills. I'm waiting on the neighbor to come down with a small dozer to knock down the two piles that are left over from the basement. He is going to smooth it out over this area.

IMG_20150726_193226987_HDR_zpsz65vdedd.jpg


IMG_20150726_193301289_zpsqe2qvs2b.jpg


IMG_20150726_193349487_zpshzewptcx.jpg


IMG_20150726_193419920_zpsp8a4dwzi.jpg
 
To avoid these ads, REGISTER NOW!
Top Bottom