To avoid these ads, REGISTER NOW!

Between 705 & 1200 SQ/FT 30x36 Backyard postframe Shop In North idaho

Workspaces between 705 and 1200 squarefeet.

BearyNelson

Active member
Joined
Feb 7, 2022
Messages
27
Hi all, I guess this is where build threads go?

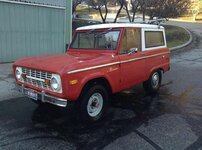
I tend to think any build thread truly starts with a wrench. Or a screwdriver, maybe a tire iron, or hammer. Whatever first car or hobby gave us the desire and NEED for space to continue busting knuckles and breathing sawdust. Mine was 1974 ford bronco with 33k original miles. I mowed lawns to buy it for $800. I drove it for awhile in in high-school and mostly WATCHED My dad wrench on it. Until a fateful day in December, a warm one for idaho. But a shady corner and black ice ended that old broncos life. It could have been my own, so I'll count a fractured face and broken femur as lucky. It wasn't my first round of physical therapy.


I've tossed in some before and after photos.
IMG_20200714_072918_698.jpg
IMG_20200714_072918_699.jpg
-This is a journal after all.-
IMG_20200714_072918_703.jpg
IMG_20200714_072918_704.jpg

I traded what was left of the bronco for a 2000 ford taurus and $500. Cool factor went way down but gas mileage went way up. AFTER we fixed the brakes. Some idiot had left the adjuster out of the driver drums so the passenger did all the work until the piston pushed itself out and dumped its brake fluid.


Beyond that taurus I went thru many many nice, junky, beat wonderful rigs. A 93 bronco was next. Then a 93 Tbird, then a 98 pontiac grand prix gtp (whoopee supercharger). Then a 92 chevy awd astro van. Then a volvo 240. Then a 91 awd shorty astro. All have many fun stories of acquisition, ownership and departure. From accidents to ls swaps.


I was going to school for biomedical engineering, got two years done life happened and I've been working as a cna since. Wife was graduating with a teaching degree right as covid was hitting. We had no plans to buy a house... but we adopted a dog and renting up here with animals is basically impossible. So, I went from staying in a vintage 60s camper to homeowner in about 2 months. (Wife was going to school In a different city). Old, decent house... in town, ick... but it is backed up to woods on a dead end street! Yay!

As everyone knows real estate went CRAZY and we were able to refinance at rock bottom rates and pull out cash for a shop build. So, had I not wrecked that bronco wanted to go into biomed, and taken a cna course in hs. And had I finished that biomed degree. I would have been pushed back many years and 150k in home value and another 30k in university debt and not gotten my house or, the point of this thread- My shop.

What a web this life weaves.

Alright, I promise the next post will have something to do with a shop build
 
Last edited:
To avoid these ads, REGISTER NOW!
OP
B

BearyNelson

Active member
Joined
Feb 7, 2022
Messages
27
Our lot is fairly sloaped below a dead end road in the "city" that backs up to 30 or so acres of trees. Directly behind us is a alley, kind of. Doesn't really look like much. And this, serves as our shop access. 30 wide by 36 deep pretty much takes up the backyard. If I went 40 deep and stayed within setbacks I'd touch the old TALL (3.5ft or more) concrete patio off the back of the house.
We had to fix the skids on an old 8x8 shed that would be moved up to my parents offgrid property to house chickens.

20220419_145930.jpg
20220419_145915.jpg

This maple had to go, loved it but the small yard left no option. My dad took care of it. He pruned a 100+ tree apple, peach, plumb, cherry orchard for decades. Much more comfortable at heights with a saw than myself.

VideoCapture_20230417-001217.jpg
20220605_143311.jpg
Shed moved fairly easy, a winch and some big pry bars!


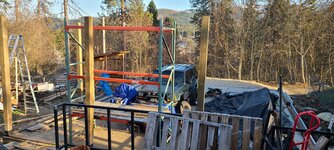
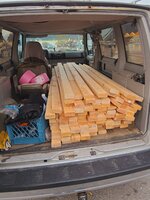
We bought our lumber pack about a year ago, picked it up with a borrowed truck and trailer and then unloaded and stacked it all by hand. My wife is a TROOPER

(This dodge has less than 60k on it, awesome rig.)

20220510_140901.jpg
20220510_185239.jpg


That pallet rack in the background would eventually be moved into the shop.


After this we would have a lot of dirt work.
 

Attachments

  • 20220605_143355.jpg
    20220605_143355.jpg
    1.8 MB · Views: 48
  • 20220605_143311.jpg
    20220605_143311.jpg
    1.6 MB · Views: 33
  • 20220605_140952.jpg
    20220605_140952.jpg
    1.2 MB · Views: 32
Last edited:
OP
B

BearyNelson

Active member
Joined
Feb 7, 2022
Messages
27
The dirt work. We're up the hill from a fairly large river, our ground is some dusty dirt. And river rock. That's it.
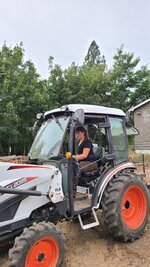
My father in law brought over his tractor and we rented the mini for the day to get everything closer to leveled out and to start digging the trenches/footings. He has built several shops, and his current house. His help, expertise, patience and guidance has been immeasurably impactful on this project. Could not have done it without him.
20220810_132259.jpg
20220810_132338.jpg
20220811_070330.jpg
20220811_124702.jpg20220811_134238.jpgVideoCapture_20230417-003135.jpg


We would need more rock, but the hailstorm that dumped right on the end was a nice way to start the compaction.

Concrete was expensive last year.. I'm sure it still is but damn. Was not prepared for that.
 

Attachments

  • 20220811_171218.jpg
    20220811_171218.jpg
    1.1 MB · Views: 25
  • 20220811_132018.jpg
    20220811_132018.jpg
    1.3 MB · Views: 40
  • 20220810_123215.jpg
    20220810_123215.jpg
    907.8 KB · Views: 43
OP
B

BearyNelson

Active member
Joined
Feb 7, 2022
Messages
27
We chose a monolithic slab, and we would use brackets off of the slab to mount posts to.

So we have big footers they're quite deep 24 inches or so for 18 inches around the edge.


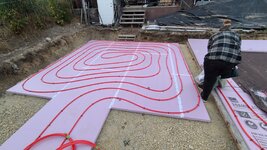
The tubing for heated floors was sort of a last minute idea... well, decision. Id had the idea forever but $$$
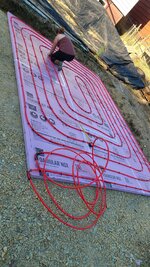
we were going to have the concrete company come in, tie all their rebar and then just tie our pex to that. I've experience with uninsulated heated slabs and... well they work fine, they take a lot longer to warm up is all. BUUUT this would be better, more efficient and easier to deal with. So we dropped the coin for the 2 inch foamular, pex and a stapler.

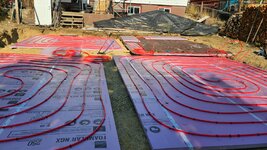
I couldn't afford the concrete crew an extra day so my solution was to lay out quadrants of foam board, lay out and staple the pex to them and then MOVE them off and out of the way so the concrete crew could come in and do the necessary final grade and compaction.
20221002_162715.jpg
20221009_123920.jpg

This was much less of a cluster f* than you might think.

20221010_211939.jpg
The quadrants were set out of the way, and then moved back with the help of the concrete crew once their final grade was done and vapor barrier was laid. I had to finish the runs and staple them which took just a little time.

Out of our 1000ft roll we had less than 8ft extra tube.

Then they did all the rebar and I went to bed (I work nights).

20221012_122940.jpg
20221012_133245.jpg
20221012_123921.jpg

Notice the 2 squares we left un insulated. These would be 2 inches deeper for mountingns 2 post lift.
 

Attachments

  • 20221009_180638.jpg
    20221009_180638.jpg
    690.3 KB · Views: 17
OP
B

BearyNelson

Active member
Joined
Feb 7, 2022
Messages
27
Pour day was October 17th, and I was a touch nervous since temperatures were dropping. Some of the stories on here both comforted me and gave me very high doses of the what-if drug.

All in all I think these guys did an awesome job.
I used a infrared thermometer to check the concrete temperature nightly for a week or so and it stayed above critical. Interestingly tho, the spots without insulation were MUCH warmer since they had ground heat. Insulated spots were a lot colder. When it finally started snowing for the year you could easily pick out my two lift squares because the snow wouldn't stick right away.

20221017_075154.jpg20221017_075402.jpg20221017_110900.jpg20221017_152503.jpg


The pump truck is awesome, and really wasn't too expensive. I stayed up pretty much all day that day listening for a pex puncture so I could fix it. SO everytime that inflatable donut that stops the flow in the pump arm released pressure I would lurch alert from my half asleep state in a camping chair.

Pex held pressure the whole way thru.
 
Last edited:
OP
B

BearyNelson

Active member
Joined
Feb 7, 2022
Messages
27
I discovered one of my trusses had a top cord with a SEVERE cup to it. Talking half an inch to an inch the entire length of the board. This caused a Crack the whole length of the board. That board had the VERY heart of the tree on one side and In my opinion should have never been the top chord of a truss... I was very irritated. But it was fine when they showed up, we stored it well and no other member of any truss had any issue.
20221019_130300.jpg

20221019_130356.jpg20221019_130405.jpg20221019_130409.jpg

The severity of the cup doesn't show up great on camera but it WAS (well get to that) bad enough that I didn't think I could confidently attach hangers to it. I didn't find this until months after delivery and had really no recourse there.
The plan last fall was to ditch this truss and order two more scissor trusses. I already had two for the back half of the building (over the lift) and figured I could just order two more, OR a single normal truss to replace this one.

This being the plan, I set this "bad" truss off to the side and covered the remaining 5 for the winter.

Now, the five that were covered all winter look great, and the problem one, while still cracked, IS NOT CUPPED. Somehow the tough love of snow cured it. Leaving me in a conundrum. Do I use it? The 11 joist hangers drilled to it should hold it together perfectly fine? Or do I go ahead and order a new one (or two). The building is still not up as of now, April 17th and I have some time to decide
 

Attachments

  • 20221029_110907.jpg
    20221029_110907.jpg
    416.1 KB · Views: 19
Last edited:
OP
B

BearyNelson

Active member
Joined
Feb 7, 2022
Messages
27
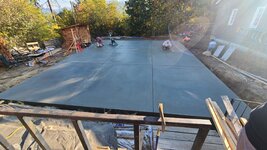
I got another two loads of fill/rock dumped at the edge of the pad so we could hopefully drive up onto it. This got delivered and I spent a morning moving it by hand into a sort of ... ramp/lump. I had little time and did this after work in the morning, still wearing my scrubs.

It froze hard that night and the damp dirt/rock became immovable until spring thaw.

20221108_121741.jpg
The jeeps, chevy tracker and my short astro all drive up fine. But the old long bed chevy drags hitch going up and down. More fill when the wallet allows.
 
Last edited:
OP
B

BearyNelson

Active member
Joined
Feb 7, 2022
Messages
27
We have already used the heck out of the pad. It's so much nicer than a sloped gravel driveway. I've done a transmission in late November (brr). We put new, regeared axles in the wife's xj and various oil changes.

I don't know why I think replacing a transmission in November in north idaho is any easier than just building the damn shop in November.... but I can do wrenches. I haven't played with hammers and nails as much!
 

Attachments

  • 20221120_115140.jpg
    20221120_115140.jpg
    809.7 KB · Views: 86
  • 20211206_154133.jpg
    20211206_154133.jpg
    731.7 KB · Views: 88
Last edited:
OP
B

BearyNelson

Active member
Joined
Feb 7, 2022
Messages
27
This brings us to present day, April 17th.
I've been collecting necessary tools for awhile. Slider miter saw, dewalt battery framing nailer, table saw, lasers, levels etc. An we "practiced" last summer by putting up a horse panel fence in the front yard to replace the short cyclone fence that was probably 50 years old.

20220903_153719.jpg

This prompted the need for many tools that have carried over to now. Namely the big harbor freight sds max rotary hammer. Much easier than a hammer drill....


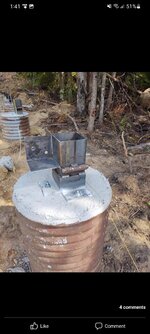
We've got all of our brackets installed.
They're 6 inch steel square tube 1/4 wall. Made by my father in law. Anchors are 5/8x6.5. I considered 3/4 OR 5/8x8 but both increases put me under the critical edge distance. Where I'm at with these 5/8x6.5 I'm technically right at the Ced. Went with screw type bolt anchor because wedge seemed like a very bad idea near the edge. The holes are all very overdrilled incase I ever have to remove and replace with an 8 inch, or epoxie type anchor. They feel ridiculously solid tho.


20230415_110713.jpg

The building wound up pretty damn square. This was challenging since there's still a torn apart jeep cherokee smack in the middle... we jacked it up about 2 feet off the ground to pull diagonals. I have one bracket 3/16 out on a gable end... NOT a corner, it doesn't matter-> Basically at all. But it bugs me.

20230415_163941.jpg

my father in laws house and shop are built on a similar system except his brackets have a HINGE, which allowed him to assemble big giant Tiber frame truss/wall beams etc on the ground and then WINCH them up into place and secure them. Absolutely ingenious. Here's some photos of that.

Screenshot_20220428-134218_Facebook.jpg
Screenshot_20220428-134149_Facebook.jpg

Screenshot_20220425-154800_Facebook.jpgScreenshot_20220425-160647_Facebook.jpg
Screenshot_20220428-135109_Facebook.jpg

If your curious to see more of his build, a lot is on instagram at @jeffstearns71


Our posts were supposed to be nominal 6x6, but are instead dimensional 6x6. Bonus in strength but I've got to pick up a hand planer in the morning now. No biggie. Sill plates (pressure treated) are cut, but not tapcon'd down yet.

Posts will go in and I'll start on some bookshelf girts!
 

Attachments

  • 20220724_165338.jpg
    20220724_165338.jpg
    1.1 MB · Views: 64
  • Screenshot_20220428-134157_Facebook.jpg
    Screenshot_20220428-134157_Facebook.jpg
    730.5 KB · Views: 68
Last edited:
OP
B

BearyNelson

Active member
Joined
Feb 7, 2022
Messages
27
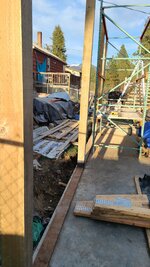
We got all but the front gable end door posts in yesterday and today, I'm very tired of planing... posts came as true 6x6, brackets are 5 5/8. The little harbor freight planer got the job done.

I havent places the two front wall posts yet, or the brackets even as i can't decide if im going with a 22ft wide or 20ft wide door. My "plans" only specced a 2x10 header for a max width 16ft door. Were going to use an I-Beam and figure out either a rolluo door... a bifold hanger style .. or?
20230417_182714.jpg


I haven't screwed down the Sill plates yet, or bolted the poles in. Once that's done I guess I'll start framing walls!
20230417_182347.jpg


Need to pick up a laser, I know atleast one corner of the pad is a good bit lower, water seems to flow that way. The bauer ones any good?


The pallet racking has become my work bench, and will soon be my scaffolding.
20230417_183338.jpg
 

Lt CHEG

Well-known member
Joined
Feb 20, 2011
Messages
511
Location
Upstate NY
Would your father in law ever consider fabricating and selling more of those brackets? They look like they could be super useful for certain projects.
 
OP
B

BearyNelson

Active member
Joined
Feb 7, 2022
Messages
27
Would your father in law ever consider fabricating and selling more of those brackets? They look like they could be super useful for certain projects.
That's the plan. All the ones done so far have been pretty manual, and time consuming with a metal cutoff bandsaw, cutting the angle, drilling the holes and whatnot. However, they've gotten a new 30ft cnc rotary tube cutter that should make them very quick, and repeatable.
 
OP
B

BearyNelson

Active member
Joined
Feb 7, 2022
Messages
27
Skipped a couple days, I've been under the weather even tho the weather has been very very nice.

But, we got all he post up, and all but the very top bookshelf girt in. We still haven't figured out perfectly where to cut and notch the posts.
20230425_194229.jpg

Every thing seems fairly plumb and square. We're novice so I could definitely have some better carpentry here and there but... it's a shop, it'll do.


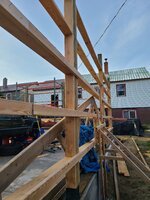
I then picked up 100 2x4x8's, (100 was when bulk pricing kicked in. ) to use as standard girting. I don't see the point of paying a bunch more money for 2x4x12's and landing them on each post when that's where all the other hinge/connection points already are. I guess doing it that way would stiffen the bookshelf up more but doesn't seem as beneficial and having lumber crossing the posts. Also, the 8 footers save a ton of cash. 20230426_072123.jpg

I do have a truck... with a brand new transmission.... but the astro has good tires and a battery I don't have to jump.

20230427_181549.jpg
I've got a huge ladder and a small ladder, I need a medium one now for the top couple standard girts.

You can see the power wires I've got to sneak under, I could move the power, or do a temporary post or or or... but it's much easier and cheaper to stay a couple inches under the wire.
 

Attachments

  • 20230419_170746.jpg
    20230419_170746.jpg
    839.1 KB · Views: 50

rixtrix1

Well-known member
Joined
Aug 25, 2013
Messages
3,010
Location
Chandler, AZ (from west NE)
That's a nice size for a shop! Pretty neat brackets to hold the posts, probable a lot cheaper than the Simpson or other brands ( like RR Buildings on YT) uses. Can you explain the need for "bookshelf" girts? Seems like a ton of extra lumber and labor.
 
Last edited:
OP
B

BearyNelson

Active member
Joined
Feb 7, 2022
Messages
27
Back after a busy summer...

Bookshelf girts just seemed better to me, still do. If/when I do this again I'll probably forgoe the standard girts. I don't really think they're too much labor. I think I could knock them out In a day alone now, I like the rigidity they provide... sheathing will do the same but... idk. I like them.


It's October now... about a year since we poured concrete, wow. I've got to look back in my photos to see where we left off.


We finished off the walls and I bought a 3x360 laser on sale to set the height of the notches. There were definitely cheaper ways to do this (water level etc) but we're going to have a hundred uses for this thing...

I then hung off the building an notched all the posts with a handled mini circ saw. It was dusty but worked well.
20230519_211800.jpg


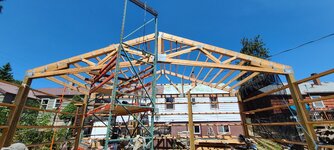
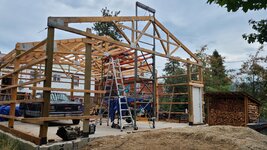
I then had to devise a way to set the trusses without renting any sort of crane, or manlift...

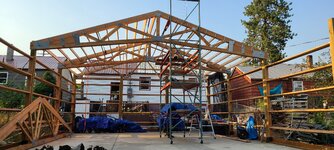
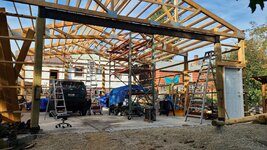
Here is my solution, a 12ft pallet racking upright bolted to the side of 12ft×4ft pallet racking/scaffolding on casters. A 5500lb apex harbor frieght winch on a receiver mount run up to a pulley and a jump box for power. This worked phenomenally. Total height was around 21-22 ft or so, it was tall enough by about 3 inches (got very lucky there) 20230625_130304.jpg


For the trusses... I wound up ordering 2 more scissor trusses. I found other truss companies that came in much cheaper but... they would require bigger members and or tripping up the trusses for the span. WTF. I had the exact truss drawings and nobody could build them... grrr. Made me a bit upset with the engineer that stamped my original plans and the truss company of my original trusses. So I called them up, and for more money... they built copies of the scissor trusses they already sold me.


I used the *extra* standard trusses to double up my gable trusses. Cause what else was I gonna do with them.

I will do things very differently next time, not order a *kit*


Installing the purlins was my worst nightmare. I HATE heights. No fun. The whole time im.up there it's a constant panic attack. Oh well, they're done.
 

Attachments

  • 20230806_182323.jpg
    20230806_182323.jpg
    713.8 KB · Views: 38
  • 20230723_125349.jpg
    20230723_125349.jpg
    608.5 KB · Views: 50
To avoid these ads, REGISTER NOW!
OP
B

BearyNelson

Active member
Joined
Feb 7, 2022
Messages
27
I locked the trusses in with... a lot of headerlock style screws.. probably WAY overkill. But they're not moving now.

The building wound up... mostly square.

I learned a lot...
 

Attachments

  • 20230903_171824.jpg
    20230903_171824.jpg
    924 KB · Views: 49
OP
B

BearyNelson

Active member
Joined
Feb 7, 2022
Messages
27
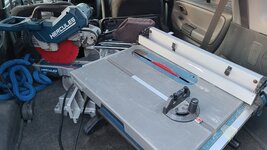
I found a killer deal on a used hercules 12 inch sliding miter and the accompanying table saw for $50 each on facebook. All the framing done with the *new* miter saw was quite a bit straighter than what was done with the junky old sliding craftsman that didn't lock at 90 anynore...

20230910_190727.jpg


Next we had to figure out the garage door header. It's gable end, so I know it doesn't have to be real beefy but... the original plans spec'd a 2x10 header for a 16ft door. That's it. (No sheathing on the side either remember).

F that, turning in off the alley way a 16ft wide door wouldn't be fun. Even though we'd been sneaking the jeep and truck in thru a 8ft opening between the post and my "scaffolding"

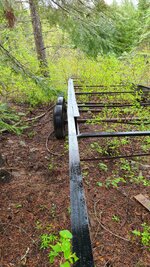
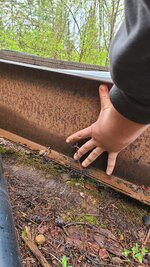
My parents had an old 60ft single wide trailer frame on their off grid property. I went up with a single handled dewalt Sawzall and a Diablo blade and cut it up. One battery, one blade. God bless those blades.
20230507_143510.jpg

My dad chained it on a squarbody 3500, resting on the bang board and end of the flatbed. For transport it was 29 ft long. What a hilarious sight. I unfortunately don't think I have a picture.
It took a little straightening, but came out fine


The beam isn't crazy heavy duty, and it's lighter than my trusses but a hell of a lot strong than a 2x10. I can sit in the center with 0 flex, so it will hang a door just fine.


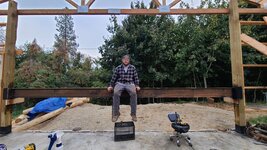
I had picked up a harbor freight titanium 125 off marketplace to weld up some brackets to hang the beam. I hadn't done much welding since high-school. I sliced up the extra beam metal to make the brackets, no sense in buying tube from the steel dealer when I had this right here.

Stuck it between posts, cut and welded it in place. Having never done vertical welded and using flux core once before.. it's good enough.

I then winched it up into place.
20230924_173906.jpg
20230925_155625.jpg
 

Attachments

  • 20230912_164953.jpg
    20230912_164953.jpg
    706.5 KB · Views: 23
  • 20230507_143048.jpg
    20230507_143048.jpg
    1.1 MB · Views: 22
OP
B

BearyNelson

Active member
Joined
Feb 7, 2022
Messages
27
Inspector came to check framing. Turns out I could have glued this building together... anyway...
We actually weren't fully, fully done. Have one girt to cut out and replace and another door to frame in but he didn't care. I mostly wanted the go ahead to roof. He gave the go ahead and said just don't miss the purlins too much and I don't care- "I used to climb up there and look, but not anymore"


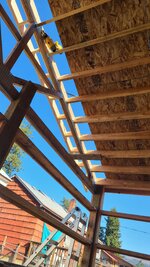
So we went ahead with sheathing the roof.

I decided, as a bit of an afterthought, to add some gable extensions. The only *good* way to this now was ladder frame them and grk them to the side of the truss. Since I had double end trusses now they are actually super, super rigid. This also let me... square my sorta square roof.
I can jump on the Gable ends without a wiggle, so im not really worried about sag and if they sag... oh well.20231008_134642.jpg


Like I said. I learned a lot for next time.
 

Attachments

  • 20231011_153340.jpg
    20231011_153340.jpg
    521.1 KB · Views: 16
  • 20231007_094237.jpg
    20231007_094237.jpg
    662.2 KB · Views: 18
  • 20231018_165940.jpg
    20231018_165940.jpg
    861.4 KB · Views: 18
  • 20231018_170603.jpg
    20231018_170603.jpg
    436.3 KB · Views: 20
Last edited:
OP
B

BearyNelson

Active member
Joined
Feb 7, 2022
Messages
27
My dad was a roofer when he was younger, and was a HUGE help for this portion.

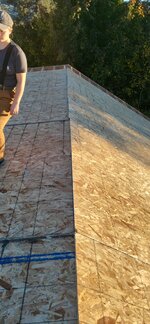
I stayed up after work one day (night shift) so we could finish sheathing and get the metal down before the incoming rain.. went through 2500 nails or something like that for 36 sheets of osb. I don't think it's going anywhere.

imagejpeg_0(4).jpg
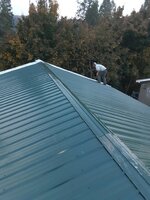
After a long groggy day.. the metal was all down. I was short 2 sheets after extending the gables but just tarped with with extra underlayment until i could pick up more metal. Stapled it to the osb and used some super strong magnets I had to hold it down to the metal. The wind didn't move it a bit.

imagejpeg_0(5).jpg

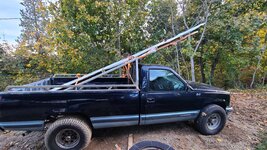
Tuesday I went and picked up my 2 more sheets I ordered. Built a pallet sort of deal to support the 16ft sheets on my 8ft bed. It was a short drive thankfully. Got those installed today.

20231017_172824.jpg


This weekend will be finishing up framing and roof trim. Then I've got to pick up more osb for the siding. Plans aren't spec'd for it, but I want it. I've procrastinated long enough that prices are starting to fall pretty good!


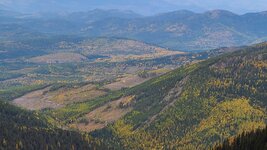
Trying to take time to get up in the mountains too!
 

Attachments

  • a04d2d72-64de-466d-9dd7-66f9e6b6b933photo.jpeg
    a04d2d72-64de-466d-9dd7-66f9e6b6b933photo.jpeg
    564.6 KB · Views: 38
  • 20231014_135438.jpg
    20231014_135438.jpg
    816.1 KB · Views: 45
OP
B

BearyNelson

Active member
Joined
Feb 7, 2022
Messages
27
Took a break from building to dig the electrical trenches before the ground freezes too hard...
no photos but I will get some... they would be worth it. Hit MANY big river rocks, and one Giant granite boulder... roto hammer came into play. Distance from the shop wall to the house is 22ft, two sections of 2 inch pvc conduit and 24 inch sweeps lines up dang near perfect. Also burying some 1.5 inch for fiber runs later.


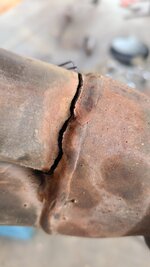
The wife's jeep xj has gotten a LOT of work done. It's on long arms, geared and locked in the rear, but we've neglected the cracked header for too long. 20231021_164224.jpg

It's finally time after new motor mounts. She did the whole job pretty much. Cut out this factory driveshaft clearance dent while we had the downpipe out. Should breath better now.
20231021_150340.jpg


New upstream o2 sensor, and the fact that it is finally getting a proper signal means the jeeps idle had smoothed waaaay out. So much better. It rained for the days we worked on the jeep. So thankful for the roof.


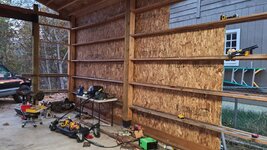
Started sheathing the walls. Going much quicker and easier than expected, I have to pick up some more osb in the morning along with some housewrap. Local Home depot only has 'woven' or more expensive greenguard stuff with water channels in it... hmm
20231030_174444.jpg

The clouds warn of how close real winter is.20231017_160521.jpg
 

jarhead

Well-known member
Joined
Jul 9, 2006
Messages
705
Location
Colorado, near Morrison
Shop is looking good, I wish i had sheathed mine 25 years ago.

Curious what OSB costs where you are at? I paid $21 a sheet recently in northern Colorado.
 
OP
B

BearyNelson

Active member
Joined
Feb 7, 2022
Messages
27
Shop is looking good, I wish i had sheathed mine 25 years ago.

Curious what OSB costs where you are at? I paid $21 a sheet recently in northern Colorado.
I'm just using 7/16 and didn't shop around, probably should have.... it's 14.28 a sheet or 12.85 bulk price
 
OP
B

BearyNelson

Active member
Joined
Feb 7, 2022
Messages
27
Approaching a year again since the last update...
I could probably finish everything I need to around this place if I just took 2 weeks off.

Anyway. Having the roof overhead for winter was life-changing for wintertime wrenching. Building still isn't enclosed... so it was quite chilly but we'll be sealed up for this year!


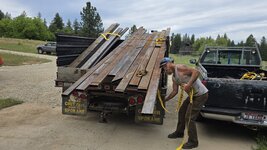
I'd been waiting buying metal to build the bifold hangar door and just a week before I finally.hsd the cash to order steel the deal of a lifetime popped up on marketplace.20240622_135606.jpg
All the metal you see pictured hanging off the square body there and more shorter stuff in the pickup on the right for $300. Absurd deal. I saw the add minutes after it was posted, called the guy and let him know I was on the way and THEN called my dad and let him know... he was also on the way... haha. He's a huge blessing, massive help. The seller had bought ALL the contents of a shop, and this mostly old mezzanine metal was in it. It's all got old weld on it, plasma cuts out of it and it's mostly square and straight....

Most of it was 2x6 1/8 wall tube and 2x4 1/8 wall tube. Heavier than id like for the door build but for the price I couldn't beat it.


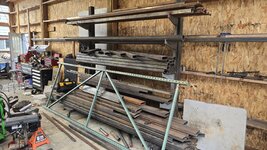
I built a rack out of some of it, and put it on the casters from my "scaffolding" it rolls around nicely.

20240729_184508.jpg
 
OP
B

BearyNelson

Active member
Joined
Feb 7, 2022
Messages
27
Keeping things square with this used steel (and my poor fab skills) proved challenging but the band saw my father inlaw gifted us meant atleast the cuts were straight.
I built a frame out of 2x6 steel and the top half of the door out of 2x4 steel then used a come along and my giant ladder to stand it upright.20240907_161510.jpg
Once it was upright I welded 2x4 "feet" onto it with some 2 inch steel round stock on one side so i could add a bunch of weight plates to that side of the "feet". I did this so i didn't risk tipping the whole thing over while dragging it into position under the I-beam. I also cut some 3/8 plate for bases of each 2x6 upright with a single hole drilled in them for some 8 inch 3/4 titen HD concrete anchors. I know it probably doesn't need them, but it makes me feel better.


Once the frame/top was slid into place i lowered the I beam and welded it to the 2x6. Now the I beam doesn't bow in and out and the 2x6 doesn't sag a bit.


I then built the bottom half, clamped it to the top half with some 1/2 plate spacers and welded on some much more modest hinges from tractor supply. The top hinges are rated for a 4000lb swinging door per pair... so they're definitely overkill but replacing them would be a massive pain. The middle hinges are much easier to get at and could be cut off and replaced in a couple minutes if necessary.

VideoCapture_20240925-041649.jpg

We had a little swing on it once everything was tacked together. Now I'll be picking up some angle iron to use as a door track for the cam followers I ordered.

I'd love to have the rollers on the inside and use linear actuator to raise the top half, which would *pull* the bottom half up. But for simplicity sake for now the rollers will be on the outside, the bottom half winched up and the top pushed open. This puts a ridiculous load on the rollers... so i made sure to order some rated for an incredible amount of weight. The challenge will be building a bracket to match...
 

Attachments

  • VideoCapture_20240925-041643.jpg
    VideoCapture_20240925-041643.jpg
    950.8 KB · Views: 23
Last edited:
OP
B

BearyNelson

Active member
Joined
Feb 7, 2022
Messages
27
Got the rollers, -> cam followers from zoro.com installed with some custom brackets welded to the botton of the door. Then the track, 2.5x2.5×.25 angle iron tacked on to the uprights. The door closes up pretty tightly against the angle and I'm hoping 1 1/4 foam weatherstripping tape will be my seal for the sides.

At first at full height the door would open only to around 7.5 ft inside. Which in practice is fine for our needs. Plenty high, but was disappointing (I knew this, I knew the math but after SEEING it..... well).
The inside (bottom) would roll up higher still of course, but because it's the shorter leg then the outer (middle of the door) bit would start to droop. I thought about cutting the whole thing, jacking it up adding to the bottom section and yadda yadda yadda, I really didn't want to do this

So Instead I thought I'd just add a *second stage* to the bottom half of the door. Until it reaches 90 degrees, the door uses the original roller in the bottom of the lower section. The awning shape this creates is quite satisfying, and will be a nice added function once there's more than one cable holding the door up. After 90 degrees, the second roller takes over. I just built a triangle off the end of either leg and stuck another roller mount there. For now one has a burnt up roller and the other has a couple of washers for testing until my other set of rollers show up. This effectively makes the bottom leg longer allowing the middle of the door to continue rising instead of drooping.

I'm building another (much smaller 9×9 or so) one of these doors on the back of the building soon. I'll definitely pay a bit more attention to my pivot lengths for that one. I knew better... lol.
I'm NOT a fabricator. NOT a welder. So that part of things is taking all my headspace and focus, letting me make silly mistakes that I've gotta fix/change later. Oh well, I consider it tuition for lessons and skills learned.
20241007_172210_1.gif

For now, it opens. I've gotta decide what to skin it with. I can ride the door up, and it stays very smooth so I'm not too worried about added weight but I'm thinking polycarbonate might be nice so I can have a couple of clear sheets to let some light in.
 
OP
B

BearyNelson

Active member
Joined
Feb 7, 2022
Messages
27
What size cam followers did you use?
They are crowned 1.375 inch diameter 3/4 inch wide concentric cam followers. Rated for 4000 ish lbs. They roll really really nicely. Anything much bigger and the mounting studs got pretty massive. These just have a 1/2-20 half threaded stud.
 
To avoid these ads, REGISTER NOW!
Top Bottom