To avoid these ads, REGISTER NOW!

30x48x12 Michigan Carr Garage

chevyracer5613

Well-known member
Joined
Dec 16, 2014
Messages
149
Location
Brighton, MI
Hey Everyone,

So I have been using this site, and others, for ideas/suggestions while building my garage/pole barn.....and I figured I might as well post something.

I will be uploading details and photos over the next.....while. Some of them include some pictures from my new thermal camera that I have been toying with, which has been fun so far.

Very short background on me, I am a Mechanical Engineer in the automotive industry (Michigan) but house/home/garage stuff is fairly new to me. Similar to most of you, I am a big DIY'er and would rather trade my time to save a few $'s. Also, I am fully open to suggestions/ideas/opinions....especially if it has some science behind it :)

So onto the main part that anyone might be interested in.
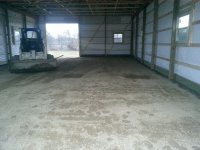
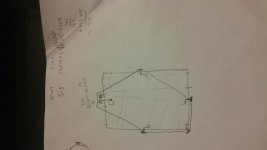
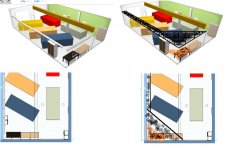
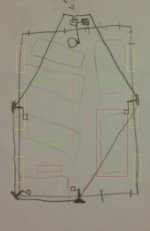
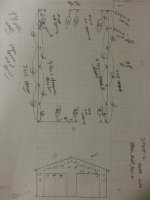
size is 30x48x12 with a 4/12 roof pitch
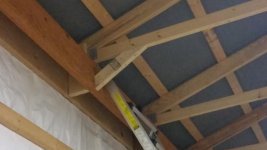
1 ft vented overhangs and ridge vents
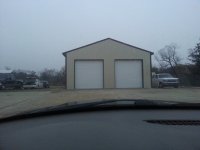
three 10x10 overhead garage doors (lightly insulated)
one side/entrance door
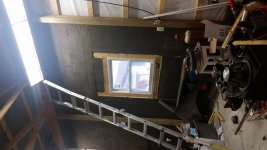
5 windows
"tyvek" house wrap
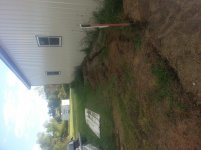
metal siding and roof
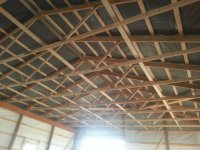
trusses 4' OC
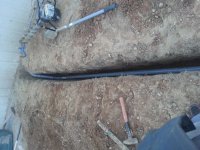
power ran from the house, under ground (100 amp)
natural gas
30' 2 stage radiant tube heater (12' of exhaust after that)
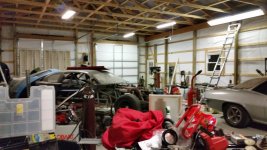
Sheet metal on the interior with bracing 30/36" OC
(will updated with other things as I remember)

Small list of things I wish I had done differently and might change in the future:
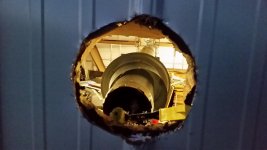
*Put a window facing the driveway, maybe I can replace a section of my garage door with a section containing windows?
*Specified loads for trusses....found out after the fact they are only rated for a 5 PSF BCDL.
*Maybe attic trusses for part of the garage
*Maybe had trusses specified for 2' OC...but maybe not
*Had the builders install/wrap under the truss to create an effective soffit baffle (just so I don't have to do it from my ladder)
*(will updated with other things as I remember)
*Plan for interior siding (sheet metal/wood/?)...if sheet metal (or other items with ridges) plan the electric and windows around it....or get clever/lucky after the fact.
*Wish I would have checked my helps installation of my electrical panel....it is at a slight angle so trimming around it will take a little work

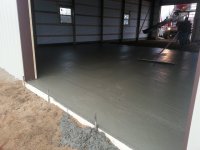
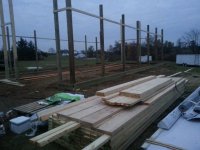
Pole barn materials are from Chelsea Lumber, they are local, reasonably priced, friendly and thorough. Since I travel a lot during the winter (when I had the "barn" built last year) I paid a company to install the building. I am mostly, but not completely, happy with the work they did. It was nice having it up in 3 days though. Of course the more time I spend in it, and work on it, the more I realize a few things could have been doing different to make my life easier, some of which I mentioned in the section above.
 

Attachments

  • 10885184_10203250350436082_7293123795658302440_n.jpg
    10885184_10203250350436082_7293123795658302440_n.jpg
    38.1 KB · Views: 448
  • 980629_10200809184368456_1584699349_o.jpg
    980629_10200809184368456_1584699349_o.jpg
    108.8 KB · Views: 420
  • 906474_10200809183768441_1201766012_o.jpg
    906474_10200809183768441_1201766012_o.jpg
    88.1 KB · Views: 445
  • 1410723_10200809183808442_568989349_o.jpg
    1410723_10200809183808442_568989349_o.jpg
    120.9 KB · Views: 559
  • 1399157_10200809183728440_1074495966_o.jpg
    1399157_10200809183728440_1074495966_o.jpg
    96.9 KB · Views: 397
  • 1008822_10200809182968421_1763641065_o.jpg
    1008822_10200809182968421_1763641065_o.jpg
    92.8 KB · Views: 411
  • 1397519_10200809182888419_1090506593_o.jpg
    1397519_10200809182888419_1090506593_o.jpg
    89.5 KB · Views: 482
Last edited:
To avoid these ads, REGISTER NOW!
OP
C

chevyracer5613

Well-known member
Joined
Dec 16, 2014
Messages
149
Location
Brighton, MI
Re: New member, 30x48x12 build in Michigan and some fun with my new thermal camera :)

And some more
 

Attachments

  • 1390687_10200851166617986_1825053248_n.jpg
    1390687_10200851166617986_1825053248_n.jpg
    134 KB · Views: 480
  • 883191_10200809186328505_1794415626_o.jpg
    883191_10200809186328505_1794415626_o.jpg
    106.7 KB · Views: 431
  • 1397300_10200809186208502_336485141_o.jpg
    1397300_10200809186208502_336485141_o.jpg
    104.3 KB · Views: 447
  • 1404621_10200809185688489_320615171_o.jpg
    1404621_10200809185688489_320615171_o.jpg
    92.1 KB · Views: 404
  • 858919_10200809185528485_2142492481_o.jpg
    858919_10200809185528485_2142492481_o.jpg
    100.7 KB · Views: 388
  • 1398430_10200809185248478_1892606223_o.jpg
    1398430_10200809185248478_1892606223_o.jpg
    69.8 KB · Views: 462
  • 1399522_10200809184888469_576204021_o.jpg
    1399522_10200809184888469_576204021_o.jpg
    65.3 KB · Views: 454
OP
C

chevyracer5613

Well-known member
Joined
Dec 16, 2014
Messages
149
Location
Brighton, MI
Re: New member, 30x48x12 build in Michigan and some fun with my new thermal camera :)

More to come at a later date
 

Attachments

  • 1425522_10200931138297228_334053685_n.jpg
    1425522_10200931138297228_334053685_n.jpg
    92.9 KB · Views: 407
  • 1185588_10200920899321260_1431703411_n.jpg
    1185588_10200920899321260_1431703411_n.jpg
    114.4 KB · Views: 581
  • 1458444_10200856398628783_439958847_n.jpg
    1458444_10200856398628783_439958847_n.jpg
    118.5 KB · Views: 455
  • 1392073_10200856398348776_2122173705_n.jpg
    1392073_10200856398348776_2122173705_n.jpg
    79.1 KB · Views: 445
OP
C

chevyracer5613

Well-known member
Joined
Dec 16, 2014
Messages
149
Location
Brighton, MI
Re: New member, 30x48x12 build in Michigan and some fun with my new thermal camera :)

Natural gas line and air lines
 

Attachments

  • 20141129_200430.jpg
    20141129_200430.jpg
    142.2 KB · Views: 382
  • 20141121_173133.jpg
    20141121_173133.jpg
    149.2 KB · Views: 364
  • 20141121_193126.jpg
    20141121_193126.jpg
    130.6 KB · Views: 316
  • 20140913_180213.jpg
    20140913_180213.jpg
    144.6 KB · Views: 340
  • 20140829_201033.jpg
    20140829_201033.jpg
    137.8 KB · Views: 431
  • 20140112_173641.jpg
    20140112_173641.jpg
    124.9 KB · Views: 318
Last edited:
OP
C

chevyracer5613

Well-known member
Joined
Dec 16, 2014
Messages
149
Location
Brighton, MI
Re: New member, 30x48x12 build in Michigan and some fun with my new thermal camera :)

Trench for electrical and lighting......lights are t8 with electronic ballast. I found them dirt cheap and used, because they are heavy (40 lb's), old and needed painting.

I still plan to add a few more lights. Probably 6 of the 8' long 4 bulb (two row) and 4 x 2 row/2 bulb 4' lights. Maybe a drop light.

For the investment, I am fairly happy with the lighting but it can always be better.
 

Attachments

  • 20141116_194051.jpg
    20141116_194051.jpg
    146.5 KB · Views: 543
  • 20141115_125047.jpg
    20141115_125047.jpg
    148.7 KB · Views: 516
  • 20141113_184228.jpg
    20141113_184228.jpg
    147.3 KB · Views: 658
  • 20141112_184547.jpg
    20141112_184547.jpg
    140.4 KB · Views: 448
  • 20141112_184109.jpg
    20141112_184109.jpg
    131.9 KB · Views: 388
  • 20131230_170628.jpg
    20131230_170628.jpg
    147.9 KB · Views: 429
Last edited:

1/2 Cup

Member Emeritus
Joined
Apr 28, 2012
Messages
19,283
Location
Shepparton. Victoria. Australia
Re: New member, 30x48x12 build in Michigan and some fun with my new thermal camera :)

Looking fantastic, well done.

That's fairly heavy for a light fitting, what sort are they??

Regards
 
OP
C

chevyracer5613

Well-known member
Joined
Dec 16, 2014
Messages
149
Location
Brighton, MI
Re: New member, 30x48x12 build in Michigan and some fun with my new thermal camera :)

1/2 Cup, I have no idea what kind they are. I was told they were pulled out of some commercial building a long time ago, but it sounded like maybe more of an office area. They used to have T12 ballast but were updated, they also came with the plastic diffusers, but they added another 10 lbs total.

And thank you :)
 
Last edited:
OP
C

chevyracer5613

Well-known member
Joined
Dec 16, 2014
Messages
149
Location
Brighton, MI
Re: New member, 30x48x12 build in Michigan and some fun with my new thermal camera :)

Ducksface, it is one of the new thermal cameras by Seek. It is not perfect, but I am happy with it and see good potential. The resolution is quite good. The images that I will show shortly (and have video of) are purely from the thermal camera....although I do sometimes have a separate image from my phone also. I chose this one because of cost, it is affordable and sufficient for a pricey "toy" :)
 
OP
C

chevyracer5613

Well-known member
Joined
Dec 16, 2014
Messages
149
Location
Brighton, MI
Re: New member, 30x48x12 build in Michigan and some fun with my new thermal camera :)

I found a company that "gives" away scrap/waste polystyrene, so I stuffed my trailer full of it and will make good use of it :).

I found another guy with take off 2" polyiso (fiber faced), certainly not free but much cheaper than new.
 

Attachments

  • barn insulation calculations.jpg
    barn insulation calculations.jpg
    14.5 KB · Views: 180
  • 20141225_152634.jpg
    20141225_152634.jpg
    139.4 KB · Views: 395
  • 20141220_143701.jpg
    20141220_143701.jpg
    137 KB · Views: 432
  • 20141130_141256.jpg
    20141130_141256.jpg
    148 KB · Views: 494
OP
C

chevyracer5613

Well-known member
Joined
Dec 16, 2014
Messages
149
Location
Brighton, MI
Re: New member, 30x48x12 build in Michigan and some fun with my new thermal camera :)

2 stage radiant tube heater. 60k btu high, 45k btu low, 30' long with another 11.5' of exhaust. Not done, but its functional while I finish the insulation :)
 

Attachments

  • 20150102_093503.jpg
    20150102_093503.jpg
    129.8 KB · Views: 314
  • 20141231_180938.jpg
    20141231_180938.jpg
    128.2 KB · Views: 325
  • 20141231_174530.jpg
    20141231_174530.jpg
    133 KB · Views: 394
  • 20150101_220709.jpg
    20150101_220709.jpg
    132.6 KB · Views: 349
  • 20150101_180610.jpg
    20150101_180610.jpg
    149.4 KB · Views: 358
  • 20141231_180952.jpg
    20141231_180952.jpg
    141.2 KB · Views: 355
  • 20141231_133627.jpg
    20141231_133627.jpg
    153.3 KB · Views: 391
OP
C

chevyracer5613

Well-known member
Joined
Dec 16, 2014
Messages
149
Location
Brighton, MI
Re: New member, 30x48x12 build in Michigan and some fun with my new thermal camera :)

A couple of quick thermal images looking towards the heater. The images are purely from the thermal camera (bolometer)....I like the black and white filter for contrast, but the other filter is interesting also.
 

Attachments

  • img_thermal1268445141.jpg
    img_thermal1268445141.jpg
    44.9 KB · Views: 262
  • img_thermal1160006.jpg
    img_thermal1160006.jpg
    37.9 KB · Views: 239
  • 20150101_230619.jpg
    20150101_230619.jpg
    138.8 KB · Views: 235
Last edited:

drivesitfar

Well-known member
Joined
Oct 23, 2013
Messages
35,988
Location
Pacific Northwest
Re: New member, 30x48x12 build in Michigan and some fun with my new thermal camera :)

Chevy: great pictures and ideas so far. not a lot of members look at this section so would you like the mods to move it to the garage gallery? that way if you have any questions you'll have a lot better chance of getting an answer or a quicker one?

welcome and looks good so far.

Just an FYI. Woody's garage thread over in the garage gallery has some similar camera images if you might want to compare. His outside temps in Ontario are below zero and his shop garage with a small heat source is able to maintain 50's temps because of his insulating.
 
OP
C

chevyracer5613

Well-known member
Joined
Dec 16, 2014
Messages
149
Location
Brighton, MI
Re: New member, 30x48x12 build in Michigan and some fun with my new thermal camera :)

Drivesitfar: Thank you, that is a good idea. I debated where to place this posting, or if I should make two, but seeing as how I am now introduced, moving it would probably be the most beneficial. Now the question is how to encourage the mods to move it :)

I will look into Woody's gallery, I always like more data and perhaps it can even help drive a few of my decisions.

Lately my debate has been weather to install my rigid foam insulation between the trusses on the bottom, on top of the bottom chord, or attached to the bottom of the top rafters (or in between). I see pros and cons to each method. I think I will likely wind up installing between the trusses (bottom) and then "filling in" above it with the scrap/waster polystyrene and maybe some blow in. With that blow in/scrap covering the bottom chord, hopefully i'll have a thickness high enough to mitigate thermal bridging and possible condensation concerns.
 
OP
C

chevyracer5613

Well-known member
Joined
Dec 16, 2014
Messages
149
Location
Brighton, MI
Re: New member, 30x48x12 build in Michigan and some fun with my new thermal camera :)

I thought i'd test adding a picture from PB instead of "attaching" it....which for some reason seems to cause a lot of my pictures to rotate.


Last edited:

drivesitfar

Well-known member
Joined
Oct 23, 2013
Messages
35,988
Location
Pacific Northwest
Re: New member, 30x48x12 build in Michigan and some fun with my new thermal camera :)

CR: some of GJ's mods actually read the introduction threads so ask on this thread and see if one of them will move it to Garage gallery if that is where you'd like it.

i'd recommend that and do you want the same name or do you have a different name since you might be adding to that thread for years to come?

nice idea on the insulating and if i might add for he bottom levels if you are doing grinding or welding in some of those areas maybe put up some tin, aluminum or stainless over the insulation even though it has a film on it already.

here's Woody's garage gallery link in case you need a little help just click on the link here.

http://www.garagejournal.com/forum/showthread.php?t=263351

maybe just put in a post without anything else. Can MODS please move this thread to Garage gallery and change name to Michigan's Chevy's garage or whatever name you choose.

i'll check back to see or PM me if you need help
 
OP
C

chevyracer5613

Well-known member
Joined
Dec 16, 2014
Messages
149
Location
Brighton, MI
Re: New member, 30x48x12 build in Michigan and some fun with my new thermal camera :)

Mods, could you move this thread to the "Garage Gallery", titled "30x48x12 Michigan Carr Garage". Yes, I did mean to put type two R's :)
 
OP
C

chevyracer5613

Well-known member
Joined
Dec 16, 2014
Messages
149
Location
Brighton, MI
Re: New member, 30x48x12 build in Michigan and some fun with my new thermal camera :)

If anyone is curious, I took a quick thermal video while walking out the garage and inside. The radiant tube heater is running, and the garage is only ~30% insulated. Outside temp is about 30 F and inside is about 43 F. Do note the accuracy of the temperature is not perfect, there is a static gradient due to calibration and I have the emissivity set to 0.98, which is reasonable for a lot of surfaces, but not all. The important/interesting to note is the difference in color. White is relatively warm, where is black is relatively cool. I can use different filters, but I like this one currently...maybe i'll do a more typical filter/video later :) Also, I am recording both cameras, the phones camera (small section) is on the left, just for reference, and the right side image is purely from the thermal camera.


rburke65

Well-known member
Joined
Nov 10, 2007
Messages
12,349
Location
Canfield, Ohio
Re: New member, 30x48x12 build in Michigan and some fun with my new thermal camera :)

Welcome to The Garage Journal. You may not be totally happy with the final product but it looks like a great start. Everyone learns through their wallet or by their mistakes. Still looks good though.
 
OP
C

chevyracer5613

Well-known member
Joined
Dec 16, 2014
Messages
149
Location
Brighton, MI
Re: New member, 30x48x12 build in Michigan and some fun with my new thermal camera :)

Rburke, thanks....I know I have done a lot of learning with this building....heck even today while installing some of the insulation :). I am always open to cost effective aesthetic or functional improvements, so if anything comes to mind, let me know.

While it was raining today, I discovered that I get to have fun sealing out the thimble on the outside, apparently it has a slow leak even with all of the foam I sprayed around it. I am surprised that I was not able to find a thimble meant for the type of siding I have. I am still tempted to make something to effectively act as a trim ring to make it look better and hopefully seal it better also.
 

drivesitfar

Well-known member
Joined
Oct 23, 2013
Messages
35,988
Location
Pacific Northwest
Re: New member, 30x48x12 build in Michigan and some fun with my new thermal camera :)

Mods, could you move this thread to the "Garage Gallery", titled "30x48x12 Michigan Carr Garage". Yes, I did mean to put type two R's :)

MODS: can you help move CR's thread to the garage gallery since it has become a thread worthy of that section?

thanks
 
To avoid these ads, REGISTER NOW!
OP
C

chevyracer5613

Well-known member
Joined
Dec 16, 2014
Messages
149
Location
Brighton, MI
Re: New member, 30x48x12 build in Michigan and some fun with my new thermal camera :)

While waiting for the thread to get moved (thanks for the help drivesitfar), I thought i'd upload some more pictures of how I decided to proceed with my ceiling insulation.

Yes, I was having some trial and error while deciding what lengths I wanted to cut everything. My final decision was taking the 4'x8' sheet, trimming/ripping 2" off the side (to ~46") then cutting the first sheet to ~6' long and using the remaining 2' for the effective soffit baffle. This allows the 2nd sheet to remain 8' long (and due to symmetry the 3rd one also). The 4th sheet (going across from one header to the other side of the garage) will be the same as the first. With the actual dimensions of the barn interior, this should leave me with manageable gaps that I will spray foam. Btw the "pro" gun of the great stuff foam is completely worth the money IMO :).
 

Attachments

  • 20150103_180928.jpg
    20150103_180928.jpg
    137.2 KB · Views: 215
  • 20150103_175515.jpg
    20150103_175515.jpg
    129.8 KB · Views: 184
  • 20150103_154221.jpg
    20150103_154221.jpg
    135.6 KB · Views: 194
  • 20150103_125421.jpg
    20150103_125421.jpg
    128.7 KB · Views: 206
  • 20150103_154239.jpg
    20150103_154239.jpg
    121.3 KB · Views: 213
  • 20150103_121952.jpg
    20150103_121952.jpg
    129.7 KB · Views: 218
  • 20150103_122448.jpg
    20150103_122448.jpg
    122.6 KB · Views: 229
Last edited:
OP
C

chevyracer5613

Well-known member
Joined
Dec 16, 2014
Messages
149
Location
Brighton, MI
Re: New member, 30x48x12 build in Michigan and some fun with my new thermal camera :)

Got a little more finished, and made a cutout about half way down the garage for future access. Still have to frame it, but you get the idea. I don't plan to store anything up there, but it'll make insulating easier and potential future runs of power, but I don' expect to need to.

Also for random facts, my heater at 60k btu is maintaining ~40 deg F inside with it being windy and ~20 deg F outside (and snowing). Of course it will do much better once I finish insulating, especially the ceiling. Since I like numbers (I am an engineer), I manipulated some theoretical R values to match my current heat loss and Delta T (using http://www.builditsolar.com/References/Calculators/HeatLoss/HeatLoss.htm ), it suggests that I have an effective R of 6 and 0.7 for the wall and ceiling respectively.

Although, once I get to R11 in the ceiling and walls, it suggests my heat loss will go from ~58k BTU to 18k btu for a 20 deg (F) deltaT. At a 70 deg delta T I am at ~63k Btu. Which suggest just my 2" of polyiso installed and sealed well should make me comfortable no matter the Michigan weather. I do plan to go to R30 ceiling and maybe R19 wall, which brings my heat loss (for a 70 deg deltaT) from 63k btu to 53k btu. My uninsulated slab allegedly contributes to a little over half of my heat loss.


OP
C

chevyracer5613

Well-known member
Joined
Dec 16, 2014
Messages
149
Location
Brighton, MI
Re: New member, 30x48x12 build in Michigan and some fun with my new thermal camera :)

Tomorrow I go on a business trip for two weeks, so no more "playing" around. I decided to take a few more thermal images, mostly because I want to calculate the spread of the thermal rays. For the most part the thermal camera just shows obvious stuff, insulated areas are warmer, windows have poor R value, doors and garages don't always seal well.


drivesitfar

Well-known member
Joined
Oct 23, 2013
Messages
35,988
Location
Pacific Northwest
Re: New member, 30x48x12 build in Michigan and some fun with my new thermal camera :)

Garage Journal MODS: can you move this thread to the Garage gallery per Chevyracer's request? his title is below/above in his or my prior posts.

thanks a lot for your help.


CR: looks like things are warming up a bit inside the shop. nice work
 

NUTTSGT

Super Moderator
Staff member
Joined
Sep 14, 2009
Messages
50,849
Location
Northern Central Ohio
Re: New member, 30x48x12 build in Michigan and some fun with my new thermal camera :)

Mods, could you move this thread to the "Garage Gallery", titled "30x48x12 Michigan Carr Garage". Yes, I did mean to put type two R's :)

We try to catch as we can but we don't always see everything. Sometimes it's just easier to PM a Mod when you need some help. By the time you see this again, it should be in the Gallery Section.
 

drivesitfar

Well-known member
Joined
Oct 23, 2013
Messages
35,988
Location
Pacific Northwest
Nutts: you are awesome. thanks for the assist.

CR: now you should get a lot more viewers and answers to your questions if you ever have any. keep up the great work and post more great pictures as you are able to.
 
OP
C

chevyracer5613

Well-known member
Joined
Dec 16, 2014
Messages
149
Location
Brighton, MI
NuttsGT and Drivesitfar, thanks for your helping getting the thread moved.

So after a little more research, i think I have determined that my wall thimble (for exhaust) is not leaking....but I am getting some condensation that is making it past the B-vent.

Actually in terms of questions, how do most of you secure it? The stuff I am using is amerivent "snap lock" B vent. two 5' sections and an 18" sections. When I put the two 5' sections together, I twisted and made sure they wouldn't pull apart, but they didn't seem to seal well. When I first started my heater I could actually see a little smoke coming out of each joint, so I taped them (HVAC tape) and it seems to work, but I can't imagine that is typical?

The 10' section technically has 3 supports, at the end going into the thimble, on the other end where it connects to the radiant tube heater, and a 3rd ~4' from the thimble.
 

schwa184

New member
Joined
Sep 17, 2014
Messages
2
Nice thread. My barn is currently under construction in MI (over by a Grand Rapids) so it's interesting to see how other people in the same climate approach insulating. I'm just about to install the metal (roof and walls) and wanted to see if you can give me some more insight on why you chose to use building wrap. I've been considering it for myself, but can't seem to figure out whether the true advantages are. Any info you have would be much appreciated.
 
OP
C

chevyracer5613

Well-known member
Joined
Dec 16, 2014
Messages
149
Location
Brighton, MI
Hey Scwa184, the main reason I wanted it is to cut down on the air that passes by the sheet metal. Before I started insulating, I could stand inside of the barn and hear the wind blow, and even see the house wrap move some, but the only air movement I felt inside the barn was from the soffits. Also it is cheap, easy to do, I am not aware of any downfalls. It is not a vapor barrier and is vapor permeable, but as I understand that is helpful as you dont want to trap the moisture...it needs a place to dry to.

I would recommend considering to use that as an effective soffit baffle, if you plan to have vented soffits. Or you could do something else of course, but it is much easier to do while the metal is off :).

I also recommend looking on CL for used rigid insulation. I was able to get mine (used) for ~$8/sheet delivered (2" polyiso). Of course if you have the money, it sounds like spray foam is a nice way to go for insulation and air sealing. Since I couldn't justify that expense, I am using the rigid foam with sealed/foamed seams to provide a comparable, albeit likely not as good, effect. If I decide that I really want to, it should also be easy to install fiberglass afterwards.

If you haven't poured your floor, you might want to consider insulating the sides. Per my research, about half of my heat loss is through my slab (uninsulated). I should still be able to heat nicely with a 45/60k btu heater, but every bit helps.

Lastly, if you are going for cheap but very well insulated, you could consider what I am still considering. That is using 1/2" rigid insulation on the interior side (or some do exterior) of the posts to reduce thermal bridging.

There are lots of decisions, and it is hard to think of everything before hand, but the more planning, the better :).

Also, I believe they used a product called "perma-felt" for the roof. That (for the roof) and the house wrap should hopefully give the condensation a place to "run", if it happens. As I understand, a "sweating" building dripping onto you and your tools is not fun lol.
 
Last edited:
OP
C

chevyracer5613

Well-known member
Joined
Dec 16, 2014
Messages
149
Location
Brighton, MI
So, I am starting to consider shelving and interior panels. I am open to ideas/suggestions.

I got the idea of a quick 3D model, from another members build thread. So I attached a quick version of what my garage is kind of like now. As the title says, it is 30x48x12 and a tight fit with 5 cars (while still having access to all of them). I really wish I had made the garage 40x48 (by doing a 10' enclosed lean to), but I didn't have the funds (could have gotten 4 cars on the side that has 3, with more room open on the opposite wall).

Just for reference, the wall with the two garage doors is North, the single garage door is South, the 3 cars is West and the 2 cars/lift is East. I do not have a lift yet, but that is where I am thinking about putting it, since it'll be close to my work bench. I also like the lift in that "bay" because I could drive something (a trailer) straight through.

My current thoughts are to use the west wall for storage/shelves. For semi-long term storage I am considering a shelf that is ~7-8' tall and could even wrap around to the south wall until it meets the single garage door.

The area with the table is the main work bench area, so good organization will be needed.

Also if anyone has a better way to position the vehicles/lift/work bench, I am open to it.

If anyone is curious, the radiant heater burner box is 8' from the north wall, since the two OH doors will likely provide more heat loss than the south wall.
 

Attachments

  • 3d pole barn.jpg
    3d pole barn.jpg
    76.2 KB · Views: 129
Last edited:
OP
C

chevyracer5613

Well-known member
Joined
Dec 16, 2014
Messages
149
Location
Brighton, MI
A very low tech idea of some shelves.....the app I am using didn't have easy to find shelves that I wanted...so I just did generic shelves that aren't sized right. The image on the right is a thought I had for storage also (black)....the orange beneath it is for a work bench.
 

Attachments

  • 3d barn 2.jpg
    3d barn 2.jpg
    82.3 KB · Views: 114
OP
C

chevyracer5613

Well-known member
Joined
Dec 16, 2014
Messages
149
Location
Brighton, MI
So I finally got back home for a few days and spent some time looking at my "leak". I am pretty confident it is condensation. Which means I think I have the thimble and what not sealed well from the weather, but perhaps there is an exhaust leak at a joint causing condensation? Since the water was coming straight down, I made a "shield" to direct it into a bucket.


I was on the ladder looking for obvious leaks....of course I decided to try my thermal camera but the shiny surface make trying to detect nuances difficult (due to thermal reflections and different emissivity). Perhaps i'll spray paint it flat black (high temp paint) so I can get accurate readings later.


OP
C

chevyracer5613

Well-known member
Joined
Dec 16, 2014
Messages
149
Location
Brighton, MI
Carr3 - I am glad to help, I am sure some people have better ways at doing certain things.....I am mostly learning/guessing/researching as I go. I do know that since I am doing most of this work alone (recently speaking of insulation) I have become very tempted to buy a dry wall hoist....HF has one for ~$180 that'd make my life so much easier :)

If it helps, here is a low tech drawing of how I am conceptually installing my insulation. I am hoping to maximize air sealing and insulation while minimizing my time on the ladder :). To state the obvious...the drawing is very much not to scale :)


BRICKmp5

Member
Joined
Aug 25, 2006
Messages
22
Location
Southwest Ohio
Chevy, just looking through your build, great job! A drywall lift comes in real handy especially if you are hanging it yourself. I bought mine through Amazon, if your a Prime member it's free shipping and you have it quick. I purchased a 11' lift and the extension to hit my 13' ceiling for under $200. Plus when your done, list it on CL for close what you paid for it. Good luck.
 
OP
C

chevyracer5613

Well-known member
Joined
Dec 16, 2014
Messages
149
Location
Brighton, MI
BRICK, thanks....its been an experience.

Yes, looking again it appears they can be had for under $140 shipped on Amazon....and I just found one local for $100.....I think I might just have to get one :). It'll become especially nice once I finally get to hanging the interior metal sheets.....probably by myself.

I haven't looked at these units closely, but the ones I see lift to 11'. I need to go another foot so I guess it'll require buying or building an extension, I lean more towards making one. Any words of wisdom from someone who has used one?
 

BRICKmp5

Member
Joined
Aug 25, 2006
Messages
22
Location
Southwest Ohio
the one I purchased from Amazon goes 11', this was good for the 10' ceiling areas and the top section of the walls since I did most of the hanging by myself. I did purchase the extension, it was 35-40 bucks through Amazon. It raises it to a max of 15 so I am told. My tray ceiling area is 13'4" so it worked for that area.

I took a few pics, the middle (orange) section is the extension
IMG_0029.jpg

Here is what the center looks like, its a triangle, for 35-40 bucks, I can't see this being worth your time to fab out. It is also a two piece system with a pulley wheel attached and a length of aircraft cable attached.

IMG_0567.jpg
IMG_0568.jpg

FYI, I did need to build a step to get the drywall sheets loaded onto the lift when the extension was installed. Loading 4x10 5/8" sheets onto the lift by myself was fun enough, the step made out of 2x8s was a necessity getting them on the lift.
 
OP
C

chevyracer5613

Well-known member
Joined
Dec 16, 2014
Messages
149
Location
Brighton, MI
Brick,

Interesting, yes for that price it seems almost worth it to just buy. However, for me only need to go up another foot, I wonder if I could just bolt a raised "rack" to the main rack. A simple frame raised up about 12" and maybe bolted to the original rack....I guess i'll just have to toy with one when/if I get it.

Thanks for the pics and heads up on the step :)
 

drivesitfar

Well-known member
Joined
Oct 23, 2013
Messages
35,988
Location
Pacific Northwest
CR: it looks like you are answering a lot of your own questions. nice thread and do you have any questions that you are still looking for answers to??

i love these thermal camera pictures you and a few of them members are using.

insulation looks like it's working well and have you already started hanging lights or just finalizing the plan?

good luck
 

stngfever

Well-known member
Joined
Apr 2, 2013
Messages
89
Location
West Michigan
schwa184, I too had Tyvek wrap put on before steel panels too keep air infiltration down.

While it may be a mute point on your build due to how you solved the soffit baffle, have a look at durovent. for ~$1 per, this was a quick and easy solution that I used.

Here's a pic of my setup used to install the steel panels on my ceiling. My walls are 12', stacking a section of the multi-purpose scaffolding on top is ~2 - 3" lower then my trusses. I attached a 3' 2x4 on both ends. I ordered my panels @ 10' 3" lengths (my trusses are 2' on center) with 4' on center I would suggest 12' 4"to6" or 8'4"to6"

With my setup, I'm able to place a ladder next to scaffolding walking up the ladder while holding the panel in one hand, once near top I can slide the panel on top of the 2x4's. Then roll scaffolding into place, climb up ladder to scaffolding platform. I'm now able to easily make final adjustment of the liner panel into place and attach.

I'm about 95% complete with my 32x40 ceiling all by myself.

I'll take a better PIC tonight.

IMAG2368.jpg
 
Last edited:
OP
C

chevyracer5613

Well-known member
Joined
Dec 16, 2014
Messages
149
Location
Brighton, MI
Drives:

I am curious how others seal up any horizontal B vent, as the twist/snap lock (amerivent, menards) doesn't seem to do a great job. I went to HF and bought some flame retardant aluminum tape and it works OK, but I still get some leaks (condensation) on start up of my heater. It seems my options would be to raise the heater enough to create a strong downward slope, find a better way to seal the B vent, install a condensation trap/Tee/extension (or make one).

Thermal cameras are fun, and for the price of the one I am using, pretty affordable. Although I suppose not everyone has a need or desire for one....perhaps i'll "rent" mine out locally to recoup some of the cost :).

The insulation does seem to be helping, even though it is not finished....the only thing I don't like about the type of insulation I am using is the fiberglass backing. The fiberglass gets everywhere and wearing a mask is strongly suggested. I also wish I had planned on more sheets so I could have built larger soffit baffles, currently they are only 30" long. However, I have some left over perma felt that I might stable to the trusses to provide and taller effective soffit baffle.

I mostly have a lighting plan in place, and 4 of the 6 "large" lights installed.

Pulling from an old hand sketch of my air line layout, I attached a low-tech , not to scale, layout of my lights. Yellow are a 4 bulb, 2 row (8') T8 fixture mounted ~60 deg from vertical. The green are cheap T8 (some old T12) 2 bulb 4' fixtures I had laying around. Red is undecided. Basically the lighting directly over (or near) my work bench is undecided and the lighting around my eventual lift is undecided. The lighting for the lift will be the most fun to decide on, since I hadn't previously considered embedding lights into the concrete (seems like a great idea). So I might mount some light low on the wall angled up, roll lights beneath the car, cut a channel into the concrete and embed lights, or just use a drop light........I am welcome to ideas :).
 

Attachments

  • lighting plan.jpg
    lighting plan.jpg
    141.8 KB · Views: 70
To avoid these ads, REGISTER NOW!
Top Bottom