To avoid these ads, REGISTER NOW!

32 x 24 3 bay overhaul

wtfdskin

Active member
Joined
Sep 27, 2016
Messages
42
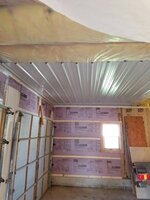
Hi all. First post here. Just started a remodel of my 17 year old 3 bay garage. When i originally built, we insulated and covered walls and ceiling with osb because i was poor. [emoji6] Well i hate to paint so its all coming down and being replaced with white steel. Furred out the 2x4 walls with 2x3s for fastening metal and added another 1.5" of insulation. First ceiling pieces go on tomorrow.

Plan is for suspended shelving along side and rear of two outside bays, center bay will be motorcycle parking, toolbox and milwaulkee 60" workbench. Also relocating my ceiling winch i use for hanging deer and removing my 5th wheel hitch from my truck. Finished off with a porcelain tile floor.

Garage gets used for parking, routine vehicle service and hone projects.

This will be a slow process as i am a one man gang and the garage is in use. Trying to keep one door usable at all times. Once i get past them it should go faster. Moving things around all the time sure slows things down.

292913f39060889e9038deb2c5af1fe8.jpg


Here we go! [emoji2]

Sent from my SAMSUNG-SM-G891A using Tapatalk
 
To avoid these ads, REGISTER NOW!
OP
W

wtfdskin

Active member
Joined
Sep 27, 2016
Messages
42
First 3 sheets up. Along with 3mil vapor barrier. Time to install door track and dismantle the other front third of the space.f43e3def204f4fa9f7468407d5a859a8.jpg

Sent from my SAMSUNG-SM-G891A using Tapatalk
 

Attachments

  • f43e3def204f4fa9f7468407d5a859a8.jpg
    f43e3def204f4fa9f7468407d5a859a8.jpg
    85 KB · Views: 0

churd9

Member
Joined
Nov 4, 2010
Messages
24
How hard was it to put up the metal on the ceiling.how did you do it did you have help and what are the specs on the sheets


Sent from my iPad using Tapatalk
 

churd9

Member
Joined
Nov 4, 2010
Messages
24
That's my next project is to finish my garage ceiling


Sent from my iPad using Tapatalk
 

cozy200305

Member
Joined
Oct 17, 2016
Messages
6
First 3 sheets up. Along with 3mil vapor barrier. Time to install door track and dismantle the other front third of the space.f43e3def204f4fa9f7468407d5a859a8.jpg

Sent from my SAMSUNG-SM-G891A using Tapatalk

About to do this very thing. I've been racking my brain trying to figure out what type of insulation to use and if I needed the plastic sheeting.

Any reason you went with the plastic sheeting?

Also, on the edges where the metal met the walls, did you use that metal J Channel to the sheets to sit in?

Looks great btw!
 

Attachments

  • f43e3def204f4fa9f7468407d5a859a8.jpg
    f43e3def204f4fa9f7468407d5a859a8.jpg
    81.2 KB · Views: 0
OP
W

wtfdskin

Active member
Joined
Sep 27, 2016
Messages
42
I used the plastic because the unsulation is unfaced fiberglass. Wasnt sure if i would need a vapor barrier so i did it just to be sure. There is usable attic space above and the garage is detached and heated.

Metal is fabral shelterguard available at home depot. Carries a 30 year warranty against chalking. 29 gauge.

I used a combination f and j channel at the ceiling and wall joint. Finishes the ceiling and wall all with one piece.

Installation was easy. Ran a stringline to make sure first piece went in square. Rented a drywall lift to set them. Makes working by yourself nice. Will use a 12' then an 8' then another 12 to span the 32' width.


Sent from my SAMSUNG-SM-G891A using Tapatalk
 
To avoid these ads, REGISTER NOW!
OP
W

wtfdskin

Active member
Joined
Sep 27, 2016
Messages
42
Standard 9x7 doors. Garage was a package from local lumber store. Drawback is there isnt much space between doors. Benefit was the entire garage was under 4000$ back in 2000 complete with siding to match the house. Its tight but surprisingly there is room to get out of the truck without banging the door against the wall but cant hang anything on the side walls.

Looking back i would should have gone 32' square. My 4 door dually pick up will fit with 2' to spare. Can never build big enough.

I will snap a pic if the door spacing when i get back to it. Its hunting season now so will only be working on it when the weather is crappy.

Sent from my SAMSUNG-SM-G891A using Tapatalk
 
Last edited:
OP
W

wtfdskin

Active member
Joined
Sep 27, 2016
Messages
42
Well 6" of rain freed up time to get back at it today.

@amkluttz heres a shot of inbetween the bays. Measures 16"
b5228bbd9c897d9bed234e4f067db999.jpg


Heres a close up of the ceiling to wall transition with the f and j combination.
f15bc6c070f089fb6f99cf82287f1604.jpg


Trimmed out the window, reinstalled the door track and got the wall started. Now relocating all the stuff and dismantling the other two doors.
4793657d2f22484dc5fc3f5364e1f185.jpg


Sent from my SAMSUNG-SM-G891A using Tapatalk
 

amkluttz

Well-known member
Joined
Sep 8, 2014
Messages
279
Location
Concord, NC
Thanks for the pics. Do you happen to have a front shot of the outside of the building looking at the bay doors?

Do you find it useful to have three bays with not much space in between or do you wish you had gone with two doors so that you could have storage space against the walls? With two or more cars inside is it difficult to get out of the car without banging car doors together? I've always been interested in doing three bays but am unsure if I'd really have enough space to do that without going wider.
 
OP
W

wtfdskin

Active member
Joined
Sep 27, 2016
Messages
42
I like the 3 bays. We use two for vehicles, the third is a work area and where i park the motorcycle. Also park the 4wheeler there for snow removal in the winter and a space to service the lawn mower etc without having to pull a vehicle out. I have enough room to rotate tires against the wall with a floor jack but the jack has to go in at an angle to clear the handle at the wall. No issues banging doors.

Would i have gone wider if budget allowed? Yes. Wider and deeper. But the third bay is handy for other projects without needing to shuffle vehicles.
e04b6f1ac6310264271b3e986015a6b0.jpg


Sent from my SAMSUNG-SM-G891A using Tapatalk
 
OP
W

wtfdskin

Active member
Joined
Sep 27, 2016
Messages
42
Now that archrey season is winding down slowly making some progress.
All 3 doors are back together and operational again. Started hanging tin above the doors. This has been the most tedious and slow part so far. Once this is done should speed up alot.
73e0a7776182359d3893db036ef1f108.jpg
ce234d36e2ff631a67f58251832a5b41.jpg


Sent from my SAMSUNG-SM-G891A using Tapatalk
 
OP
W

wtfdskin

Active member
Joined
Sep 27, 2016
Messages
42
Been a while since I posted, busy at work and holidays. Finally got to get back to it today. End wall finished, tear out more old stuff tomorrow on the back wall and rearrange more clutter.
c4cff19b1e91b384a26e2c35dcba7ea4.jpg

6103997a7595496b3f8161bdffa23700.jpg


Sent from my SAMSUNG-SM-G891A using Tapatalk
 
OP
W

wtfdskin

Active member
Joined
Sep 27, 2016
Messages
42
Tin is all up, starting into electrical mode now. All surface mount emt.
9d719ede6789c0b2d28b00eb155c7b74.jpg

9608923299f20d815bd105da79a6d7da.jpg


Sent from my SAMSUNG-SM-G891A using Tapatalk
 

amkluttz

Well-known member
Joined
Sep 8, 2014
Messages
279
Location
Concord, NC
Looking good! You must be handy with a conduit bender.

Do you find the conduit being surface mounted is problematic for sliding things against the wall or mounting things on the wall?
 
To avoid these ads, REGISTER NOW!
Top Bottom