To avoid these ads, REGISTER NOW!

32 x 40 build complete

machinist5

Member
Joined
Jul 14, 2007
Messages
9
Well, I guess I'm a little late posting this build thread - my shop has been done for about a year now, but I felt I should share my build because without this forum I would have never been inspired to take on the project myself, nor would it have turned out as nice as it did.

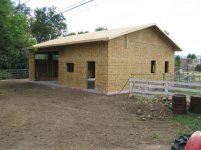
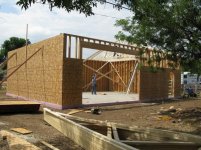
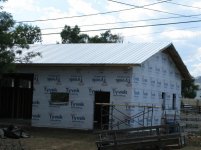
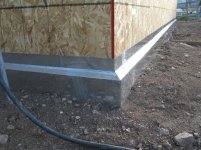
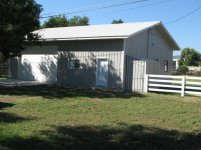
I live in a somewhat rural area and always pictured putting up a pole barn, but after getting quotes from Cleary and doing a lot of homework, I decided to build a 32 x 40 stick frame construction (2x6) on an insulated monolithic slab. Because I was working primarily by myself (with the occasional help from friends) I ended up hiring out some of the big labor tasks. Foundation, rough framing and drywall were hired out, but I did everything else myself.

The most frustrating part was dealing with the zoning dept for almost a year before I was able to get started. After that it was all smooth sailing, and the building dept was actually very helpful and a pleasure to work with (I work with inspectors at work though, so maybe I just know how to kiss a little *** to get what needs to be done...).

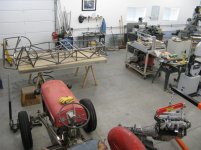
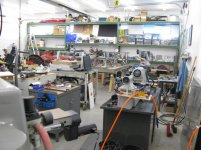
I'm not going to post as many pictures as I would have if I had been posting as I was going along, but hopefully you'll enjoy seeing it go up fast. I've had fun looking back at the photos now - makes me realize how much I was busting my *** over the last two years.

So, here's the first group of photos:

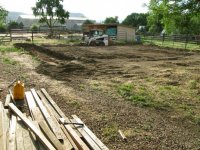
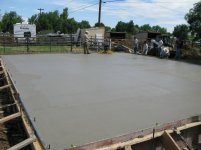
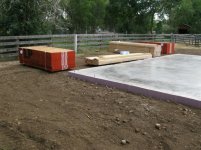
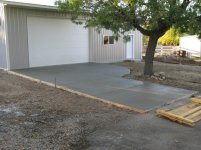
The old shed that had to go (I really liked how cute it was, but not really functional for any real work). Digging the hole. Insulated, rebar, ready to pour. Power trowell, and building in a pile, ready to go up.
 

Attachments

  • 1.jpg
    1.jpg
    120.5 KB · Views: 99
  • 2.jpg
    2.jpg
    133.1 KB · Views: 88
  • 3.jpg
    3.jpg
    153 KB · Views: 105
  • 4.jpg
    4.jpg
    148.3 KB · Views: 129
  • 5.jpg
    5.jpg
    79.7 KB · Views: 134
  • 6.jpg
    6.jpg
    126.3 KB · Views: 125
To avoid these ads, REGISTER NOW!
OP
M

machinist5

Member
Joined
Jul 14, 2007
Messages
9
The rough framing only took 2-1/2 days. It's fun seeing a building go up that fast. We had to crane the trusses over a power line and behind a tree - they placed all 24 trusses in exactly one hour - impressive to watch.
 

Attachments

  • 12.jpg
    12.jpg
    103.6 KB · Views: 123
  • 11.jpg
    11.jpg
    131.1 KB · Views: 156
  • 10.jpg
    10.jpg
    108.6 KB · Views: 130
  • 9.jpg
    9.jpg
    136.7 KB · Views: 124
  • 8.jpg
    8.jpg
    126.4 KB · Views: 124
  • 7.jpg
    7.jpg
    145.5 KB · Views: 127
OP
M

machinist5

Member
Joined
Jul 14, 2007
Messages
9
This is where I took over. I had some custom flashing bent to cover the insulation on the outside of the foundation - very happy with how that turned out. Next, installing Tyvek, man door and framing in the windows. The windows on the N & S walls were recycled and FREE! I had Raynor install the 16'x10' and the opposing 8'x8' doors - R18 insulated and built very well - I'm very happy with them. Next pics are installing/trimming out the soffets, and starting to install the siding. I used pro-panel II steel siding and roofing - pretty easy to work with and I love the way it came out. My goal was to never have to paint it in my lifetime.
 

Attachments

  • 18.jpg
    18.jpg
    119.5 KB · Views: 203
  • 17.JPG
    17.JPG
    123.8 KB · Views: 179
  • 16.jpg
    16.jpg
    114.9 KB · Views: 136
  • 15.jpg
    15.jpg
    93.9 KB · Views: 130
  • 14.jpg
    14.jpg
    122.5 KB · Views: 135
  • 13.jpg
    13.jpg
    124.4 KB · Views: 186
OP
M

machinist5

Member
Joined
Jul 14, 2007
Messages
9
Next I had a driveway slab poured - we used fiber reinforced mud with rebar on this one - one year later it still looks exactly the same (and they did a fantastic job finishing it). The next two weeks were spent digging the trench for the electric and gas. Electric had to be 24" below ground, and gas was 16" below. Luckily the electric was only 65' long. I dug it all with a pick axe and breaker bar as the ground is all hard clay and rocks (see next pic) - all those rocks came out of the trench - enough to later line the front and back of the building 10' out. I debated using a ditch-witch, but didn't want to have to pay the repair bill if one of those rocks won the contest. Needless to say, I was in pretty good shape after that two weeks.
 

Attachments

  • 19.jpg
    19.jpg
    114.3 KB · Views: 136
  • 20.jpg
    20.jpg
    141 KB · Views: 111
  • 21.jpg
    21.jpg
    134.2 KB · Views: 114
OP
M

machinist5

Member
Joined
Jul 14, 2007
Messages
9
After that I did the wiring (with the help of my aunt, a master electrician) - she and my uncle helped with burring the electrical cable, mounting the main panel and moving the main drop from my old garage to the new building (no pics). I also had to lay the gas line and pressure test it before burying it. Then it was time to insulate, drywall, paint and install lights and furnace. 3-rows of 6, 8' fixtures for lighting. I chose a 30' long, 40,000-btu natural gas fired IR furnace - my plan was to over-insulate the building and keep it heated 24-7. During winter I keep it at 60*F all the time, and it's very comfortable to work in. The floor usually measures around 65*F and it only costs me about $20 a month to heat it.
 

Attachments

  • 28.JPG
    28.JPG
    99.5 KB · Views: 218
  • 27.JPG
    27.JPG
    104.2 KB · Views: 201
  • 26.JPG
    26.JPG
    91.8 KB · Views: 225
  • 25.JPG
    25.JPG
    108.1 KB · Views: 195
  • 24.JPG
    24.JPG
    131.5 KB · Views: 194
  • 23.JPG
    23.JPG
    95.5 KB · Views: 190
  • 22.jpg
    22.jpg
    77 KB · Views: 207
OP
M

machinist5

Member
Joined
Jul 14, 2007
Messages
9
For ceiling insulation, I blew in about R60 cellulose - oh, I guess I forgot to mention the ceiling height is 12'. Being that high, and only having a 4-12 pitch roof, there wasn't much sense in trying to store anything in the attic. I should mention that the attic is vented through soffit vents exiting through a peak vent - the system seems to work very well - Winter is efficient to heat and Summer temps are always cooler than outside. I think the white steel roof helps with that too.

For internal storage, I scored some pallet racking on Craigslist - $300 for 30' worth, and it's the heavy stuff, but it needed some fresh paint before I wanted to install it - I decided to go with Jack Olsen green - I love that color. It took me about 40-hrs work to prep and paint it, but turned out very nice and I got lucky and found a matching flammables cabinet on CL as well.
 

Attachments

  • 31.jpg
    31.jpg
    77.9 KB · Views: 294
  • 30.jpg
    30.jpg
    68.4 KB · Views: 188
  • 29.JPG
    29.JPG
    135.8 KB · Views: 171
OP
M

machinist5

Member
Joined
Jul 14, 2007
Messages
9
So that's the short version of the build log. Last summer I added a compressor room that houses the air compressor and vacuum system for the sandblaster, and keeps the lawn tools from taking up valuable shop space. Here's a final pic of what the building looks like outside and pictures I took today with the inside already full of ****. I work as a machinist by trade, and take on side jobs as well as being an artist that works in glass, metal and wood. One very important project that I'm now able to make some progress on is the Lotus Seven replica I'm scratch building (frame on the table in front of the old Ferguson).

Hope you enjoy the pics. Like I said before - this forum really inspired me to go forward with the build myself. The building turned out better than I ever expected, and I couldn't be more happy with the end result. Thanks!
 

Attachments

  • 32.jpg
    32.jpg
    111.1 KB · Views: 286
  • 33.jpg
    33.jpg
    105.3 KB · Views: 356
  • 34.jpg
    34.jpg
    95.8 KB · Views: 396
  • 35.jpg
    35.jpg
    107 KB · Views: 405

larry_g

Well-known member
Joined
Apr 28, 2007
Messages
16,874
Location
oregon
You have something very nice there, well done. You others looking in here note how well the the 32' depth works. Room for a car and a tractor..

lg
no neat sig line
 
Last edited:

Cars&Quads

Member
Joined
Feb 19, 2012
Messages
24
First off nice garage. I'm looking at building something vary similiar in size. I've been debating on 28 x 40 but anyway to my question. On you man door side with the 16' garage door is that the 40' side and 32' deep? Thanks
 
To avoid these ads, REGISTER NOW!

flybefree

Well-known member
Joined
May 18, 2008
Messages
1,111
Location
Ohio/Kentucky
Looks great...like the way you have everything set up. What kind of lathe do you have? I am a budding machinist, always like to see what kind of machines guys have.

Well done.

Shaun
 
OP
M

machinist5

Member
Joined
Jul 14, 2007
Messages
9
First off nice garage. I'm looking at building something vary similiar in size. I've been debating on 28 x 40 but anyway to my question. On you man door side with the 16' garage door is that the 40' side and 32' deep? Thanks

Yes, the 32' depth is between the two big doors. I was originally going to build a 30x40, but 32' wastes less material when using 4x8 sheathing (really just an excuse to go 2-foot bigger). I'm glad I did - two small cars will fit lengthwise with just enough room to walk around. I know it looks a bit cluttered right now, but it really doesn't seem that way when your working in there. The way I laid it out, the right half is all stationary fixtures (machines, benches, etc) and the left half is all mobile, leaving the option to move things around and have a big open 18x32 space to work in.


Looks great...like the way you have everything set up. What kind of lathe do you have? I am a budding machinist, always like to see what kind of machines guys have.

Shaun

The lathe is a Victor copy of a Hardinge. I got it used for a good price and it's been great. Pretty much like all the other copies out there (sharp, etc). Some things about it I like better than a real Hardinge, but it's not built quite the same - still a very good lathe.

- John
 

sapcpo

Active member
Joined
Jan 30, 2012
Messages
35
Location
Western NY
Nice garage! I'm a little jelous. You did a great job. This is a great forum that motivates lots of people, including myself. I really like the insulation job and the heat source. What area are you from.
 

CanuckGT

Well-known member
Joined
Jan 8, 2012
Messages
47
Nice build! Looking to build similar up here in Canada this Spring.

I see you tinned the roof and was wondering, it looks like you also sheeted the roof first, can one just strap it then tin? Would this save a few $$ or for the extra $$ is it worth sheating first? im not a carpenter by no means,just curious..
 
OP
M

machinist5

Member
Joined
Jul 14, 2007
Messages
9
I'm in Colorado, and the weather has been relative temperate the last two Winters so I guess that helps keep the heating bill down a bit - but I think all the attention to detail, keeping it air tight, roof ventilation, South facing windows, steel siding/roof - it all helps make it more efficient. I was a little worried that the heater would be under-rated as most people seem to have a 60k-btu unit or larger for this size building. I will admit, if you want to change the temperature, it takes a while for it to warm up, but on the flip side, it seems to work very efficiently, and you can barely feel the heat coming off of the unit, so it's never uncomfortable to work under it. The unit I bought was from SRP - here's a link to it - it has internal baffles in the burner tube that keep the temperature much more consistent from one end to the other, and they also prevent a lot of the heat from going out the exhaust. Another nice thing about the 30' model is that the 40/60/80 k-btu units all use the same burner and hardware - just different jetting, so you can always bump it up if there's not enough heat output.

http://www.superiorradiant.com/Prod...redHeaters/ModelLTAStandardLowEvenHeater.aspx


As for attaching the steel roof straight to stringers (or perlins); yes, you can do that and the pro-panel II instructions cover the details. A friend did his garage that way, but he also insulated the underside of the steel with 3" of spray foam insulation - which works great on steel roofs, but it's more expensive. In his case, it was a really great way to insulate with a scissor truss design. All depends on what you want to do with the space, and what your climate is like. I also tend to over-build things, but I'm pretty sure this is going to give me many years of trouble free service. Oh, and I was also worried about hail damage having a roof non-continuously supported.
 

Zelatore

Well-known member
Joined
Sep 22, 2011
Messages
835
Location
Walnut Grove, CA
I didn't even bother reading the text, just scanned the pictures.

Then I saw that bare frame. Wait a minute...wazzat? (reads back through text) Yup, that's what I though, Seven!

Well done on both the shop and the Lotus project!
 
To avoid these ads, REGISTER NOW!
Top Bottom