You are using an out of date browser. It may not display this or other websites correctly.
You should upgrade or use an alternative browser.
You should upgrade or use an alternative browser.
32x40 Finally getting my Garage
- Thread starter matouse3
- Start date

To save some money, my dad and I put in the radiant pex and manifold as well as the moisture barrier and insulation. The insulation is 2" XPS and was installed under the slab and around the edge. Edge pieces were cut at a 45 up to the height of the top of the slab so that no insulation could be seen. All seems were tapes with Gorilla tape.
Moisture barrier was from Stego. A little difficult to find, but I contacted the company and they set me up with a local guy I could purchase it from. It was 15mil and was tough as nails. Never had any worries about ripping it or poking through this stuff. I overlapped it a few feet and taped the seams with the Stego tape. The tape was pricey, but nice stuff ($38/roll of 180ft.)
The PEX I order from BlueRidge.com as a package. Really nice stuff, manifold was great and went together easy. They had a the best prices I could find and were very helpful. They offer a layout service, but since they only do it a certain way, I opted for my own layout (took me forever), but I got it the way I wanted it. 6" spacing on the outside 2 lines and then 12" from there on in. Each of the 5 circuits also runs outside first and then works itself inward. Layout is below.
Attachments


kert
Well-known member
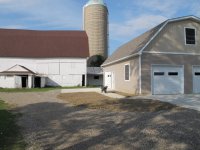
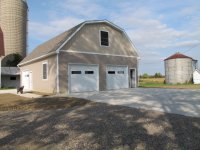
Congratulations. That's going to be a nice building. Love the old barn and silo.
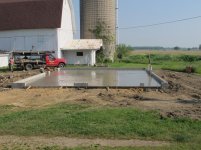
Next came the slab last Thursday. Guys did a great job and it looks awesome. It has rained on it the last couple days and the drains perform perfectly and I didn't notice any puddle spots.
The contractor wanted to lay the drain pipe on top of the sand and have me run my foam right up to it and cut around. I told him that I didn't spend $1200 bucks on insulation to cut it up and not have a continuous insulated surface. So we worked on the drain sump buckets and had to re-cut the holes lower to get them low enough to go under. Looked great when we were done and worked perfect. I put a drain under each car area on the front and a single one in the center of the workshop in the back.
The contractor wanted to lay the drain pipe on top of the sand and have me run my foam right up to it and cut around. I told him that I didn't spend $1200 bucks on insulation to cut it up and not have a continuous insulated surface. So we worked on the drain sump buckets and had to re-cut the holes lower to get them low enough to go under. Looked great when we were done and worked perfect. I put a drain under each car area on the front and a single one in the center of the workshop in the back.
Attachments


Last edited:
Bib Overalls
Well-known member
An impressive bit of work so far. Please keep the pictures coming. We like pictures!


Non Member
Active member
- Joined
- Feb 22, 2008
- Messages
- 37
Holy sh1T,i was worried about the roof and kept reading and ,that roof looks great with the barn/silo theme...and that bonus room is ****..
classic boost
Well-known member
nice. mine is the same size. what size doors?
Kevin54
MEMBER EMERITUS
Holy sh1T,i was worried about the roof and kept reading and ,that roof looks great with the barn/silo theme...and that bonus room is ****..
That was my first thought too once I saw the roof on the house. Glad to see you tied it all together to match everything else.
NWOhioChevyGuy
Well-known member
Love the garage, plan something very similar at myplace some day.
I plan on doing 10x10 doors and having a 12' ceiling height though.
What part of the world are you in? Mind to share a budget price, and what's included in that budget?
I plan on doing 10x10 doors and having a 12' ceiling height though.
What part of the world are you in? Mind to share a budget price, and what's included in that budget?
Love the garage, plan something very similar at myplace some day.
I plan on doing 10x10 doors and having a 12' ceiling height though.
What part of the world are you in? Mind to share a budget price, and what's included in that budget?
I considered 10x10 doors, but figured I didn't need anything that big as I have 13ft doors on my pole building that I store all my large stuff in. The ceilings in the place are right around 11ft with the 10ft 2x6 walls on top of the 8in block left out of the foundation and the sill plates.
I'm in mid-michigan.
I'll try to break out the budget as best I can. I contracted out the cement, building, OH doors, and roof somewhat separately to get the best price. Any questions- just let me know.
Budget:
Cement $12K
includes 42" footer, 3 rows of 6in block, 5 inch pad with 3 drains, 35'x40' approach (5inch), 20'x16ft approach (5 inch), and sidewalk to connect the 2 pads. Also includes the 2" foam board, Stego vapor block, ~1500ft 1/2" pex, and manifold (we installed this portion). This cost includes the cement labor.
Building Supplies $16K
includes 2x6 construction for a 32x40, Gambrel trusses (with addition of 2x6 framing for bonus room), Standard 4" horizontal siding with a small section of vertical board and batten accent on the front of one of the Gambrels, 3- 8x10 OH doors with R19 insulation and openers, 3- ninelight man doors, 40yr shingles, 5 windows (which I had), and a 6 ft sliding glass door.
Building Labor $9K
Includes erecting entire building and installing all doors, windows and roof. Also includes stairway to the bonus room and 3/4" floor up there. Pretty much buttons up the building and has it ready for me to start on the inside.
Inside work is mine to do (besides maybe spray foam of the bonus room). A little too early to describe my plans as they are ever changing for that part of the project, but I'll keep the thread up to date.
Last edited:
NWOhioChevyGuy
Well-known member
Thanks, our farm had all the buildings tore down before we purchased it. So this will be my only out building. (besides a small single car garage next to the pool area)
Want doors big enough to get enclosed trailer and other potential projects into, that is why I'm going with 10x10's.
I think I will also add a leanto off one side to provide shelter for trailer storage and other items that just need a roof and gravel floor.
I will probably do like you, and hire the items you listed and finish off the barn inside. However I may do the roof & siding.
Thanks for the budgetary $'s.
NWOhioChevyGuy
Well-known member
One other question, what is the dimensions of the bonus room with that truss?
What Truss company built them?
What Truss company built them?
One other question, what is the dimensions of the bonus room with that truss?
What Truss company built them?
Dimensions on the bonus are 15 wide, 7'8" tall.
I bought from Glaser's lumber- They use Bear Truss Company.
Be thankful that those buildings were tore down before you bought. We spent most of the spring tearing down the old garage and chicken coops. The tearing down went quick- it was the cleaning out of 100 yrs worth of old tools and metal and plain junk. I did take all the misc tractor parts and such down and got $1000 in scrap, so I guess it wasn't a complete wash.
")
NWOhioChevyGuy
Well-known member
Yeah, my father has told me over and over that they did me a favor in tearing them down.
They had been neglected since the 70's and would of been a lot of work.
Just wish the budget allowed for a shop to be built sooner than later. Have my first going off to college this year and her sister going next year. So at best looking at another five before mine gets built.
They had been neglected since the 70's and would of been a lot of work.
Just wish the budget allowed for a shop to be built sooner than later. Have my first going off to college this year and her sister going next year. So at best looking at another five before mine gets built.
kert
Well-known member
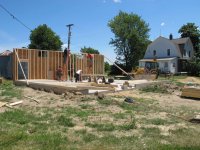
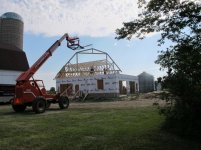
Trusses went up today along with a few decking boards. Starting to really take shape. Figure they will be ready for shingles by the 4th.
Those pictures look familiar.

Those pictures look familiar.
Great minds think alike I guess. Been jealous watching your place go up and sitting around waiting on mine. This board is a great resource for ideas and plans--so glad I found it.
Not much of an update. The crews finished up the roof deck and took off early on Friday due to the heat here and are off for the weekend. Should have my roof on early next week and then some lag time for the holiday weekend.
Last edited:


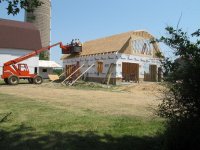
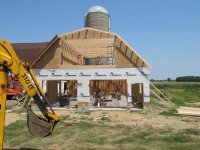
The crew has been busy this week. The roof was finished and the upstairs floor installed. The stairway was also installed. I decided on a new direction for the stairway based on limited space with the 3rd garage door. It now faces the small access door instead of the large garage door, but its better than not having enough space to drive into the garage through that door.
The windows went in as well, along with the access doors. The windows were leftovers from the installation in my house. The vinyl window company made the windows for the house wrong and just left them with us after they made the new ones. I knew I would find a use for them sometime.
The access doors are galvanized steel with PVC jams. They are nine-light doors with the grids on the inside of the glass for easy cleaning.
They got a good start on the siding as well. Its simple D4 from Certainteed, in the Natural Clay color.
The second floor is looking good with the slider and windows in. Now the planning for the layout begins.
Attachments


moonlight_ken
Active member
- Joined
- Dec 23, 2011
- Messages
- 26
WOW! Your building my shop! Thanks for the visuals.... I hope to be doing the same thing in the next few months. I am really praying that I can get the foundation in before winter sets in. Really like what I am seeing! NICE JOB
Just about got her buttoned up. The siding was finished today along with the last window. The wife picked out the siding color and I think she did a fine job.
They got the ledger up for the deck I'll be putting on shortly. I wanted the crew to slap it to the building so that they could flash it in properly.
They got the ledger up for the deck I'll be putting on shortly. I wanted the crew to slap it to the building so that they could flash it in properly.
Attachments


BigGMC
Well-known member
Awesome! Appreciate the detailed pics..... I'm planning the exact floor layout and I might steal your radiant pipe plan
thanks for sharing the numbers too, it's good to see things cost more in NY!
Questions:
Is that vinyl siding?
There are two pads? (and you mention a sidwalk too) Thats' alot of concrete work for the money!
You did control cut the garage slab? I keep seeing conflicting thoughts about cutting a radiant pad due to possible contact with Pex. Is your Pex under the wire mesh?
Last edited:
Awesome! Appreciate the detailed pics..... I'm planning the exact floor layout and I might steal your radiant pipe plan
thanks for sharing the numbers too, it's good to see things cost more in NY!
Questions:
Is that vinyl siding?
There are two pads? (and you mention a sidwalk too) Thats' alot of concrete work for the money!
You did control cut the garage slab? I keep seeing conflicting thoughts about cutting a radiant pad due to possible contact with Pex. Is your Pex under the wire mesh?
Yes, that is vinyl siding. Certainteed, D4 on the bottom. Certainteed Board and Batten vertical on the top section.
There will be 2 pads with a connecting sidewalk. Yeah, I feel like I'm getting a fair price for all that hard surface work.
Control cuts were made in the floor, the day of the pour as the contractor said he has seen some issues with rather fast drying with insulation under the floor and wanted to make sure there weren't any early cracks.
I stapled my pex right to the foam as hitting it with the control cuts was a #1 concern for me. I have read all the varying schools of thought, and I didn't see a big issue with leaving it against the foam and putting the steel on top. Made me sleep better at night.
Tell me about your floor drains. Are they straight pipes to daylight, or do you have a pit. P trap? Sand trap? Straight 90 degree elbow beneath the drain? And how are you managing things at the garage doors... will you have any sort of thermal break between the poured slab and apron? If so, inside the door, outside the door, or directly beneath?
Really looks like it came together great! Your wife has a great eye for color.
Really looks like it came together great! Your wife has a great eye for color.
The drains are straight piped out the back to daylight. I don't foresee much prolonged use of water in there, so I'm going to stick with that. Each drain has a sand trap box that sits about 3-4 inches deeper than the outlet drain. Each of the sand trap boxes has an in and out and all three drains are connected. No thermal break at the garage doors, going to have to live with the heat loss there.
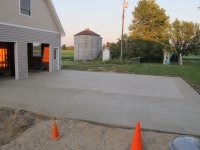
Cement approach and sidewalk went in today. Turned out really nice and, as always, bigger than planned. Pictures are included of the approaches to the 3 garage doors, but they also put in my posts for the deck and a small pad for the 3rd man door on the East side.
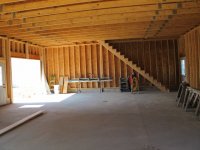
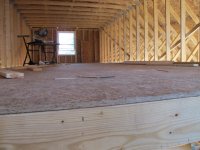
I also threw in a pic of the upstairs where I have been picking away at filling in the void rafter space to make storage area behind the walls. I plan to have some doors to access that space as well as build in some storage. Figured I would just go ahead and fill in all the rafter space, then work in my storage later. Makes for a safer working environment as well as I don't have to worry about myself or the little one stepping off the edge.
I also threw in a pic of the upstairs where I have been picking away at filling in the void rafter space to make storage area behind the walls. I plan to have some doors to access that space as well as build in some storage. Figured I would just go ahead and fill in all the rafter space, then work in my storage later. Makes for a safer working environment as well as I don't have to worry about myself or the little one stepping off the edge.
Attachments


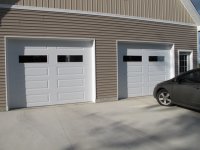
Now she's got the finalized look. The garage doors went in yesterday. I got CHI doors with an R19 insulated value. I think they turned out looking very nice. I also spent the last few evening moving dirt around to get the edges of the garage up to grade with a nice slope from the building. I plan to wait a couple days for it to rain on it then till it up, finalize the leveling and put the seed to her.
The other pic is of the graded dirt along with my post supports for the deck that will go in *soon*.
I decided to cover up my floor drain outlet, so I dug a 5 foot hole, filled it with stones and covered it with a large piece of cement. I don't foresee using the drains for much more than a seldom floor wash down, so I don't see a problem.
Attachments


Well, didn't pass final inspection last Friday, so we had to add a rail to the stairway and block off the slider to the yet-to-be-built deck. Got her passed on Monday morning.
It worked out that if I put a 2x6 on each step, it gave me a <4" gap between each "spindle". I ran them up an extra 36" past the top to kill two birds and give me a rail on the upstairs looking down the stairwell. Just ran a 2x4 up the side for support and a hand rail. Also ran a 2x4 along the bottom of the steps for support and to tie all the "spindles" together. It is secured in a way that if I need to pull it out, I can just untie from the second story floor and the whole thing will come out in one piece. Hopefully I won't have to do that, but you never know.
It worked out that if I put a 2x6 on each step, it gave me a <4" gap between each "spindle". I ran them up an extra 36" past the top to kill two birds and give me a rail on the upstairs looking down the stairwell. Just ran a 2x4 up the side for support and a hand rail. Also ran a 2x4 along the bottom of the steps for support and to tie all the "spindles" together. It is secured in a way that if I need to pull it out, I can just untie from the second story floor and the whole thing will come out in one piece. Hopefully I won't have to do that, but you never know.
Attachments


Last edited:
BigGMC
Well-known member
Came out great, keep plugging away.
Spray foam huh? In your area how does that system compare with standard fiberglass? I'd like to do it, but can't swing the cost.
Spray foam huh? In your area how does that system compare with standard fiberglass? I'd like to do it, but can't swing the cost.
Came out great, keep plugging away.
Spray foam huh? In your area how does that system compare with standard fiberglass? I'd like to do it, but can't swing the cost.
Thanks, trying to keep her moving, but with hunting season here, I am pulled in other directions.
It doesn't compare with fiberglass IMO. I had my house done and I absolutely am sold on the stuff. It seals up the place like a dream and works great.
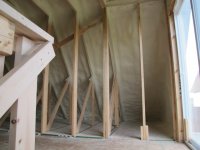
I'm paying $4K for the upstairs which is about 2000 sq ft of surface area that needs to be sprayed 3-4 inches thick. I looked into doing fiberglass, but I would need to run baffles up each rafter space, or figure out how to insulate around the walls that I plan to put up inside the living space in the loft. I really couldn't see how I could do it, and do it well. I want to use the open rafter spaces outside of the room space for storage-if I ran insulation in the room walls, this would be difficult. If I ran it against the roof, I don't know how I would get it thick enough to work well.
Since I am going to insulate right against the roof deck with the foam, this means that I don't have to do all that baffle work and I can wait to run electrical and do my wall setup later in the winter when I have time. I'll also be able to work in an insulated space during that time of the year, which will help with motivation.
Last edited:
Spray foam is all finished in the bonus room. Looks incredible up there and is as quiet as could be and nice and tight. Just in time for winter (after this last warm spell of 80 deg. weather passes). Only had the upstairs sprayed for now as I have to run electrical and such downstairs before he comes back for that. The upstairs is such that I can run all the electrical in the inner wall with the insulation already up and not have a problem. I was quoted for 3.5inches all around, but for the most part he came out thicker than I expected, but no complaints here.
I might get around to putting a coat of paint on it this weekend.
I might get around to putting a coat of paint on it this weekend.
Attachments


Last edited:
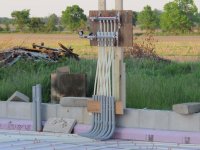
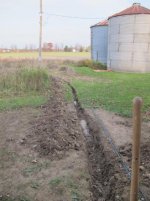
Pulled my electrical into the building. Trenched it from an overhead line that ran to a nearby pole. The pole had electrical to it, so I put a new light on the pole and a shutoff, then ran direct burial to the building for a 125 amp service.
Now that its inside, I can start pulling some wire and getting some light.
Now that its inside, I can start pulling some wire and getting some light.
Attachments

Well, progress has been slow with hunting season here, but I managed to get a few things accomplished. I sprayed a coat of white paint (photo) on the foam to protect it and also give some light reflection as I plan to mount some lights in the rafter space behind the walls to serve as a usable "closet" area.
I ran some electrical to get me started and get the extension cord off the lawn running from the house to power the garage openers. I ran a single 15A circuit to the car garage area and a double 20A circuit to one wall of the workshop area downstairs where I plan to put my work bench area (photo). I'll run more in a bit when I finalize where I want some of the other items downstairs.
I was debating between plywood and carsiding for the walls upstairs since I wanted this to have a more finished look as I plan to have a hangout area up there and a functional spare bedroom. While I was debating on the additional cost for carsiding, Menards ran their black friday deals and had it on sale. The sale made it less expensive than plywood and Home Depot, although reluctantly, matched the price and gave me their policy extra 10% off, so I grabbed two bunks of the stuff which is now sitting on a trailer inside waiting for me to get started. I was leaning toward the carsiding as I can put it up myself without help to hold and cut the large sheets of plywood. It won't go as fast, but I think I will look better. We shall see.
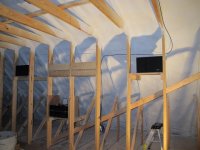
I also have been picking away at putting in the stereo and TV area (photo) since I needed a place to start and centering this in the wall accomplished that goal. Planning on installing the ceiling can lights this weekend up there to give me some light and hopefully make the area more inviting to work in.
I ran some electrical to get me started and get the extension cord off the lawn running from the house to power the garage openers. I ran a single 15A circuit to the car garage area and a double 20A circuit to one wall of the workshop area downstairs where I plan to put my work bench area (photo). I'll run more in a bit when I finalize where I want some of the other items downstairs.
I was debating between plywood and carsiding for the walls upstairs since I wanted this to have a more finished look as I plan to have a hangout area up there and a functional spare bedroom. While I was debating on the additional cost for carsiding, Menards ran their black friday deals and had it on sale. The sale made it less expensive than plywood and Home Depot, although reluctantly, matched the price and gave me their policy extra 10% off, so I grabbed two bunks of the stuff which is now sitting on a trailer inside waiting for me to get started. I was leaning toward the carsiding as I can put it up myself without help to hold and cut the large sheets of plywood. It won't go as fast, but I think I will look better. We shall see.
I also have been picking away at putting in the stereo and TV area (photo) since I needed a place to start and centering this in the wall accomplished that goal. Planning on installing the ceiling can lights this weekend up there to give me some light and hopefully make the area more inviting to work in.