To avoid these ads, REGISTER NOW!

32x40 Pole Barn Build Thread

Kma4444

Active member
Joined
Oct 27, 2010
Messages
42
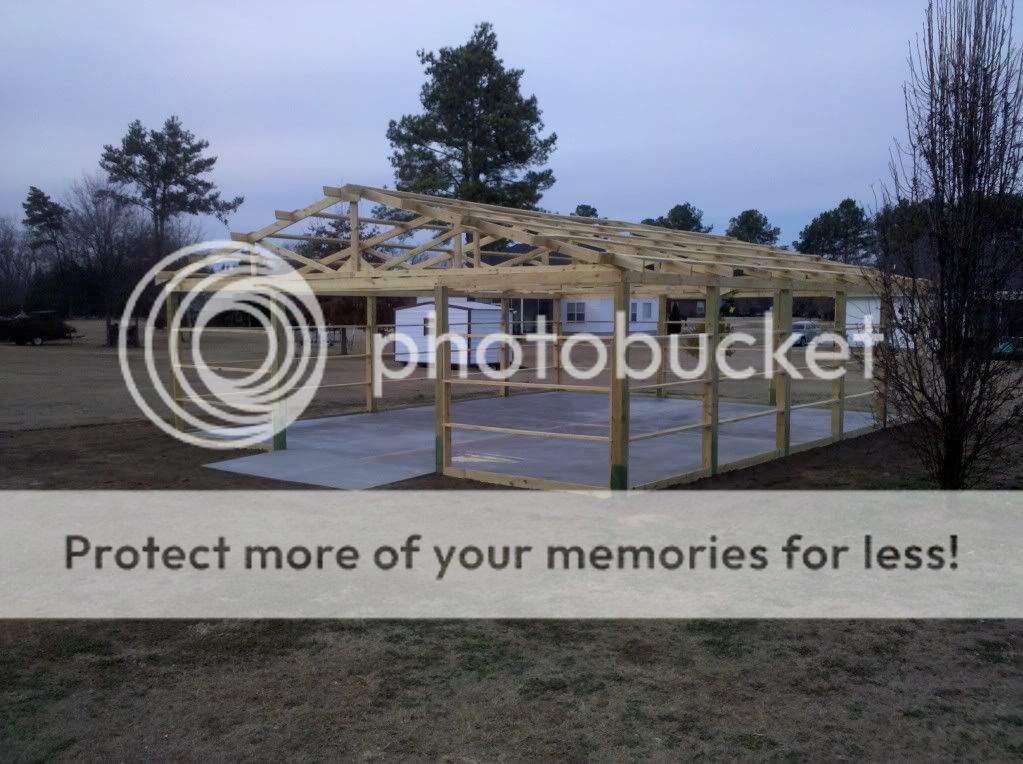
So I thought I would toss some pics up of my current project. I recently had a move from Atlanta to Macon Ga. I lost my 24x33 shop but am gaining a 32x40, pretty good trade except for the dissembled nature of the new one.

I went and got zoning and building permits, which were relatively painless and got a set of plans from Blackberry Meadows, which were alright. Didn't really need them as I ended up changing them quite a bit. They called for 4x4's on 10 foot centers and I went with 6x6 on 8 foot. I also decided to do commercial or bookshelf girts and added a foot overhang all around to dress the place up a bit.

It will be finished in white steel sides and a black roof. Yeah, not my first choice of roof colors but it matches the house which is in a neighborhood.

So with the preamble done here's what everyone cares about, pics.

IMG_20110106_161546.jpg


This was end of day one. I'm working mostly by myself. Just some occasional help from the girlfriend's nephew. He was here for pole setting day and that has been all so far.
 
To avoid these ads, REGISTER NOW!
OP
K

Kma4444

Active member
Joined
Oct 27, 2010
Messages
42
Another view from day one. This also shows my workbench, the trailer.

IMG_20110106_143954.jpg


IMG_20110106_143935.jpg
 
OP
K

Kma4444

Active member
Joined
Oct 27, 2010
Messages
42
19.8 tons of #57 gravel. $475 ish delivered. I was stunned at the ditch a dumptruck could back through. It was wet from rain the day before and he backed right through a ditch and right up a 4 foot high ditch. Didn't even spin a little, but it did leave HUGE impressions in the yard, oh well.

IMG_20110106_121557.jpg
 
OP
K

Kma4444

Active member
Joined
Oct 27, 2010
Messages
42
Day two 16 holes, in somewhat recalcitrant clay soil. Actually the first foot was balck soil and pretty easy, then a cap of clay that was hard as concrete then red clay that was very easy to get through.

IMG_20110107_130413.jpg


This made it a bit easier, it was $90 well spent.

IMG_20110107_130617.jpg
 
OP
K

Kma4444

Active member
Joined
Oct 27, 2010
Messages
42
Day three and the posts begin to sprout from the holes. I couldn't get any poles treated for burial so I bought some Cop-ox on advise from the building supply place and painted on two wet coats.

IMG_20110108_123031.jpg


And they are beginning to take over the yard.

IMG_20110108_162823.jpg


IMG_20110108_162847.jpg
 
OP
K

Kma4444

Active member
Joined
Oct 27, 2010
Messages
42
I know, this is nothing for you folks up north there, but for Macon Ga, this was a LOT of sleet and frozen rubbish, this cost me a day and a half. Crazy thing is, a week later, it is still on the ground in the shade. Yeah it's been pretty cold for Central Georgia.

IMG_20110110_072733.jpg


The ski boat, pretty useless right now.

IMG_20110110_072746.jpg
 
OP
K

Kma4444

Active member
Joined
Oct 27, 2010
Messages
42
The end of day four, well four and a half as I did get a half a day in during the freeze BS. Almost looking like something.

IMG_20110113_143805.jpg
 
OP
K

Kma4444

Active member
Joined
Oct 27, 2010
Messages
42
End of day six, yeah this was a hard day with hanging off a ladder, circular saw in one hand and sawzall in the other, Well, maybe not exactly but pretty close. The Zoning guy stopped by later in the day and said he didn't want to read about me in the paper. Dead from the fall, hand sawn off during the fall. He offered to bring by a four legged stand for me to use. Very nice of him. Love southern hospitality.

IMG_20110114_173712.jpg
 
OP
K

Kma4444

Active member
Joined
Oct 27, 2010
Messages
42
And where I am now, a week worth of work days and this is it so far. Sorry for the terrible first pic.

IMG_20110115_164139.jpg


IMG_20110115_164224.jpg


IMG_20110115_164250.jpg
 
OP
K

Kma4444

Active member
Joined
Oct 27, 2010
Messages
42
So I guess this ended the eighth working day. Had help in the form of the girlfriend's nephew and his dad. Dad brought over his Mahindra with the 5' tiller and broke the ground up and between him and me on my little Allis we leveled it out and spread 19.7ish tons of gravel. Nephew drilled and bolted the tops of the posts and 2x6's together. It was probably not a necessary step but I feel better about it than I would have with just nails.

Next is compacting the gravel and getting the lumber yard to swap my 2x6x16s for the 2x6x18s I need to finish the trusses. Not looking forward to the concrete bill but there ya go.

IMG_20110116_170405.jpg


IMG_20110116_170450.jpg
 
OP
K

Kma4444

Active member
Joined
Oct 27, 2010
Messages
42
Yesterday was a rainy one so of course it was perfect for COMPACTION!!!! 7 Hours of following the plate compactor around, raking down high spots etc. Great fun, would have been better if my new rainsuit had a hood like it was supposed to, but there ya go.

IMG_20110117_172455.jpg
 
OP
K

Kma4444

Active member
Joined
Oct 27, 2010
Messages
42
And today was a final lap or two with the compactor and then truss building. Not very exciting visually, but it was good progress. Now just to recruit some help and hoist the trusses in place and purlins. Then it's framing inspection and concrete. The concrete might get done next week. Waiting to hear for sure from the mud slingers. I have decided to enlist the help of trained individuals as I don't want to make a mess with $2k worth of the stuff.

IMG_20110118_165212.jpg
 
OP
K

Kma4444

Active member
Joined
Oct 27, 2010
Messages
42
Thought I would toss up some just detail pics to see if I can entertain anyone. We love pics of course.

IMG_20110118_165238.jpg


IMG_20110118_165421.jpg


IMG_20110118_165403.jpg


IMG_20110118_165318.jpg
 

Sterff

Well-known member
Joined
Feb 8, 2010
Messages
1,367
Location
PA
Looks good so far. We had some freezing rain here today. It can be a pain!
 
OP
K

Kma4444

Active member
Joined
Oct 27, 2010
Messages
42
Thanks for that, I feel for ya on the freezing rain. But of course what I might have to deal with would not even be an inconvenience to you guys!!!!!
 

HeyNow^

Well-known member
Joined
Jun 9, 2010
Messages
147
Location
Wv
When they built my 30X40X12 pole barn, they wrapped the 2X4s around the building every two feet. Does your plans call for 2X4s placed between the posts? What will hold the posts from moving? I'm just asking, no smart *** intended. I am not that familiar with all building types of construction.
 
OP
K

Kma4444

Active member
Joined
Oct 27, 2010
Messages
42
If you look at my pics you will see 2x6s between the poles, they are laid flat between the poles instead of vertically on the outside of them. I will likely add another row of them equidistant between the top row there now and the 2x6s at the top of the posts. This is for supporting the metal wall sheathing. The building is supported by the poles and they provide the vast majority of the strength of the building. I decided to do the girts like this, "bookcase or commercial" style as I liked the look of it and it will make doing interior walls and or insulation a bit easier.

That's a long explanation for a simple question, sorry about that.

Here's my next progress pic. I have to tell you, the trusses were a serious pain to get up there and braced, that was dangerous work and next time I would only do it with a power lifting unit of some kind, backhoe, forklift, something. I have rented a bucket lift for the purlin installation. I have it for the weekend for a one day charge, should make things much easier and hopefully quicker.

IMG_20110120_083037.jpg
 
To avoid these ads, REGISTER NOW!

MatthewM

Well-known member
Joined
Dec 20, 2009
Messages
67
Location
Phoenix Valley (Peoria), AZ
Wow, this is a great build keep the pictures, explanations, and tips coming. I plan to build a barn and/or shop (depending on what we buy) at my new site after moving in March and will absolutely be using your build as guidance. Have you built a barn before, and can your reccomend any references or books for a first time builder?
 

gabeancounter

Well-known member
Joined
Jan 8, 2010
Messages
914
Location
east bumble
Awesome work. Looks really good. I am planning to do a very similar build this spring.

Got a few questions for you.
1. Did you consider using three laminated 2x6's in place of the 6x6's? I found they are wanting $50 a post and I am little concerned about twisting. My understanding is that gluing and nailing the PT 2x6's helps with twisting - any downside to this?

2. Did you build your trusses? If so where did you get the design? They are spaced 8' apart? I thought max was 4' for a metal roof?

3. Do you think the bucket lift could have been used to help set the trusses? How much do think each truss weighs?

Thanks Paul
 
OP
K

Kma4444

Active member
Joined
Oct 27, 2010
Messages
42
Alright then, so I'll give a few of the questions a shot. Sorry for the slow response, the weather was alright this weekend so I worked, you know how that goes.

This is my first pole style building. I have done lots of building projects but this is my first complete building. I chose the pole style because I liked the look and sturdiness of it.

Probably the best info I found on building it was here http://www.pole-barn.info/how-to-build-pole-barn.html

I bought a book by the company I got the plans from, blackberry meadows, and it was alright but the info on the site there was more helpful.

I did think about using the laminated 2x6 method and might go that way if I do another one. I only had a couple poles that had any bend to them and it wasn't too consequential. I would want to use a very good adhesive if I was to do the lamination style posts. That was the only thing that made me decide to use the 6x6 instead. I would have used a 4x6 post but since I wanted to do the commercial style girts, the 6x6 was the way to go. Don't get me wrong, the laminated post would be a nice way to go and good adhesives are out there but with the tight time I am working with, I wanted to just get on with it.

I did build the trusses, they came out pretty good, no real complaints except for the terrible lumber quality. Of course that goes for the rest of the lumber as well. I'm not saying there is any particular problem but a #2 board can range from pretty nice to utter rubbish. there was some warping and such with the lumber and when you get out to an 18 foot long one as in the rafters for the trusses, it was hard to find a good piece. What I have will work fine, but I'm used to doing metal work and any twist warping or whatever would mean scrap so it's an adjustment. The plans I bought had the truss design in them. They will be plenty strong.

The plans called for the trusses on 10' centers and the posts to be 4x4, I changed the posts to the 6x6 and added a row to make the centers 8'. The roofing attaches to the purlins which are on 4' centers so it's all good with that.

No doubt a bucket lift, backhoe, rough terrain forklift etc would have made the trusses easier. The biggest issue is keeping the truss upright while you get it tied in. The best method I found for that was a long strap around the top of it with a person on each end keeping it vertical. It was easy enough to tell them which way to pull to keep it vertical. With the 2x6 rafter boards, the things are pretty heavy, I would guess 200 pounds. So combined with their 32 foot width and wobbly nature, they are a tricky thing to handle. I would use a tall lifting device or sure next time. And as soon as it is in place it has to be braced.

SO I think that's all my accumulated knowledge for now. and with that here's a pic from yesterday afternoon. Purlins are done and the temporary supports are gone from the gable ends. Also got all my overhangs done and on. I wanted the look of the 12" overhang all around.

IMG_20110123_170400.jpg


Also found a happy piece of wood in my pile. Guess this would be a good #2.

IMG_20110123_152810.jpg


Calling the inspector today for my only required inspection, hopefully that goes quickly and well. I'll let you know. Well, I will have to get an electrical inspection. And a licensed guy has to sign off the work before the inspector will do his thing so that is another thing to deal with. No biggie.
 
Last edited:

KEH

Well-known member
Joined
Jan 31, 2010
Messages
5,142
I'm assuming the timbers you have on the ground between the posts are treated lumber, I con't tell from the pics.

Welcome to the cold snowy South. It will be years before you experience that again.

KEH
 
OP
K

Kma4444

Active member
Joined
Oct 27, 2010
Messages
42
Yes, the bottom boards are treated, the ones on the outside of them are just there for form boards. I will take them down and use them as the last row of girts when the 'crete is done.
 

KEH

Well-known member
Joined
Jan 31, 2010
Messages
5,142
Good job. Insulate for protection from the heat, that will be more of a problem that cold. Are you on the South side of Macon? My recollection is that the North side is more hilly than that, of course you can't tell much from one pic.

KEH
 

sparky7

Well-known member
Joined
Dec 13, 2010
Messages
364
Location
NewEngland
are there any pole barn designs out here that do not use a truss type roof, such as for a boat shed for example?
 
OP
K

Kma4444

Active member
Joined
Oct 27, 2010
Messages
42
Hey all, sorry for the terribly slow response, but it seems that getting cement trucks stuck in your side yard, on top of the phone lines, is hard on the DSL. I am on the south side of Macon here,very astute, the best exit is the last one on 475.
I would not recommend the Blackberry farms plans, they are only a rough guideline at best. I'm going through a thing with the building inspector at the moment that I think I will be done with tomorrow if the assistant director is true to his word. But if I had built the shop to the plans the shop would not have been able to pass inspection. I changed the pole spacing to 8' instead of 10'. I talked to a local engineering firm and they felt that the 10' centers wouldn't have been likely to pass at all but the way I built it would likely be fine if they did their inspection on it. I am still angling towards not needing to pay for that. I'll keep you guys updated, hopefully tomorrow as I go to Denmark Wednesday for three weeks.
As far as setting the trusses I notched the top of my poles to set the trusses which you can see in my pics. This made setting them and nailing/bolting them in place pretty simple and secure. I don't have many uplift worries with them.
So here's some pics from concrete day, pretty eventful as it had rained the day before, pretty hard on the lawn.......
First truck, a little sloppy there

IMG_20110126_081154.jpg


Getting close;
IMG_20110126_081012.jpg


The first of the goop hits the ground;
IMG_20110126_081221.jpg
 
OP
K

Kma4444

Active member
Joined
Oct 27, 2010
Messages
42
More from the concrete extravaganza;

IMG_20110126_081540.jpg


IMG_20110126_081648.jpg


The first truck gets out OK and the second one tries to get in;

IMG_20110126_084440.jpg


That's as far as he got at first..........

IMG_20110126_090602.jpg


After lots of digging and stuff we got him out of the ditch and he jumped through it the next time,,,, GOOD until he got up in the yard and jumped on the brakes..........
 
OP
K

Kma4444

Active member
Joined
Oct 27, 2010
Messages
42
Well, the brakes were a bad idea. This took a little extra help

IMG_20110126_094719.jpg


A chain and an extra duty strap.

The chain broke so it was just the strap this time, I, as before, got well away.

IMG_20110126_095116.jpg
 
OP
K

Kma4444

Active member
Joined
Oct 27, 2010
Messages
42
As you can see, the yard wasn't too bad,,,,,,,, yet. Have you ever seen a cement truck smoke the tires, I have. It finally pulled it back and we filled the ruts with wood and everything else we had so the truck could pull up to the shop before the concrete hardened. It had been about two hours at this point

IMG_20110126_094817.jpg


And the yard looked fairly rough at this point

IMG_20110126_100424.jpg


But at least my finishers were working

IMG_20110126_131011.jpg


This was getting close to the last load, we had to fill the ruts with two truck loads of sand so the trucks could get in and out. This was an extra little bit of work. Sorry I didn't het pics of all that.

IMG_20110126_090617.jpg
 
Last edited:
OP
K

Kma4444

Active member
Joined
Oct 27, 2010
Messages
42
There was lots of digging and filling of ruts, all in all quite an ordeal.

IMG_20110126_170843.jpg


But the finishers did a great job, working until 9pm and I have a nice slab.

IMG_20110127_165054.jpg
 
OP
K

Kma4444

Active member
Joined
Oct 27, 2010
Messages
42
The siding and roofing is sitting there on the trailer, but until I get past the inspection, I am hesitant to install any of it. Hopefully tomorrow.
 

Case IH

Well-known member
Joined
Dec 31, 2010
Messages
904
Location
Green Bay WI
That Cement truck extravaganza was pretty funny from here but im sure those drivers were pissed they had to get out of there trucks.....I feel for ya we had a very wet summer here too.
 

lrainh2o

Active member
Joined
Feb 5, 2011
Messages
35
Location
Oregon
How tall are the walls? Whats the size of the door opening? I plan to build of 24x48 pole barn when i sell my other house!
 
OP
K

Kma4444

Active member
Joined
Oct 27, 2010
Messages
42
The walls are 10' this limits the door to the height I built for it's opening. The door will end up around 9'5" tall and about 11' wide. It will be two doors hinged in the middle. I thought I would prefer the look of the two doors and sealing them will be easy.
Work has stopped for the moment as I am on a business trip to Denmark until the 24th. Really would have liked to gotten the metal on before I left, but there ya go. Stay tuned for updates.
 
To avoid these ads, REGISTER NOW!
Top Bottom