To avoid these ads, REGISTER NOW!

36 gmc

MP&C

Well-known member
Joined
Oct 21, 2009
Messages
4,398
Location
Leonardtown, MD
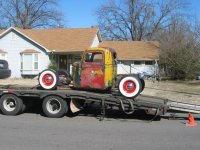
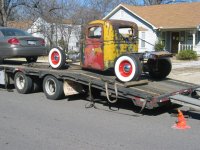
This stopped by the shop today....


Picture019.jpg


Picture018.jpg


Picture020.jpg


Picture021-1.jpg


Picture022-1.jpg


The owner had asked me to paint this a couple years ago, but I was elbow deep in a 65 Fairlane at the time. He found someone else to paint it for him, it's a garage done finish with a bit of dust and peel in various areas, so it will get some 3M trizact magic done to it..
 
To avoid these ads, REGISTER NOW!
OP
M

MP&C

Well-known member
Joined
Oct 21, 2009
Messages
4,398
Location
Leonardtown, MD
Thanks for the comments guys. This thing is neat as a pin, but the owner just wants it detailed a bit nicer. We started to look around at a few things, and noticed this right off the bat. How does this happen?


Picture030.jpg


Next, the hood sides showed a bit of mis-alignment. Back by the cowl, plenty of gap at the top, but overlapping at the bottom....


Picture027.jpg


This looks to be an issue with the core support height. Looked under the front end, and the core was bolted directly to the frame. Everything I've ever seen had a rubber pad and shims under it. Playing with some different sized bolt "spacers", it looks like we need to gain about 3/4" in height, for this as a result....


Picture038-1.jpg


Still, we had inconsistencies from one side to the other. A quick triangulation measurement from drivers hinge pin to center of grille, and passenger hinge pin to center of grille, showed the grille is sitting off to the passenger side about 3/8". These didn't help matters either:


Crooked hood hinge block
Picture029.jpg


Core shifted to passenger side
Picture032.jpg


Picture033.jpg


So in order to not drag this out too long, I've asked the owner to come over tomorrow and draw the line in the sand so we can keep my **** retentive nature to a minimum..
 

larry_g

Well-known member
Joined
Apr 28, 2007
Messages
16,871
Location
oregon
Great looking rig there. To my eye it looks to be a weight class above the norm with a longer box? Am I correct or is it a difference between the Chev and GMC of the day?

lg
no neat sig line
 

supermerle

Active member
Joined
Aug 25, 2010
Messages
44
Location
Arkansas
To bad you were busy at the time. In your first post you talked about 3M trizact? What is that and what does it do? With the body miss aligned and no rubber I'd bet there is some scatches on the lower hood area? Thanks for your time again and look forward to seeing you work your magic. Not trying to steal your post but here's a picture of a 1941 International KB1 I did a few years ago that took me @5 years in my spare time. I restomoded it with new drivetrain, but wished I had left original. I thought people might like to see another old truck.
 

Attachments

  • PICT0268.jpg
    PICT0268.jpg
    148.1 KB · Views: 91

iajonesy

Well-known member
Joined
Feb 8, 2009
Messages
2,467
Location
Iowa
Man, that is very nice. You really know how to fit up those old panels. That is a job on old trucks as they were often abused and over loaded causing lots of stretch in the tin. Nice thing about old trucks is not a lot of money spent on the interior.

Mike
 
OP
M

MP&C

Well-known member
Joined
Oct 21, 2009
Messages
4,398
Location
Leonardtown, MD
Merle, 3M Trizact is a sanding system they use to replace wet sanding in the buffing process. It uses a DA, a 1/2" thick foam interface pad (to keep from sanding flat spots) and starts with a 1500 grit pad. It is used damp (a spray bottle) and gets rid of the dust nibs and any orange peel. This is followed up with a 3000 grit pad, and by the time that is done, you can start to see the shine even before buffing. A box of the 3000 grit pads is quite spendy, but easily offsets the cost difference in time. I'm sure they have a video on youtube that would demonstrate it.
 
Last edited:
OP
M

MP&C

Well-known member
Joined
Oct 21, 2009
Messages
4,398
Location
Leonardtown, MD
Thanks for the comments guys.

Matt, it stays in the garage, he drives it when he feels like it, and it's more likely to be seen at the golf course than at a car show. :bounce:

So that's why we're in the process of buffing it out, to make it more presentable at the club house.. :thumbup:
 
To avoid these ads, REGISTER NOW!

bassman

Well-known member
Joined
Feb 13, 2005
Messages
198
Location
florida
That brings back memorys, my father had a 36 chev 1.5 ton dump body I used to love to ride in his old trucks
 
OP
M

MP&C

Well-known member
Joined
Oct 21, 2009
Messages
4,398
Location
Leonardtown, MD
Got started on the 3M Trizact tonight, that first picture shows a reflection of my manual door closer (not a scratch)


Here's your typical defects, dust nibs, slightly orange peely/grainy appearance..


Picture041-1.jpg


A quick once over with the 1500 grit Trizact on the DA highlights the areas needing attention quite well.


Picture043.jpg


Before....


Picture046-1.jpg


After the 1500. Notice all the sanding scratches alongside the tape. It's all in the prep....or lack thereof.


Picture047.jpg


After the 3000 grit Trizact. As nice as this is coming out, it shouldn't take too much effort in buffing (fingers crossed)


Picture050.jpg


My biggest complaint in the past using W/D paper (even up to 2500) and the cross hatch pattern was those errant sanding scratches around the perimeter that always seemed a bear to get out. Here's the nice part about using the DA and the Trizact system, easily blend the prepped areas to the non-prepped without the headache of those sanding scratches.


Picture048.jpg


Smooth as a baby's behind...


Picture049.jpg


More typical sanding scratches left in the prep work...


Picture055-1.jpg


Picture056-1.jpg


All done with the 3000 here, time for the next fender...


Picture058-1.jpg


Picture060-1.jpg
 
Last edited:
OP
M

MP&C

Well-known member
Joined
Oct 21, 2009
Messages
4,398
Location
Leonardtown, MD
With the truck being assembled, it will be near impossible to get to everything. The fender pictured above was prepped to within about 3" of the hood side so we won't have to disassemble the front end just to buff it out. Your first glances at a vehicle are just like first impressions of people. If you walk up to the truck and see a bunch of dust in the front fenders, you start looking for more. If you can comb your hair in the reflection, you're less likely to look for defects. So we're going with that logic, and hit all the obvious areas, tops of fenders, hood, cab corners, etc. Just to clean it up where we can and make it more presentable.
 

78Bird

Well-known member
Joined
Apr 23, 2010
Messages
528
Location
Charlotte, NC
That truck is super nice to begin with, I'm sure once your done it'll be a real breath taker! those little details will really set it apart.

I'm real interested in that 3M system, gonna do some research... but it looks like the easiest (if not cheapest) way to do final sanding prior to buffing that I've ever seen.
 

z28snksknr

Well-known member
Joined
Jul 8, 2009
Messages
1,827
Location
Turnersville, NJ
looking forward to seeing this progress. I always wondered what the buffing steps were after the sanding, in terms of what products are used to get it back to a shine. I've got an entire car that could use this treatment, and you may be convincing me it's time to try it out.
 
OP
M

MP&C

Well-known member
Joined
Oct 21, 2009
Messages
4,398
Location
Leonardtown, MD
Thanks for the comments guys!


Worked on the core support shim yesterday. In looking for a piece of rubber for the shim, found this generic exhaust hanger......


Picture064.jpg


Picture065.jpg


Used a strip of 1/8 x 1 aluminum for shims....


Picture066.jpg


.......and pulled the ends snug together using a c/s 10-32 and riv-nut on the opposite side as a "hidden" nut.


Picture067.jpg


Picture068-1.jpg


Installed...........


Picture070-1.jpg


Picture071.jpg
 
OP
M

MP&C

Well-known member
Joined
Oct 21, 2009
Messages
4,398
Location
Leonardtown, MD
Had a question asking what 3M Trizact is. Sorry I missed that on the first post, I must be slipping. :lol_hitti


3M Trizact is the product used to replace the wet sanding in the final cut and buff process. Here's the 1500 and 3000 grit pads, hook and loop attachment, used with a DA.


Picture075.jpg


A close up of the 1500. This pad is relatively flat, the purple looking surface is the abrasive material.


Picture077.jpg


The 3000 grit, a foam pad, the silver/grey surface is the abrasive.


Picture076.jpg


The biggest difference between W/D paper's abrasive and what you see here is consistency of the grit. The Trizact abrasive is much more consistant in grit, and from what you see in the pictures of the fenders posted above, no errant scratches from the abrasive, largely due to this consistency.


These are used on a DA using hook and loop pad, and a 1/2" thick interface pad. This pad helps the abrasive sheet to follow the contour of the panel. A perfectly flat pad would have a tendancy to leave flat spots in a crowned panel, where the second picture below shows how the interface pad helps the abrasive follow the contour of what you're finishing.


Picture078.jpg


Picture080.jpg


I have between 1 and 2 hours in each front fender, and about an hour or less per back fender. (time relative to the paint conditions present) You could easily double that time spent if wet sanding with W/D paper. While this method is a definite time saver (and especially in time saved in the buffing process), cost does play a factor. The 3000 grit box of 15 pads is right around $100, the 1500 much less. For time saved in an overall job however, worth their weight in gold.
 
OP
M

MP&C

Well-known member
Joined
Oct 21, 2009
Messages
4,398
Location
Leonardtown, MD
Got one of the fenders buffed out this morning. Here's what we're using, Presta products.


Picture081.jpg


The adjacent area is masked off (bed sheets come in handy) to minimize the clean up afterwards


Picture082.jpg


The results (and reflection) show dramatic improvement...


Picture083-1.jpg


Picture085.jpg


Picture086.jpg


Not sure how much of the yellow I'll be able to buff. The passenger door looks to have a bit more yellow than the cab next to it, as if the door got an extra coat of paint. Looking at some of the areas of the cab that are a bit "sparing" on application of paint, I'm worried that working these areas will risk revealing primer in short order.


Picture087.jpg


Picture089.jpg
 

v8garage

Well-known member
Joined
Jun 27, 2007
Messages
901
Location
Texas
What kind of supports does it have under the cab? These came with wooden blocks and shims. If these aren't right it can cause a lot of misalignment problems with the front sheetmetal. For instance if the back supports have rotted away or are not right it could cause the hood misalignment shown. I have a '36 Chevy that I have been gathering information on for a future project. Some of the old Chevy truck suppliers on the internet have the correct wood blocks for these.
V/8
 
Last edited:

cnyeco1

Well-known member
Joined
Feb 3, 2009
Messages
326
Location
Oklahoma City, Oklahoma
Never got to finish mine. Needed the money for my Nova. This was the day it left for its new home in Indiana.
 

Attachments

  • IMG_1159.jpg
    IMG_1159.jpg
    146.9 KB · Views: 60
  • IMG_1158.jpg
    IMG_1158.jpg
    148.7 KB · Views: 54
  • IMG_1156.jpg
    IMG_1156.jpg
    150.3 KB · Views: 53
Last edited:
OP
M

MP&C

Well-known member
Joined
Oct 21, 2009
Messages
4,398
Location
Leonardtown, MD
What kind of supports does it have under the cab? These came with wooden blocks and shims.
V/8

Looking under it I do see the wooden blocks, I take for granted the guy who did the work ordered the correct ones, as they don't look like something he cut up from some 2X lumber.


More progress, masked the front fender for buffing....


Picture093.jpg


Buffed.........


Picture098.jpg


Picture096.jpg


Comparison, before and after.....


Picture041-1.jpg


Picture094.jpg
 
OP
M

MP&C

Well-known member
Joined
Oct 21, 2009
Messages
4,398
Location
Leonardtown, MD
Thanks for sharing your techniques, that is way to close to my old ford project that needs cleaned up.

Looks pretty good in your avatar! :thumbup:


Looking good Robert.:thumbup:You Sir, are a patient man. Painting, buffing,sanding or just playing with the mud, are not amongst my skills...:bowdown:

But most of your work is best viewed without the paint anyway!


Well as much as I didn't want to, the hood had to come off.


Picture112.jpg


The front hinge pivot block had quite a bit of wear, enough that the hood would scrape paint when opened.


Picture105.jpg


To raise it up a bit and prevent more scraping we found some stainless tubing to form a sleeve and take up the slop.


Picture106.jpg


On to the back side of the hood, this is a home-made job that someone failed to get the studs straight on.


Picture110.jpg


.....which caused the alignment issue at the back..


Picture101.jpg


As much as I hate slotting anything, the owner was more keen on that as a quicker fix, than me rebuilding, painting, etc. We did cut some 1/16 thick rubber washers to seal the holes.


Picture115.jpg


....for a much better fit..


Picture116.jpg


All the fenders buffed, and hood re-assembled. Couldn't do much to clean up the yellow as the paint was too thin, and I just didn't feel like repainting this right now. It's all ready to leave tomorrow, then I can get back to grinding and welding....
welder.gif


Picture118.jpg


Picture123.jpg
 
Last edited:
OP
M

MP&C

Well-known member
Joined
Oct 21, 2009
Messages
4,398
Location
Leonardtown, MD
The truck all cozy at home:


Picture127.jpg


As I've come to discover, these trucks and the 6 cylinder "conversion" are prone to overheating issues. The engine is a 55-57 GM, as per the casting number..


Picture129.jpg


When the front end (core support) was shimmed to correct the hood gaps, the fan interfered with the lower neck, so it required some trimming....


Picture128.jpg


And as you can guess, it overheated on the way home. Supposedly there is a relocation kit to raise the water pump up higher on the front of the block, but I need to know if this is the correct water pump and pulley to use with that kit, or do they need to be replaced. We are going to pull out the radiator for a pressure test and likely recore. The fan will be swapped out for a 15" model (providing that fits ok...)


Picture130.jpg


Picture131.jpg


Picture132.jpg


Picture133.jpg


Picture134.jpg


Picture136.jpg


Picture137.jpg


So can any of the 6 cylinder guru's familiar with this kit tell me if I need a new pump/pulley or is what we have compatible?


Oh.....and something else needing some buffing touch-up when that is done...


Picture126.jpg
 

iamironman

Well-known member
Joined
Dec 28, 2009
Messages
159
Location
Marshall, NC
Blah blah blah, ...very nice truck...very nice work...
blah blah blah...


Oh.....and something else needing some buffing touch-up when that is done...


Picture126.jpg

Mmmm, Cords. [Drool] That's a '37 812, right? It's also needing delivery to me.
 
To avoid these ads, REGISTER NOW!
Top Bottom