To avoid these ads, REGISTER NOW!

36X40 pole garage

tmaxxryder

Member
Joined
Nov 28, 2015
Messages
12
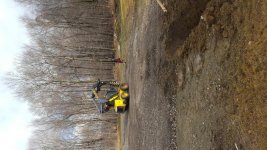
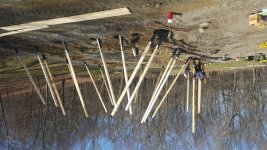
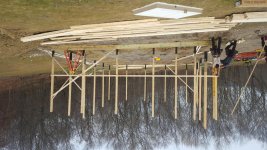
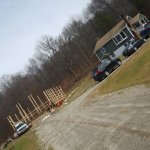
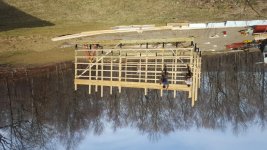
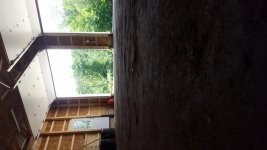
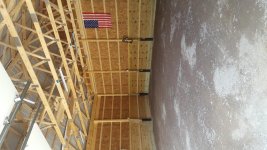
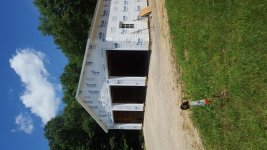
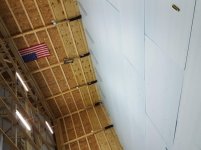
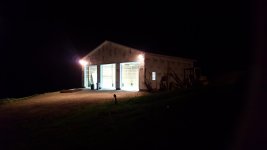
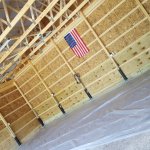
So I'm kind of starting this late into the build but I had a 40X36 pole building put up by Lancaster Pole Buildings.
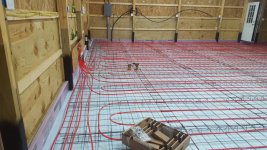
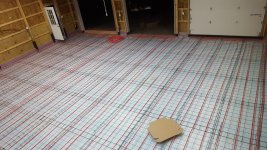
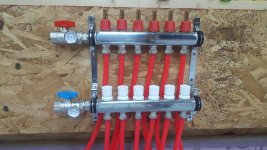
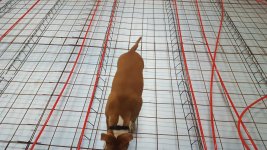
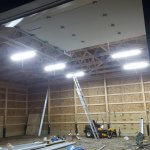
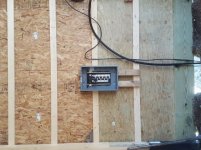
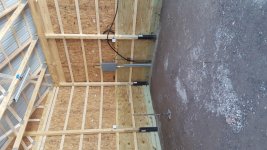
the whole building cost just over 25k and thats not including siding or concrete floor. I opted out of having them do that because I am doing headed floors and i wanted vynal siding to match my house rather than the standard metal siding or some off color that would be "close" (we all know how that goes) So at this point the building is up, electric and water is in and the gravel floor is compacted and ready for the vapor barrier and foam board insulation.
 

Attachments

  • 20160311_091357.jpg
    20160311_091357.jpg
    144.9 KB · Views: 83
  • 20160316_105542.jpg
    20160316_105542.jpg
    147.2 KB · Views: 85
  • 20160316_133551.jpg
    20160316_133551.jpg
    148.9 KB · Views: 79
  • IMG_20160316_141051.jpg
    IMG_20160316_141051.jpg
    85.1 KB · Views: 94
  • 20160316_142952.jpg
    20160316_142952.jpg
    154.8 KB · Views: 77
  • 20160316_183148.jpg
    20160316_183148.jpg
    149.6 KB · Views: 72
  • 20160317_133033.jpg
    20160317_133033.jpg
    149.5 KB · Views: 85
To avoid these ads, REGISTER NOW!
OP
T

tmaxxryder

Member
Joined
Nov 28, 2015
Messages
12
Haha no I am building this in New York.
And as far as the pictures go, my phone is retarted and they are right side up in my phone but I dont know why they post upside down.

As far as the purpose of this garage its going to be my own little (big) workshop for project cars and trucks and just building stupid stuff
 

Attachments

  • IMG_20160522_214646.jpg
    IMG_20160522_214646.jpg
    62.2 KB · Views: 104
  • IMG_20160329_171800.jpg
    IMG_20160329_171800.jpg
    98.6 KB · Views: 73
  • IMG_20160323_190825.jpg
    IMG_20160323_190825.jpg
    95.2 KB · Views: 94
  • 20160323_184344.jpg
    20160323_184344.jpg
    151 KB · Views: 71
  • 20160319_133713.jpg
    20160319_133713.jpg
    153.3 KB · Views: 95
OP
T

tmaxxryder

Member
Joined
Nov 28, 2015
Messages
12
these here are my most recent pictures. I hope they upload rightside up being as i uploaded them directly from my camera as i took them rather than from the photo gallery
 

Attachments

  • 1466185164218-944870997.jpg
    1466185164218-944870997.jpg
    146.5 KB · Views: 50
  • 14661851442851026588599.jpg
    14661851442851026588599.jpg
    154.4 KB · Views: 67
  • 1466185122552-406748445.jpg
    1466185122552-406748445.jpg
    151.2 KB · Views: 65
  • 14661849815561496259094.jpg
    14661849815561496259094.jpg
    146.9 KB · Views: 84
OP
T

tmaxxryder

Member
Joined
Nov 28, 2015
Messages
12
This is the 100 Amp panel I put in. i also ran an extra conduit so if i need to run another line later on i dont need to dig. I also ran a telephone line so i can hook up internet and wifi.

P.S. I realized i have to hold my phone upside down when i take the picture to get it to show right side up here. I dont know yet how to turn or delete the ones i have already posted
 

Attachments

  • 1466185957344-437426480.jpg
    1466185957344-437426480.jpg
    151.7 KB · Views: 71
OP
T

tmaxxryder

Member
Joined
Nov 28, 2015
Messages
12
Ok so its been a few weeks since I posted or even worked on the garage due to my local distributor having foam back ordered for the floor. I wanted the 4x8 sheets to reduce the # of seams for heat loss. So the material finally came this AM (vapor barrier, foam, wire mesh and chairs) I started the vapor barrier and foam right away then had to go to work around 3 so now its 2AM and i finally finished the foam insulation. As I was working, my dog was making sure everything was straight.
Mesh is next, then "pre-slab inspection" from the town. then i get to pour!
 

Attachments

  • IMG_20160713_021917.jpg
    IMG_20160713_021917.jpg
    69.1 KB · Views: 66
  • 20160713_013204.jpg
    20160713_013204.jpg
    132.4 KB · Views: 76
  • 20160712_101913.jpg
    20160712_101913.jpg
    138.8 KB · Views: 86
  • 20160712_113644.jpg
    20160712_113644.jpg
    141.6 KB · Views: 82
  • 20160712_105027.jpg
    20160712_105027.jpg
    149.7 KB · Views: 87
  • IMG_20160712_094030.jpg
    IMG_20160712_094030.jpg
    95.7 KB · Views: 86
  • 20160712_093038.jpg
    20160712_093038.jpg
    147.1 KB · Views: 68
To avoid these ads, REGISTER NOW!

rebelranger

Well-known member
Joined
Sep 18, 2012
Messages
188
Looking great! Are you support poles 4x4s or 6x6s? what is the deal with the black tar around the support poles...and why do they look narrower were the black starts? How tall is your building? How does your building feel about vinyl on the pole barn? If you don't mind can you tell me the material vs labor cost split? I'm wanting to do exactly like your building, DIY, but would like to compare options. Also most builders around here say pole barn and vinyl siding equals disaster.
 

FANTM58

Well-known member
Joined
Feb 21, 2015
Messages
575
Location
Brighton, Co
Haha no I am building this in New York.
And as far as the pictures go, my phone is retarted and they are right side up in my phone but I dont know why they post upside down.

As far as the purpose of this garage its going to be my own little (big) workshop for project cars and trucks and just building stupid stuff

FYI we don't use the term retarted ,,its Democrat !!!
 
OP
T

tmaxxryder

Member
Joined
Nov 28, 2015
Messages
12
Looking great! Are you support poles 4x4s or 6x6s? what is the deal with the black tar around the support poles...and why do they look narrower were the black starts? How tall is your building? How does your building feel about vinyl on the pole barn? If you don't mind can you tell me the material vs labor cost split? I'm wanting to do exactly like your building, DIY, but would like to compare options. Also most builders around here say pole barn and vinyl siding equals disaster.

1) the support posts are 2x6 glulams (3- 2x6 boards glued and fingerjointed. the bottom is pressuretreated

2) the black "tar" is actually called green post wrap. i dont know why its black haha but it is meant to keep all oxygen off the post to prevent any rotting that the pressure treating wouldnt stop. just an extra security measure

3) the post looks narrower at the bottom but its not, the edges are just chamfered where the wrap is to prevent a sharp edge that would cut the wrap.

4)as for the heighe my ceiling will be 12'6", the garage was set on 2x12 skirt board (thats where the floor gets poured to so 1.5" of skirt board will be exposed above floor) and the trusses are aprox 6' tall but i think the total is close to 21' at the peak.

5) i chose to go with vynal to match my house, i asked a few people about that and they said there shouldnt be an issue with buckeling.

6) as far as cost split the whole building as stands with tyvek and steel roof and no floor was $25,152
i would have to get back to you when i dig out my quote from the builders

:)
 
OP
T

tmaxxryder

Member
Joined
Nov 28, 2015
Messages
12
Update! Got my "pre slab inspection" from the town today, all set with that. Now I started laying the pex for the radiant floor. I would have actually made progress today if work didnt call but I have to pay for this somehow.

Currently I am just using zip ties to attach the tube to the mesh. I have a 6 loop manifold that I got off amazon for around $175. and 2000' of pex. The manofold uses these compression fittings so I didn't have to buy the special pex crimper.

The only dilema I am having is to run 2 loops per bay or run 3 loops covering a 20x36 area (so half and half)
There are a few different patterns for layout I am considering so I guess its good I didnt get too far today
 

Attachments

  • 20160721_103851.jpg
    20160721_103851.jpg
    158.8 KB · Views: 48
  • 20160721_104205.jpg
    20160721_104205.jpg
    152.5 KB · Views: 49
  • 20160721_104253.jpg
    20160721_104253.jpg
    126.6 KB · Views: 43
OP
T

tmaxxryder

Member
Joined
Nov 28, 2015
Messages
12
So my concrete guy came today and suggested that i do 2 loops in each bay. Working on that in this sweltering heat. Will post pics soon!!!
 
OP
T

tmaxxryder

Member
Joined
Nov 28, 2015
Messages
12
So the pipe for the heated floor is all finished. I contacted my concrete guy so just waiting for a good day to pour the floor. I've used about 800 zip ties to attach the pipe to the mesh. You can see all the tails i cut off the zip ties. My hands are pretty sore from using so many. And as you see my dog Bailey felt the need to help out
 

Attachments

  • 20160725_115920.jpg
    20160725_115920.jpg
    151.9 KB · Views: 40
  • 20160724_223458.jpg
    20160724_223458.jpg
    159.1 KB · Views: 42
  • 20160724_223337.jpg
    20160724_223337.jpg
    156.2 KB · Views: 38
  • 20160724_223224.jpg
    20160724_223224.jpg
    151.3 KB · Views: 39
  • 20160722_225302.jpg
    20160722_225302.jpg
    158 KB · Views: 40
  • 20160722_182034.jpg
    20160722_182034.jpg
    149.9 KB · Views: 40
  • 20160722_225316.jpg
    20160722_225316.jpg
    163 KB · Views: 27
OP
T

tmaxxryder

Member
Joined
Nov 28, 2015
Messages
12
So the pipe for the heated floor is all finished. I contacted my concrete guy so just waiting for a good day to pour the floor. I've used about 800 zip ties to attach the pipe to the mesh. You can see all the tails i cut off the zip ties. My hands are pretty sore from using so many. And as you see my dog Bailey felt the need to help out
 
To avoid these ads, REGISTER NOW!
Top Bottom