To avoid these ads, REGISTER NOW!

4 Posr Lift Slope & Bolt Down Thoughts

Zedder

Well-known member
Joined
Jul 21, 2005
Messages
100
Location
Oakville, Ontario
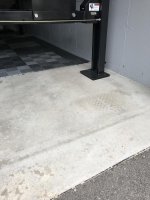
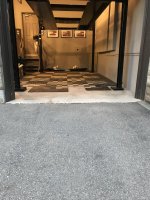
So, I made up some shims to level out my lift before bolting it down. The manual says that the lift should be bolted down if the slope is greater than 1/8 inch per foot which is 1.8 inches between the columns. It doesn't say that the columns need to be raised to eliminate this slope before bolting down. So I assume that I don't have to do this. Is that how others perceive this situation?

My original slope was 3.5 inches between the columns. I had to shim a little side to side to get the columns on the same plane and was able to get another 1/2 inch under the rear columns with the casters on. I now have 3 inches of slope and would prefer to just bolt it down like this rather than having the rear columns sitting on 2 or 3 inch tall spacers. What do you guys think?
 
Last edited:
To avoid these ads, REGISTER NOW!

infinkc

Well-known member
Joined
Jan 19, 2012
Messages
862
your runways should be level, if they are not i would space the posts up.
 

logical

Well-known member
Joined
Aug 31, 2005
Messages
2,449
Location
Northern fringe of the Motor City Suburbs
Re: 4 Posr Lift Slope & Bolt Down Thoughts

That much may put you outside the adjustment windows to get the runways even close to level. Is that OK?...not to me.

There is conflicting info out there but I decided I wanted mine square to the world even if it meant needing extended ramps. I primarily use it for storage, car in winter...ATV and plow in summer.

Sent from my garage.
f068497e319ffa3ed0529fa0e55b9c82.jpg
 
Last edited:

tom86951

Well-known member
Joined
May 14, 2005
Messages
155
Location
CA
I had my BendPak 4-post lift installed by an authorized installer, and am no expert myself. But, I can share my experience since my garage has a similar slope.

The installer did not shim the low end, and did not bolt the lift to the floor. Instead, the used the adjustment nuts to pull the rear end up enough level when lifting and locked. He had to maxed it out. To them, that was the only critical thing, so the car is level whenever it's on the lift, which makes sense.

However.... I couldn't help but notice their choices were also the easiest/fastest things for them to do, so while I'm sure they wouldn't do it if not safe in their minds, I did wonder if it was the best way to go.

I ended up drilling holes in the concrete under the lift pads and sinking long threaded couplers in the holes with epoxy, so that I could loosely bolt the lift in place (finger tight) while still giving the posts enough wiggle room to settle a bit while going up and down. (I didn't want to use the studs that came with the lift, since they'd stick up out of the floor if I ever moved the lift, which seems problematic at best....)

The primary reason they gave for not bolting it down was so that the columns don't bind up when the lift moves. My solution (actually my contractor's) with the loose bolts allows for the columns to move a bit for this purpose, but should also prevent the lift from walking across the floor in one of our many California earthquakes.

As for shimming the low end, my are not shimmed, but I am likely to add them in the future. With the lift adjusted so that the runners are level, the rear end of the runners never go all the way down and rest on the floor like the front. Instead, the rear remains off the ground a few inches, essentially hanging on the cables. Shimming the posts would allow the weight of the rear to bottom-out on the post pads (and therefore the ground). But to distribute the weight better, I'm mulling adding small blocks to the bottom side of the rear runners, so that they help bear the weight too when the lift if lowered all the way.
 
To avoid these ads, REGISTER NOW!
OP
Z

Zedder

Well-known member
Joined
Jul 21, 2005
Messages
100
Location
Oakville, Ontario
Thanks Guys...I appreciate the comments.

I’m having a pro installer come out this week and will get his input. I think I’ll put another inch or so of spacers to bring it down to 2 inches of slope.
 

Attachments

  • A876919C-FE43-4B23-BC66-7B7343FD5122.jpg
    A876919C-FE43-4B23-BC66-7B7343FD5122.jpg
    74.3 KB · Views: 51
  • C1A4290E-4B10-4837-A430-A0AA2C98D0EF.jpg
    C1A4290E-4B10-4837-A430-A0AA2C98D0EF.jpg
    91.4 KB · Views: 47
  • AB933681-577F-43E4-8FB2-D93D746BA360.jpg
    AB933681-577F-43E4-8FB2-D93D746BA360.jpg
    52 KB · Views: 48

tom86951

Well-known member
Joined
May 14, 2005
Messages
155
Location
CA
Ideally, get advice from someone with no skin in the game. My guy charged a flat rate to install, so no surprise he "recommended" against anything that took more effort. A guy who comes out looking for work might be motivated to "recommend" things that are profitable to them.
 
OP
Z

Zedder

Well-known member
Joined
Jul 21, 2005
Messages
100
Location
Oakville, Ontario
Thanks guys. Installer comes tomorrow morning. I added another 1/2 inch of plates 0n the low end, so slope is now 2.5 inches. I’m good with that. Fingers crossed for tomorrow!
 

Attachments

  • 84FB2A57-E4A7-4589-B356-86940988DF7D.jpg
    84FB2A57-E4A7-4589-B356-86940988DF7D.jpg
    135.6 KB · Views: 44
To avoid these ads, REGISTER NOW!
Top Bottom