To avoid these ads, REGISTER NOW!

40' X 60' Shop Renovation

To avoid these ads, REGISTER NOW!

NUTTSGT

Super Moderator
Staff member
Joined
Sep 14, 2009
Messages
51,098
Location
Northern Central Ohio
Re: Building the Ideal Mancave

Since this is turning into your build thread, I'll move it to the more appropriate Gallery Section. If at any point, you decide to change the title of the thread to something more fitting or to your liking, just let me know, I'll be happy to help out.

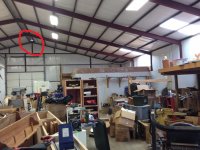
I do have a question though. In the red circle (in attachment) is that daylight I see coming in the rook/ceiling peak ?
 

Attachments

  • paladin.jpg
    paladin.jpg
    85.7 KB · Views: 317

3bay

Well-known member
Joined
Dec 29, 2007
Messages
157
Location
Indiana
Re: Building the Ideal Mancave

I think folks were just pokin fun, not that serious of a deal I think, I just call mine "MY" garage! :) But Paladin306 built it, he can call it whatever the hell he wants, he earned that right!!!

Very nice building BTW! :thumbup:
 
Last edited:
OP
P

Paladin306

Well-known member
Joined
Jun 25, 2014
Messages
136
Location
Oklahoma City, OK
Re: Building the Ideal Mancave

First question. If you are going with a two piece wall, how are you going to tie the two together. Since the wall isn't load bearing it shouldn't be a big problem.

The plan is to just nail the sill board of the top half to the header board of the bottom half as well as screwing the studs of both halves to the horizontal girts. (Hopefully, I'm using all the right terms here.) Also, using a Hilti powder actuated gun to attach the bottom sill boards to the concrete floor. Is there a better way?

I guess I could make it one tall wall will really long studs but as I'll be doing most of the work myself I'm afraid this might be too unwieldy. But, maybe I need to give that some more thought.

What type of interior wall covering will you use?The weight and placement could cause the wall to buckle inward at the 8ft height unless it is tied to the purlins, braced between the two or bolted.
Have you thought about metal studs? This could make the job easier, and the walls straighter and all continuous. If metal is more, it makes up in ease of install. Probably not the best solution if you continue with the wood siding.

Tongue and groove 3/4" southern pine. Same as the "office walls" in the pics.

For scaffolding, my neighbor had two standard sections. I rented wheels, a short section and walk boards from the scaffold company. The rental was cheaper than I expected. A good tip, check to see if there is a daily, weekly, month rate, longer term could save in the long run. I also rented a Genie material lift to get my joist and decking up for the loft areas. $75 for the weekend and well worth it. I also rental a electric man lift to install the 7 exterior panels. I fabbed a wood clamp to hold the panel (20' long), hooked clamp to rail, up I went.

Thanks, I haven't checked in to the rental yet but it's on my "to do" list.

Mark
 
OP
P

Paladin306

Well-known member
Joined
Jun 25, 2014
Messages
136
Location
Oklahoma City, OK
Re: Building the Ideal Mancave

Mark. Just following up on your build. I used the tar paper as a cheap insurance for a little weather protection, even though it's all inside the walls I figured it wouldn't hurt. For scaffolding I found a two section high unit 12' total with top rails and outrigger wheels on CL for $200. It was well worth it especially when I did my lighting. Tractor Supply has this same set up but you should check CL. Use it for a year then sell it for same price. I still have mine out in the barn. I use it for shelving now.

Thanks Nighttrain! Once again, you certainly have an outstandingly, awesome build. I've added both your suggestions to my "to do" list.

Mark
 
OP
P

Paladin306

Well-known member
Joined
Jun 25, 2014
Messages
136
Location
Oklahoma City, OK
Re: Building the Ideal Mancave

Since this is turning into your build thread, I'll move it to the more appropriate Gallery Section.

Thanks for your help Eric! In case you can't tell I'll take all the suggestions I can get regardless of whether it has to do with construction or website protocol.

If at any point, you decide to change the title of the thread to something more fitting or to your liking, just let me know, I'll be happy to help out.

LOL, I think it's all in good natured fun but if you would please change it to "40' X 60' Shop Renovation" that would be awesome as that more accurately describes what I'm doing.:D

I do have a question though. In the red circle (in attachment) is that daylight I see coming in the rook/ceiling peak ?

Yessir, that's honest to gosh Oklahoma plains sunlight. And, I'm impressed that you noticed as well that you asked. Does it serve a purpose? I've read just enough about ridge vents to be totally dangerous. (If this was a stick shop I would certainly seal it up.)

Or is it just shoddy workmanship? (If you find a gap like that in my woodworking it typically gets thrown in the scrap bin.):dunno:

I haven't noticed any leaks from the weather other than the obvious air that's leaking. All suggestions welcome.

Thanks again,

Mark
 

NUTTSGT

Super Moderator
Staff member
Joined
Sep 14, 2009
Messages
51,098
Location
Northern Central Ohio
Re: Building the Ideal Mancave

Thanks for your help Eric! In case you can't tell I'll take all the suggestions I can get regardless of whether it has to do with construction or website protocol.


LOL, I think it's all in good natured fun but if you would please change it to "40' X 60' Shop Renovation" that would be awesome as that more accurately describes what I'm doing.:D


Yessir, that's honest to gosh Oklahoma plains sunlight. And, I'm impressed that you noticed as well that you asked. Does it serve a purpose? I've read just enough about ridge vents to be totally dangerous. (If this was a stick shop I would certainly seal it up.)

Or is it just shoddy workmanship? (If you find a gap like that in my woodworking it typically gets thrown in the scrap bin.):dunno:

I haven't noticed any leaks from the weather other than the obvious air that's leaking. All suggestions welcome.

Thanks again,

Mark

So it is a ridge vent. I wondered if that was what it was but wanted to ask. I just found it odd as generally around here, the vents are put up in the attic space to vent that area. Putting them in your work area, you'll lose valuable heat through the opening.

I'll get your title changed in the mean time.
 

roverhybrids

Well-known member
Joined
Jan 27, 2010
Messages
46
Location
Redding, CA

920kip

Well-known member
Joined
Aug 11, 2011
Messages
168
Location
Titletown USA
OP
P

Paladin306

Well-known member
Joined
Jun 25, 2014
Messages
136
Location
Oklahoma City, OK
Re: Building the Ideal Mancave

So it is a ridge vent. I wondered if that was what it was but wanted to ask. I just found it odd as generally around here, the vents are put up in the attic space to vent that area. Putting them in your work area, you'll lose valuable heat through the opening.

I'll get your title changed in the mean time.

Thanks again Eric. So, it is a ridge vent? (By no means was I telling, more like asking.) Would you not close it up then? Since it is a steel building it doesn't have an attic and the ceiling is insulated.

Mark
 
OP
P

Paladin306

Well-known member
Joined
Jun 25, 2014
Messages
136
Location
Oklahoma City, OK
Re: Building the Ideal Mancave

I would use Titan HD bolts to screw it to the floor. It would be easier to move/remove later. My experience with the powder actuated nailers it that they don't always sink the nail in cured concrete.

QUOTE=920kip;4633024]Would Tapcon's do the same as the Titan HD bolts. They are available at the big box stores. I have used them a few times and thought they held well.[/QUOTE]

Thanks guys, but I've already purchased the Hilti so I'll probably try it first. I purchased the heavier loads so, we'll see. If it doesn't work out it can always be sold on Ebay. But, I'll certainly keep these ideas in my "toolbox" as a backup plan.

I'm still having a little trouble picturing how to attach the studs to the girts as I've had trouble finding self tapping screws that would be of a length to go through a 3.5" stud and of a sufficient diameter. But, it finally dawned on me that I could install a 2x4 horizontally between each set of studs at the height of the girt with the face of the board against the girt rather than the edge. Then the screws only need be about 2 inches long.

However, if you see a problem with this, please don't hesitate to correct me.

Just did a hospital procedure yesterday and sounds like I'm going to be doing light duty for about 4 weeks. (I'm sure I'll find something to do, it just won't be any heavy lifting. In addition, the large RV that we're keeping for friends will be gone in about 6 weeks. So, hopefully it all meshes together for lots to do this spring.

Mark

Mark
 

navyeoseabee

Well-known member
Joined
Sep 9, 2012
Messages
142
Location
san deigo
Re: Building the Ideal Mancave

Howdy Shortykorte,

Unless plans change, (and currently, I don't know why they would) I plan on the framing being from the floor to ceiling on the interior side of all four of the exterior walls. Basically everywhere you currently see the while insulation in these pics:

This is a small portion of the 60' long north wall:

View media item 47430
This is currently the best pic I have of the east wall (in the back) as well as a little of the south wall.

View media item 47401

These look awesome! i wish my stuff was that great!
 

madoc1

Well-known member
Joined
Dec 11, 2012
Messages
1,242
Location
spicewood, tx
that's a great space and love the t&g wall covering. also, the idea of using horizontal 2x4s laid flat would work if you then added 2x4s vertically to them. wouldn't need a lot of the horizontal ones I don't think.

jim
 
OP
P

Paladin306

Well-known member
Joined
Jun 25, 2014
Messages
136
Location
Oklahoma City, OK
Well, I think I'm about ready to start on those walls. While I've been waiting to get clearance from the doc I've been working on finishing the drawer fronts for the workbench.

View media item 49590
Once I received the necessary clearance I cleaned off the loft area so that it could be moved out slightly. Mr. Deere over in the corner was of significant help in that endeavor as I placed the bucket under the loft roof and then gingerly moved it back. This allows me to remove the pegboard and then add the wood frames as well as the tongue and groove planks. I've also done some significant cleaning out and moving around of the south side so that I'll have ample room to build the walls.

View media item 49589
View media item 49588
I still have a little bit more maneuvering to do so that I'll be able to slide the frames behind the loft section. I also have a bid to add cellulose insulation to both the ceiling and walls (once they're built).

Next up, finish that last bit of cleanup and then remove the pegboard.

Mark
 

lilscorpion

Well-known member
Joined
Mar 15, 2010
Messages
3,600
Location
Colorado
So you have any idea how jealous I am? With this much space I could get some $hit done. Dude...

Realty like the bench too. Awesome contrast in species!
 
OP
P

Paladin306

Well-known member
Joined
Jun 25, 2014
Messages
136
Location
Oklahoma City, OK
So you have any idea how jealous I am? With this much space I could get some $hit done. Dude...

Realty like the bench too. Awesome contrast in species!

Thanks Lilscorpion! I am certainly honored that you stopped by. And, since tone of voice and other indicators don't come through on emails and boards I'll go the extra mile and state that yes, the statement is very sincere.

If there is anyone on the planet that hasn't viewed Lilscorpion's thread it is absolutely one of the best is all of Garagejournal. Yes, it's long but it is absolutely filled with numerous ideas and photos that I dare say there would be very few that don't come away with several ideas for their shops/garages.

As for the shop, yes, at 2400 square feet, it's bigger than the house and I have been greatly blessed.

Mark
 

Strouty

Well-known member
Joined
Mar 21, 2010
Messages
38,224
Location
Southern Maine
Looks like a really nice space for sure. I think more than a few of us are jealous.

So you have any idea how jealous I am? With this much space I could get some $hit done. Dude...

Realty like the bench too. Awesome contrast in species!

Make us all feel inferior, what the heck do you call what you do now?
 
To avoid these ads, REGISTER NOW!
OP
P

Paladin306

Well-known member
Joined
Jun 25, 2014
Messages
136
Location
Oklahoma City, OK
Progress is slow but progress none the less.

The shop has been significantly cleaned up and getting ready to do the walls.
View media item 50128
2 x 4's have been bought to do the wall frames. I'm having cellulose insulation added to the ceiling next week so I left the lumber on the trailer so that it can be easily moved out of the way at any point. (The PVC pipe is from another project and, at this point, is junk but, I wasn't able to get rid of it during Spring Cleanup. So, right now it's piled on the trailer.) Anyone needs mostly short pieces of PVC pipe, I'm your man.:D
View media item 50127
Miter saw has been moved from the back wall to very close to it's final spot so that I can cut the 2 by's to their respective sizes.
View media item 50125
Sorry these next 2 pics are turned sideways but thought someone might enjoy seeing my solution for my housing my woodworking magazines. I just used quarter inch plywood for the sides and then varying species of wood for the backs and fronts. Gives me a good example to show the wife one species over another when she has a project she wants. Each box is labeled with the magazine name and what issues it contains. I have an Excel spreadsheet with all the articles that I wanted indexed so that I can easily find any article on any subject that I've saved in about 15 seconds.
View media item 50130
View media item 50129
 
OP
P

Paladin306

Well-known member
Joined
Jun 25, 2014
Messages
136
Location
Oklahoma City, OK
Well, the shop renovation has now started in earnest. First up, bringing the miter saw front and center from the mass of tools, shop carts, workbench etc that it was buried in. View media item 50682
Started with the ceiling by adding extra insulation as this will be a place of cool summers and warm winters. This was accomplished by adding 1x4 strips of pine to the purlins so that their would be something to staple the netting to. Once the netting was stapled up then insulation was added with a insulation type foam board which has an R value of it's own on top. The "button down" look is growing on me. (In the interest of full disclosure I hired this step of insulating the roof out.) As you can see this whole process buries the purlins for ever. View media item 50686
There's absolutely no place this stuff doesn't cover. Insulation is everywhere doesn't begin to cover it. View media item 50685
Four sections down and two to go:
View media item 50687
Next up the walls. (As planned I am doing this part.) The insulation company rented out the scissor lift for a full month so that I would have access to it, as that wasn't much more expensive than the almost two weeks that they used it. I initially thought I would make the walls 10' wide as that is the distance between the girders. However, after putting up the first 15' high 10' wide section I decided 5' wide sections would be the better part of valor. Here, you see that first 10' section along with the first 5' section. I placed the boards that run parallel to the flat (face side out) against the purlins?? and then used the nail gun to nail the studs to them. I then used #14 x 2" self drilling screws through those same boards to attach them to the purlins. View media item 50688
I'm also going to use a Hilti powder actuated gun to drive nails down thru the sill boards into the concrete floor just as soon as I learn how to use it. Currently I can't get it to fire but, since it's brand new I'm quite sure it's operator error. I've tried to pull on the walls and they are solid as a rock.

Mark
 

Bassfishing54

Active member
Joined
Jun 19, 2014
Messages
43
Location
Camden, SC
Paladin 306,
Looks like it is coming along well. I like the ceiling after the insulation installation!
Trying to figure out the difference in the look with the netting and the final finish. I assume they use the netting so they can tell how the cavity is filling and then cover it with the reflective vinyl, as a final finish?
Thanks,
Glenn
 
OP
P

Paladin306

Well-known member
Joined
Jun 25, 2014
Messages
136
Location
Oklahoma City, OK
Howdy All, I haven't posted in a while because I didn't think I was making enough progress. But, now that I'm entering the final phase, I certainly can't make that claim anymore.

But, first, I'd like to thank all of the previous posters for your ideas, support and encouragement.:thumbup: Having no formal construction background I certainly wouldn't made it this far without your help.:dunno:

That said, let's get down to some shop remodeling. First off, I had insulation added to the ceiling. I hired this part out just due to the enormity of the project. They first added 1x4 strips tot he purlins and then attached netting to the 1x4's. They then added cellulose insulation in between the netting and the ceiling and covered it with some foam insulation that is about 3/8" thick. The two sections on the right of this next pic show the final product while the section on the left show what I started with.

View media item 50686
Here's a pic which shows, in the middle sections the 1x4 strips with the netting and the insulation added:

View media item 50687
Once they completed that job I started on framing the walls myself. I started out by building the sections on the floor and then lifting them up and putting them into position. Notice I said, I started out that way but, after picking up the first 10' wide section, (which is 15' 3" tall), I figured out I didn't want to do that anymore and began building sections which were 5' wide. On the left hand side of this next pic you'll see the first 10' section then a much lighter 5' one.

View media item 50688
And then, several more sections:

View media item 50724
But, by the end of the project I was securing the bottom plates to the floor and then just toenailing the studs into place. The bottom line is, either way the methods used made the walls rock solid. I doubled up the 2x4 studs for the section where the 3 horsepower Dust Gorilla is going to hang because it is some kind of heavy. For most of the cross section strips I used #14 x 2 1/4" self drilling screws to attach to the metal strips (horizonital studs??) of the building. But, once again maybe going overboard, but I literally bolted the studs which will hold the Dust Gorilla.

View media item 50726
and Hilti powder actuated nails to the floor. I also used the pink sill foam beneath the treated wood bottom plates.

View media item 50725
I moved all of the outlets and the breaker boxes out so they would be flush with the tongue and groove panels once they were installed.

View media item 53241
I didn't have a clue on how to do the ends but, the owner of the insulation company loaned out his 18 year old son to me. Don't let his age fool you, this kid had more knowledge, (including construction info) in his little finger than I have in my whole body. We got most of both ends done in 3 days and he had to move on to another job. It was more than enough to get me on the right track and I then finished them as well as the the rest of the sides. Here's a pic after the extra insulation was added.

View media item 53243
I've now started on the final phase which is installing the tongue and groove 1x6"s and I'll try to post more pics of that as the ones I took didn't turn out too good.

Mark
 
OP
P

Paladin306

Well-known member
Joined
Jun 25, 2014
Messages
136
Location
Oklahoma City, OK
Your not fire blocking those walls?

I did use 2 x 4 material to do fire blocking in some of the channels as you'll see in the pic below. (The pic was correct when I took it but, the website rotated it counter clockwise by 90 degrees when I uploaded it. Not sure how to correct this.)

View media item 53307
In addition, the Xcell 100% Borate Formula Stabilized Cellulose is rated a Class 1 (A) fire rated barrier.

However, it's true, for most of the channels I did not use anything additional for fire blocking. Hopefully, I won't regret that at some point.
 
OP
P

Paladin306

Well-known member
Joined
Jun 25, 2014
Messages
136
Location
Oklahoma City, OK
Paladin 306,
Looks like it is coming along well. I like the ceiling after the insulation installation!
Trying to figure out the difference in the look with the netting and the final finish. I assume they use the netting so they can tell how the cavity is filling and then cover it with the reflective vinyl, as a final finish?
Thanks,
Glenn

Howdy Glenn,

Somehow I missed your message. Please accept my apology.

Yes, you're absolutely correct. The netting simply allows them to fill the space between the netting and the top of the building roof with the cellulose insulation with a minimum density of 1.8 lbs per cubic foot.

The "final finish" is a 3/8" foam type of board called "Thermal 3Ht" which is shiny on one side and white on the opposite side with the white side facing out. In other words the white side is what you see when you look up at the ceiling. It advertised as a Radiant / Thermal / Vapor Barrier intended to seal off and cover to prevent air infiltration and complete the Thermal Boundary. It provides a 97% reduction of radiant energy transferred through the roof.

So that I pretty much have instant cool when I go to the shop on a hot day I set the mini-splits to their "Economy mode" setting with a temperature of 78 deg. Then, when I go to the shop I just turn it down to 72 or 74 depending on how active I'm going to be and it pretty much makes the shop very comfortable.

Obviously, the walls aren't fully covered yet but, I'm curious to see what my winter utility bills will be versus last year.

Mark
 
OP
P

Paladin306

Well-known member
Joined
Jun 25, 2014
Messages
136
Location
Oklahoma City, OK
Been down with seasonal allergies lately but thought I would post a couple of pics of the bathroom which is close to being finished. This is 1x6 tongue and groove eastern red cedar for a little variety. Sorry these pics are great. Anyone know how to get them to load better? (They need to be rotated 90 degrees clockwise.


View media item 54014
View media item 54015
 
OP
P

Paladin306

Well-known member
Joined
Jun 25, 2014
Messages
136
Location
Oklahoma City, OK
Thanks Lordiesel! It's a lot of work but, I have fun doing it.

The lumber rack area of the wall is now complete which allowed me to get the huge pile of lumber off the floor. All stacked and separated by species.

View media item 59006
Note to self: When unloading several hundred pounds of lumber always remember to leave enough room to drive equipment through. (If I had I would be able to drive the lift up and down the length of the wall as I add the T&G). At this point it's take the time and effort to move the lumber or, do without the lift and use a ladder on the other side.

View media item 59005
This is the "long wall" (60') and is coming along nicely. Currently, I'm a little over half way done. The short term goal is to get the area covered where the "Gorilla" dust collector will go so that I can get it up off the floor.

Mark

View media item 59004
 
OP
P

Paladin306

Well-known member
Joined
Jun 25, 2014
Messages
136
Location
Oklahoma City, OK
I haven't posted lately because my progress has been incremental between kids, grandkids, yard work and honey-do's. But, as you can see in the pics
below I finally have the long wall done. That, and it's a great feeling to have the big yellow Gorilla back on the wall once again!:bounce:

View media item 62039
View media item 62040
That said, I'm starting to look for ideas on what I might be able to do for the areas directly above the overhead doors. I don't think I'll be able to use the same tongue and groove pine, at least not all the way down, as the door obviously has to have a small amount of clearance as it is raised. I have three overhead doors and the pic below shows the door with the largest section that might give me a problem. All of these sections have insulation in them so I would certainly like to seal them up. I could probably use pine on the upper section, (which has the netting over the insulation), but I probably need a different idea for the bottom section.

View media item 62041
Any ideas?

Mark
 

Riley

Well-known member
Joined
Feb 18, 2007
Messages
398
What about a thin piece of sheet rock painted a contrasting color?

Red or Orange come to mind depending on your tastes in OK college football....

Great looking place and a heck of a project!
 
OP
P

Paladin306

Well-known member
Joined
Jun 25, 2014
Messages
136
Location
Oklahoma City, OK
I haven't posted in a while but, that doesn't mean I haven't been busy. Once I got the 60' long by 15' tall "long wall" completed the rest went together pretty easily.

But first, my apologies to Riley who was the last poster about thin sheet rock above the overhead doors. I actually thought I had responded but, obviously not. Ultimately, I've decided on 3/64" sheet metal maybe diamond plate on one wall and colored aluminum on the opposite. But, until I order it nothing is final and that's a project I'm still trying to complete.

I next worked on the south wall (opposite the "long wall") because once it was completed I could move the loft back into place which, would also help me with the west end wall. Here's a pic of the south wall about 75 complete along with my ever so watchful, (and faithful) shop dog:

View media item 66968
Here's another pic of the south wall with the loft pushed back into place. I purchased some heavy steel brackets and used them to wrap around the 4 x 4 loft supports. I then bolted the brackets into studs in the wall. Rock solid!!!

View media item 66970
And, now for the west wall. For someone as inexperienced as I am matching the slope was a little intimidating. But, after a couple of trial cuts 12.5 degrees on the miter saw seemed to be the magic trick and things went smoothly all the way to the ceiling:

View media item 66967
Same story, different verse on the east end:

View media item 66972

With all four walls now complete I'd like to say a very belated Thanks!!! to all those who have contributed to this thread, and others, on which I have sought advice. I certainly would not have been able to do the job this well without your assistance. What you may have considered to be ordinary common knowledge was, many times, huge boulders of useful information on my end.:bowdown:
 
OP
P

Paladin306

Well-known member
Joined
Jun 25, 2014
Messages
136
Location
Oklahoma City, OK
Still have to install the ductwork for the dust collection system. But, with the walls done I've turned my attention back to woodworking to get a couple of things done. Here's a piano bench I made for a birthday present for my wife's piano teacher:

View media item 66973
I used hard maple for the entire project including interior bottom. Just edge glued a couple of boards together and then planed the almost 10" plank down to 3/8's of an inch. Looks much better than the standard 1/4" plywood you'll find on most commercial pieces and it's solid as a rock:

View media item 66975
 
OP
P

Paladin306

Well-known member
Joined
Jun 25, 2014
Messages
136
Location
Oklahoma City, OK
Thanks Dirt Dobber!

Actually, her teacher wanted to paint it black, herself. (Ugh) As a woodworker seems a shame to me but, people like what they like. However, here's a before, and after, picture of a kitchen table I made for my son about three years ago. This was oak, rather than maple but, I think I got a pretty good finish on it even though finishing is not really my strong suit.

View media item 67072
View media item 67073
Mark
 
OP
P

Paladin306

Well-known member
Joined
Jun 25, 2014
Messages
136
Location
Oklahoma City, OK
The shop organization continues:

So, my current project was to make a charger cabinet for my cordless tools. My original idea was to make this cabinet from Woodworkers Journal.

View media item 68759
But, if I was going to that much effort shouldn't it work as a storage place for my cordless tools as well? So, I started looking at this style as well:

View media item 68760
But wait, that doesn't have the tambour door and, well, I really wanted to try out making one. And, if one drawer is good wouldn't four be even better?

So, ultimately I combined the two ideas and this is what I came up with. It's not finished yet but, it's close enough to give any lurkers what the idea looks like:

View media item 68762
The pictures make it look as though it's leaning. But, in real life it's straight and square. I'll try to post a little more at a later date on how I got there as well as a finished product.

Mark
 

05r50

Well-known member
Joined
Jan 12, 2013
Messages
195
That's nice. Tambor door is an interesting touch. Always liked roll top desks, no skills to build one though
 
To avoid these ads, REGISTER NOW!
Top Bottom